
1. The Cancellation module
Youtube video: Cancellation Demo
Please note that the cancellation feature was originally named “Expiries”. The cancellation module has been created to ensure we have better control over customers who cancel their services with your company. In the new cancellations module, cancellations will have a two-factor cancellation authorisation. This means that the cancellation will be set and approved by the ISP and then the customer will need to log into their online profile and confirm the cancellation as well. This process will be applicable for customers who want to completely cancel their services as well as customers who only want to cancel a specific radius account.
After the cancellation date has been set, the customer name or radius service will be added to the cancellation list. Once the name has been added to the list, the cancellation needs to be approved from the ISP’s side as well as from the customer’s side. It is important to follow up with customer to ensure that they approve the cancellation.
If the customer approves the cancellation, their account will be stopped as per the cancellation date. Should the customer deny the cancellation, a ticket will be generated and assigned to the person who originally approved the cancellation. If the customer does not approve the cancellation, the cancellation will be reset and the customer’s service will continue as per normal on a month-to-month basis.
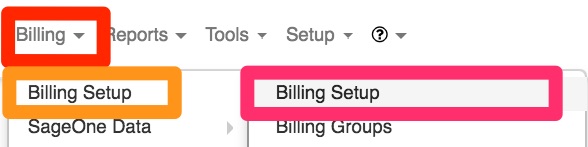
2. The cancellation module setup
First, you will need to enable the suspension settings. To do this, go to “Billing” – “Billing Setup” and then click on the second “Billing Setup” option.
When the screen has finished loading, look for the “Customer & Radius Account Cancellation Approval Settings” and then click on the toggle button next to “Enabled” to change from “OFF” to “ON”.
![]()
Once the toggle button has been switched to “ON”, a list of “settings” will appear at the below.
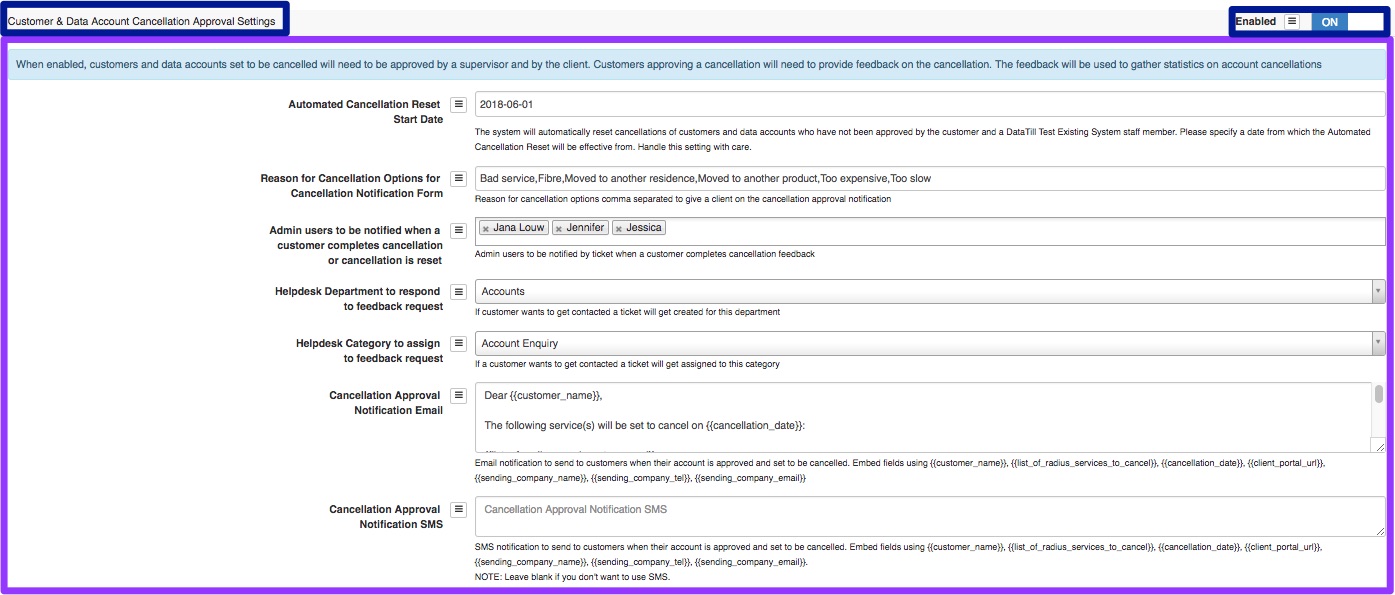
2.1. Cancellation Module Setup
2.1.1. Automated Cancellation Reset Start Date
This section will allow you to determine from which date the new cancellation module should be enabled. We would advise that you enter the enable date or the day after the enable date to ensure that all previous cancellations that have been done are not reset.
2.1.2. Reason for Cancellation Options for Cancellation Notification Form
In this section, you will need to add reasons as to why the customer is cancelling. When the customer logs into their online portal, they will need to choose one of these reasons as to they are cancelling their services with your company.

You will be able to add as many reasons as you want as to why the customer is cancelling. Should you choose more than one reason, please separate the reasons by using ONLY a comma without any spaces in between reasons. For example: Bad service,relocating,too expensive etc.
Even though we would want to give our customers as much as possible reasons, the ideal would be to keep it short and sweet with only a few possible reasons to ensure that the customer is not confused and chooses a relevant reason.
2.1.3. Reason for Cancellation Options for Cancellation Notification
Here you will be able to select specific people who should also receive a notification when a customer completes the cancellation or the cancellation is reset.

This means that as soon as the customer completes the cancellation feedback form, the admin users above will be notified via a ticket.
2.1.4. Helpdesk department to respond to the feedback request
When the customer submits their approval for the cancellation request, they can choose whether they would like someone from your company to contact them regarding the cancellation. In this section, you will need to decide to which department that feedback form need to be assigned to. In other words, which department will be responsible for contacting and following up with customers who wish to cancel their services.

2.1.5. Helpdesk Category to assign to the feedback request
In this section, you will need to choose the relevant category to which that feedback from will be submitted. Remember that all helpdesk categories are linked to departments, so if you can’t find the specific category that you are looking for, please ask your company HeroTill administrator to check whether the helpdesk category is linked to the relevant helpdesk department.

2.1.6. Cancellation approval Notification Email
Here you will be able to view the cancellation approval notification email that the customer will receive once the account is approved for cancellation. You can scroll down with the bar in the green section to read the whole message.

Please note that all fields that start with {{ and end with }} are embedded fields and will pull through from the customer profile. The red and green fields will be applicable for all warning emails and SMS sections.
2.1.7. Cancellation Approval Notification SMS
This section will allow you to view the cancellation approval SMS that will be sent to the customer to confirm that the service(s) has been set to cancel. If you do not want the customer to receive a SMS for the cancellation approval, please remove all text from the block and leave the field blank.

2.2. Cancellation Notifications
You will also have the option to determine whether or not customers should be notified when their account is cancelled. To find this setting, go to “Setup” and then click on the “Notifications” option.

On the following screen, scroll down until you find the “Account Cancellation Notifications” option.

If the toggle button is switched to “Yes”, customers will receive an email when their accounts are cancelled. If this toggle button is switched to “No”, customers will not receive an email when their account is cancelled.
*Please note that this setting will not influence the cancellation approval messages that get sent out.
3. Setting the cancellation:
The customer cancellation module has a two-factor authorisation method. After receiving the cancellation email from the customer, the ISP will need to set up the cancellation for either the customer profile or the specific radius account. After the cancellation has been set up by the ISP, the customer will need to confirm the cancellation by logging into the online profile.
If the customer does not approve their cancellation, the cancellation will be reset and the customer’s service and billing will continue as per normal. In cases where the customer is not able to or refuses to do the cancellation approval, the ISP’s General Manager will have the ability to overwrite the process and cancellation the customer. Please note that terms and conditions should be updated with the new procedure.
3.1. Setting the cancellation for the customer profile
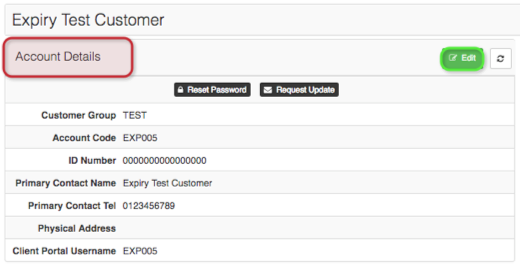
This will happen in cases where the customer is leaving your company and do not have any intention of coming back. To set the cancellation for the customer, you will need to go to the customer profile. On the profile, look for the “Account Details” section and then click on the “Edit” button.
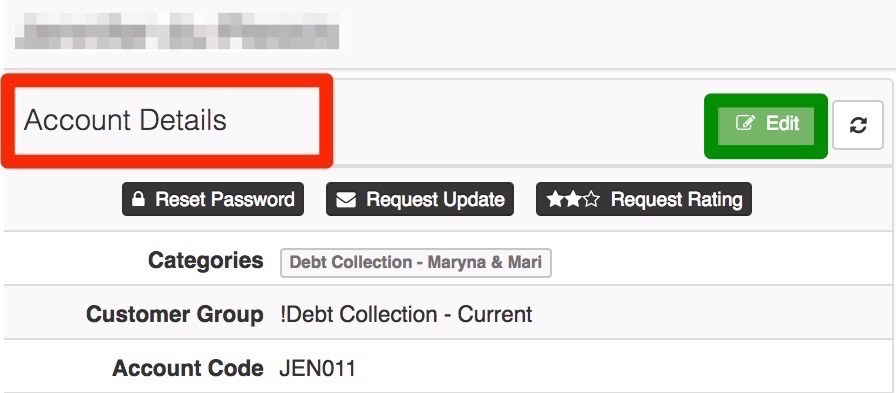
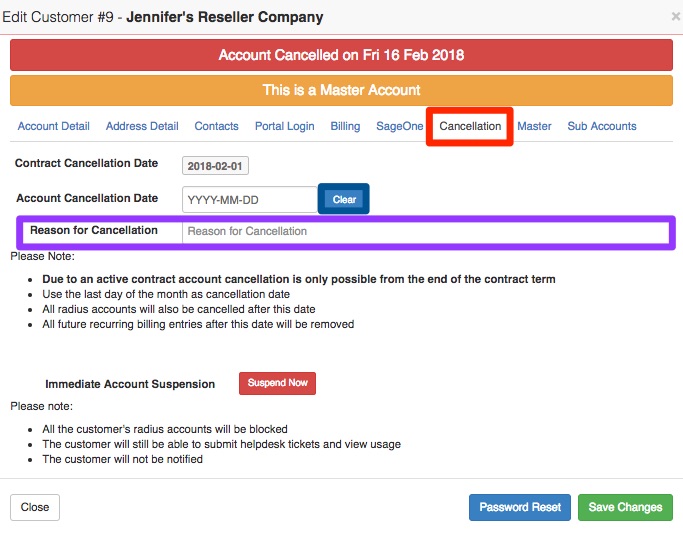
After clicking on the “Edit” screen, you will see a pop-up screen. Click on the “Account Cancellation” tab to see the following screen.
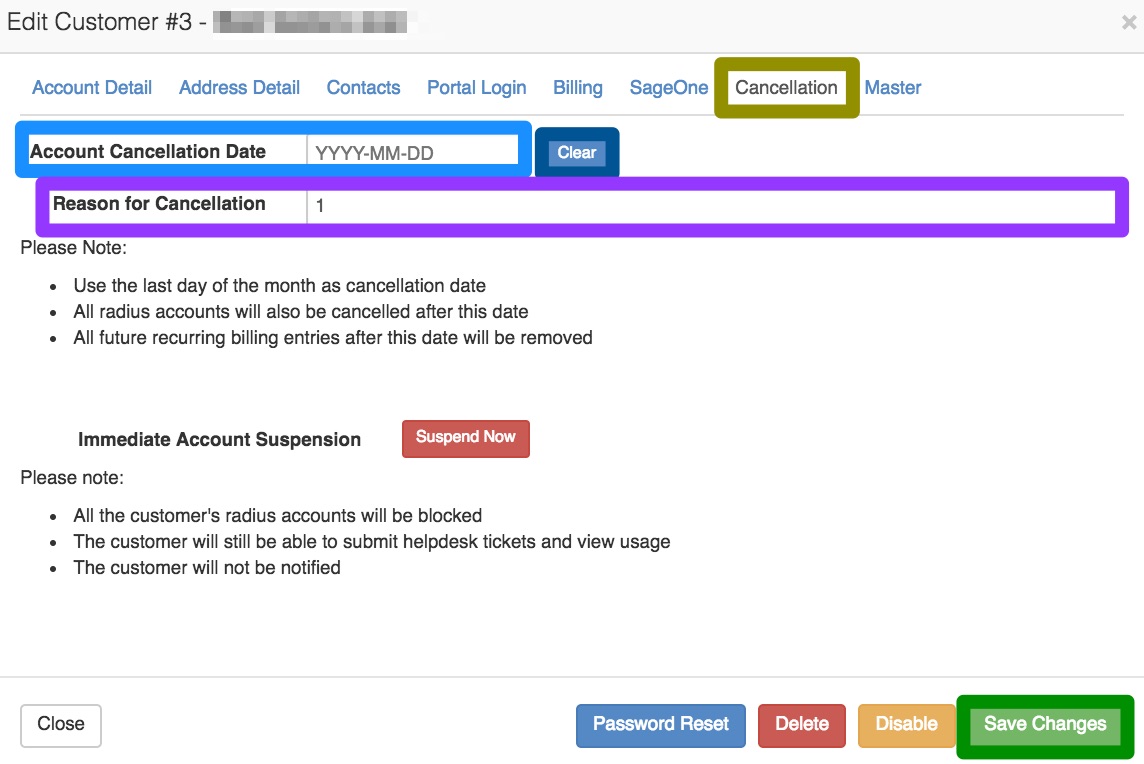
| Light Blue: | In this section, you will need to add the cancellation date. Click on the YYYY-MM-DD to see a calendar. On the calendar, choose the cancellation date.
*If the calendar does not pop-up, refresh the page and start the process again. |
| Dark Blue: | If you need to clear the date, click on the clear button. |
| Purple: | Here you will need to add the reason for the cancellation. If possible, always try and refer to a ticket a number and a short reason as to why the customer is moving. |
| Green: | After adding all relevant details, remember to click on the “Save” button. |
*Please note that the system will not allow you to add a cancellation date if the customer still has an ongoing data contract. In other words, the cancellation date cannot be set for a date prior to the data contract expiration.
After the expiration date has been set, you will see an orange banner on the customer profile. In this banner, you will be able to see the date for which the cancellation has been set. Please note that when you expire customer profiles in this manner that ALL services on the profile will be terminated.

The customer cancellation will now appear on the cancellation list and will need to be approved before any communication goes out to the customer. Once the cancellation has been approved, the customer will receive an email and will need to log into their online customer profile to either approve or cancel the account cancellation. For more information on how to approve the cancellation, please refer to 3.2.3.
3.2. Setting the cancellation for a specific radius account
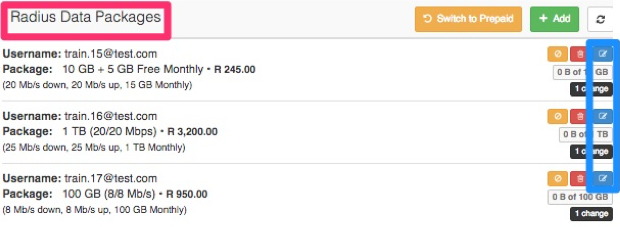
This section is for customers who have more than one radius account, but only want to cancel one or some of these radius accounts with your ISP. To do this, you will need to cancel the “Radius Data Package”.
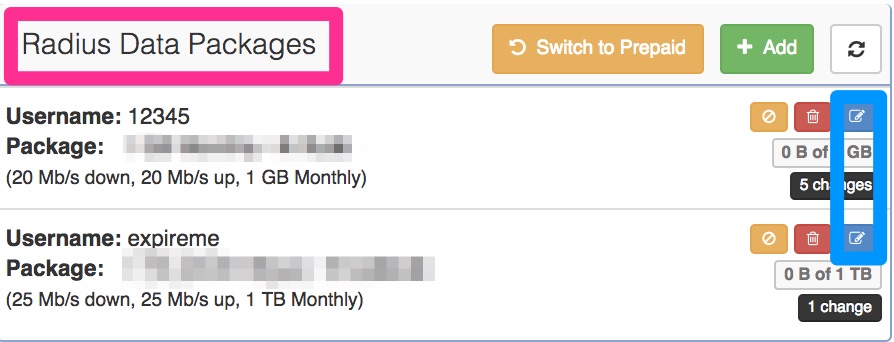
In the list of radius packages, look for the relevant account that the customer wants to cancel. When you have found the package that needs to be cancelled, click on the “Edit” button on the right-hand side of the screen. After clicking on the “Edit” button, you will see the following pop-up screen:
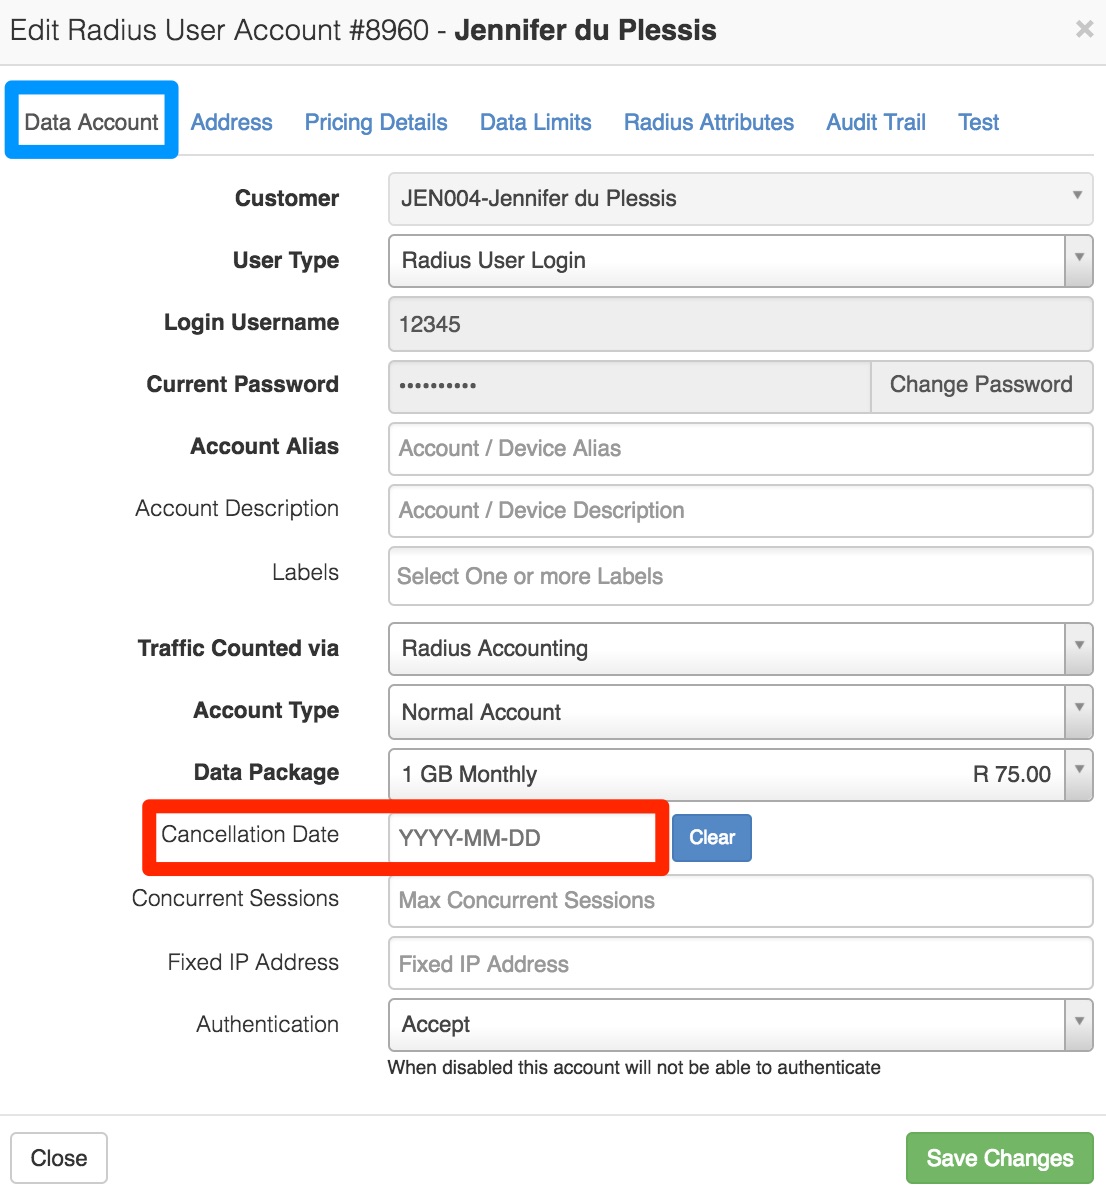
Ensure that you are on the “Data Account” tab. In the red section, you will need to add the “Cancellation Date”. Remember to click on the “Save Changes” button after making any changes.
Please note that this method will NOT cancel all services on the customer profile, but just the services that have been given a cancellation date.
4. The Customer and Radius Cancellation Screen
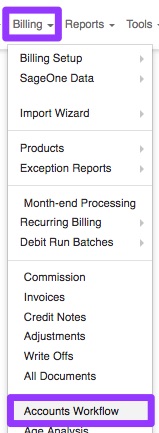
To find a list of all cancellations that need to take place, you need to go to “Billing” and then click on the “Account Workflow” option.
After the page is finished loading, you will see the screen below. Click on the “Cancellations” option to see a list of all cancellation requests.

4.1. Filter Functions:

| Dark Blue: | The “Mode” button will allow you to toggle between customers who want to cancel and between customers, who have multiple radius accounts (like resellers), who just want to a cancel specific radius account(s). |
| Green: | In this section, you will be able to filter according to the status that the cancellation is currently in. The status can be one of the following:
|
| Red: | In this section, you have a date picker. You can filter the list according to certain dates that you want to see. |
| Yellow: | The yellow section refers to your search bar. Here you can type in a customer name or account code to filter the list for only their cancellation information. |
| Purple: | These buttons will allow you. To either select all customers on this list or to deselect all customers on this list. All changes made will be made on all the customers who are selected. |
| Light Blue: | These buttons will allow you to either copy or export the information seen on the screen. Exports can be made to either CSV or normal excel formats. |
| Black: | In this section, you will be able to add additional fields or hide fields that you do not want to see. |
4.2. The cancellation list:
There are two types of cancellation lists. The one list covers all customers who want to cancel their services completely and the second one is for customers, with more than one service (like resellers), who only want to cancel one service. Even though the initial cancellation will be set on the customer profile, the cancellation will need to be approved before any communication or cancellation approval requests go out to the customer.
4.2.1. Customer
To see a list of all customers who want to cancel their services, ensure that the “Mode” toggle switch is set on “Customers”.

On this list, you will be able to see the following information about the customer:

| Green: | This will show you the customer ID. |
| Red: | In this section, you will be able to see the customer account code as well as the customer name. |
| Yellow: | Here you will be able to see the total monthly billing for the customer. |
| Dark Blue: | In this section, you will see the which date which has been set for the customer cancellation. |
| Purple: | Here you will be able to see whether the cancellation has been approved yet as well as who approved it. |
| Light Blue: | This section will show you whether the customers has approved the cancellation or not. Please note that if the customer has not approved it, you will need to remind them. |
| Black: | The confirmation status gives you an indication of how far the process is. The status can be one of the following:
|
If you would like to view more details about the customer account that is being cancelled, you can click on the “Expand” button. In the expanded section, you will be able to view more information about the customer’s radius accounts that will be terminated.

4.2.2. Radius
To see a list of all customers who want to cancel their services, ensure that the “Mode” toggle switch is set on “Radius”.

On this list, you will be able to see the following information about the customer:

| Green: | This section will show you the radius ID. |
| Red: | In this section, you will be able to see the customer account code as well as the customer name. |
| Yellow: | Here you will be able to see more information regarding the radius account that is being cancelled. |
| Dark Blue: | Here you will be able to see the total monthly billing for the customer. |
| Purple: | In this section, you will be able to see the cancellation dates that have been set. |
| Light Blue: | This section will show you who approved the cancellation as well as if the customer has approved the cancellation on their side or not. |
| Black: | The confirmation status gives you an indication of how far the process is. Please refer to the previous table to see what the different statuses are. |
4.2.3. Approving the cancellation
After the cancellation date for either the customer or a specific radius account has been set, the cancellation will need to be approved. Ideally, this will be done by someone other than the person who set the initial cancellation date.
4.2.3.1. Normal cancellations:
This method will happen for most customers who want to cancel their services with your ISP. To approve the cancellation, go to the cancellation list and then look for the relevant customer or radius account. On the right-hand side of the customer name or radius account, you will see a red tick mark. This is the “Approve Cancellation” button.

After clicking on the “Approve Cancellation” button, you will see the following pop-up screen:
To approve the cancellation, click on the “Approve Cancellation” button. You will now go back to the cancellation list. On this list, you will now be able to see that the cancellation has been approved, by whom it was approved, whether the customer has approved it or not as well as the current suspension confirmation status.

4.2.3.2. General Manager Override cancellations
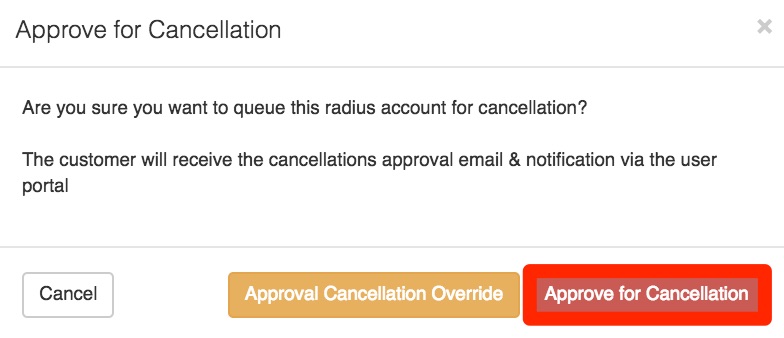
In the case that the customer is unable to or refuses to approve the cancellation, the general manager will be able to override the cancellation and the account will expire as per the normal cancellation date. To override the cancellation process, you will need to go the Customer & Radius Cancellation screen. Look for the relevant cancellation that you need to override and then click on the “Approve Cancellation” button.

After clicking on the approve cancellation button, you will see the following pop-up screen:
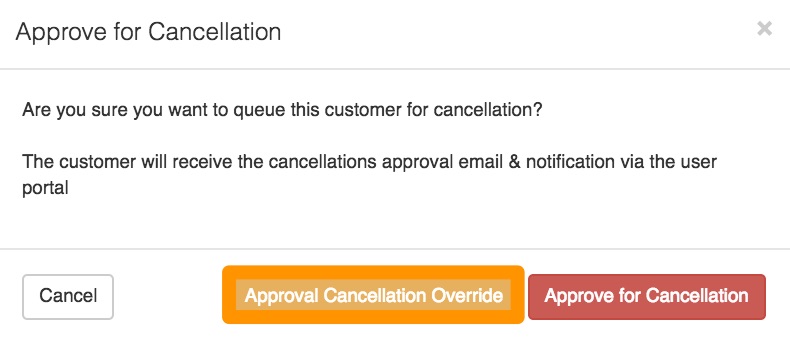
Once you have clicked on the “Approval Cancellation Override” button, you will need to choose a reason for the cancellation from the drop-down menu. After choosing a reason, continue to click on the “Approve Cancellation Override” button.
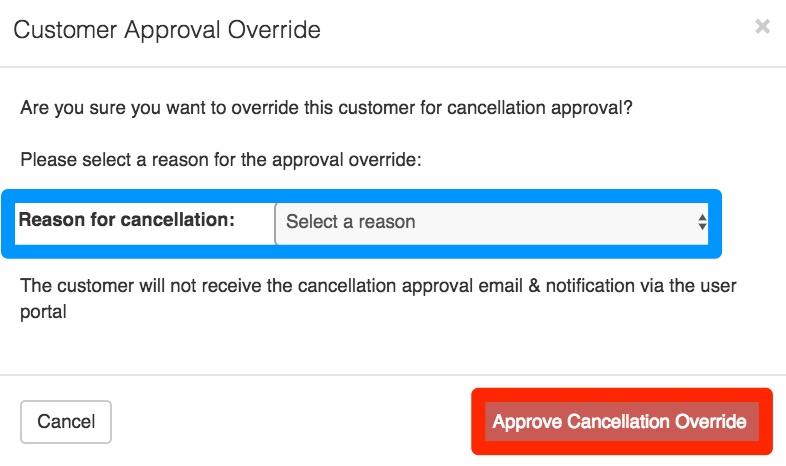
Please note that the customer will not receive the cancellation approval email and notification via the user portal.
4.2.4. Customer Approval
After the cancellation has been approved, the customer will receive an email to notify them that the cancellation has been approved. The customer will now need to log into their online customer profile and approve the cancellation on their side. Once the customer has logged in, they will see the following screen:
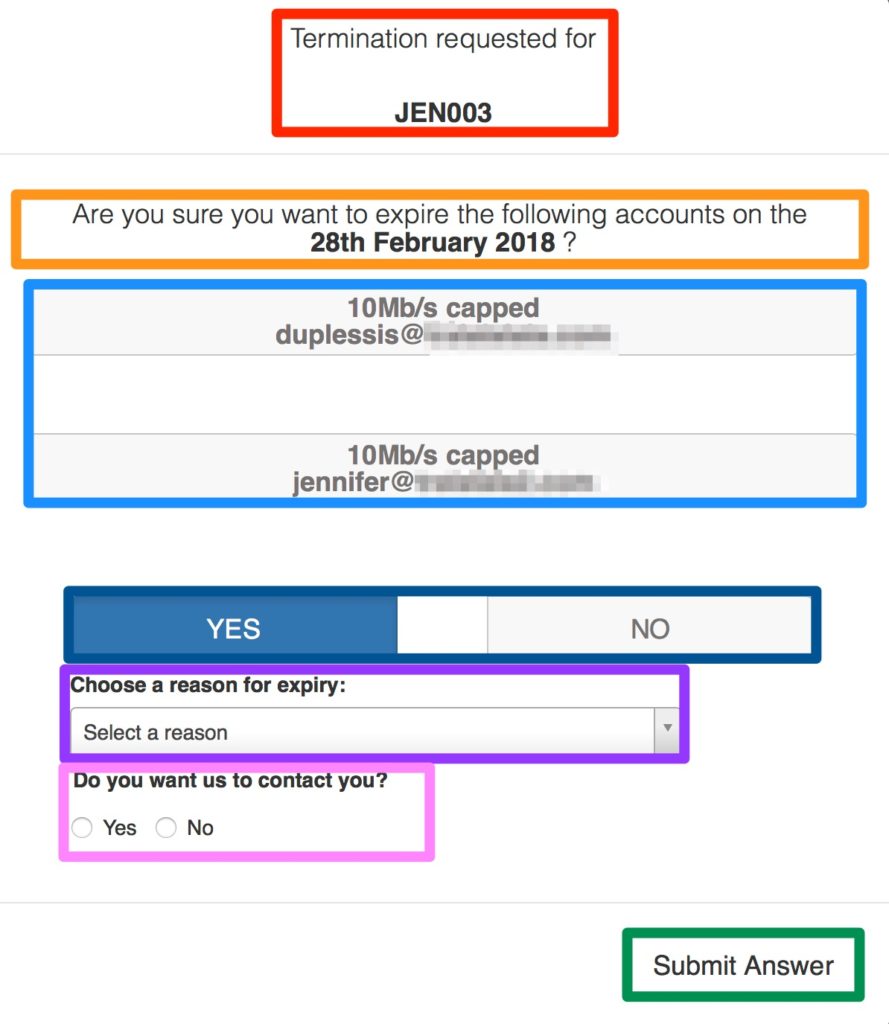
| Red: | This will notify the customer that they are seeing a termination request for their account. |
| Orange: | In this section, they need to check the cancellation date. |
| Light Blue: | Here they will be able to see the data package(s) that they are terminating. |
| Dark Blue: | In this section, they will need to either click on the yes or the no button. If they click on yes to confirm the cancellation, they will need to pick a reason as to why they are cancelling their services. |
| Purple: | This drop-down menu will give the customer a list of cancellation reasons as per the setup in section 2.1. The customer needs to choose a reason in order to submit the approval. |
| Pink: | Here the customer will be able to state whether they would someone to contact them. The customer will be forced to choose either yes or no. This notification will then go to the department as per the setup done in section 2.3. |
| Green: | When the customer has completed all the information, they need to click on the “Submit Approval” button for the approval to be finalised. |
After the customer has approved the cancellation, the termination of the data package(s) will continue as per normal. If the customer denies the cancellation, then a ticket will automatically be generated and assigned to the person who approved the cancellation. In the case that the customer does not accept or reject the cancellation, the cancellation will be reset and service and billing will continue as per normal.
Should the customer choose to be contacted, a ticket will be created with the following title:
“Customer Account Cancellation Approval Requests has been accepted. Contact the client.”
![]()
4.3. Cancelling the cancellation
4.3.1. How does the rescue process work?
BEFORE the cancellation takes place:
- All cancellation dates will be cleared immediately
- Customer and/or radius user(s) will not be cancelled or closed.
- Customer and/or radius user(s) will be removed from the customer and radius cancellation screen.
In the case that the customer wants to cancel their cancellation, we have built in a rescue button. This “Rescue” button can be used at any stage during the cancellation process.

Click on the “rescue” button on the right-hand side. You will now see the following pop-up screen:
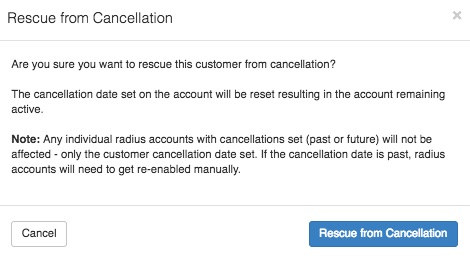
Click on the “Rescue from Cancellation” button to rescue the customer. The customer will now disappear from the cancellation list and their cancellation will be reset.
4.3.2. Customer Account
To do this, you will need to go to the customer profile and “Edit” the “Account Details”.
On the “Account Cancellation” tab, click on the “Clear” button and remove the “Reason”. Once you have done this, remember to click on the “Save” button.
4.3.3. Specific Data Accounts
If you need to stop the cancellation on a specific data account, you will need to go the “Radius Data Packages” section on the customer profile. When you have found the specific data account you need to work on, click on the “Edit” button found on the right-hand side of the data package.
After clicking on the “Edit” button, you will see the following pop-up screen:
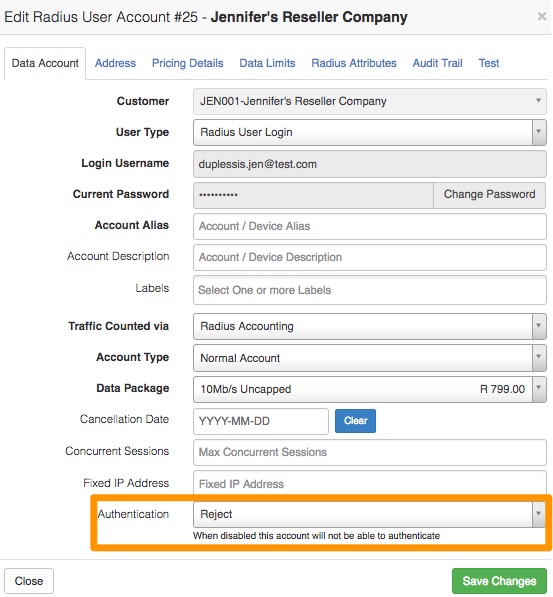
Click on the “Clear” button to remove the cancellation date and ensure that the “Authentication” is set to “Accept”. After making the changes, click on the “Save Changes” button.