Introduction
With the new Fair Usage Policy (FUP) module, HeroTill is able to handle speed and data limits three different ways.
The Traditional way
This way will allow you to manage data accounts with fixed normal and capped speed. If no capped speed is defined, the user will be hard capped, else a soft cap will be applied
FUP speed limiting
Rolling window limits can be set up which will be used to reduce user speeds as their usage increases. The speed limiting will be determined by the following:
- Fixed cap or a specific cap percentage that has been used.
- Fixed speeds or a specific percentage speed that should be allocated to the user
- A combination of fixed and percentage caps and speeds.
FUP speed boosts
The speed boosts are used to increase a user’s speed during certain times i.e. night time or over weekends or public holidays. The speed boosts will be determined by the following:
- Start and stop times
- Weekends or public holidays
- Fixed or percentage speed upload and download boosts.
- Whether the speed boost is available during rolling window limits (FUP speed limiting)
- Whether the speed boost is available for customers who are capped.
All FUP limits are defined on the data product level and applies to all data accounts linked to that product. All three methods can be used in a variety of combinations, as explained below.
Traditional Speed and Cap limits
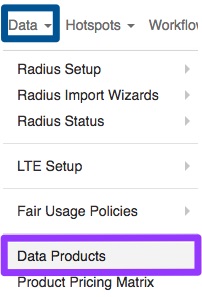
The traditional way is to configure a fixed data and speed limit only on the data product. To do this go to “Data” and then click on the “Data Products” option.
You will now see the following screen:

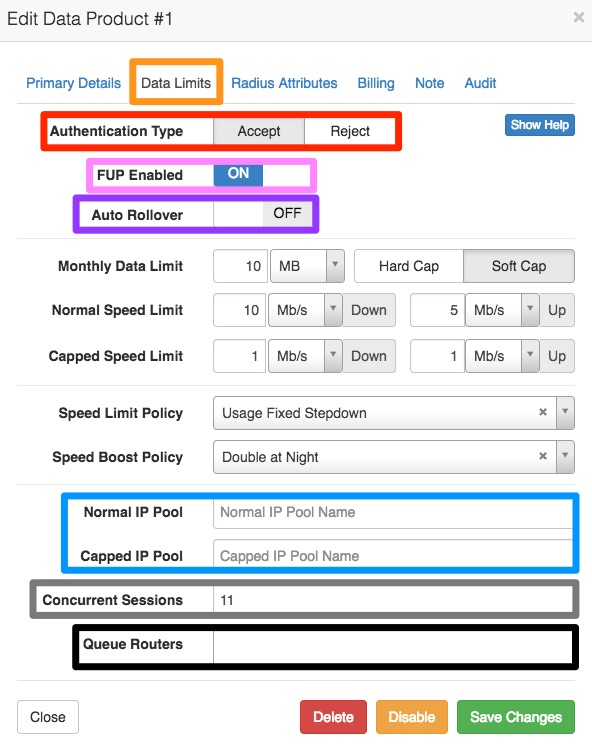
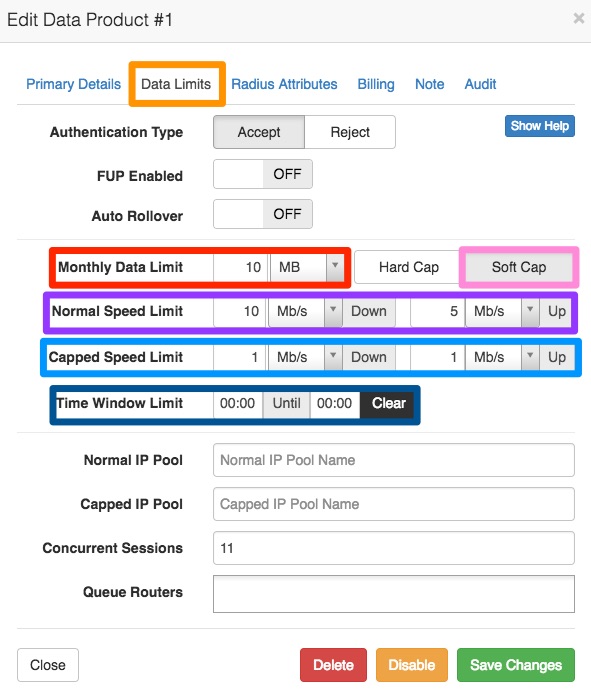
General Settings
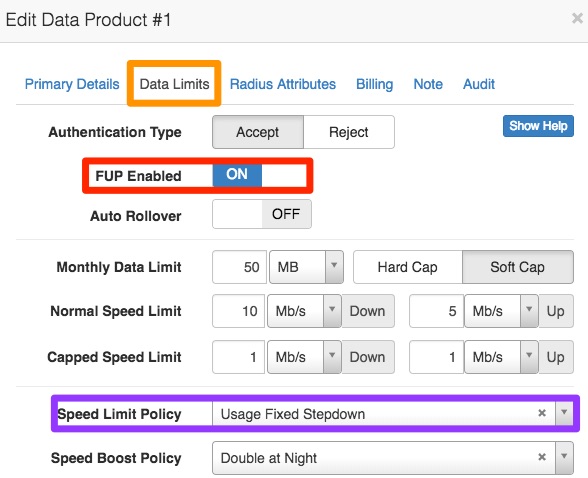
You will be able to determine these settings when either adding a new product or editing an existing one. To do this, ensure that you are on the “Data Limits” tab. If you need additional help, you can always click on the “Show Help” button in the top right-hand corner.
| Red: | This will allow you to determine whether this data product should be in use or not. Please note that if this is switched to reject, that all users linked to this product will be disconnected from the internet and that they will not be able to reconnect to the internet. This will typically be used for specials or events. |
| Pink: | If FUP (fair usage policy) is enabled, then both a speed limit and a speed boost policy can be applied to the data product. The speed limit policy will be mandatory, but the speed boost policy is optional, and may or may not take effect if the data account is capped or throttled. If this is disabled, you will be setting up a data package in the traditional manner. |
| Purple: | Here, you can determine whether auto rollover should be enabled or not. |
| Blue: | In this section, you will be able to add the relevant IP Pool names. This field is not compulsory. |
| Grey: | The concurrent sessions section is a compulsory field which has been added to your products. This will automatically be linked to all customers who make use of this product. You will also still be able to overwrite the concurrent sessions for customers on their specific data account. |
| Black: | Queue Routers are used to indicate on which Mikrotik routers static queues should be maintained. HeroTill will use the Mikrotik API to create static queues on these devices and will adjust the speed limits as the individual user’s FUP policies change. |
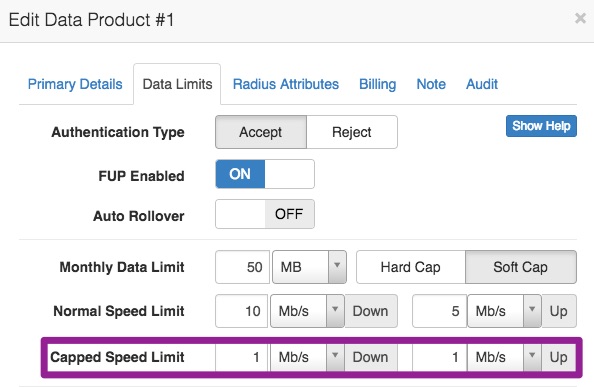
2.2. Hard Capped products
Users will receive fixed speeds until they reach the cap which has been set up. Once all their data has been used, the user will be hard capped and will not be allowed to access the internet. As you can see below, this package is set up in the traditional way without FUP enabled.
You will be able to set these limits when either adding a new product or editing an existing one. To do this, ensure that you are on the “Data Limits” tab.
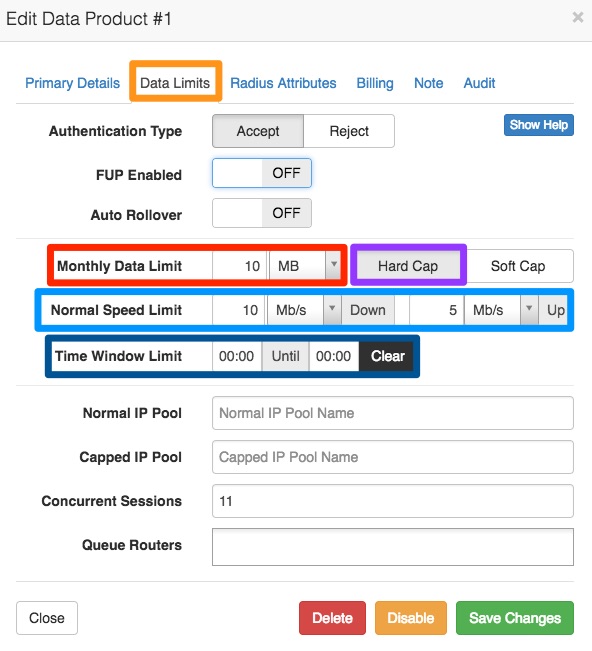
| Red: | Here, you will need to set the monthly data limit or cap. This can one of the following:
|
| Purple: | In this section, choose the Hard Cap option. |
| Light Blue: | In this section, you will need to determine the download speed and then the upload speed. Your speed can either be Kb/s or Mb/s. |
| Dark Blue: | Here, you will be able to set a specific time in which this package should be active i.e. a business package which should be active from 07h00 – 19h00. |
Remember to click on the “Save Changes” or the “Add Product” button after making any changes.
Uncapped products
This user will have a fixed speed until they have reached their soft cap limit. Once they have reached their soft cap limit, then the customer’s speeds will be throttled. As you can see below, this package is set up in the traditional way without FUP enabled.
You will be able to set these limits when either adding a new product or editing an existing one. To do this, ensure that you are on the “Data Limits” tab.
| Red: | Here, you will need to set the soft cap for this product. This cap can either be:
|
| Pink: | In this section, choose the Soft Cap option. |
| Purple: | In this section, you will need to determine the normal speeds that the customer will receive before reaching their soft cap. You will first need to determine your download speed and then your upload speed. Your speed can either be Kb/s or Mb/s. |
| Light Blue: | Here, you will need to add the speed which the customer will receive once throttled or when they have reached their soft cap. You will first need to determine your download speed and then your upload speed. Your speed can either be Kb/s or Mb/s. |
| Dark Blue: | Here, you will be able to set a specific time in which this package should be active i.e. a business package which should be active from 07h00 – 19h00. |
Remember to click on the “Save Changes” or the “Add Product” button after making any changes.
Speed limits
Data usage is measured over a rolling window period, as either a % of the total data product cap size or as a fixed amount of data, and a speed limit applied based on a stepping scale. Just as the Usage can be measured as either a percentage or a fixed amount, so the speed can be reduced as either a % change or a fixed speed. There is no limit as to the number of steps included in the speed limit definition. The system will automatically sort the limits in the correct order and ensure there are no gaps.
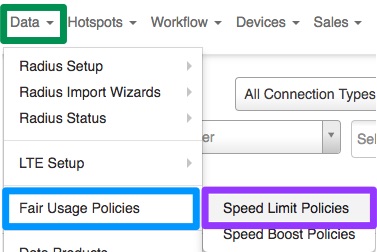
If FUP (fair usage policy) is enabled, then you will need to add speed limits policies to your data products. To set up your speed limit policies, you will need to go to “Data” → “Fair Usage Policies” and then click on the “Speed Limit Policies” option.
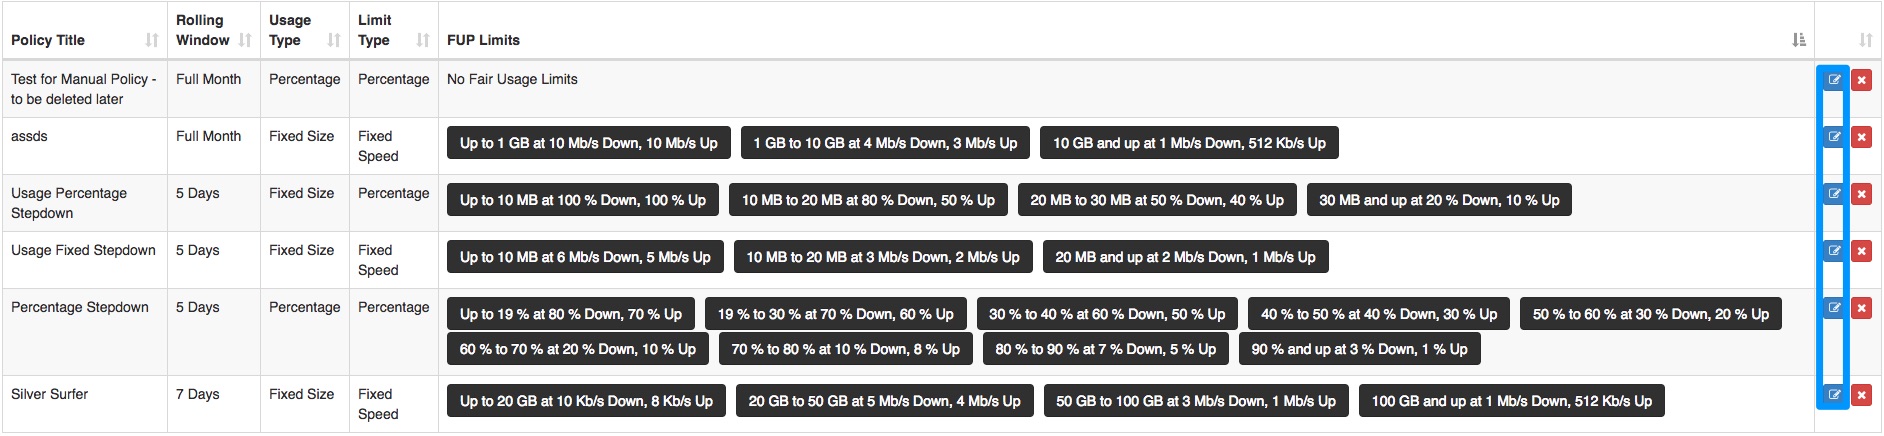
On this page, you will see a list of all speed limit policies that you have previously created.
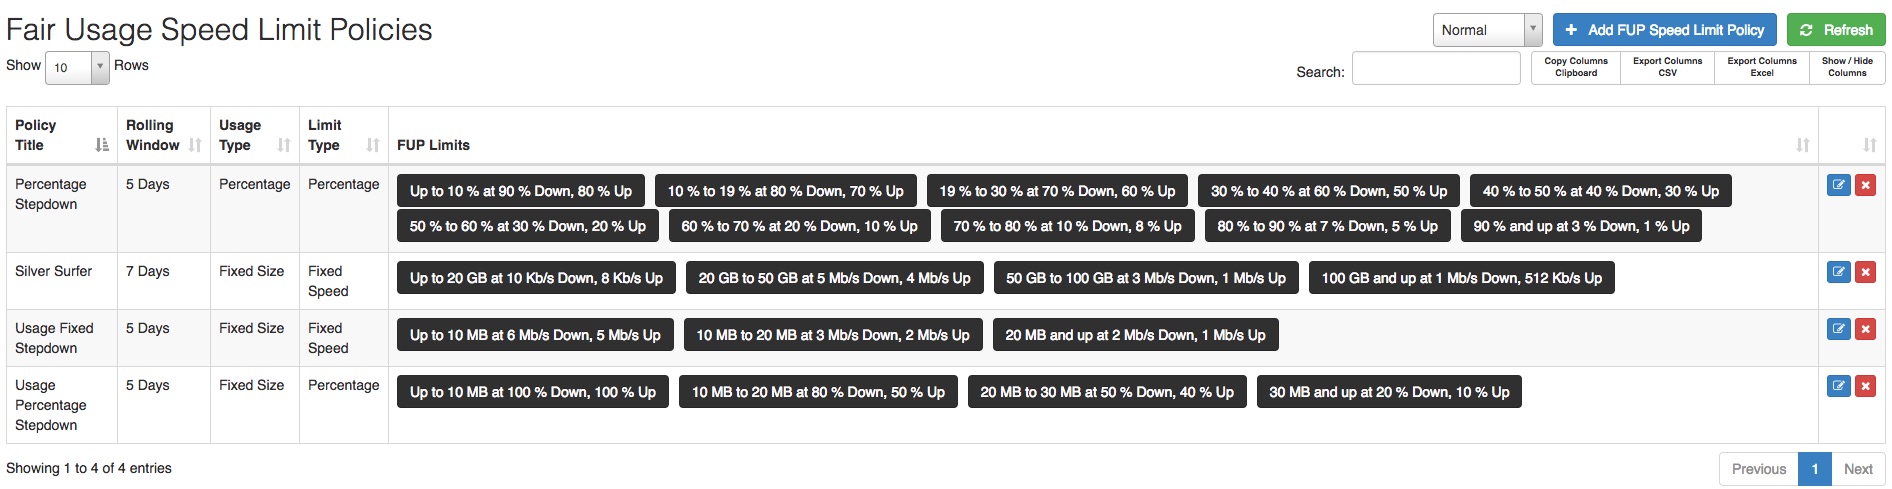
From this screen, you will either be able to add new speed policies or edit already existing speed policies.
Adding new speed limits Policies
To add a new speed limit, click on the “Add FUP Speed Limit Policy” button. Please note that you will need to create the policy first before you can create the FUP limits.

You will now see the following pop-up screen:
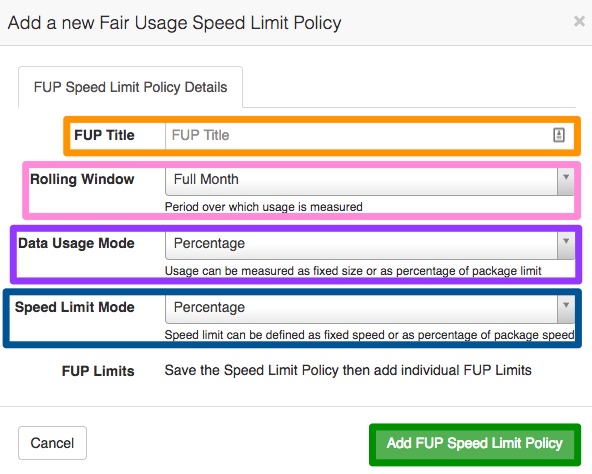
| Orange: | In this section, add a title to your policy. |
| Pink: | Here, you will need to add the rolling window time frame for your policy. A Rolling window is defined as a fixed number of consecutive days (window size). Your rolling window can be from one day up until a month. |
| Purple: | In this section, you will need to determine the data usage mode. The usage can either be measured as a fixed size i.e. 10GB or as a percentage of the package limit i.e. 10% of 10GB. |
| Dark Blue: | Here, you will need to determine the speed limit mode. The speed limit can either be defined as a fixed speed i.e. 2Mb/s or as a percentage of the package speed i.e. 80% of the 2mb/s. |
Please note that you can set up your data usage mode and speed limit mode in the following way:
- Both as percentage
- Both as fixed size
- A combination of fixed size and percentage.
Remember to click on the “Add FUP Speed Limit Policy” button after adding all the details.
Adding FUP Limits
To add the respective FUP Limits, click on the “Edit” button next to the relevant speed policy.
After clicking on the edit button, you will see the same settings as when adding a new policy and at the bottom, you will see the section to add the “FUP Limits”.
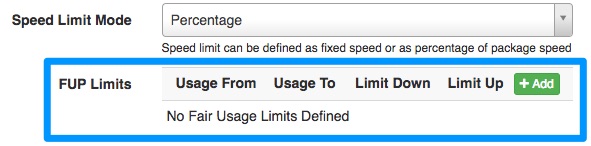
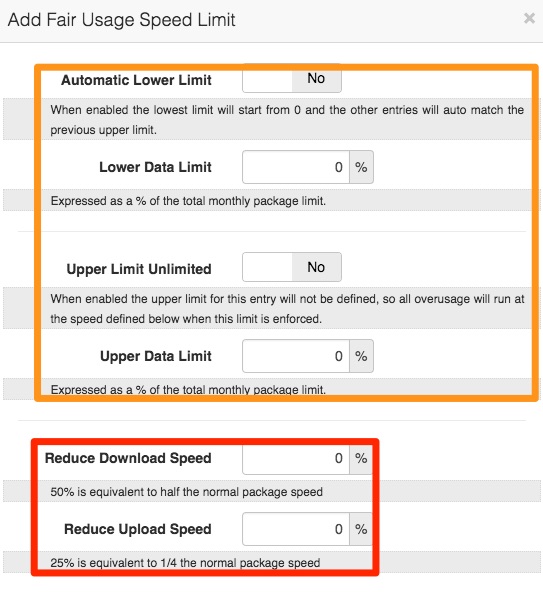
To add FUP limits, click on the “Add” button. You will now see the following screen:
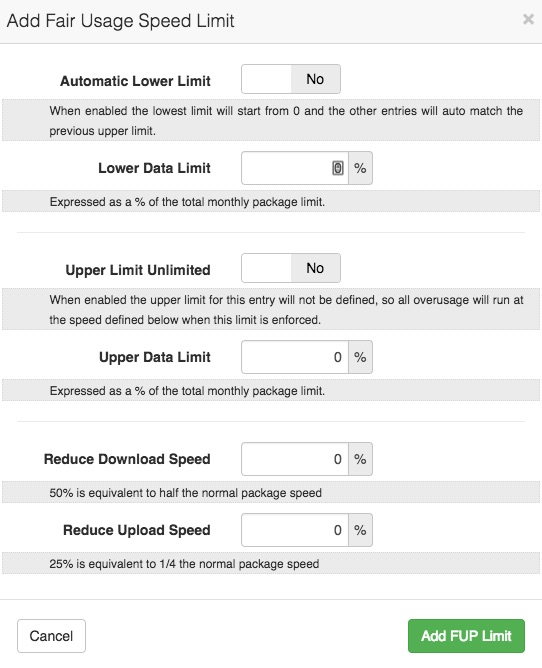
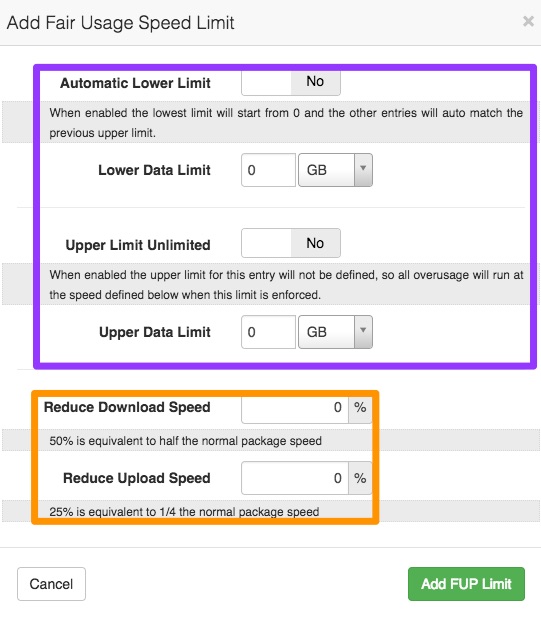
Adding Lower Limits
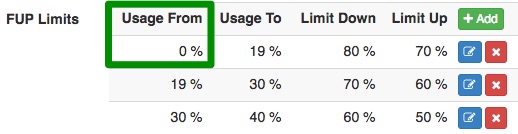
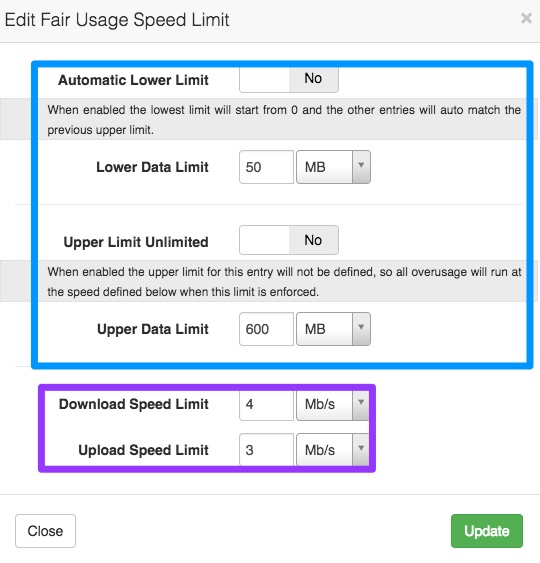
Your lower limits will determine from which fixed amount or percentage the of usage the speed limit policy should be implemented. You can either implement the speed policy from 0% or a 0 fixed amount or usage, or you can set up the specific amount. Please note that you can either enable the automatic lower limit or you can lower the data limit, but you will not be able to do both.
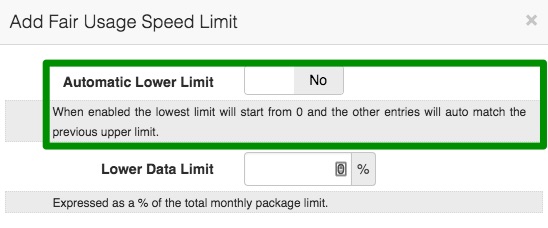
Automatic Lower Limit
If you enable the automatic lower limit, it means that your lowest limit will automatically start from 0 and all other entries will auto-match the previous upper limit.
In other words, after adding your speed limit, you should see a screen similar to the following one:
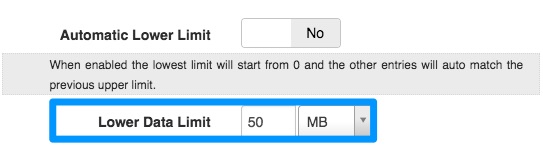
Lower Data Limit
If you would like to add your own lower level, you can do this by either entering a percentage amount here or a fixed amount. This will be determined by your data usage mode which you have chosen when originally creating your speed limit.
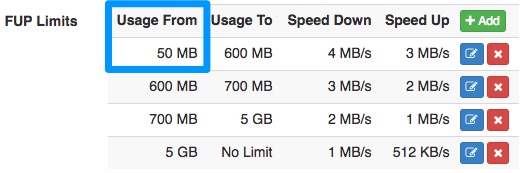
When you go back to your speed limit policy screen, you will then see that your speed limit policy will be implemented from the fixed amount or specified percentage.
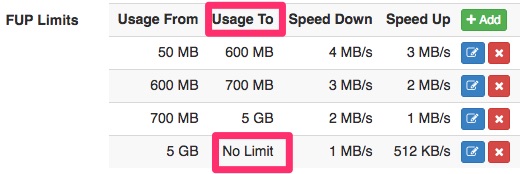
Upper Limits
Your upper limit refers to your last throttle level. This is used to determine what needs to happen to the user’s line speed if the user goes over a specific limited amount or percentage of their data limit. If an upper limit is not set up, then the user will fall back onto the capped speed limits as per the product’s setup.
When adding an upper limit to your speed policy, you will have one of two options. You can either add the upper limit as unlimited or you can add a specific upper data limit.
Upper Limit Unlimited
To add you upper limit as an unlimited amount of data usage, you can enable the “Upper Limit Unlimited” toggle switch. This will allow all over usage to run that the speeds specified on your speed limits set below.
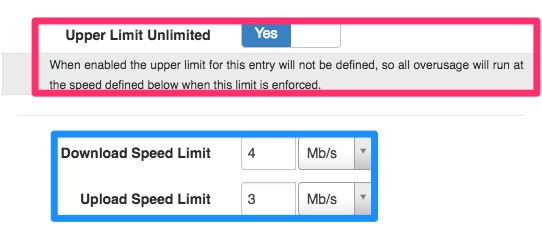
After adding the speed limit, you will then see your upper level displayed as below:
Upper Data Limit
To add a fixed amount or a percentage as your upper level, you will need to ensure that your “Upper limit Unlimited” toggle button is disabled. You will now be able to add a fixed amount or a percentage, depending on how you set up your speed limit policy.
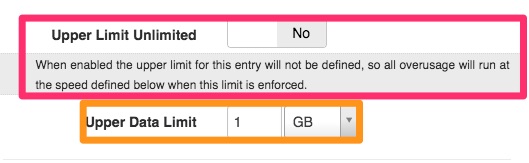
After adding the speed limit, you will then see your upper level displayed as below:
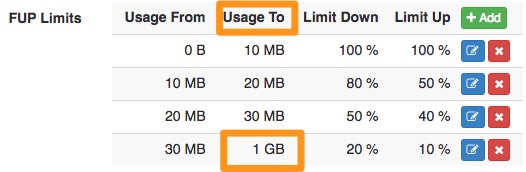
Please note that should the customer’s over usage be more than the fixed amount or percentage specified below, then they will also revert back to the capped speed limits as per the product setup.
Adding percentages
If you are adding the FUP limits in the form of percentages, then your screen will look similar to the one below. You will first need to add the percentage amount for the data limit and then you will need to add the percentages for the download and upload speeds.
Let us look at an example of a customer who is on a 100GB 10mbps line (up and down).
Example 1
- Data Limit: 10% used
- Download speed: 100% (represents full line speed)
- Upload speed: 100% (represents full line speed)
- This means that the customer has 90%of their cap left to use at their full line speed.
Example 2
- Data Limit: 50% used
- Download speed: 25% (a quarter of user’s line speed)
- Upload speed: 25% (a quarter of user’s line speed)
- This means that the customer has 50% of their cap left to use at 2.5 Mbit/s (a quarter of their line speed).
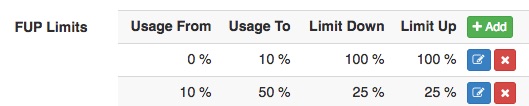
Please note that above is just an example to assist with comprehension and each ISP should determine the percentages themselves.
Adding fixed amounts
If you are adding the FUP limits in the form of a fixed amount, then your screen will look similar to the one below. You will first need to add the fixed cap amount for the data limit and then you will need to add the fixed line speed for the download and upload speeds.
Let us look at an example of a customer who is on a 100GB 10mbps line (up and down).
Example 1
- Data Limit: 25 GB (represents the amount of data that the customer has used)
- Download speed: 10 Mbit/s (represents full line speed)
- Upload speed: 10 Mbit/s (represents full line speed)
- This means that when if the client has used between 0 and 25 GB of their monthly cap, their line speed will run at the full 10Mbit/s.
Example 2
- Data Limit: 60 GB (represents the amount of data that the customer has used)
- Download speed: 6 Mbit/s (represents full line speed)
- Upload speed: 6 Mbit/s (represents full line speed)
- This means that when if the client has used between 0 and 25 GB of their monthly cap, their line speed will run at the full 10Mbit/s.
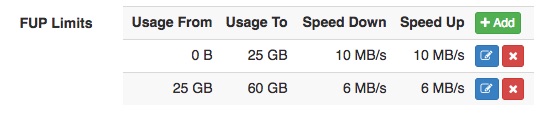
Please note that above is just an example to assist with comprehension and each ISP should determine the fixed amounts themselves.
Adding a combination
If you are adding the FUP limits in the form of fixed amounts and percentages, then your screen will look similar to the one below. Please note that your combinations can be one of the following:
- Data limit = fixed amount and speed = percentage
- Data limit = percentage and speed = fixed amount
In this example, we are using a percentage for the data limit and a fixed amount for the speed.
Example 1
- Data Limit: 20% (represents the percentage of data that the customer has used)
- Download speed: 10 Mbit/s (represents full line speed)
- Upload speed: 10 Mbit/s (represents full line speed)
- This means that when if the client has used between 0 and 20% of their monthly cap, their line speed will run at the full 10Mbit/s.
Example 2
- Data Limit: 50 % (represents the percentage of data that the customer has used)
- Download speed: 8 Mbit/s (represents full line speed)
- Upload speed: 8 Mbit/s (represents full line speed)
- This means that when if the client has used between 20% and 50% of their monthly cap, their line speed will run at the 8mbit/s.

Please note that above is just an example to assist with comprehension and each ISP should determine the percentages and fixed amounts themselves.
Linking your FUP Limit to your Data Product
To link your FUP Limit Policy to your data product, find the relevant data product and then click on the edit button. For more information on how to get to your data products, please refer to section 2.
| Red: | Ensure that you have the FUP option enabled. |
| Purple: | Choose the relevant FUP policy from the drop-down menu that you would like to apply to the data product. |
Remember to click on the “Save Changes” button.
Speed boosts
Speed boosts are time windows during which data account speed limits are increased or decreased. If FUP (fair usage policy) is enabled, then both a speed limit and a speed boost policy (or reduction) can be applied to the data product. The speed limit policy will be mandatory, but the speed boost policy is optional, and may or may not take effect if the data account is capped or throttled.
To add your speed boosts, go to “Data” → “Fair Usage Policies” and then click on the “Speed Boost Policies” button.

On the following screen, you will see a list of all your current speed boost policies.

Adding speedboost
To add a speed boost policy, click on the “Add Speed Boost Policy” button. You will see the following screen:
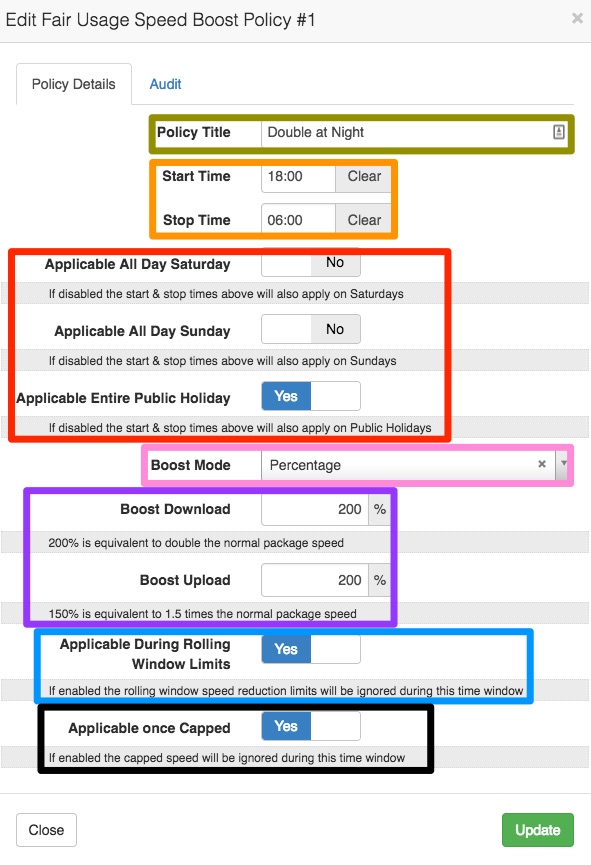
| Gold: | Enter the title for you policy in this section. |
| Orange: | Here, you will need to add the start and end times for when this speed boost is applicable i.e. from 00:00 until 06h00 in the morning. |
| Red: | Here, you will need to determine whether the boost should be applicable all day on:
If these switches are not enabled then the time window defined above will also apply on these days. |
| Pink: | In this section, you will need to choose whether you would like to increase the speed in a percentage method or if you would like to use a fixed speed. |
| Purple: | Percentage:
Add the percentage that you would like to increase the user’s speed with in this section. Please note that the percentage amount will need to be higher than 100 as the normal speed is represented by 100%. In other words, 150% is equivalent to 1.5 times the user’s normal speed and 200% is 2 times the users normal speed. If the percentage is lower than 100%, then the customer’s speed will be reduced. Fixed Speed: It you would like to use the fixed speed setting, choose the fixed speed option from the drop-down menu and then add the respective upload and download speeds. |
| Blue: | If this section is enabled, then the speed reduction enforcement (speed limits) will be ignored and the customer will have a speed boost during this time window. If disabled, customers whose speeds are limited will not be able to enjoy the speed boosts. |
| Black: | If this is enabled, then capped speed will be ignored during this time. If disabled, then capped customers will not be able to enjoy the speed boosts. |
After making the changes, remember to click on the “Add Speed Boost Policy” button.
Linking a speed boost to your data product
To link your FUP speed boost to your data product, find the relevant data product and then click on the edit button. For more information on how to get to your data products, please refer to section 2.
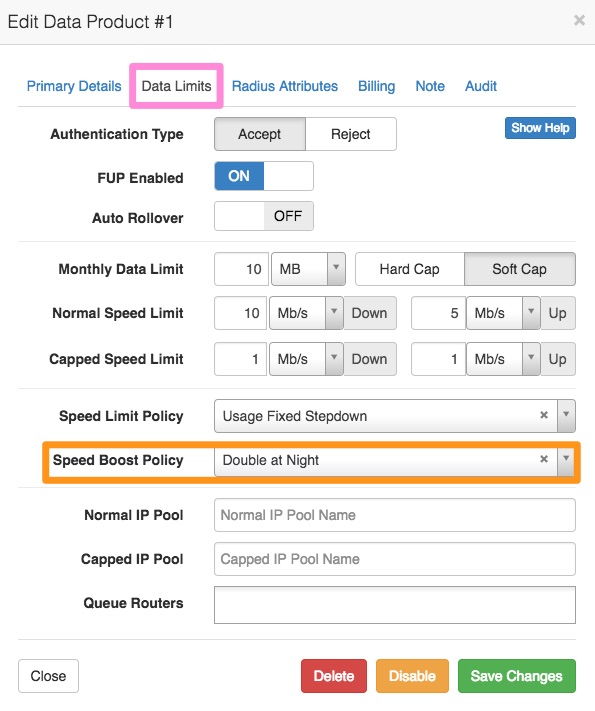
| Pink: | Ensure that you have the FUP option enabled. |
| Orange: | Choose the relevant FUP policy from the drop-down menu that you would like to apply to the data product. |
Remember to click on the “Save Changes” button.
Public holiday calendar
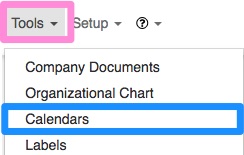
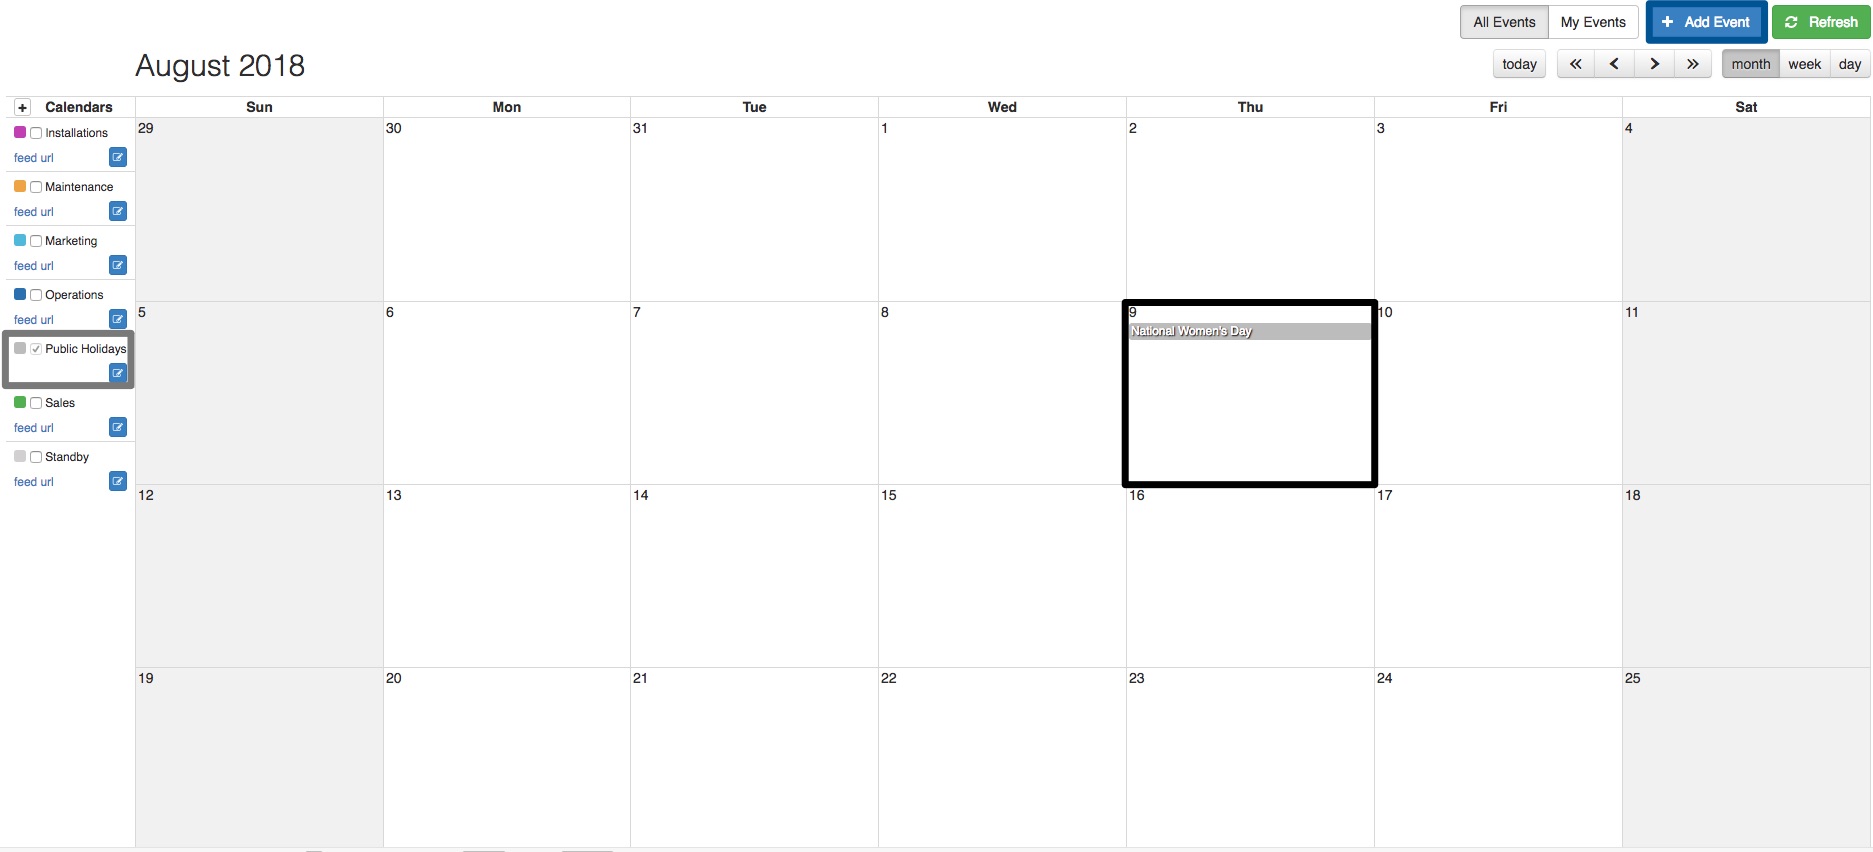
If you would like to make use of speed boosts on public holiday then you will need to ensure that all relevant public holidays have been added on your calendar. To find your calendar, go to “Tools” and then click on the “Calendar” option.
Once your calendar has loaded, you will be able to see the “Public Holidays” calendar in the left-hand side of the screen. When you view this calendar, you will be able to see that all current public holidays have already been added in the calendar.
Adding additional days as public holidays
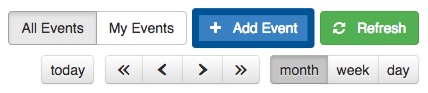
If you need to add any additional “public holidays”, then you will be able to do this by clicking on the ”Add Event” button.
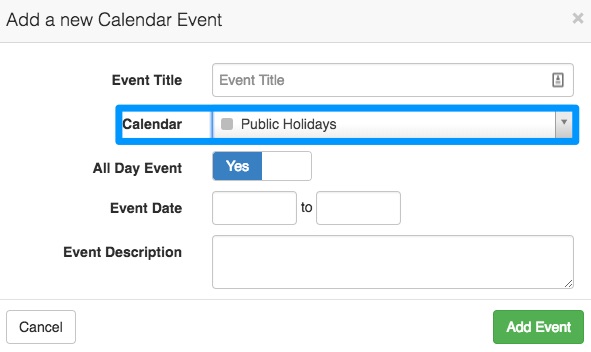
After clicking on the “Add Event” button, you will need to complete the details on the following screen. It is crucial that you ensure to choose the “Public Holidays” calendar when adding a new event. If this event is added on any other calendar, then it will not be taken into account as a public holiday and the speedboost will not be available for your customers.
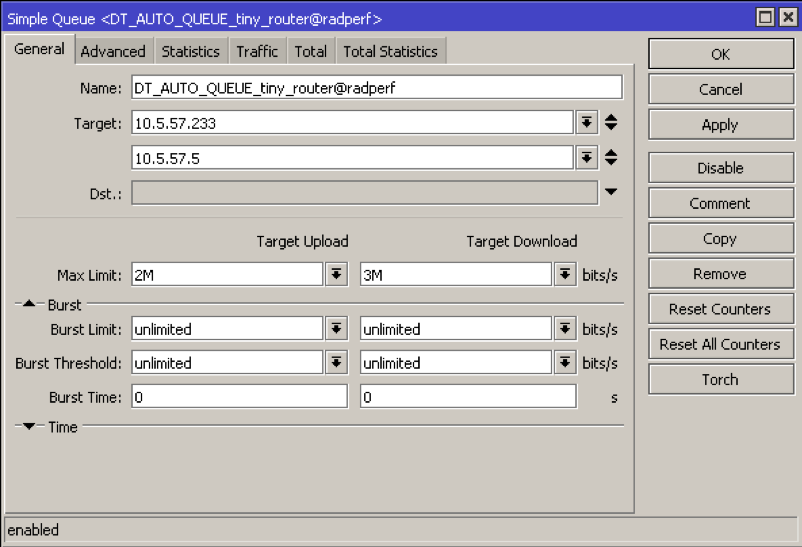
Queue Routers
Manual queues are simple queues maintained on one or more static routers. These queues are sometimes required when the NAS the user connects to does not manage the queues as well. Another use case would be when a parent and sub account shares the same speed. A static queue containing both IP addresses will then be created to ensure the speed limit is enforced across both account simultaneously.
Telkom OpenServe accounts are an example where manual queues must be used to control the speed of data accounts. In this scenario the traffic must flow through the specific router where the static queues are going to be maintained for it to have any effect. This means you need to either use a MikroTik router on the client site or use a router at the breakout point where the OpenServe IPC joins your network in Terraco. Another example is where the customer makes use of of master and sub data account.
Configuration
A queue device can be defined on either a data product or on a data account. If defined on the data product then it takes effect for all data accounts using that product but can be overridden for individual data accounts.
When enabled, the system will create and maintain a static queue on the router for every data account affected. If a data account has sub accounts, then the IP addresses of all the data account and its sub accounts will be combined into a single queue. IF the data accounts do not use fixed IP addresses, then the system will use a cron job to periodically update the static queues by building a list of IP addresses from the active radius session table.
Linking router queues to data products
To add a queue router on you data products, find the relevant data product and then click on the edit button. After the screen has opened, you will see the following:
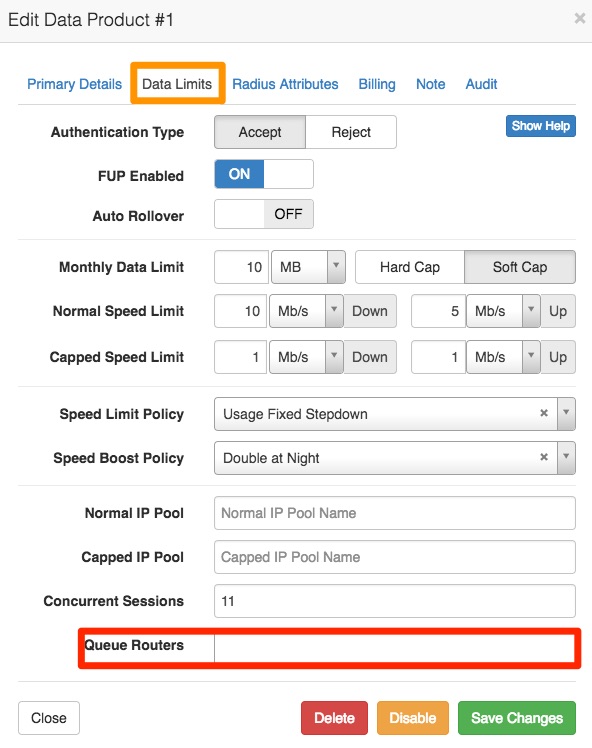
In the queue router section, choose the applicable router to link to this product. Remember to click on the “Save Changes” button after making any changes.
Linking router queues to data accounts
To add a queue router on a data products, find the relevant data account and then click on the edit button. After the screen has opened, you will see the following:
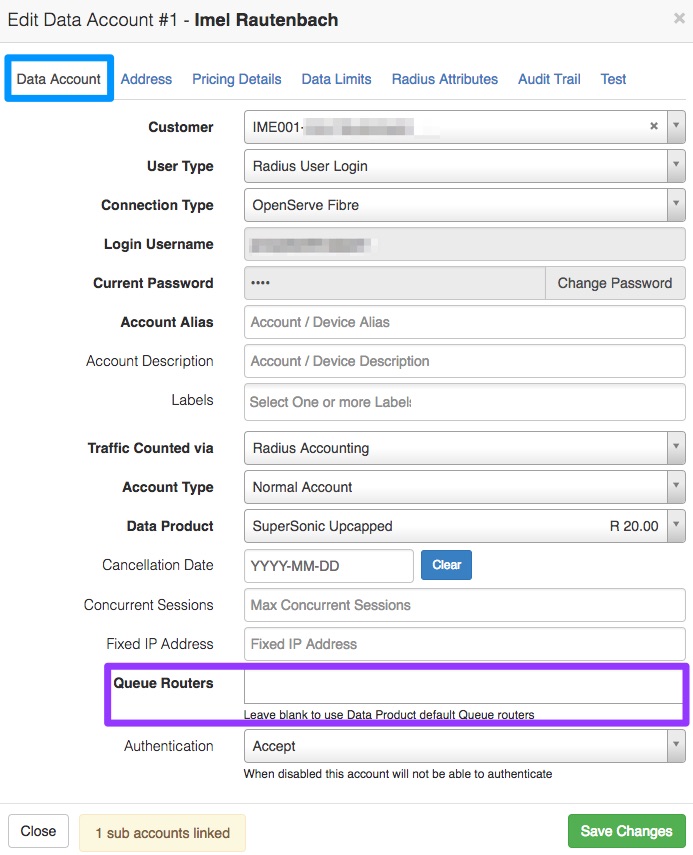
In the queue router section, you can either choose the use package default option or choose the relevant device. Remember to click on the “Save Changes” button after making any changes.
Top-ups
The top-up process will work as per normal. The customer can either requests top-ups from the ISP or they can submit their own top-ups from the customer portal or mobile app. Top-ups will be influenced by FUP.
Top-ups on percentage speed limits
All top-ups that are done on FUP speed lines will influence your speed limits. Percentage speed limits are calculated on the customer’s total amount of data that is available.
Example
You have a 10GB package on a 10Mbit/s line. You also have a speed limit policy in place which states that if you use 50% of your data, then your line speed will be halved.
- You have used 50% of your data.
- Your line gets reduced to half the speed.
This means that you have 5GB left which you will be able to use on a 5 Mbit/s line speed.
Now you do a 10GB top-up.
- You now have 15GB.
- Your speed return to 10Mbit/s.
Why:
Because 50% of 15 GB = 7.5GB.
Considering you have only used 5GB, this means that you have not yet used 50% of you data. As soon as you have reached 7.5GB (50%) of your data, then your line speed will be halved again.
Top-ups on fixed cap limits
Top-ups on fixed cap limits works differently than the top-ups on percentage cap limits. Top-ups with fixed capped limits take the rolling windows more into account.
Example
You have a 10GB package on a 10Mbit/s line. You also have a speed policy in place with a 7 days (1 week) rolling window. This policy also states that if you use 5GB within a week, then your speed will halve.
- You use 5GB of your data
- You line gets reduced to half the speed.
This means that you have 5GB left which you will be able to use on 5 Mbit/s line speed.
Now you do a 10GB top-up.
- You now have 15GB
- Your speed is still 5 Mbit/s
Why:
Because of the 7 day rolling window.
The system will count all usage within the 7 days together. In return, this total usage amount will then determine the cap limit for the speed which the customer should be on.
In other words, if the customer has used a total of 5GB or more, during any time within the 7 (consecutive) days rolling window, then the customer’s speed will stay 5 Mbit/s.
Support
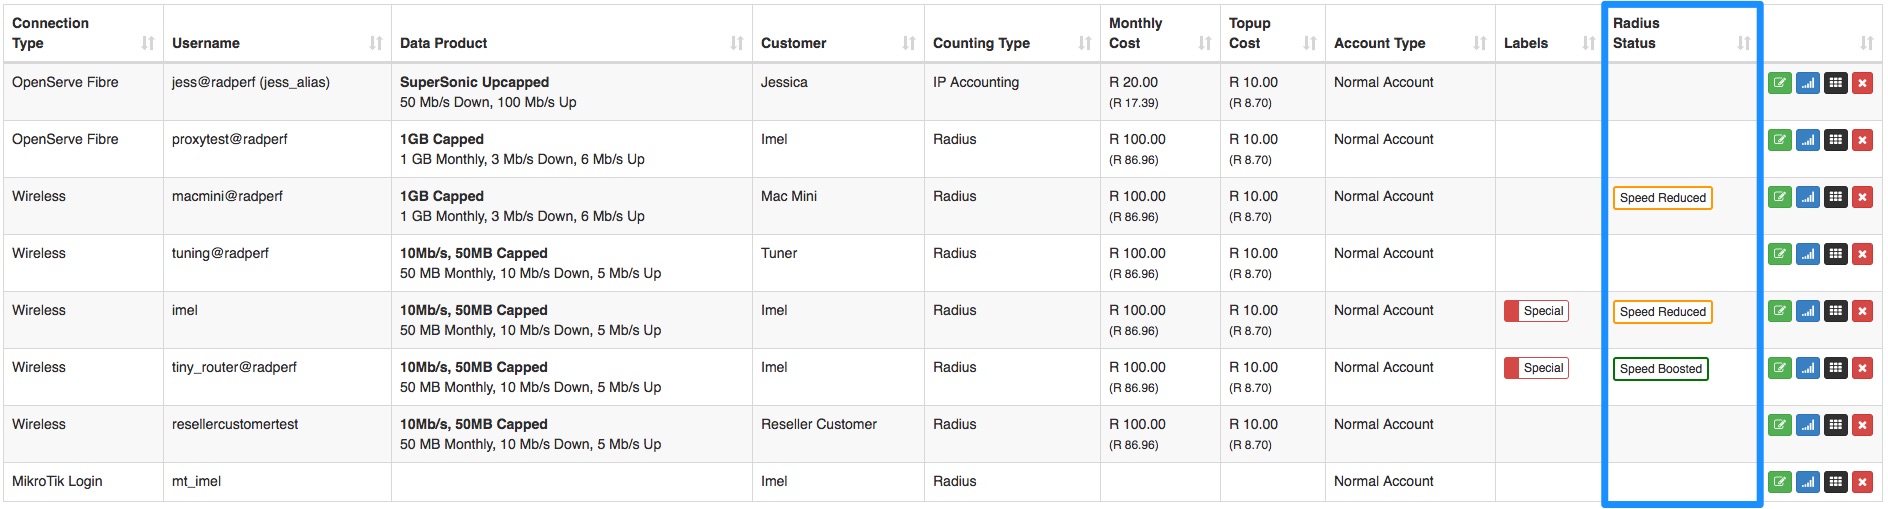
There are several places in which you will be able to see that the user’s speed has been limited or increased. These places include the:
- Customer Profile
- Customer Usage Screen
- Data Accounts Screen
Customer Profile
On the customer profile, you will be able to see a banner at the top of the customer’s profile as well as small labels next to the data accounts which will state whether the speeds have been cut or boosted.
Banners at the top
At the top of the customer profile, you will be able to see an orange banner which will tell you which accounts have been boosted or reduced. This will look similar to the screen below:

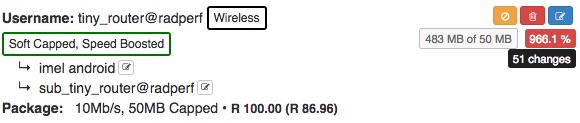
Labels next to the data accounts
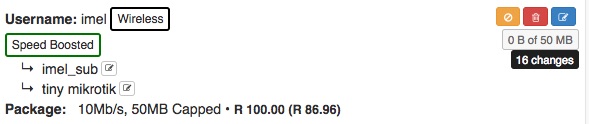
In the data accounts section, you will also be able to see labels next to the data account to mention whether it has been reduced or boosted. In this labels you will also be able to see whether the product has been capped or whether the product has reached its soft cap.
Speed Boosted:
Speed reduced:

Soft Cap reached, speed boosted
Customer Customer Usage Screen
Orange banner
On the customer usage screen, you will also be able to see the same orange banner which tells you which accounts have been boosted or reduced.
![]()
Data Summary
You will also be able to view the data package status in the data summary section found on the left-hand side of the screen. Click on the relevant data account which you would like to see more information for.
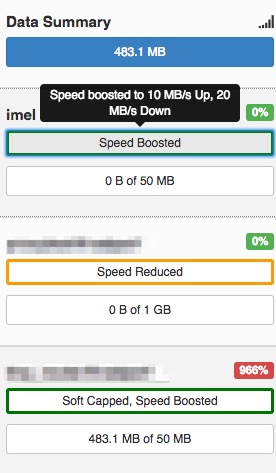
Speed Boosted:
In the red section, you will be able to view the customer’s original speeds whereas in the orange section, you will be able to view the boosted speed that the customer is currently receiving.

Speed reduced:
In the blue section, you will be able to view the customer’s original speeds whereas in the green section, you will be able to view the reduced speeds that the customer is currently receiving.

Data Accounts page
You will also be able to view the data account status on the data account page. To get to this page, you will need to go to “Data” and then click on the “Data Accounts” option.
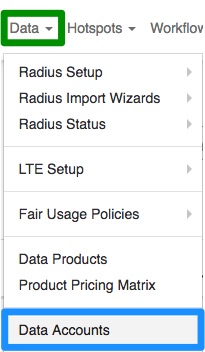
On the following screen you will be able to view the data account status on the right-hand side of the screen: