
To see the hotspot setup on HeroTill’s side, see: Hotspot Overview
Hotspot setup guide for Winbox
Please remember, that in order to run a hotspot on HeroTill the MikroTik must have a level 4 MikroTik license and up.
This is the hotspot setup guide that explains how to configure a MikroTik hotspot to work with HeroTill to provide free trial access, hotspot vouchers, prepaid accounts and radius account authentication.
Step 1. Upgrade router-board firmware and software packages.
Please note that when upgrading router board firmware and software always start with the firmware then the software packages. Reason: You will lose your wireless package if you upgrade the firmware last!
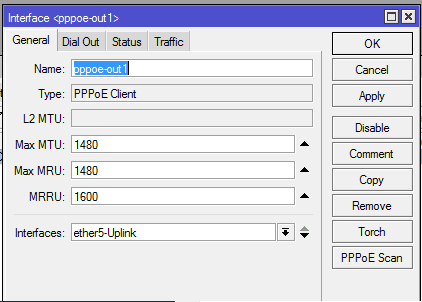
Step 2. SETUP PPPoE ACCOUNT
- Go to the PPP tab
- Click on following button:

- Click on PPPoE Client
- Leave NAME as default
- Select the UPLINK port for the INTERFACE tab.
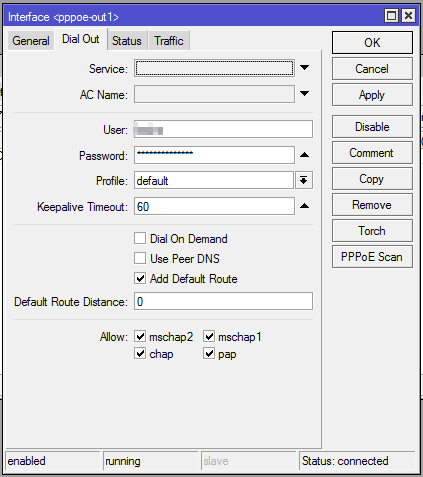
6. Navigate to DIAL OUT tab and fill in client PPPoE details as shown below.
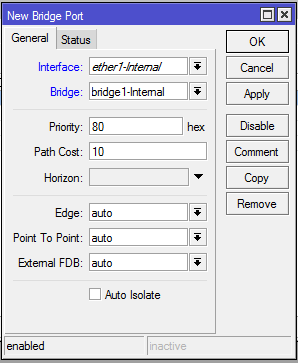
Step 3. Configure Bridge on network:
- Navigate to BRIDGE tab
- Click on icon as shown
- Create bridge and name as follow: bridge1-Internal
- Navigate to PORTS tab.
- Click on icon as shown
- Insert ports 1,2,3,4 in the bridge. NB: DO NOT INSERT UPLINK PORT IN BRIDGE
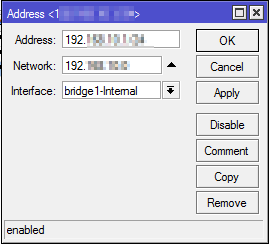
7. Navigate to IP/ADDRESSES
8.Click on icon as shown ![]()
9. Insert IP range for bridge created on previous steps.
10. Navigate to IP/DHCP SERVER
11. Insert DHCP on bridge1-Internal
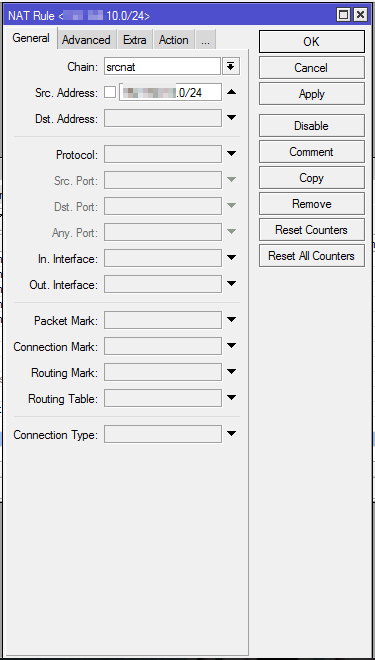
Step 4. Hotspot firewall setup
- Navigate to ip/firewall/NAT
- Click on icon as shown
- NAT bridge1-Internal ip as masquerade
- Choose Chain as srcnat
- Fill in Address: include whole range __10.0/24 NB: Do not choose an interface
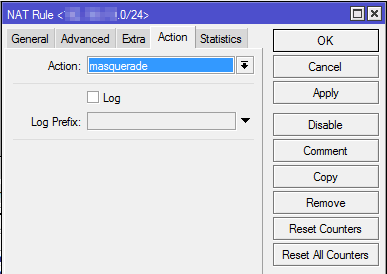
6. Navigate to Action tab
7. Choose Action as masquerade
Step 5. VLAN SETUP
- Navigate to Interfaces/VLAN
- Add VLAN as shown below
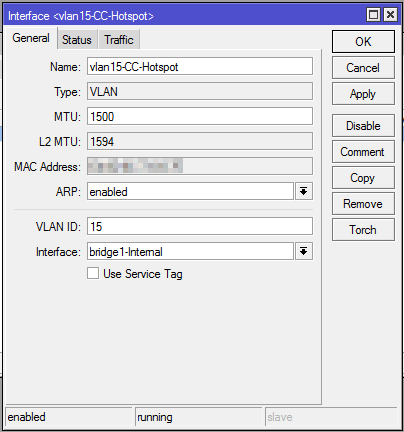
- Choose interface as bridge1-Internal
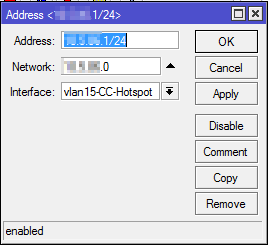
- Navigate to IP/Addresses
- Insert hotspot IP on VLAN interface
Step 6. DNS Setup
- Navigate to IP/DNS
- Insert DNS IP on Servers tab
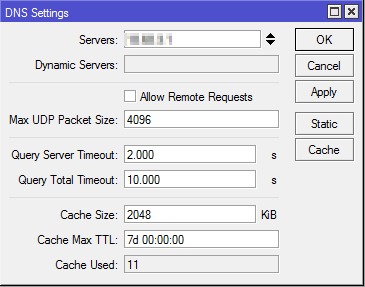
- DO NOT ALLOW REMOTE REQUESTS
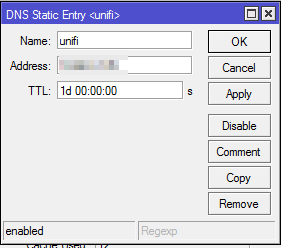
- Navigate to Static Tab
- Insert Static Unifi DNS IP
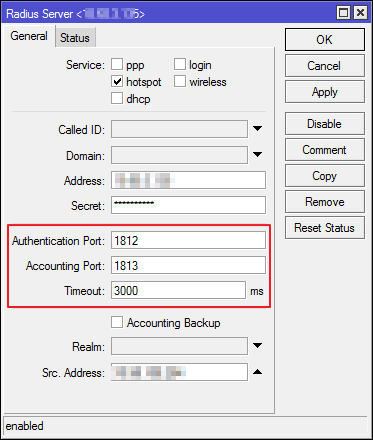
Step 7. Setup Radius
- Navigate to Radius tab
- On service select hotspot
- On Address add the radius IP
- On Secret add Radius Password
- On Timeout insert 3000ms
- On Src Address insert PPPoE IP address
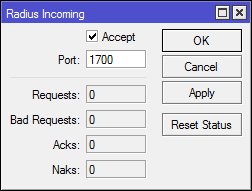
7. Navigate to Incoming tab and complete as shown below
Step 8. Hotspot Config Setup
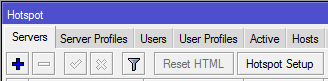
- Navigate to IP/Hotspot
- On server tab select Hotspot Setup tab
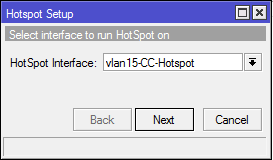
- Follow Hotspot setup Wizard as shown
- Hotspot Interface: Select your VLAN interface
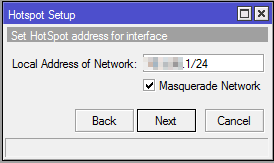
- Local Address of Network: Ensure that Masquerade Network is enabled
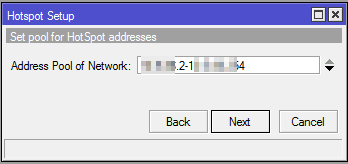
6. Address Pool of Network:
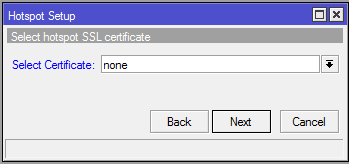
- Select Certificate:
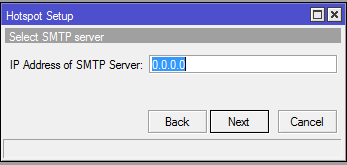
- IP Address of SMTP server:
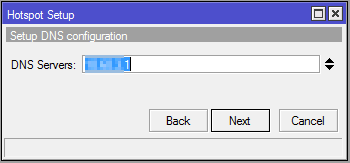
- DNS Server:
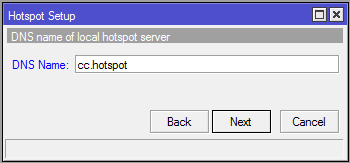
- DNS Name:
- Create local Hotspot user:
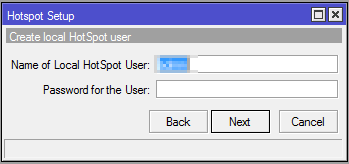
- Basic hotspot setup has now been completed
- Navigate to IP/Hotspot/Users and delete the user that was created through the Wizard setup
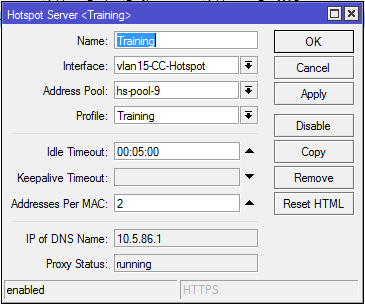
- Navigate to IP/Hotspot/Servers and select your hotspot server
- Name: Insert your hotspot name here
- Profile: Select your default profile here
- Navigate to Server Profiles and select created hotspot profile
- General tab: Fill in same name exactly the same as given in step 15 of Hotspot Config Setup
- Rate Limit (rx/tx): This is for queueing the entire hotspot please see below screenshot
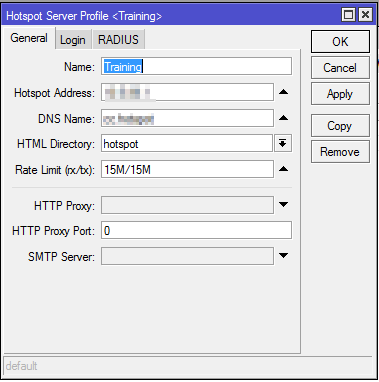
- HTML Directory: Select landing page that was uploaded from datatill (See screensot above.)
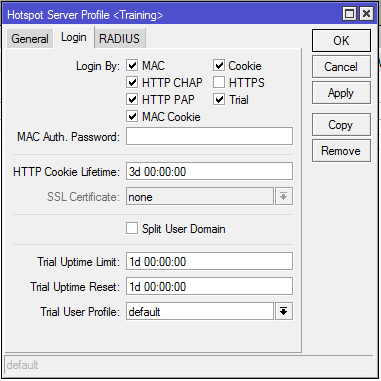
- Navigate to Login tab: Ensure that your Login tab is exactly configured as screenshot below
- Navigate to IP/Hotspot/Server Profile/Radius: Ensure that your RADIUS tab is exactly configured as screenshot below

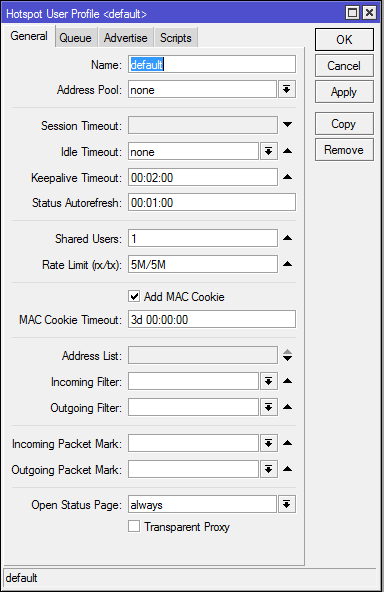
- Navigate to IP/Hotspot/User Profile
- Insert Rate Limit (rx/tx) with entry of 5M/5M as shown in screenshot below
Step 9. User List, SNMP and NTP Setup
- Setup an apiuser user and password with full permissions
- Navigate to IP/SNMP: Enable and complete SNMP
- Contact Info: Insert your Business Name here
- Location: Insert client Business Name here
- Navigate to System/SNTP Client: Enable and complete SNTP Client
- Primary SNTP Server: 98.1.1 (This address can change)
Hotspot setup completed.
Now we move to HeroTill to add a network device, Hotspot Location and NAS list.
Here we also adopt the APs.
HeroTill system side notes:
Step 1. Configure MikroTik hotspot
This step is the same as the Winbox hotspot guide above. There are just a few settings to double check compatibility with HeroTill, such as the ports to be used.
Create a hotspot server and ensure you give it a unique server name. This name must be unique across all hotspots.
This name is used to identify the hotspot when the requests reaches HeroTill.
Create a hotspot profile using the following settings:
- The hotspot address must be a local IP address defined on the router, it does not need to be on the same interface as the hotspot.
- The DNS name should be short, and preferably not an existing public address. The MikroTik router will auto add a local DNS entry on the router pointing to the IP address defined above.
- If multiple hotspot profiles are defined on the router they can share the same DNS name and hotspot address, but not the same interface.
- Note that the HTML directory can be left default for now. Once you have created the hotspot location in HeroTill the system will generate a new HTML folder which will need to be selected here.
- Tick all the login by settings except for HTTPS
- Change the http cookie lifetime to 3 days. (This can be tuned to your own preference)
- Set trail uptime limit and trial uptime reset to 24 hours. The HeroTill server will be controlling the disconnection of free trial sessions.
- Enable the radius tick box. Ensure that the radius server is defined in the MikroTik router and that the NAS is defined in HeroTill
- Tick the Accounting tick box
- Change the interim update interval to 1 minute
Add a Radius server to the router
At least the hotspot service needs to be checked.
Make sure the secret matches the secret defined under the NAS in HeroTill. Use the following ports:
- Authentication Port: 1812
- Accounting Port: 1813
- Incoming Port: 1700
Make sure the timeout is increased from 300ms to 3000ms.
Step 2. Create walled garden entries in HeroTill
Go to “Hotspot, Walled Garden Entries”
Add the following walled garden entries as a minimum:
- IP address of the HeroTill server
- IP address of your DNS server
You will be able to update the walled garden entries across all MikroTik routers at once by clicking on the red “Update Routers” button.
Note that all existing walled garden entries are removed from the MikroTik router when the update is done.
Step 3. Create network device in HeroTill.
Go to “Devices, Network Devices”
Add a new device for each MikroTik hotspot you are adding.
Note that you must use a valid Device Location when adding a Network Device.
To add a new location go to the device location drop down at “ISP Workflow, Workflow Setup, Locations”
First enter the IP Address. HeroTill will check whether the IP address is reachable.
Then enter the login username and password. This account should be configured as a full user on the MikroTik router (system/users). Also ensure the MikroTik API is enabled on the router (ip/services)
Then click on the “Scan” button. HeroTill will connect to the router via SNMP. If this connection is successful it will update the device type, device make and device model, as well as the device description.
It will then connect to the router via the MikroTik API, and retrieve the firmware version.
If HeroTill cannot connect to the router via the MikroTik API then it will not be able to make changes to the router or manage free trial sessions.
Step 4. Create hotspot in HeroTill.
Go to “Hotspot, Locations”
Add a new hotspot location for each MikroTik hotspot you are adding.
(Note that entries may be auto added to this list users access the hotspot before you have configured the hotspot location in HeroTill)
The default options for all new hotspots can be configured under “Setup, Hotspots”. All new hotspots created defaults to these values.
If the defaults are set up correctly it can save a lot of time when adding new hotspot locations.
The Hotspot ID must match the hotspot name as defined on the MikroTik router under the hotspot server definition.
Make sure that the hotspot router previously defined under network devices above are selected. This is used to link the router API to the landing pages. If not done or incorrectly linked weird results will happen.
Under the free trial section you should add the limits that needs to be applied to free trial sessions. This includes data and time limits.
If no limit is defined then trial users will have unlimited access!
Lots of other hotspot settings are available, and are self explanatory.
To see the hotspot setup on HeroTill’s side, see: Hotspot Overview
Step 5. Download settings to MikroTik router.
To download the settings to the MikroTik router click on the yellow button next to the router just added.
This will update the walled garden settings on the router and will generate and download the hotspot files to a specific folder on the router.
You need to take note of the name of the folder displayed on this popup window, as you need to edit the MikroTik hotspot server definition to use this html folder.
There are various reports available to show hotspot activity, under the “Hotspots” menu.