
Radius Proxy Guide
HeroTill allows the proxy of radius requests between multiple HeroTill instances.
1. Overview
HeroTill servers can proxy radius requests. A primary HeroTill installation can forward the radius request to a secondary instance, which can then forward it on again. Two HeroTill instances can also forward radius requests to each other, if so configured.
Radius forwarding is done by means of realms. Specific realms are configured on each HeroTill instance to indicate that any radius requests for user accounts that matches these realms should be processed by another radius instance.
Both radius authentication as well as radius accounting requests are catered for in the HeroTill proxy implementation.
The proxied radius sessions will appear as active radius session on the primary HeroTill instance even though this instance will have no information about the radius user accounts being forwarded through it.
These same radius sessions will also appear on the secondary HeroTill’s active radius session screen, with associated user and data product details.
2. Defining User Realms
There are two ways of defining the realm used to trigger a remote proxy authentication on a remote radius server.
2.1. Traditional Realm
The first scenario is to use a realm, for example john@myisp.com. In this example myisp.com is the realm that is used to redirect the user to the remote proxy for authentication.
Note that the realm will be stripped from the username when the secondary radius server receives the radius request. If the realm is required by the secondary radius server as part of the username then the second method (prefix) described below will be required.
2.2. Username Prefix
The second scenario is the use of a prefix, for example myisp.com/john. In this example myisp.com is still identified as the realm, and the auth request will be sent to the remote proxy for authentication.
Note that both can be used together. For example, myisp/john@myisp.com will indicate that the realm to use for remote proxy is myisp, and john@myisp.com is the username used on the remote proxy.
Should you require the suffix (@myisp.com) to be forwarded to the secondary radius server then a prefix will be required. If a prefix is not used then the suffix will be stripped as part of the proxy request.
If myisp/john@myisp.com is used as the username on the CPE, then john@myisp.com will be the username used to verify authentication on the secondary radius server.
3. Configuration
3.1. Primary radius server
The primary HeroTill instance is where the auth request will first be seen. This is the radius server that will redirect the request to the secondary radius server. The username that is being checked for authentication must not exist on this radius server.
3.1.1. Config file
Edit the /etc/freeradius/custom_proxy.conf file and scroll to the very bottom of the file.
Paste the following code below all other text and replace all the words market in bold and purple with the appropriate values:
home_server my_realm_name {

            type                  = auth+acct

            ipaddr               = 1.2.3.4

            src_ipaddr         = 1.1.1.1

            port                   = 1812

            secret               = xxxxxxxxxxxxx

            require_message_authenticator = yes

}


home_server_pool cloud_auth {

            type = fail-over

            home_server = my_realm_name

}

realm my_realm_name.co.za {

            type      = radius

            pool      = cloud_auth

}
realm – In this code snippet above the realm used is my_realm_name.co.za,
ipaddr – The IP address to forward any radius requests for any user that matches that realm is 1.2.3.4.
src_ipaddr – The src address that will appear on the secondary radius server is 1.1.1.1. There must be a valid NAS configured on the secondary radius for this IP address, else these proxied radius requests will be rejected by the secondary radius server.
secret – this password must match the secret used on the NAS with matching IP address configured on the remote radius server.
Note that the nostrip option can be added to the realm section. This will result in the full username containing the realm be passed on to the proxy server for authentication. Bear in mind that MSChapV2 auth can only be used in the proxied radius server if the nostrip option is used.
3.1.2. Ports
Port 1700 must allow incoming requests from the remote or secondary radius server. This will be used to send disconnect requests from the secondary radius to the primary radius, as the secondary radius does not talk to the originating NAS devices directly, but via the primary radius server.
3.1.3. NAS
The secondary HeroTill server’s IP must be configured as a NAS on the primary HeroTill installation. Also ensure that the secret used matches the secret defined in the proxy.conf file.
4. Remote radius server
The remote radius server is the secondary HeroTill instance that will process the auth request. It is here where the radius account must exist.
4.1 Config file
No configuration file changes are required. The proxied radius requests will appear as if coming from a normal NAS device. The NAS device IP address will be that of the the primary Data Server.
4.2 NAS
The primary HeroTill server’s IP must be configured as a NAS on the secondary HeroTill installation. Also ensure that the secret used matches the secret defined in the proxy.conf file.
4.3 Ports
Ports 1812 & 1813 must allow incoming radius requests from the primary radius server.
5. UBNT & Mikrotik devices
Note that when the primary radius server strips the realm from the username during the proxy request the authentication will fail if MSChapV2 is used. In those scenarios switch your CPE device to using MSChapV1 instead. If the realm is retained during the proxy request then MSChapV2 authentication can be used.
To switch the CPE devices to use MSChapV1 instead of MSchapV2 authentication use the following instructions:
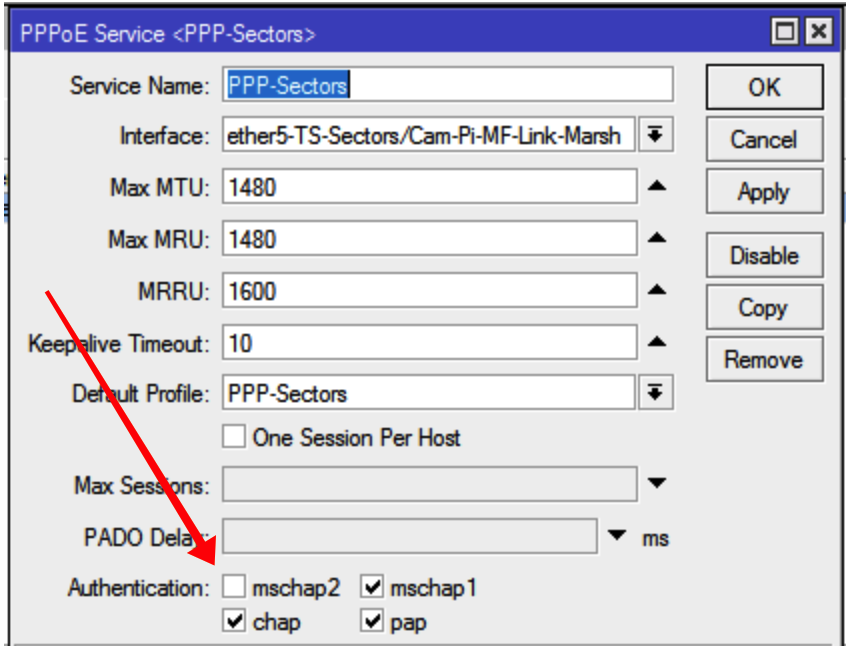
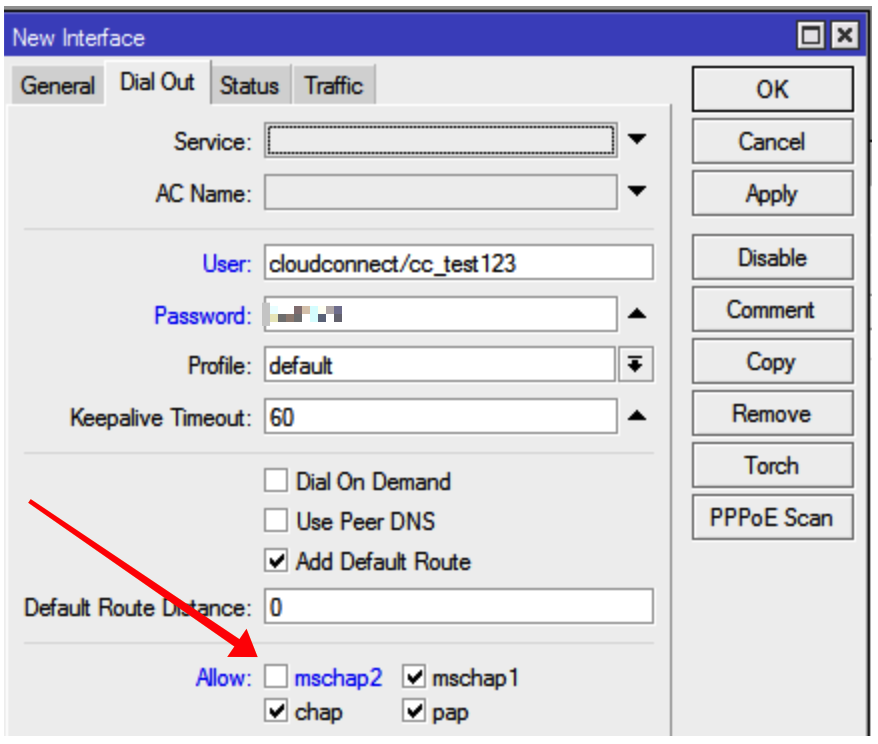
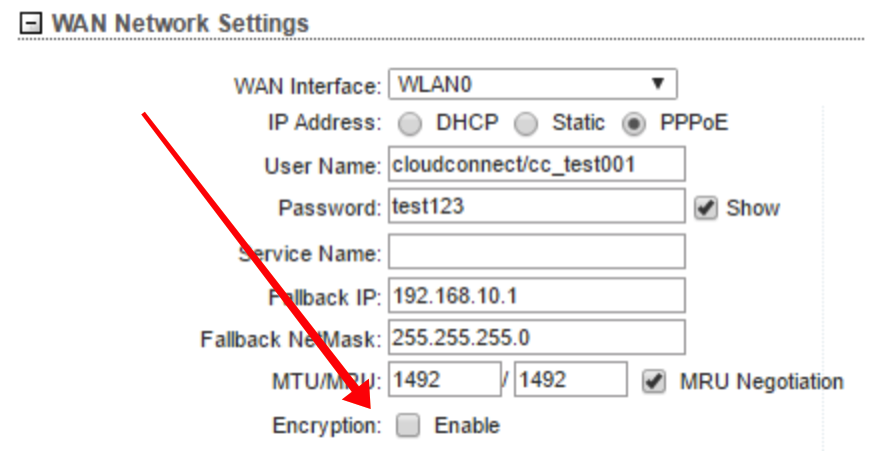
Ensure that the authentication protocol mschap2 is disabled on your PPP server on the highsite and that mschap2 is disabled on your clients PPP account.
If mscap2 is not disabled then radius auth requests will not be successfully handled by the secondary radius server.
5.1. Mikrotik NAS
PPP service on Mikrotik NAS device:
5.2. Client Devices:
PPPoE dialup setup on Mikrotik CPE device:
PPPoE dialup setup on UBNT CPE device:
6. Testing the proxy setup
Remember to restart the primary radius service once the changes to the proxy.conf file has been made. If a syntax error was made in the proxy.conf file the radius service may not restart successfully, so check the file changes carefully.
To test the that the proxy setup is working execute the following command on the primary radius server:
usr/local/bin/radtest proxy_test@myisp.com 'my_password' 127.0.0.1 10 nas_secret
(replace username@realm, my_pssword and nas_secret with the settings)
The output should looks similar to the following:
Sending Access-Request of id 123 to 127.0.0.1 port 1812

                User-Name = "proxy_test@myisp.com"

                User-Password = "1212"

                NAS-IP-Address = 196.1.2.3

                NAS-Port = 10

                Message-Authenticator = 0x00000000000000000000000000000000

rad_recv: Access-Accept packet from host 127.0.0.1 port 1812, id=123, length=55

                Acct-Interim-Interval = 300

                Mikrotik-Rate-Limit = "1048576/1048576"

                Session-Timeout = 1497420