
How to set up Mailbox Scraping and Mailbox Scraping Rules
Webinar: Mailbox Rules and Scraping
1. Introduction
This feature allows you to capture client emails to your company email address (example: support, accounts or sales mailbox’s) and either generate a helpdesk ticket or generate a sales lead. Mailbox Rules are set up to take specific action on certain Email Addresses and Email Subject Lines.
Important: If a Sales Lead or Helpdesk Ticket is generated it sends out a notification to let the receiver know about the action. If the receiving mailbox has an autoreply set up or a similar helpdesk ticket system and sends out reply notifications it could cause back and forth emails to be sent and resulting in multiple tickets being opened. To prevent this you will have to add a Mailbox Scraping Rule for the mailbox the auto replies are originating from.
2. Mailboxes
To find your mailbox(es), go to “Setup” – “System Settings” and then click on the “Mailbox Scraping” option.
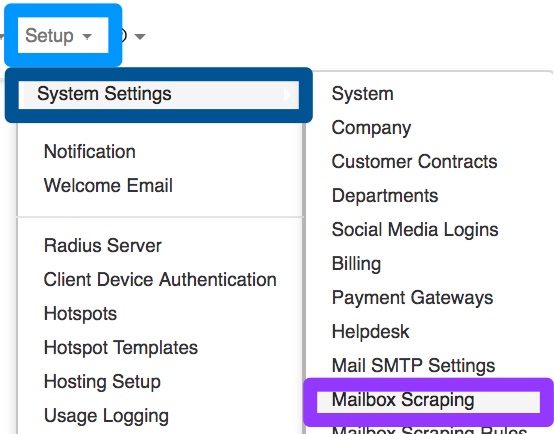
On the following screen, you will be able to add new mailboxes, view a list of all mailboxes and edit or delete existing mailboxes.

2.1. Add a Mailbox
Click on the “Add Mailbox” button and then complete your mailbox details.
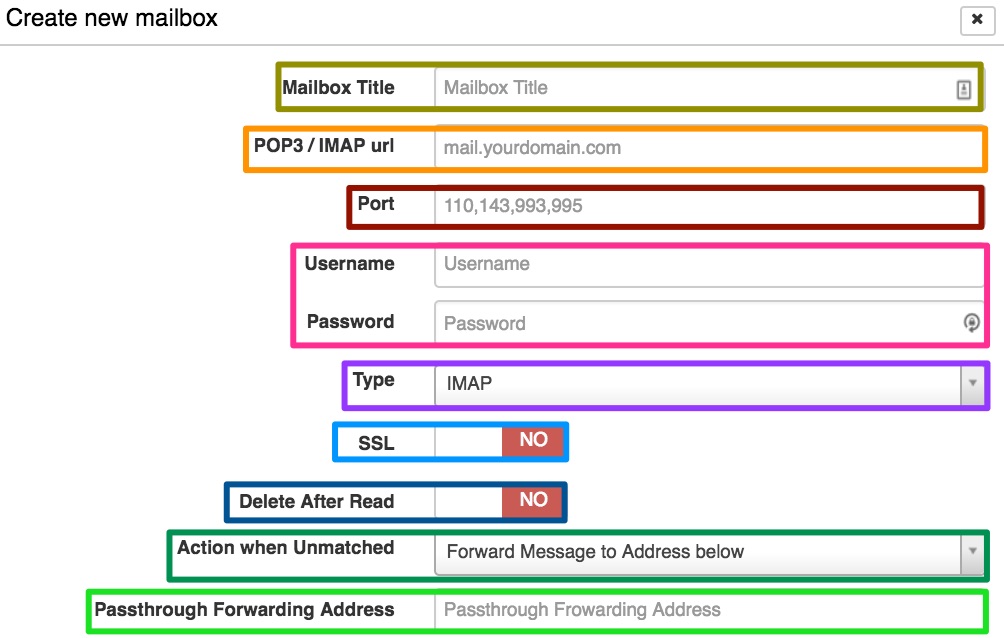
| Yellow: | Here, you will give your mailbox a name i.e. Supports, Accounts or Sales etc. |
| Orange: | This is where you add in the POP3 or IMAP URL that your mail server uses. |
| Red: | This is where you specify the port that is used to log into the mailbox. |
| Pink: | In this section, you will need to add the:
|
| Purple: | Here you will specify the type of protocol your mailbox will use. |
| Light Blue: | In this section, you will specify if your mailbox uses SSL or not.
Note that the ports will differ depending on if SSL is switched on or not. (Usually: POP3 with SSL: 110 | POP3 without SSL: 995 | IMAP with SSL 993 | IMAP without SSL: 143). |
| Dark Blue: | This is where you specify if it should remove the emails from the Mailbox itself. Note that it will still be on HeroTill as a Ticket or Sales Lead but it will be removed in the inbox itself. |
| Dark Green: | This is where you specify what you want the system to do if the email does not exist on HeroTill for a customer. There are four options to choose from:
|
| Light Green: | This is where you can specify an email address that HeroTill will forward the mail to. |
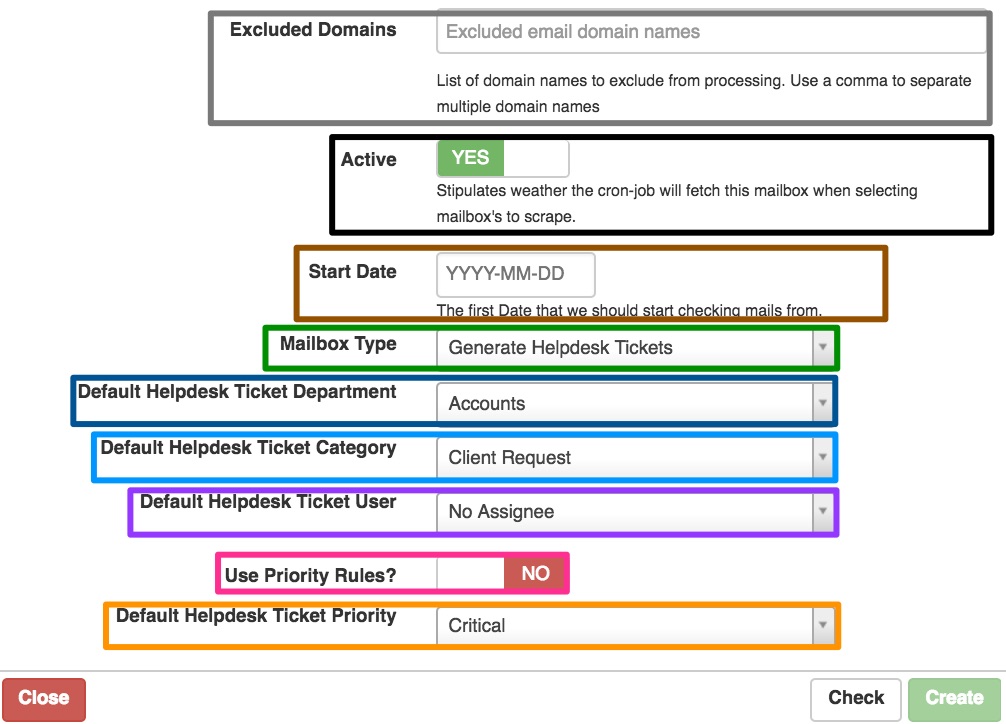
| Grey: | This is where you specify the list of domain names to exclude from processing. Use a comma to separate multiple domain names |
| Black: | This is where you specify if the Mailbox will process incoming mail (Stipulates weather the cronjob will fetch this mailbox when selecting mailbox’s to scrape). |
| Brown: | This is the first Date that we should start checking emails from. |
| Green: | This is where you select what you want the mailbox to generate. Options are:
|
| Dark Blue: | This is where you specify the default helpdesk department for the mailbox. Note that the Helpdesk should be set up on HeroTill for any Mailbox Type. Click here for a guide on how to set up the Helpdesk Module. |
| Light Blue: | This is where you specify the default ticket category. Note that the Helpdesk should be set up on HeroTill for any Mailbox Type. Click here for a guide on how to set up the Helpdesk Module. |
| Purple: | This is where you specify the default Admin User. If the Mailbox is set up to generate helpdesk tickets it will automatically assign the ticket to the specified admin user. If the Mailbox is set up to generate Sales Leads it will automatically assign the ticket to the specified admin user. |
| Pink: | This is where you set the default ticket priority on the mailbox. Default is:
|
| Orange: | This is where you can specify an email address that HeroTill will forward the mail to. |
After adding all the mailbox details, click on the “Check” button.
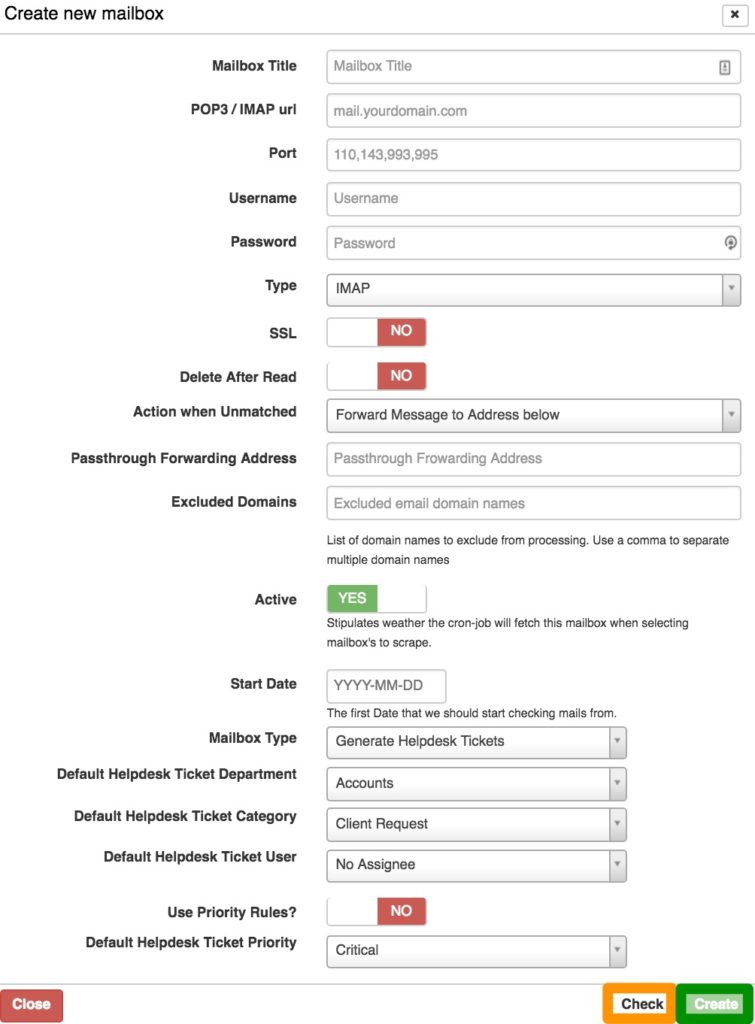
If the mailbox test is successful, then you will be able to click on the “Create” button.
3. Mailbox Rules
To find a list of all your mailbox rules, or to create new mailbox rules, go to “Setup” – “System Settings” and then click on the “Mailbox Scraping Rules” option.
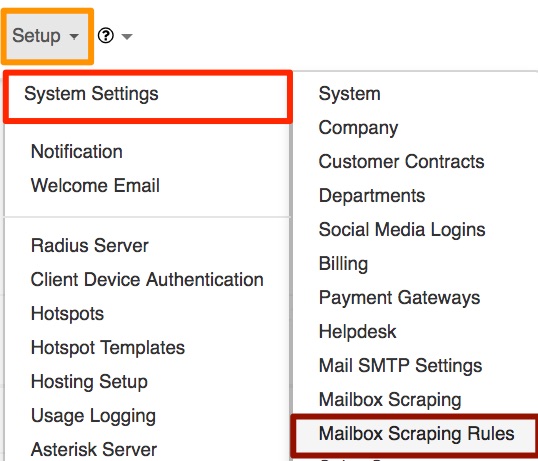
On the following screen, you will be able to add new mailboxes, view a list of all mailboxes and edit, disable or delete existing mailbox scraping rules.

3.1. Add a Mailbox
To add a mailbox, click on the “Add Mailbox” button and then complete all the mailbox rule details.
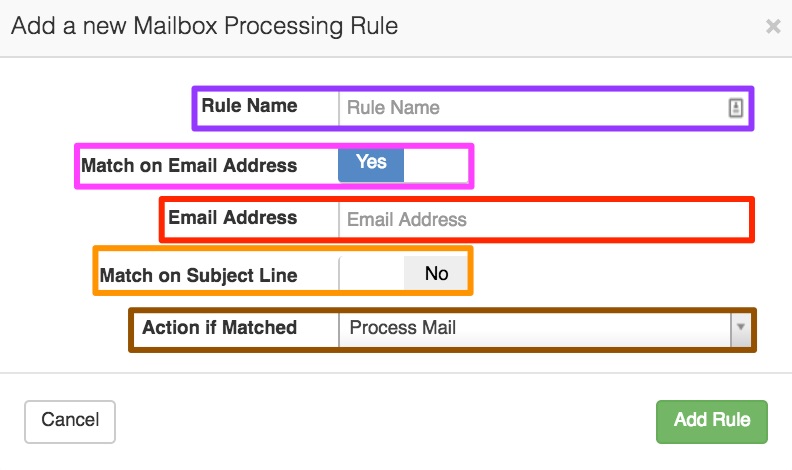
| Purple: | This is where you add a name for your rule. |
| Pink: | In this section, you specify whether or not is should be matched on an email address. |
| Red: | Here you can specify which email address the rule should take action on. Please note that this will only show if you have “Match on Email Address” marked as “Yes“. |
| Orange: | In this section, you will be able to specify the subject line for the tule to take action on. Please note that this will show if you have “Match on Email Address” marked as “Yes“. |
| Brown: | Here you will need to specify which action should take place if the mail matched on the Email Address or the Subject Line. The different actions are:
If you have selected Forward Mail it will as you to specify a Forwarding Email Address. |
After adding all the details, click on the “Add Rule” button.
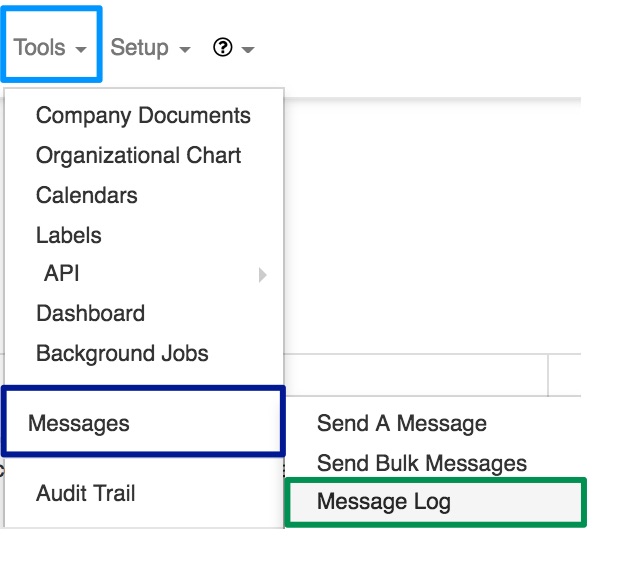
4. Message Log
The message log refers to all message that have been sent from HeroTill. To find the message log, go to “Tools” – “Messages” and then click on the “Message Log” option.
You will now see the following page:

On this screen, you will be able to see the message type, status and date as well as the customer or email address the mail has been sent to. You can also filter your list to see only certain message types, different states such as delivered or failed, messages sent from specific admin users or to view all messages sent to a specific customer or to view messages sent in a certain time frame. You will also be able to view the message that has been sent to the customer or resend the message if need be.
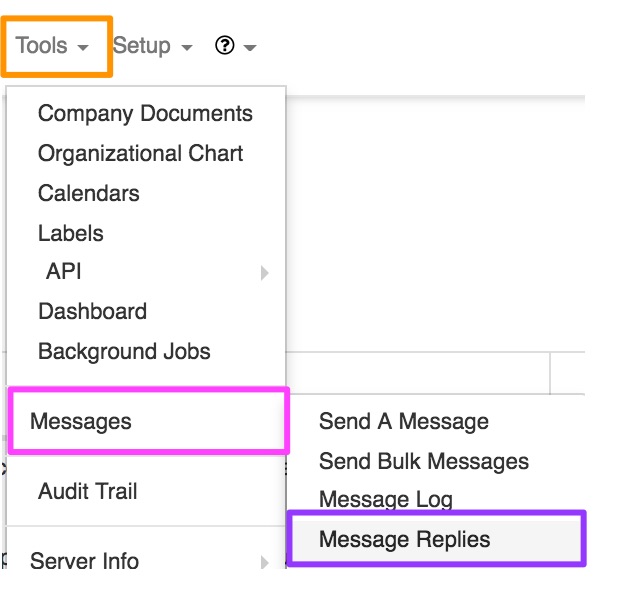
5. Message Replies
To view a list of all message replies, go to “Tools” – “Messages” and then click on the “Message Replies” option.
You will now see the following screen:
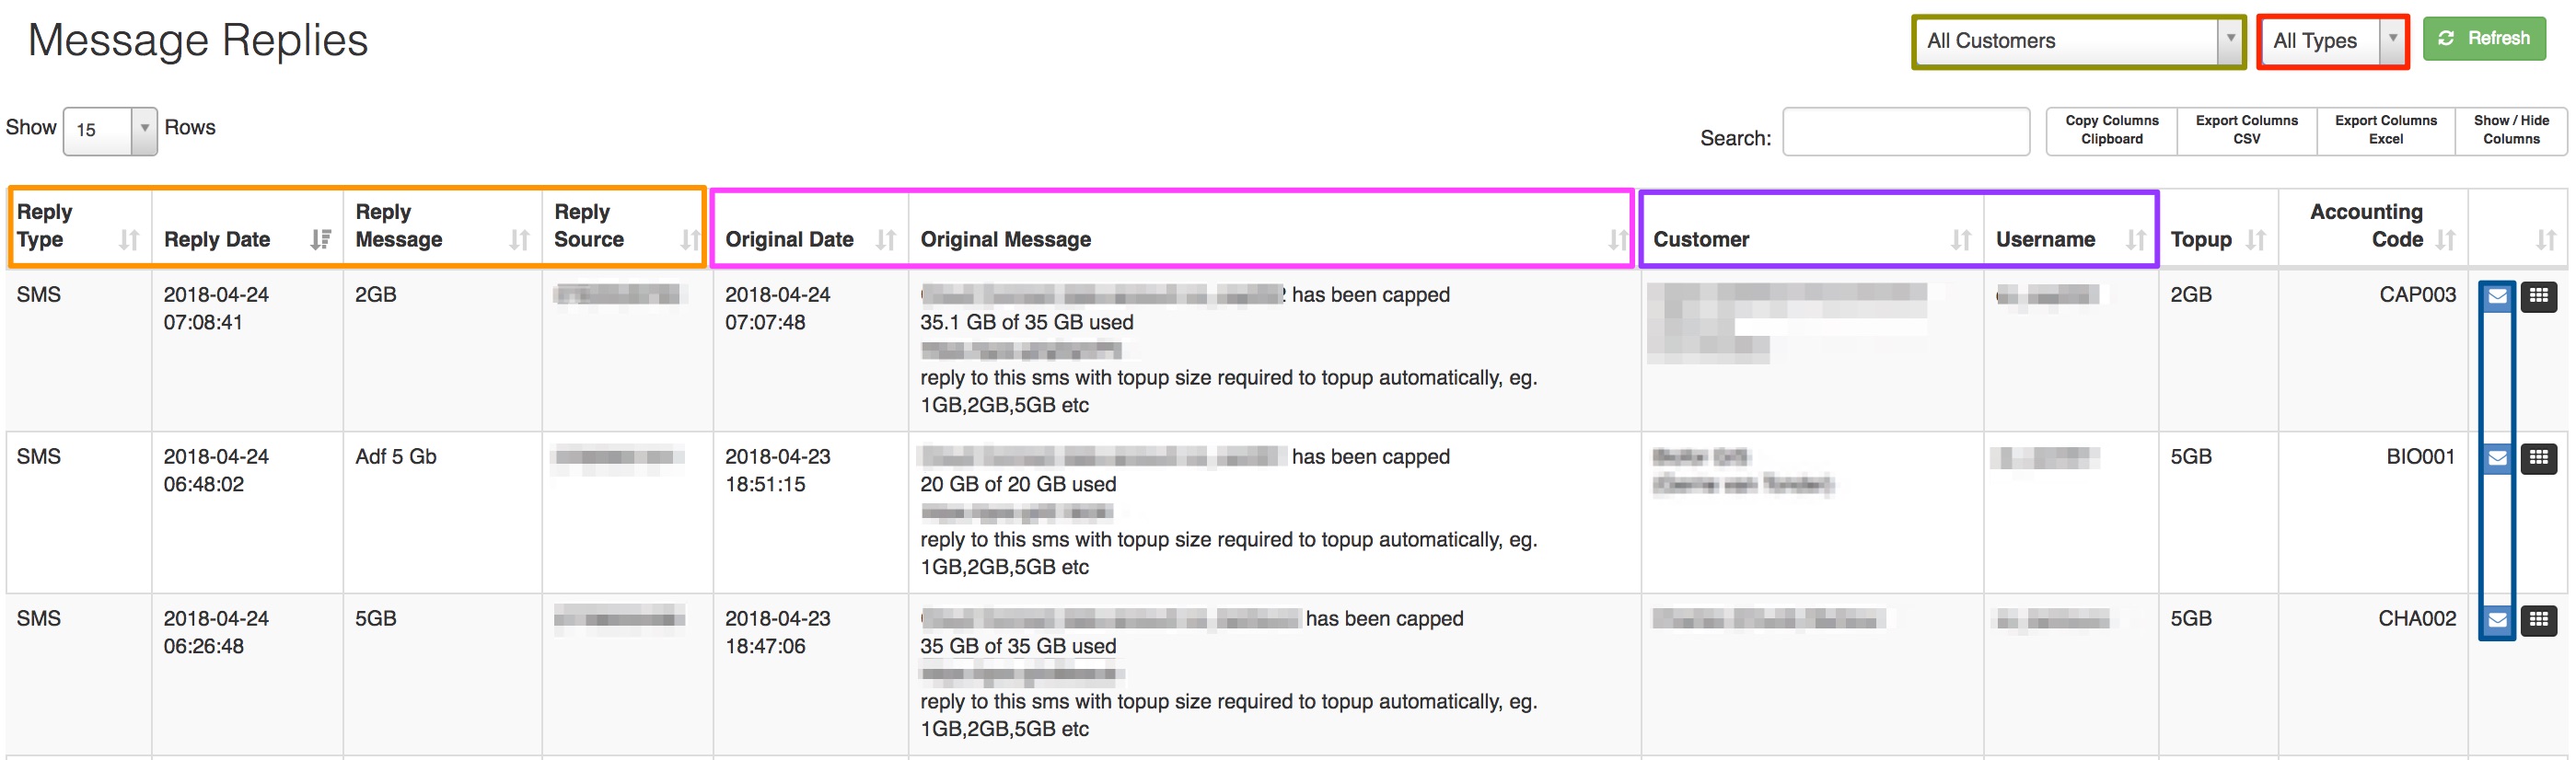
On this screen, you will be able to view the reply details, the original message details and the customer details. You will also be able to filter the list to view certain message types, view all messages sent from a specific customer or view the messages sent.
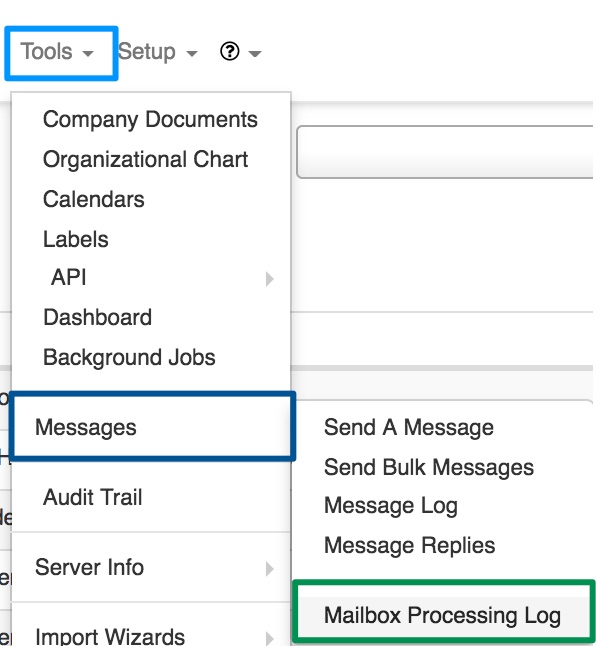
6. View Mailbox Processing Log
The Mailbox Processing Log refers to all incoming messages. To view this log, go to “Tools” – “Messages” and then click on the “Mailbox Processing Log option.
You will now see the following page:

From this screen, you will be able to see the message details as well as filter the list for specific customers, message states or view all messages in a specific time frame.
The buttons found on the right-hand side of the screen has the following functions:
 |
This button will allow you to view the email. |
 |
Click on this button to download the email. |
 |
Click this button to link the email address to a customer. Note that this will show regardless if the email address is linked to a customer or not. |
 |
Click this button to view the helpdesk ticket. Note that in some cases a helpdesk ticket will not be created (example: Sales Leads or if it is forward to another email address). |
 |
This button will take you to the customer profile. |
 |
Click this button to quickly set up a mailbox rule. |