
1. Adding new customers in HeroTill
There are two ways in which new customers can be added in HeroTill:
- Sales Module – Please refer to the Lead to Receipt guide for
- Manually adding new customers if you are not making use of the sales module.
In this guide, we will show you how to add customer’s through both of these methods.
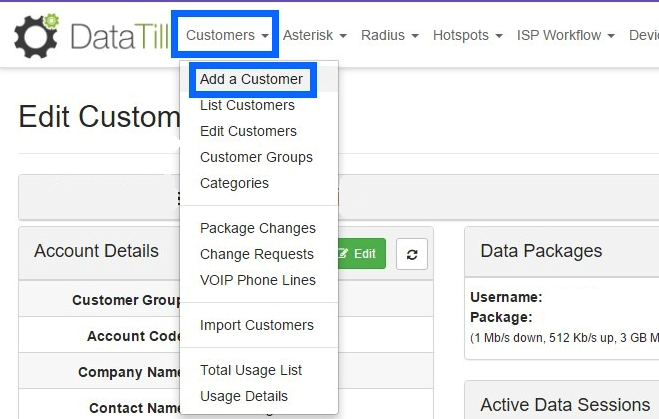
Primarily, all new customers should be added through the lead to receipt process to ensure that duplication of customer accounts do not take place. In the case that a profile should be split and a new profile should be created, or you do not make use of the lead to receipt process, then you will add new customers in this way. To add a new customer, go to the “Customers” and then click on the “Add a Customer” option.
1.1. Company vs. Individual customer.
Once you have done this, a pop-up screen will appear. On this screen, you can start filling in the details of the customer. Once the screen has popped up, you will have the option of choosing if it is a company or an individual customer. Obviously, there are differences between adding a new customer and adding a new company to the system. Adding a company has additional fields like Company Name, VAT number and contact name whereas adding a new individual customer has none of these.
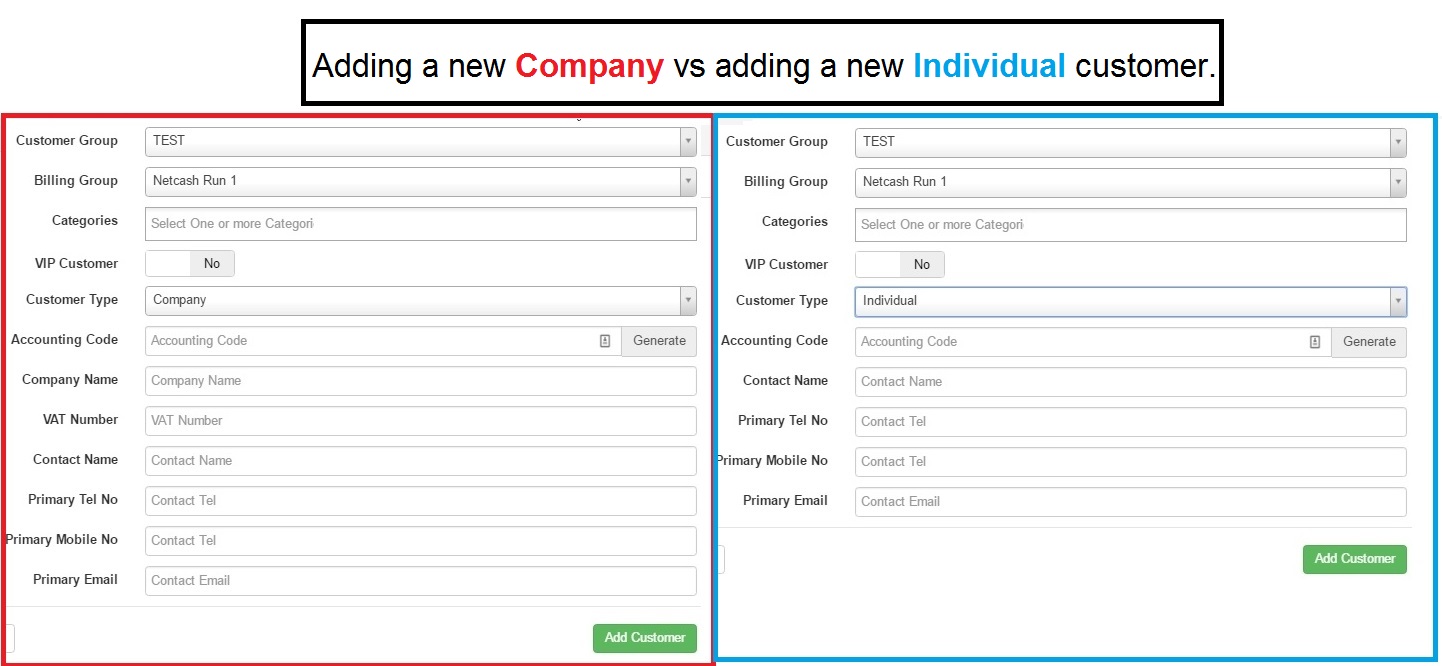
Although it is important that all detail should be filled in, there are some compulsory fields that are non-negotiable. Should one of these fields not be filled in, the system will show you which fields are compulsory, highlighting it in red. When adding a new company, the compulsory fields are – Company name, contact name, contact tel, contact email and of course the accounting code (Customer code). When adding a new individual customer, the required fields are – Contact name, Contact Tel, Contact Email and the Accounting code (Customer code).
1.2 Adding the details:
1.2.1 Customer Group & Billing Group:

| Pink: | These are groups like staff, highsite owners, names of estates, resellers etc. |
| Purple: |
This is to define on which day the customers would like to have their Debit Order (DO) deducted. Please note that this differs from WISP to WISP. Please ensure that you know the date(s) on which your WISP runs DO batches and that you don’t make promises to customers that you can’t keep. |
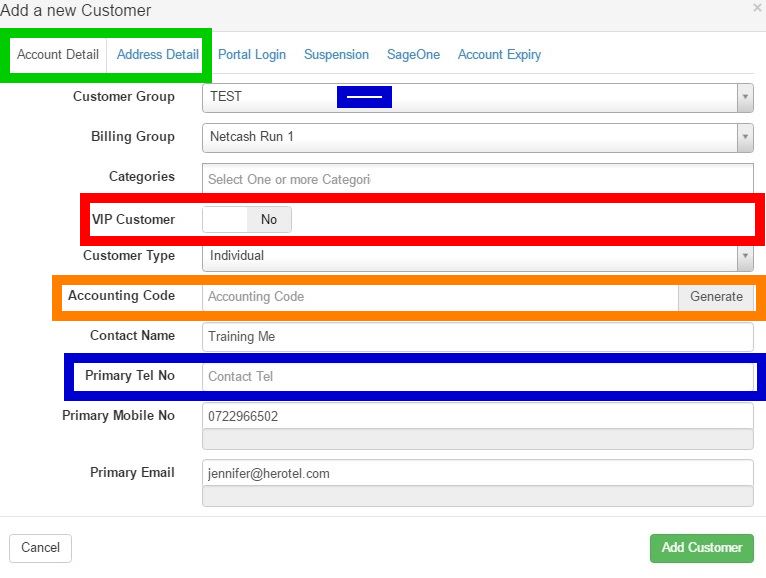
1.2.2 VIP Customer & Customer type.

| Blue: | This is to mark the customer as an Important customer – for example, high paying customers will be marked as VIP. |
| Green: | Choose whether the new customer is an individual or a company. |
1.2.3 Filling in the customer details:
Before you can generate a customer code (accounting code), you will need to complete the customer or company’s details first. Only once this information has been completed, will the customer’s account code generate. In the red section below, you will see all the required fields that should be filled in for companies. In the blue section below, you will see all the required fields that should be filled in for normal home users and their families.

1.2.4 Accounting code – a.k.a customer code.
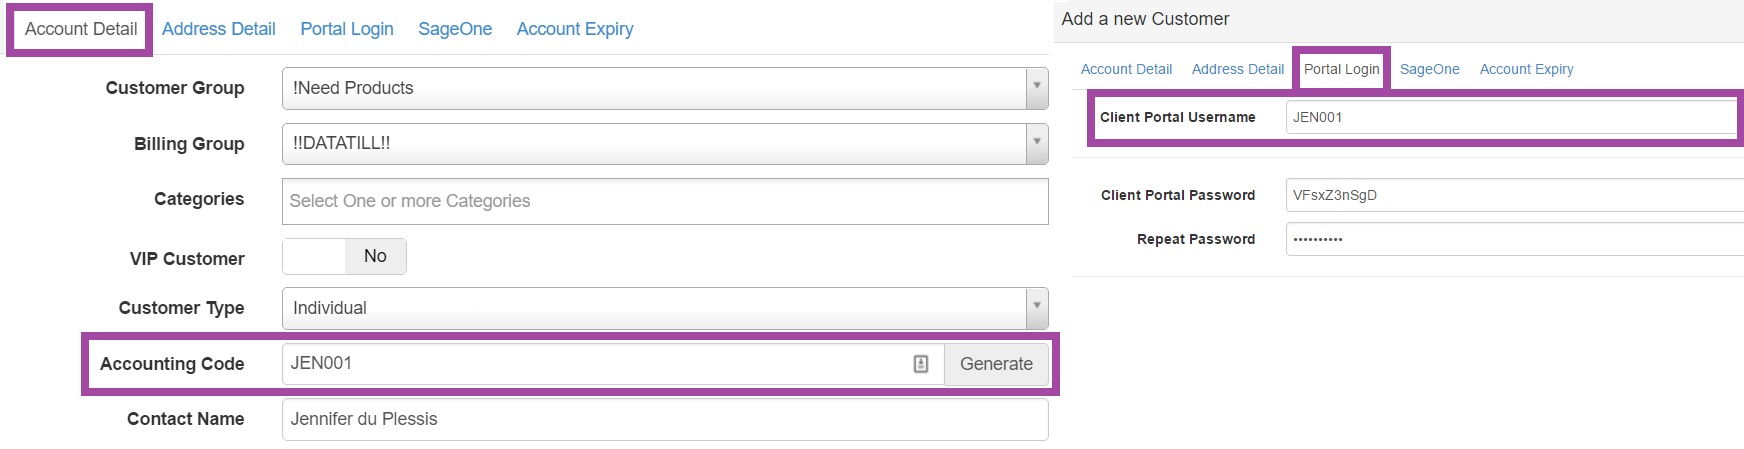
The good news is that you don’t have to figure out the customer code by yourself. The bad news is that the customer code is never allowed to change – even if the customer name/ business name might have changed. After you have filled in all the customer’s details, click on the “Generate” button and watch the system generate a code for the customer. It doesn’t matter how many times you push the generate button, you will get the same code every time.
![]()
1.2.5 Address Details:
Even though this is not a compulsory field when you are adding a customer, please remember to add this. Just click on the “Address Detail” tab and then fill in the physical or postal address. Next, you will need to complete the “Address Detail” tab. Here, you will need to add the physical address and postal address (if applicable). After adding the physical address, you can click on the “Show on Map” button. This will then pinpoint the location on the map and give you the customer’s GPS Position.
Please note that for this to work correctly, you will need to have a Google Maps API. For more information on this, you can refer to the following:
- Webinar: Google Maps API
- Guide: How to get your Google Maps API

After completing all relevant fields, remember to click on the “Add Customer” button to ensure the customer profile is successfully created.
1.2.6 Portal Login:
This is related to the login details for the customer portal. This is not something you have to worry about or work on. As soon as you generate the customer code, the “Customer Portal Username” will automatically be filled in with the “accounting code“.
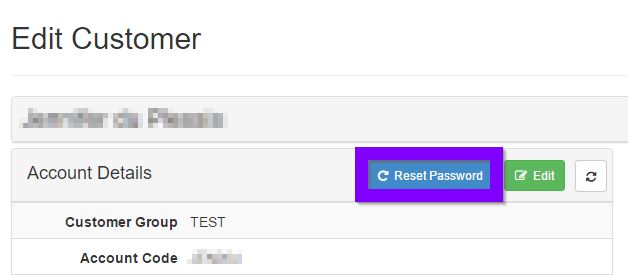
If the customer has forgotten their password, then you can send them a “Reset Password” link. To do this, go to the customer profile, look for the account detail section, and then click on the Blue “Reset Password” button.
1.2.7 The SageOne ID:
This ID is related to the syncing functions with SageOne – the online accounting system we use for reporting functions. This ID will also automatically generate a number as soon as a new customer is created. This ID is never to be tampered with as this will ensure for lots of drama, syncing issues and a broken customer profile.
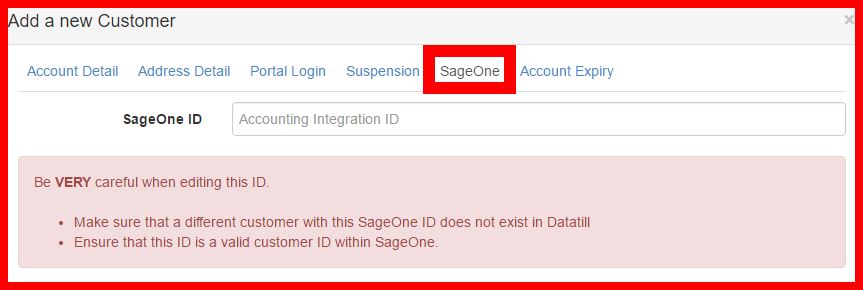
Even though it says “Be VERY careful when editing this ID”, please do not attempt to edit this without permission from the Systems Administrators.
1.2.8 Account Expiry:
This section is for the accounts department only. The accounts department will use this section for customers who need to be suspended due to non-payment as well as all customer who cancel their services with us. Remember to click the Save changes button before closing the screen.
| Pink: | Here you can see where to find the “Account Expiry” tab. |
| Blue: | This is the section you use when a customer cancel their services. |
| Green: | The big red button is the one you use when the customer doesn’t pay and they need to be suspended. |

1.3 Adding a customer from a sales lead.
The sales module will allow you to take your incoming sales lead from the first point of contact right through to the billing of the new sales. One of the steps will require you to create your new customer within HeroTill. To create you new customer, open your sales lead module and then go to the “Customer” – “New” section. Find the customer who’s profile you would like to create and then click on the “Create Customer” button found on the right-hand side of the screen.

After clicking on the “Create” button, a pop-up screen will appear. On this screen, you will focus on the “Account Detail” tab. Information like company name (if applicable), the contact name, the mobile number, email address and the address detail will already be filled in. All that’s left to do is adding the rest of the information: Is it a VIP customer or not? Generate the Accounting Code and add the primary telephone number.
Next, you will need to complete the “Address Detail” tab. Here, you will need to add the physical address and postal address (if applicable). After adding the physical address, you can click on the “Show on Map” button. This will then pinpoint the location on the map and give you the customer’s GPS Position.
Please note that for this to work correctly, you will need to have a Google Maps API. For more information on this, you can refer to the following:
- Webinar: Google Maps API
- Guide: How to get your Google Maps API
After completing all relevant fields, remember to click on the “Add Customer” button to ensure the customer profile is successfully created.