
Sales
Please note that the Billing module and integration with Sage One is required for Quotations to work.
Sales Guides:
Pro Rata Billing On Lead To Receipt Invoices
Setup Guide
Before you can start the sales set up on HeroTill, you first need set up the Helpdesk. For more information on how to do this, please see the Helpdesk setup guide on the HeroTill website.
1.1. How to get to the sales setup
1.2. Enable Online Applications
1.3.2. Sales Document Template setup
1.5. How to set up the messages the customer receive
1.5.3. Online Application Terms & Conditions
2. User Permissions for lead to receipt
3.1. Where to find the document templates
4.2.1. Creating checklist templates
4.2.2. Linking checklist templates to the lead to receipt module
1.1. How to get to the sales setup

After clicking on sales setup, you will see the following screen:
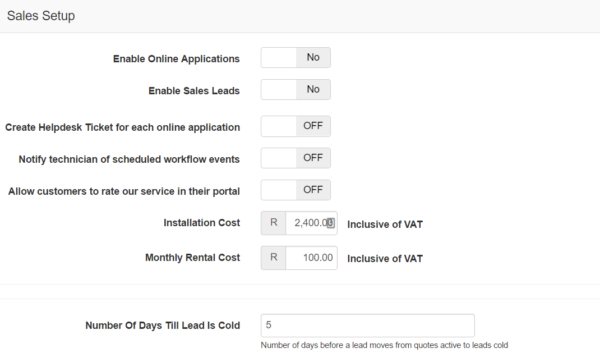
This screen will give you the option(s) to enable online applications as well as the lead to receipt module. Each module has different settings that need to be setup for the workflow and management of the module to work correctly. After making changes to the settings, click on the “update” button found in the bottom right-hand corner of the screen.
1.2. Enable Online Applications:
Online applications are queries that customers submit by completing the online application form found on your WISP’s website. If you enable the Sales leads module as well, then all online applications will be found under the Sales Leads – New section. If you do not use the sales leads module, all online applications can be found under Sales – Online applications.
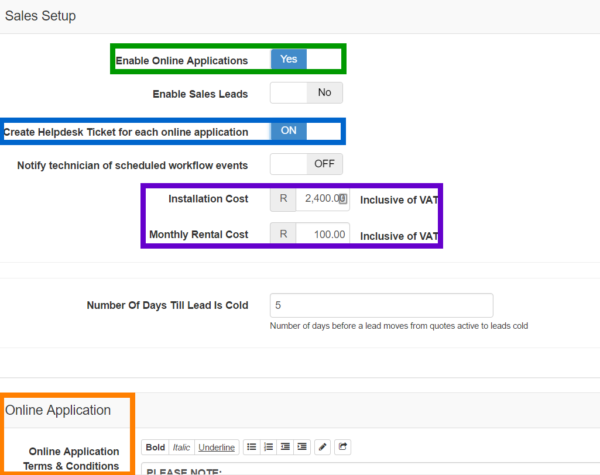
| Green: | To enable online applications, click on the button to switch it to “Yes”. |
| Blue: | By switching this section on, each online application generates a helpdesk ticket. It is suggested that this function be switched on. |
| Purple: | If you are not planning on using the sales leads module, please enter the installation costs and monthly rental costs in this section. These amounts will then automatically pull through on the online application. |
| Orange: | The Online Application Terms & Conditions can be added here. For more information on this, please see 1.7. |
1.3. Enable Sales Leads:
If you want to use the full lead to receipt module, click on the button to enable the Sales Leads. If you would like technicians to receive a notification whenever a workflow event is scheduled to them, enable the setting in the blue section.
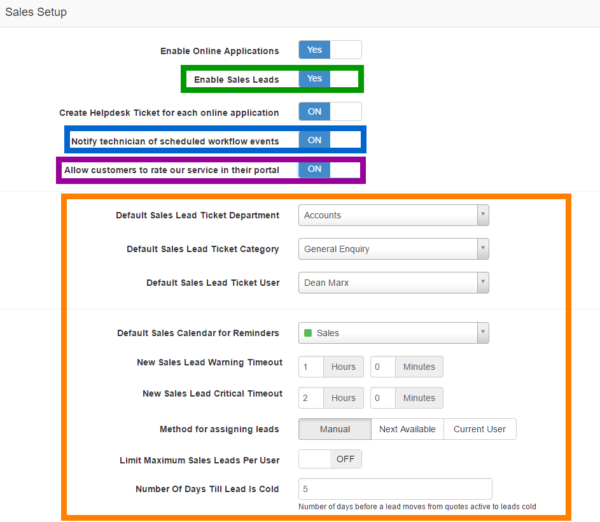
| Green: | To enable the lead to receipt module, click on the button to turn the switch to yes. |
| Blue: | This section determines whether HeroTill notifies the technician when a job has been scheduled and assigned to them. |
| Purple: | This will enable customers to rate their experience with you WISP when they log into their online portal. |
| Orange: | If you are planning on using the sales leads module, you can start with the setup of the module in this section. For more information on how to setup the sales lead function, please see 1.3.1 below. |
1.3.1. Sales Setup:
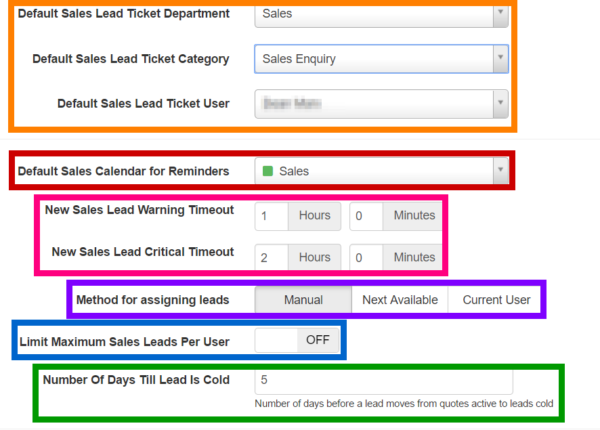
| Orange: | Default Sales Lead Ticket Department:
Here you can choose in which department new sales leads tickets should generate for example the sales department of support department. Default Sales Lead Ticket Category: In this section you can link the sales lead to a certain category for example: new leads or sales enquiry. Default Sales Lead Ticket User: If you have a dedicated person who assigns all new leads or sales tickets, you can select their name form the list. If each sales agents assigns their own leads and tickets, you can choose “No Assignee”. |
| Red: | In this section you can determine to which HeroTill calendar all sales reminders should be scheduled to. |
| Pink: | This section will determine after what set amount of time the lead status will change to orange (needs attention) to critical (urgently needs attention). |
| Purple: | Manual:
This allows each person to assign leads to themselves without the system automatically allocating the lead to someone. Next available: This allows the systems to assign the lead to the next available sales agent (only applicable if the limit maximum sales leads per user is enabled). Current User: This allows the system to automatically allocate the lead to the sales agent who created the lead. |
| Blue: | This button enables you to determine a set amount of sales leads that a sales agent is allowed to work on. For example if the limit is 10, the sales agent will only be allowed to have 10 sales leads. The sales agent will need to complete or close a sales lead before being assigned to a new lead. |
| Green: | After sending the quote to the customer, the customer will have a certain amount of time to respond to the quote. If the customer does not respond within the allocated time, the sales lead will move to cold. |
1.3.2. Sales Document Template setup:
If you would like to make use of the document templates for quotes, job cards and invoice, click on the button to enable the setting.

1.3.3. Sales Helpdesk setup:
In the following settings section, you will set up the “Default Ticket Department”, “Default Ticket Category”, and the “Default Ticker User” for the site surveys, quotes, customer create, job cards, billing, customer care and customer update workflow phases found in the lead to receipt module.
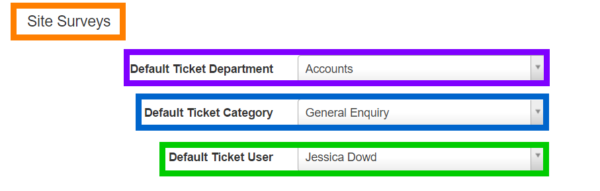
| Orange: | This refers to the different workflow phases in the lead to receipt module. |
| Purple: | In this section you can choose the default ticket department. For example sales leads will be allocated to the sales department and billing related tickets will be allocated to the accounts department. |
| Blue: | In this section you can link the sales lead to a certain category for example: new leads or sales enquiry. |
| Green: | If you have a dedicated person who assigns all new leads or sales tickets, you can select their name form the list. If each sales agents assigns their own leads and tickets, you can choose “No Assignee”. |
1.4. Checklist Setup:
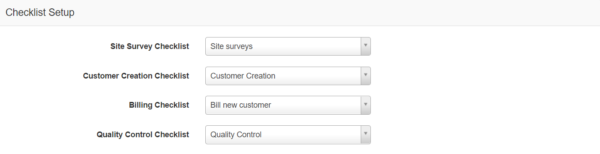
This checklist setup is for the checklist that appear on the tickets. The checklists appearing on the tickets are site survey, customer creation, billing and quality control checklist. All of these checklists first need to be set up individually before being able to link them to the relevant sections here. To link a checklist to one of these sections, click on the drop-down list and choose the relevant checklist. See more on the setup of checklists and checklist attributes in section 3.
1.5. How to set up the messages the customer receive:
Generic messages for quotes, customer care and online terms and conditions are set up in advance but you will be able to these messages to suit the needs of your WISP.
1.5.1. Quote Settings:
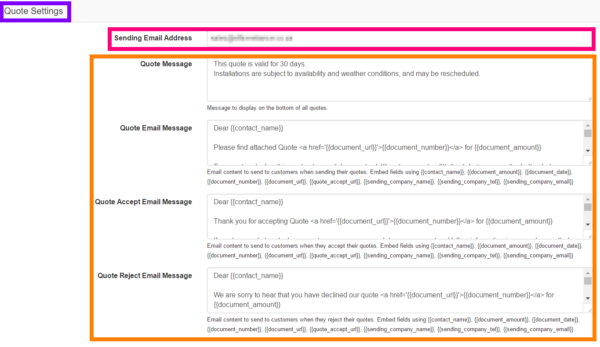
| Pink: | In this section you can enter the email address that you will be sending quotes from. |
| Orange: | Here you can view and update the quote messages that the customer will receive. |
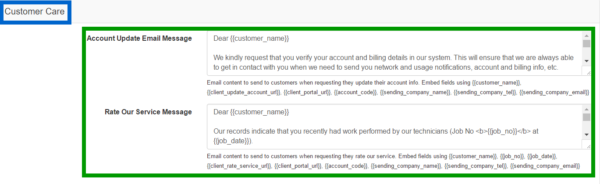
1.5.2. Customer Care:
In the green section you can view and update the messages customer will receive when the customer care email is sent.
1.5.3. Online Application Terms & Conditions:
The online application terms & conditions will only be applicable should you choose to enable the Online Application module. There is also some basic formatting tools like bold, italic and underlining to make the message more reading friendly.
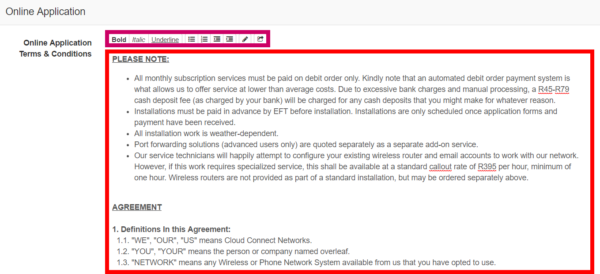
Remember to click on the “update” button found in the bottom right-hand corner of the screen.
2. User Permissions for lead to receipt
2.1. Leads:
| Description: | Permission: |
View: |
Modify: |
| Create, edit and update your own sales leads. | Sales |
X |
X |
| Submit your own sales lead for a site survey. | Sales |
X |
X |
| Create leads from customer profile. | Customer |
X |
|
| Assign and Re-assign Leads | Sales Lead Assigner |
X |
X |
| Assign, re-assign and work on other sales leads. | Sales Supervisor |
X |
X |
2.2. Surveys:
| Description: |
Permission: |
View: |
Modify: |
| Create, edit and update sales leads. | Sales |
X |
|
| Operations |
X |
|
|
|
Job Cards |
X |
||
| Schedule events. | Sales |
X |
|
| Operations |
X |
||
| Job Cards |
X |
||
| Helpdesk |
X |
X |
|
| Mark site survey as complete: | Sales |
X |
|
| Operations |
X |
||
| Job Cards |
X |
2.3. Quotes:
| Description: | Permission: |
View: |
Modify: |
| Create, edit and update sales leads. | Sales |
X |
|
| Basic Accounting |
X |
X |
|
| Create Quote | Sales |
X |
|
| Basic Accounting |
X |
X |
|
| Mail Quote | Sales |
X |
|
| Basic Accounting |
X |
X |
|
| Manually accept or reject quotes: | Sales |
X |
|
| Basic Accounting |
X |
X |
2.4. Customers:
| Description: | Permission: |
View: |
Modify: |
| Create, edit and update sales leads. | Sales |
X |
|
| Customer |
X |
X |
|
| Edit billing details: | Sales |
X |
|
| Customer |
X |
X |
|
| Recurring billing complete: |
Sales |
X |
|
| Customers |
X |
X |
|
| Update customer details (changes that have been submitted through the customer online portal). | Sales |
X |
|
| Customers |
X |
X |
2.5. Job Cards:
| Description: | Permission: |
View: |
Modify: |
| Create, edit and update sales leads. | Sales |
X |
|
| Operations |
X |
X |
|
| Job Cards |
X |
X |
|
| Schedule job | Sales |
X |
|
| Customer |
X |
||
| Operations |
X |
X |
|
| Job Cards |
X |
X |
|
| Helpdesk |
X |
X |
|
| Add and complete checklists on lead`s: | Sales |
X |
|
| Workflow |
X |
||
| Operations |
X |
X |
|
| Job Cards |
X |
X |
|
| Create job card from ticket. | Customers |
X |
|
| Helpdesk |
X |
X |
2.6. Invoicing:
| Description: | Permission: |
View: |
Modify: |
| Create, edit and update sales leads. | Sales |
X |
|
| Basic Accounting |
X |
X |
|
| Generate invoice from job card: | Sales |
X |
|
| Workflow |
X |
||
| Customers |
X |
||
| Operations |
X |
X |
|
| Helpdesk |
X |
||
| Job cards |
X |
||
| Basic Accounting |
X |
X |
|
| Push invoice to Sage One: | Customers |
X |
|
| Billing |
X |
X |
|
| Basic Accounting |
X |
X |
2.7. Quality Control:
| Description: | Permission: |
View: |
Modify: |
| Edit and complete checklist: | Sales |
X |
|
| Operations |
X |
X |
|
| Workflow |
X |
||
|
Customers |
X |
||
| Helpdesk |
X |
||
| Basic Accounting |
X |
X |
2.8. Ratings:
| Description: | Permission: |
View: |
Modify: |
| Acknowledge Rating: | Sales |
X |
|
| Workflow |
X |
||
| Customers |
X |
||
| Operations: |
X |
||
| Create helpdesk ticket for rating: | Sales |
X |
|
| Workflow |
X |
||
| Customers |
X |
||
| Helpdesk |
X |
3. Document templates
The lead to receipt module allows users to make use of pre-defined quote templates. Even though these quoting templates are pre-defined as per your ISP’s needs, during the quoting process, the sales agent will still be able to edit the commission percentage or add or remove products from the quote according to the customer’s needs.
3.1. Where to find the document templates:
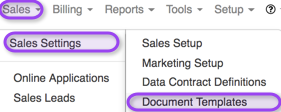
To start with the quote template setup, go to “Sales” – “Sales Settings” and then click on the “Document Templates” button.
Once the screen has loaded, you will see the following:

| Blue: | To add a new document template, click on the “Add” button. |
| Green: | In this section, you will be able to see a list of all templates that have been created. |
| Light Blue: | If you need to edit a document template, click on the “Edit” button found on the right-hand side of the specific document that you would like to work on. |
| Red: | If you would like to delete a document template that you are no longer using, then click on the “delete” button. |
3.1.1. Adding new templates
To add a new template, click on the “Add” button. On the pop-up screen, you can now start editing the details to create the template according to your needs.
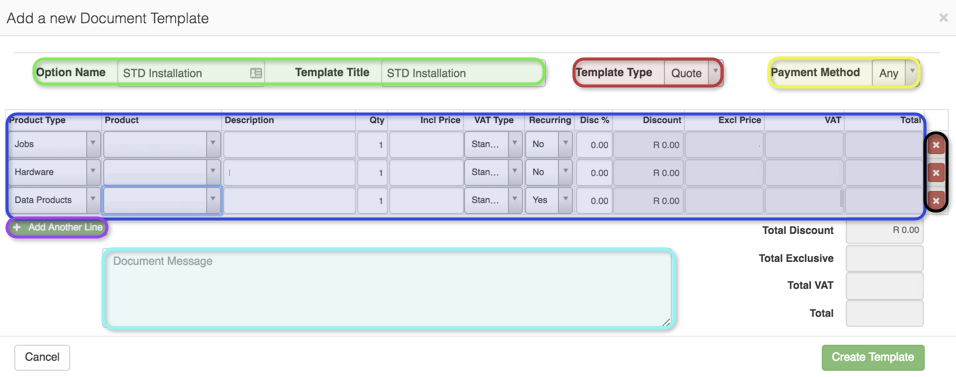
| Green: | In this section, you need to add the option name and template title. |
| Red: | Here you need to choose the template type. You can choose between:
|
| Yellow: | The payment method option allows you to link a certain payment method to the template. |
| Blue: | In the blue section you can add all the pre-requisites that you want to see on the template. Please note that this is only an example and is not an indication of how you should create your templates. Each WISP will create the template according to their individual needs. |
| Black: | If you need to remove a line item, click on the red cross on the right-hand side of the line item to remove it. |
| Purple: | If you need to add another line item to the template, click on the “Add another Line“ button found in the purple section. |
| Light Blue: | In this section, you will be able to add a standard message that will automatically go out to the customer when the document is sent. |
After you have added the relevant details to the template, click on the “Create Template” button found in the right-hand side corner. Editing quotes will work on the same concept as explained above.
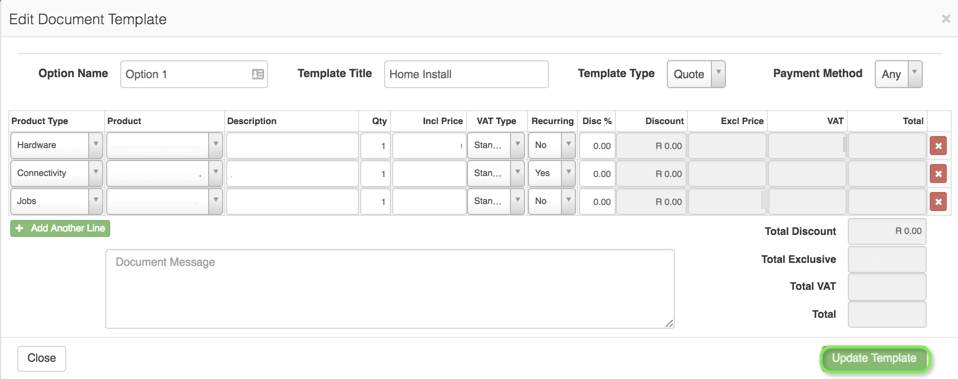
3.1.2. Editing templates
To edit a quote, click on the blue edit button found on the right-hand side of the template. The editing process will more on the same concept as explained above. When all the necessary details have been updated, click on the “Update Template” button to save your changes.
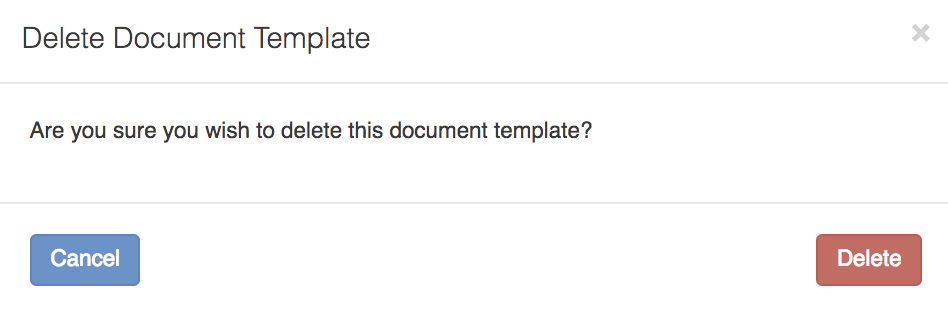
3.1.3. Deleting templates
To delete a document template, click on the “delete” button. A pop-up screen will now appear. If you are sure that you would like to delete the template, click on the “Delete” button.
4. Checklist setup:
Checklists can be set up for staff to be complete to ensure that all relevant checks and information has been collected and double checked. The WISP will be able to set up their own checklists templates according to their needs and internal workings.
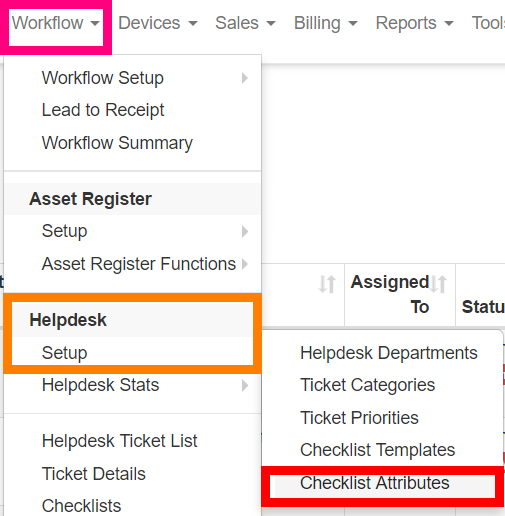
4.1. Checklist attributes:
Before creating a checklist template, you need to choose all the relevant attributes that you would like to be checked. The attributes that will be set up are items that you would like to have checked before being able to complete a checklist for example: Check that payment details have been added or check that the customer’s radius account and monthly billing has been set up correctly etc.
To set these attributes up, go to “Workflow” – “Helpdesk – Setup” and then click on “Checklist Attributes”.
After the screen has loaded, you will see the following:
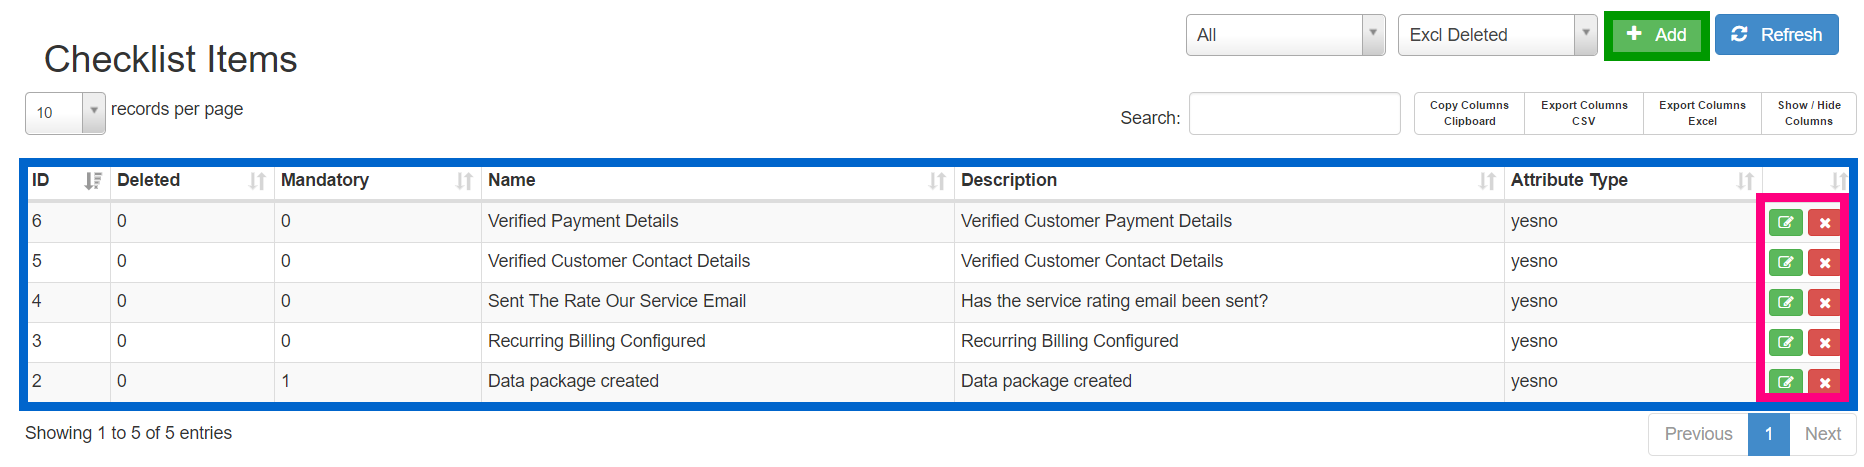
| Green: | To add new attributes, click on the “Add” button. |
| Blue: | This is a list of all attributes that have been created. On this list, you can view the description of the attribute. |
| Pink: | Edit button:
To edit the attribute, click on the green edit button. Delete button: To delete an attribute, click on the red button. |
4.1.1. Adding new attributes:
To add a new attribute, click on the green “Add” button. The following pop-up screen will now appear:

| Pink: | Choose a name for the attribute. |
| Purple: | Type in a sentence to explain the attribute. |
| Dark Blue: | The attribute type will determine how you see the option on the checklist for example: Yes / No button, text field or high site select. |
| Light Blue: | Is this a mandatory field that needs to be completed? |
| Green: | After you have added all the details, click on the create button. |
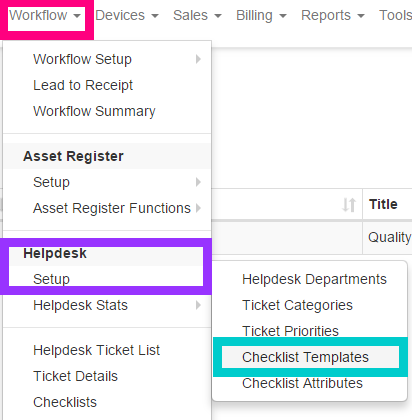
4.2. Checklist templates:
After all the relevant attributes have been added, you can start creating the checklist templates. To create checklist templates, go to “Workflow” – “Helpdesk – Setup” and then click on “Checklist Attributes”.
When the screen is done loading, you will see the following:
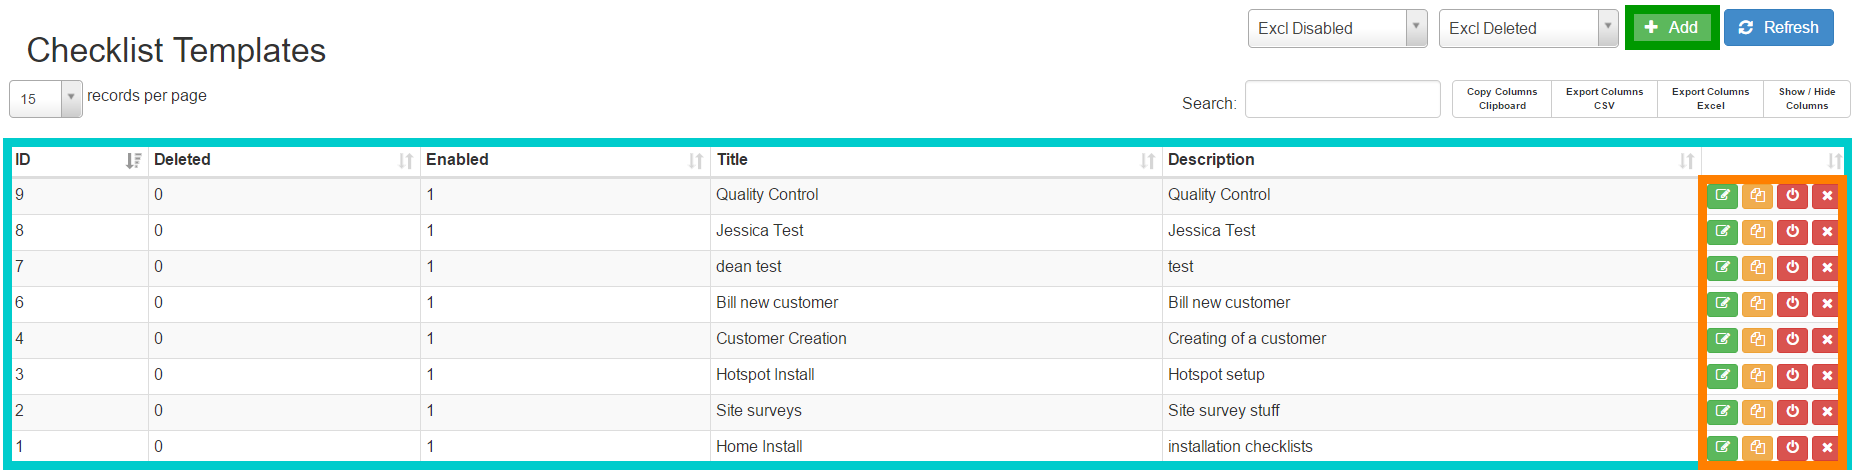
| Green: | Click on this button to add a new checklist template. |
| Blue: | This is a list of all checklist templates that you currently have. |
| Orange: | Green: Edit button
If you need to edit a checklist, click on this button. Orange: Cloning function If you need to create a checklist that is similar to another with, you can simply clone the checklist and then edit it. Red 1: Disable function Click on this button if you temporarily want to disable, but not delete an attribute. Red 2: Delete function. If you want to permanently delete an attribute, click on the delete button. |
4.2.1. Creating checklist templates:
To create a checklist template, click on the “Add” button. After you have clicked on the button, the following pop-up screen will appear. Give the checklist a name and type a short description explaining what the checklist is about.
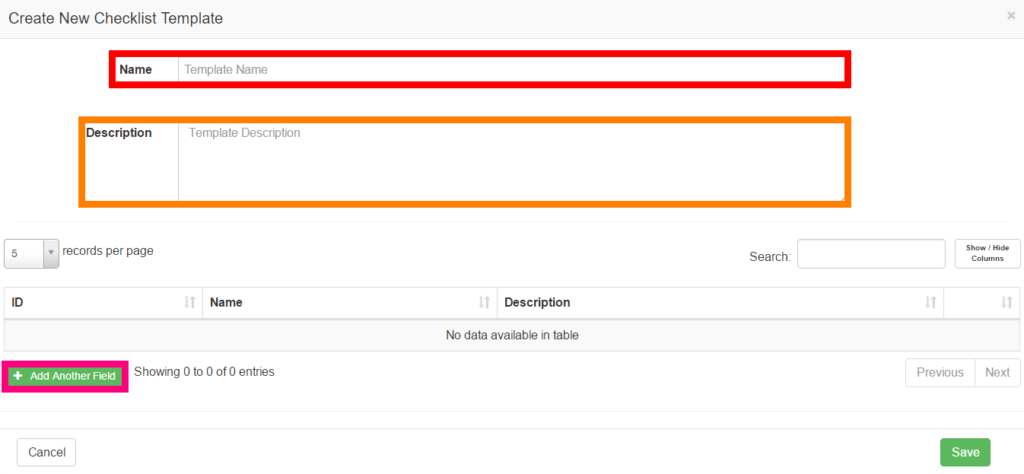
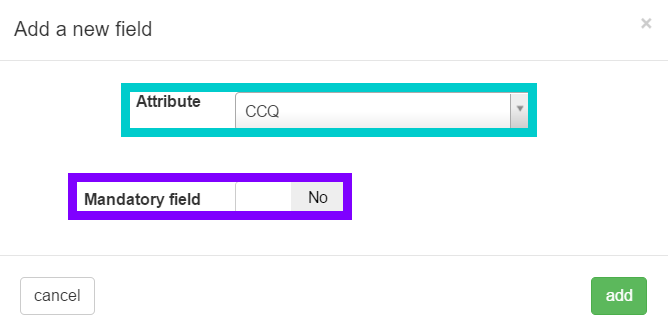
To add attributes to the checklist, click on the “Add another field” button found in the pink section. On the pop-up screen, choose the attribute that you want to appear on the checklist and mark it as either mandatory or not mandatory. Click on the add button when you are done. Please see screenshot on the next page.
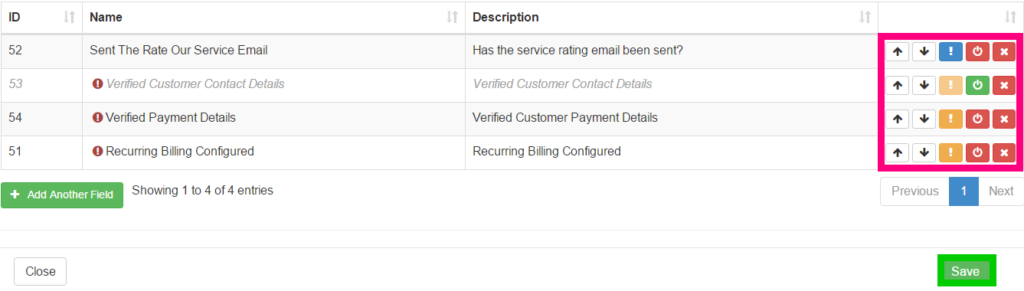
After all of your attributes have been added, you can start editing the checklist to your liking. Remember to click on the save button once you are done creating the checklist.
| |
To move an attribute high onto the list, click on the upwards facing arrow. |
| |
To move an attribute lower on the list, click on the downwards facing arrow. |
| This button marks an attribute as mandatory or not mandatory. This will mostly be used when editing checklists.
Blue button: This means that the attribute is currently marked as a NOT mandatory field. Orange button: This means the attribute is currently a mandatory field that needs to be completed. |
|
| Click on the button to either disable or enable an attribute. The disable button will only be used if you temporarily want to remove an attribute from the checklist.
Red: If the button is red, it means that the attribute is currently enabled and will be displayed on the checklist. Green: If the button is green, it means that the attribute is currently disabled and will not be displayed on the checklist. |
|
| |
If you want to permanently remove an attribute from a checklist, click on the delete button. |
4.2.2. Linking checklist templates to the lead to receipt module:
For more information on how to link a checklist to the checklist that appears in the lead to receipt module, please refer to section 1.4 found under sales set up.