
IP Accounting Guide
2. Enabling the IP Accounting module in HeroTill
2.1.1. Default IP Pair Threshold
2.1.4. Default Scheduler File Creation Interval
2.1.5. User Data for Traffic Identification
2.1.6. Fetch IP Accounting Data from All MikroTik Routers
3. MikroTik router configuration management:
3.1. Enabling routers individually
3.2. Disabling routers individually
3.3. Maintaining user speed limits
3.3.3. Hard capped and suspended accounts
4. Monitoring and collecting IP Accounting usage information
4.1. How does HeroTill know which queues to check?
4.2. IP Accounting Processing log
4.3.3. Router Scheduler Script and FTP (Scheduled file dumping)
5. Managing user IP address assignments
5.1. Adding IP Pools to a router
6. Creating IP Accounting user accounts
7. IP Accounting based billing
1. Overview
HeroTill normally uses radius accounting to
track the data usage for each individual user. This means that there needs to
be a radius account in HeroTill as well as a PPPoE authenticated radius session
on a router on the network. HeroTill then reads the FreeRADIUS generated
accounting info to process usage, and auto blocks the PPPoE account from
authentication once it is capped, so uses radius speed attributes to throttle
the user once a soft cap limit has been reached.
When IP Accounting is used, there is no
PPPoE dialup and no FreeRADIUS session involved. This means that the usage
information is pulled from the High site router the user is connected to. This
is done by using the MikroTik IP Accounting feature, which maintains a table in
memory for each source and destination IP Pair.
Speed limits are enforced by creating
static queues for each radius user’s fixed IP on a specified breakout router. Once
a user has reached a soft or hard cap limit, the static queue needs to be
adjusted accordingly. For this to work each HeroTill radius user accounts that
use IP Accounting must have a fixed IP address assigned. To ensure no
conflicting IP addresses are used, IP address lists will be maintained and
assigned to individual High site routers. User accounts will then be able to
select available IP’s from these lists.
Capped and suspended accounts will be
blocked by a firewall rule on the breakout routers, which will redirect traffic
from all users in special capped or suspended address lists. This means that
it is crucial that all router firewalls are setup correctly.
2. Enabling the IP Accounting module in HeroTill
The IP Accounting module can be turned on
or off on a global level. If the module is disabled, there will be no IP
Accounting switches or settings visible on the system.
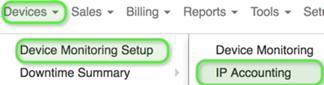
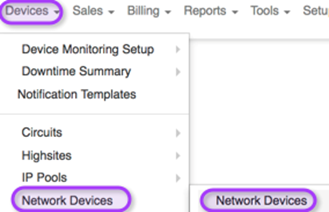
To enable the IP accounting module in
HeroTill, go to “Devices” – “Device Monitoring Setup” and then click on the
“IP Accounting” option.
You will see the following on the screen
once it has finished loading:
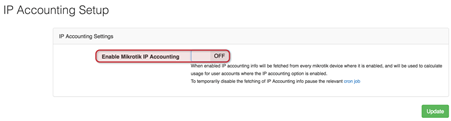
Click on the “Enable
MikroTik IP Accounting” button to enable the module. After the MikroTik
IP Accounting function has been enabled, more settings will appear. Carefully
read through the text in the blue section before continuing with the module setup.
2.1. IP Accounting Settings
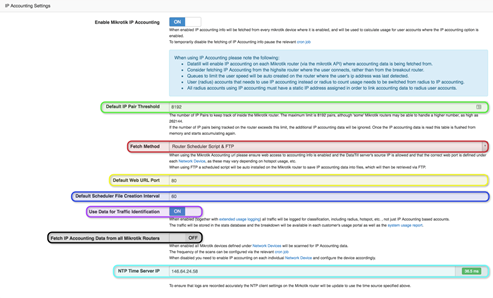
2.1.1. Default IP Pair Threshold
Here you can add the IP Pair Threshold. If
the router is old or has outdated firmware, the threshold will be lower. New
routers tend to be able to take a higher threshold. It is advised to always
allow the maximum number of IP Pairings. Please see section 3 for more
information.
2.1.2. Fetch Method
There are three distinct methods available
to fetch IP accounting information from the routers:
- · MikroTik API·
- Router Accounting URL·
- Router Scheduler Script and FTP.
The “Fetch Method”
chosen is used as the default for all routers, but can be overridden on
individual routers is required. For more information on which fetch method to
choose, please refer to section 4 (Monitoring and collecting IP Accounting usage information).
2.1.3. Default Web URL Port
This section is only applicable should you
choose to use the Router Accounting URL as your preferred fetch method. The
default port will always be on 80. In the case that you have made any manual
changes to the router, please remember to adjust the port in the IP Accounting
set up to the correct port.
Once the default port has been set, it will
automatically pull through to all new devices that are installed onto the
network. Please note that this is only the default port number and that
individual routers on the network can have different port numbers
2.1.4. Default Scheduler File Creation Interval
This section is only applicable should you
choose to make use of the Router scheduler script & FTP setting fetch
method. This number equals the number of seconds you would like to extract
data for. Ideally, this number should not be higher than 60 (1 minute) as the
systems cron job interval is 60 seconds.
In short, the shorter the time is set for,
the more files the script will extract from the router which will lead to more
processing and strain on your server. However, you should know that the less
files are extracted over a longer period of time (depending on how busy the
line is versus the amount of time set), the more your chances are or losing
traffic data.
2.1.5. User Data for Traffic Identification
If enabled, the IP accounting data will be
analysed and classified like net flow data classification. This adds
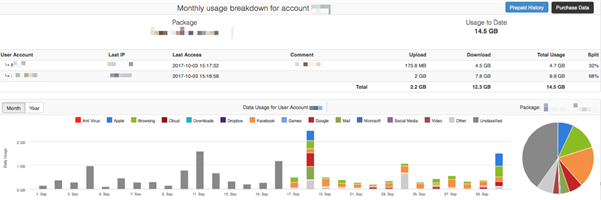
additional depth to the user control panel by tracking data to specific fields
such as Apple, Browsing, Facebook, Google, Mail, Video, Other and Unclassified.
The intensity of the analysis can be
configured under the extended logging system settings. Please note that this
will however add significant processing overhead to the server.
2.1.6. Fetch IP Accounting Data from All MikroTik Routers
With the IP Accounting module, you can
choose whether you want to enable the IP Accounting for only certain routers or
for all routers. Please note that if a High site router is assigned to a
specific user who has the IP Accounting enabled, that the IP Accounting will
then be automatically be enabled for the High site router.
2.1.6.1. Enable All MikroTik Routers
If you would like to enable the “Fetch IP Accounting Data from all MikroTik Routers”
toggle switch. Once enabled, a scheduled job will try to pull accounting
information from all MikroTik routers defined in the system.
2.1.6.2. Enable individual MikroTik Routers
For more information on how to enable and
disable individual MikroTik routers, please refer to 3.1 and 3.2.
2.1.7. NTP Timer Server IP:
All files that are exported from the router
will be saved onto a local server and the file name will be saved with a
certain date and time. This means that the date and time on the router should
be set up correct to ensure that the files are not saved incorrectly. To do
this, you will need to have a time server set up. It is preferred that the
time server should be within your network. After your time server is set up,
add the IP address to the NTP Time Server IP field and click on the update
button. Please note that this is a mandatory field for all ISP’s using the IP
Accounting module.
Should you choose to only enable individual
routers, you will need to update each router by clicking on the “Update
Router” button to ensure that all the settings have synced to the router.
When clicking on the “Update Router” button, the NTP time setting will
automatically be added to that individual router.
2.2. Capped Page setup
All capped packages that run through the IP
Accounting module, will be managed by a router or different routers (depending
on your infrastructure). These routers will usually be your breakout routers.
For the IP Accounting module to successfully cap packages, you will need to
configure the firewall on your router(s). If the firewall on your routers are
not configured, you will not be able to cap the customers and they will be able
to continue to surf the internet.
We suggest that you set up your routers
firewalls in one of the following ways:
- · Either block the customer off the internet.·
- Redirect the customer to a hotspot which will enable them to top-up.·
- Redirect the customer to a proxy with a static page.

|
Green: |
In the green section, you can choose |
|
Red: |
In this section, you will add a name for |
|
Yellow: |
Here you will select the routers on which |
2.3. Dynamic IP Queue Setup
Just like with your capped page setup, your
queue setup will also take place through your breakout routers. If the routers
are not setup correctly, the customer’s speed limits will not be enforced.
When configuring the router, you can set up the capped and speed queues on the
same router or on different routers.

|
Blue: |
In this section, you can choose whether |
|
Purple: |
In this section, you will add a name for |
Please note that HeroTill has a background
job that resets all queues to their original state every 5 minutes. After
your changes has been made, please click on the “Update”
button to save your changes.
3. MikroTik router configuration management:
HeroTill will automatically periodically check all routers set to use
IP accounting and enable the settings on the router if it is not enabled. If
the schedule script method is enabled, then HeroTill will also verify that the
script and correct schedule is defined on the various routers.
To find a list of all network devices, go to “Devices” – “Network Devices” and then click on the “Network Devices” option.
After the screen is finished loading, look for the router that you would like to enable to IP Accounting functionality
for. Once you have found the router, click on the blue edit button found on the right-hand side of the screen.

3.1. Enabling routers individually
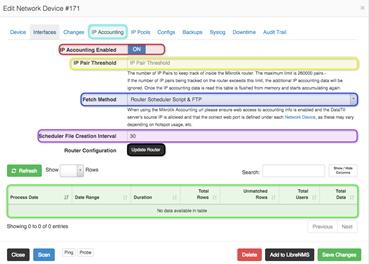
After clicking on the edit button found on
the right-hand side of the device, you will the following pop-up screen. Click
on the “IP Accounting” tab to start editing the specific router properties.
|
Red: |
In this section, you can enable the IP |
|
Yellow: |
Here you can add the IP Pair Threshold. |
|
Dark blue: |
In this section, you can choose the fetch |
|
Purple: |
This is where you need to add the |
|
Black: |
After filling in all the details, it is |
|
Green: |
In this section, you will be able to view |
After all details have been filled in and you have clicked on the update router button, click on the “Save Changes” button.
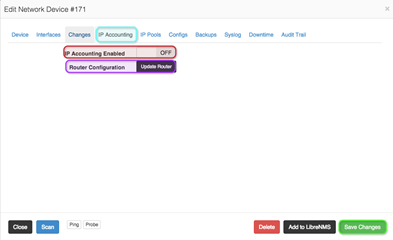
3.2. Disabling routers individually
After clicking on the edit button found on the right-hand side of the device, you will the following pop-up screen. Click on the “IP Accounting” tab to start editing the specific router properties.
|
Red: |
To disable the router for IP Account |
|
Purple: |
Click on the “Update Router” |
|
Green: |
After your changes has been made and you |
3.3. Maintaining user speed limits
It is important that all queues and caps are
properly setup on the breakout router as the customer’s queues and cap will be
managed through the customer’s IP address. Even though helpdesk agents can
adjust the customer’s queues, HeroTill runs a background job that resets all
queues to their original state every 5 minutes.
HeroTill will only allow the following factors to influence the customer’s queue:
- · Package changes
- · Capped packages
- Top-ups
- · Uncapped packages
- · Soft capped packages
- · Adding new accounts
- · Expiring accounts.
3.3.1. Capped Accounts
HeroTill will ensure that an IP based queue is created on these routers for every IP Accounting based user account. Once a user account’s speed is adjusted in HeroTill, is capped or reaches a soft limit, their queue will be adjusted accordingly on these routers. As the ‘queue maintenance’ is run as a background job it may take up to two minutes
before speed limits are adjusted in line with the package changes made to the user account.
3.3.2. Sub Accounts
When sub-user accounts are created in HeroTill (for example a home and business account share the same package) then both accounts need to share the same data and speed limits. In these scenarios, a queue with multiple IP addresses will be created. This multi IP queue will include the IP address of the parent account, as well as the IP address of each child account. MikroTik will then enforce the speed limit across these accounts, assuming all the accounts use the same breakout router.
3.3.3. Hard capped and suspended accounts
Accounts that need to be blocked (hard capped, suspended and expired) will use a firewall rule on the breakout router to redirect the user to a web proxy page displaying a static age. To achieve this HeroTill will automatically add or remove capped and blocked user IP addresses from specific address lists used by the firewall rules, on the
breakout routers.
4. Monitoring and collecting IP Accounting usage information
To read IP Accounting usage information,
the MikroTik router where the user connects, needs to have IP Accounting
enabled. Once enabled, the router will keep a memory table of IP pairs,
containing the source and destination IP’s, as well as the data consumed.
After this data is read, the table will be cleared.
This table has a finite limit of only 8192 pairs. Note that some routers allow
a larger value of up to 262144 entries. Once the limit is reached the
additional IP pair information is discarded, so it is important to read this
information frequently enough so that the limit is not exceeded and no
information is lost.
4.1. How does HeroTill know which queues to check?
On the router, you will be able to find a
list of all queues. All the queues, for each IP accounting user, will have a
unique identifier in the form of a pre-fix. HeroTill will only look at the
queues that start with DT_AUTO_QUE_USERNAME OF CUSTOMER ACCOUNT.
Please note that you can only have one
queue per IP address. If you have more than one queue per IP address, then HeroTill
will eliminate the IP address and que that does not have the unique identifier
pre-fix. When setting up the user account and IP, you will need to ensure that
you only choose IP’s that are allocated to the IP Accounting pool. All user
accounts with IP’s outside of this pool will also be eliminated.
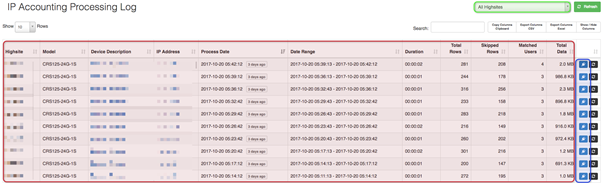
4.2. IP Accounting Processing log
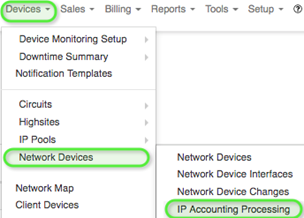
To view the IP Accounting processing log, go to “Devices” – “Network Devices” and then click on the “IP Accounting Processing option”.
Once the screen has loaded, you will see the following:
|
Green: |
Here you can choose to only see data |
|
Red: |
In this section, you will be able to see |
|
Blue: |
Click on this button to view the specific |
4.3. Choosing a fetch method:
As previously mentioned, there are three methods in which HeroTill can retrieve the IP Accounting information from the relevant MikroTik routers:
- · MikroTik API
- Router Accounting URL
- Router Scheduler Script and FTP
4.3.1. MikroTik API
HeroTill will log into the router via the MikroTik API and then retrieve the IP Accounting table data stored on the router.

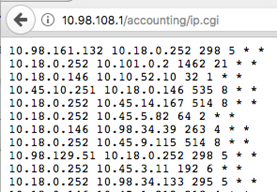
4.3.2. Router Accounting URL
HeroTill calls a local URL on the router, which will return a csv based contents of the IP Accounting table data.
HeroTill will automatically set the IP Accounting URL.
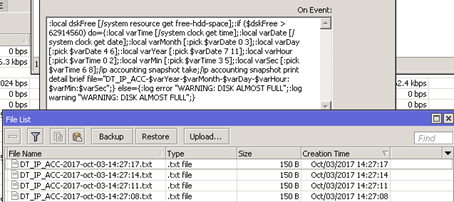
4.3.3. Router Scheduler Script and FTP (Scheduled file dumping)
A local script is created on the MikroTik router
that dumps IP Accounting data to a local file every few seconds (30-60). The
script checks available free disk space to ensure that it will not dump data if
there are less than a predefined amount (2MB) of disk space available.
HeroTill then uses FTP (File Transfer
Protocol) to retrieve the files from the router, and deletes the files once
they are downloaded to the server. The last file on the router will always be
skipped, in case the file is still being written to at the time of download.
4.3.4. Suggested method
All the above methods can be used, either
exclusively or in combination. It is however preferred that the scheduled file
dumping option is chosen as it is the last likely to result in lost usage data
due to the memory table limit being reached. To facilitate the accurate
configuration of the script and scheduler on the routers, HeroTill will auto
configure the relevant routers when this method is chosen.
Once the usage data has been collected, it
is processed exactly like radius based usage information. One of the IP
addresses from the IP Pair is matched to a radius account using the fixed IP
address assigned to each of the IP Accounting based user accounts. Data is
then summarised on a daily and monthly basis, and made available in the end
user’s usage portal just like Radius, Fibre and LTE based usage data.
If extended logging is enabled within
HeroTill then the remote IP addresses are used to identify and classify the
data usage (Dropbox, Facebook, YouTube, etc.), like the way net flow data is
analyzed. This allows the customer to view a breakdown of data usage in their
end user portal. Please note that the extended logging may be very resource
intensive on your HeroTill server.
5. Managing user IP address assignments
Every IP Accounting based user account must
use a fixed IP address. Two users cannot share the same IP address, as the
system will then be unable to allocate data usage to the correct account.
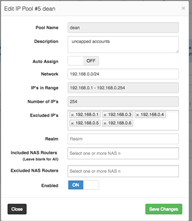
5.1. Adding IP Pools to a router
To add an IP Pool to a router, edit the router properties of the specific router that you would like to work on. Once
the pop-up screen has loaded, go to the “IP Pools” tab.

|
Blue: |
To add an IP Pool to the router, click on
|
|
Purple: |
In this section, you will be able to view
|
|
Green: |
After making any changes, remember to |
5.2. High site IP ranges
One or more IP subnets will be assignable to each High site router from within HeroTill. The system will automatically count the number of available IP addresses, and the admin user will be able to exclude reserved IPs from the list of selectable IP addresses, like for example equipment on the High site such as cameras and power monitors.
5.3. User IP Allocation
When IP Accounting user accounts are created, the High site where the user will connect must be selected. Once the
High site has been chosen, the list of available subnets will be available for selection. Once a subnet has been chosen, a free IP can be selected form the list within that subnet.
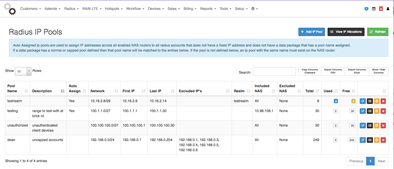
5.4. IP Exclusions
HeroTill will automatically keep track of which IP’s are already in use amongst all the IP Accounting user accounts, and will prevent you from selecting an IP that is in use (already allocated) or excluded from selection. IP addresses assigned to other network devices (routers, radios and power monitors) will also be excluded form selection.
HeroTill will also indicate whether the IP address selected is live on the network, by doing a ping test.
The method of managing these IP ranges will be like the way Radius IP pools are being managed.
6. Creating IP Accounting user accounts
IP Accounting based user accounts are created the same as radius accounts. On the create user pop-up window there is a selector to choose between radius or IP accounting based data traffic counting. (Note that this option is only visible if IP accounting has been enabled in the system)
To create the IP Accounting user account, go to the customer profile (“edit customer” screen) and then “add” a new user account in the “Radius Data Package” section.
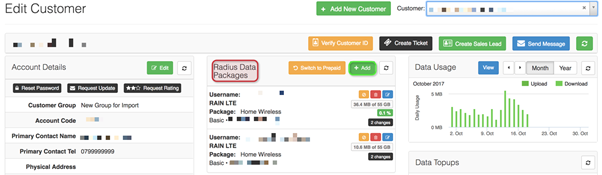
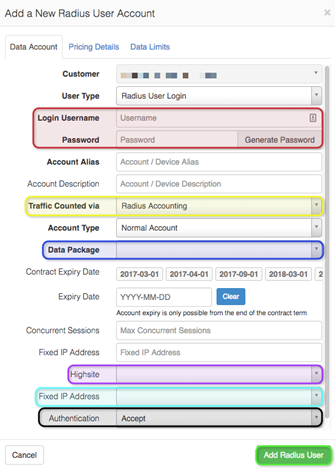
After clicking on the “add” button, you will see the following screen:
|
Red: |
In this section, you will add the |
|
Yellow: |
In this section, you will need to choose When adding a normal radius account, you
|
|
Dark blue: |
Here you will choose the data package as |
|
Purple: |
The next step will be to choose the high |
|
Light Blue: |
Here you will be able to select and IP |
|
Black: |
Always ensure that the authentication is |
|
Green: |
When all details have been filled in, |
Data package selection, pricing and top-up settings are done in the same way as which you would have added these settings for a normal radius account. Please note that when adding sub-accounts, that they need to follow the same traffic counting method as the parent account.
When IP Accounting is selected, a High site device and fixed IP address must also be selected. The High site selected here is the one where the user must connect, and is where the IP accounting data for this user will be tracked.
7. IP Accounting based billing
7.1. Monthly billing
Billing for IP Accounting based user accounts is identical to other data accounts like radius, LTE and OpenServe. Monthly recurring billing is generated from the data package cost, and can be overridden on an individual basis.
7.2. Suspensions
When IP accounting based users are suspended, the user’s IP address is added to a blocked account address list, on
a designated router. A firewall rule on that router needs to be configured so that any traffic from any IP in that address list is redirect to a proxy page indicating a suspended accounts message.
If multiple breakout routers are in use then the address lists will need to be auto maintained on all these routers.
7.3. Capped accounts
Similar to suspended accounts, hard capped
account IP addresses are also added to a central address list on the breakout
router, where a similar firewall rule needs to redirect the user to a similar
page showing that the user’s cap has been reached.
Download
Click the link below to download the IP Accounting Guide: