1. How to get to the Adjustment Section
When HeroTill has finished loading, your screen will look like this:
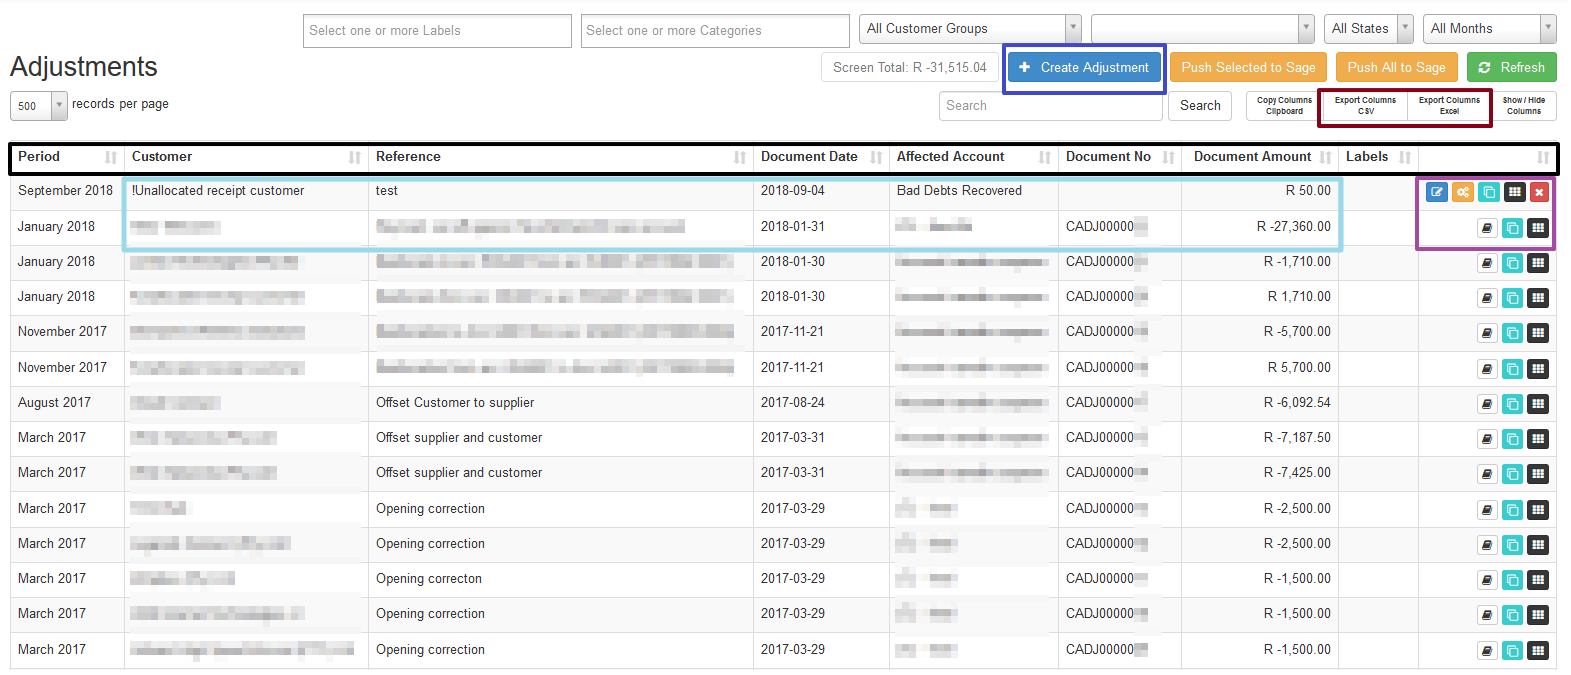
| Black: |
These are the headings under which the information is sorted. Remember that each heading works as a filter function. |
| Light blue: |
These are the specific details related to each adjustment. It consists of the customer name, the reference used, document date, the affected account and then the document amount. Only once the adjustment has been pushed through to sage one, will there be a document number. |
| Purple: |
If you need to edit the document after creating it, click on the dark blue button in the purple section. If you want to delete the document, click on the red cross. To send the adjustment to Sage One, click on the orange button. To view the customer’s profile, click on the black button. Please note that once a document has been pushed to SageOne, it can’t be edited again. The white button is to view an already pushed adjustment document and the light blue is to clone an adjustment document. |
| Brown: |
To export a list of adjustments, click on the export to CSV or export to Excel button. Remember, the exported document will only show a list as long as the number of customers you view on the screen. Change this by changing the number of records per page filter as well as any other filters or search criteria. |
| Blue: |
To create a new Customer Adjustment, click on the “Create Adjustment” button. |
1.2. Creating the adjustment:
Click on the “Create Adjustment” button to create a new adjustment.

You will now see the following pop-up screen:
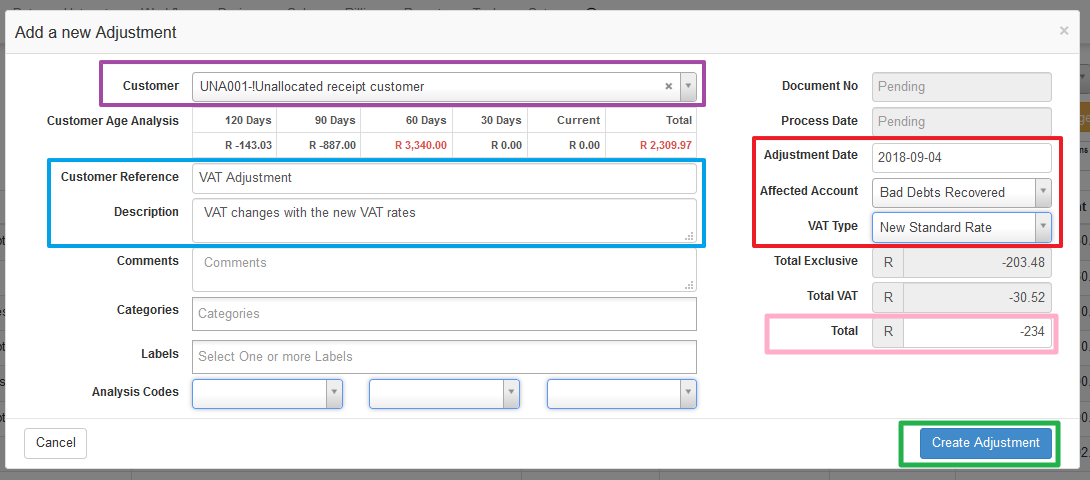
| Purple: |
Here you choose the applicable customer. Once you’ve chosen the customer, his or her Age Analysis will automatically pull through. |
| Blue: |
The customer reference and description are important. Choose a reference that is applicable to why you are doing the adjustment and in the description field, you can explain or give a reason for the adjustment being made. It is best to provide as much detail as possible. |
| Red: |
Here you choose the date of the adjustment, the account it is affecting and the VAT type that is applicable to your adjustment. The default VAT type will mostly be your default VAT rate set up in your billing setup. |
| Pink: |
This is the total amount that is applicable to your adjustment. It is important to remember that should you want the specified account to decrease, to add a minus (-) in front of the amount. If you want the specified account to increase, only type the amount, without any added symbols. |
|
Green: |
When you’ve finished filling in all the details, click on the “Create Adjustment” button. |
1.3. Payment reallocations: Sage One Receipts erroneously allocated.
*Please note that the section below is just to provide some direction and doesn’t have to be followed to a T.
While updating the bank on Sage One and allocating payments is a rather easy but timely job, you sometimes have clients who use special references like “Uncapped 2Mbit/s”, “wifi payment”, “wireless install,” “monthly subs”.
All these payments are automatically moved to the “!Unallocated Customer Receipt” customer until we receive the proof of payment from the customer (who will probably be upset because their payment has not yet been allocated to their profile). If you pick this up before the period is closed, the allocation can still be corrected. If the period has been closed off, you will have to make a customer adjustment.
Step 1: Find the original receipt number and total the customer paid.
The payment’s receipt number in Sage One will be used as the reference. To find the receipt number, On Sage One, go to customers – reports – customer transactions. How do you know to which customer the payment has been allocated? You will have to go check in the banking on Sage One for the matching date, amount and reference as provided by the customer. Once you have located the payment, you will be able to see to which customer the payment was allocated to.
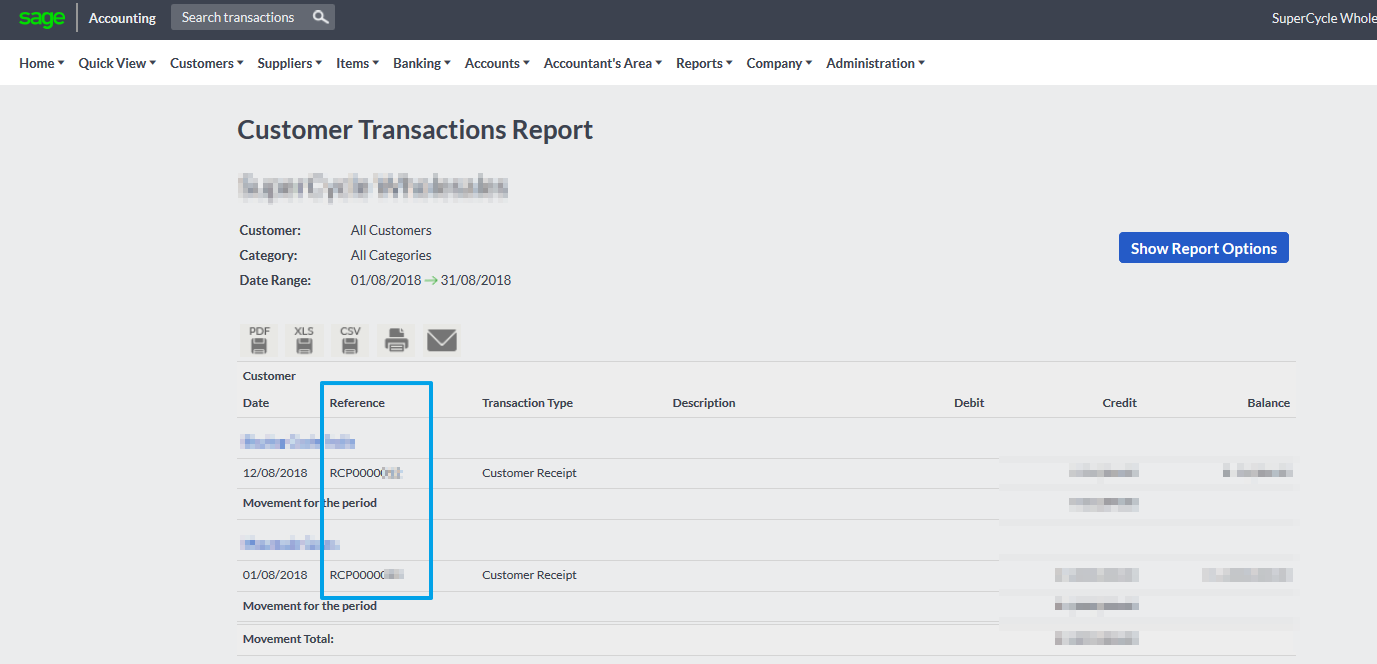
After clicking the refresh button, you will see all transactions for the specific customer. Look for the applicable transaction and then you will find the receipt number and the amount that the customer paid.
Step 2: Get your two adjustment screens next to each other in HeroTill.
In HeroTill, If you want to reallocate payments from one profile to another profile; Open two customer adjustment screens next to each other. This will make it easier for you and will reduce the chance of making a mistake.
Step 3: Start filling in the details.
In HeroTill, When reallocating payments from one profile to another profile, use the “Suspense Transfer Account” and the VAT type will always be “No Tax”. Be sure to remember a minus (-) before the amount, when the profile total has to decrease. When you are done and sure that the two adjustments will balance each other out, press the “Create Adjustment” button on both screens.
![]()
![]()
Step 4: Push the adjustments to Sage One. (Financial managers only)
In HeroTill, When both adjustments have been created, they should lie together on the Adjustment screen. To push both to Sage One, click on both of the orange buttons.

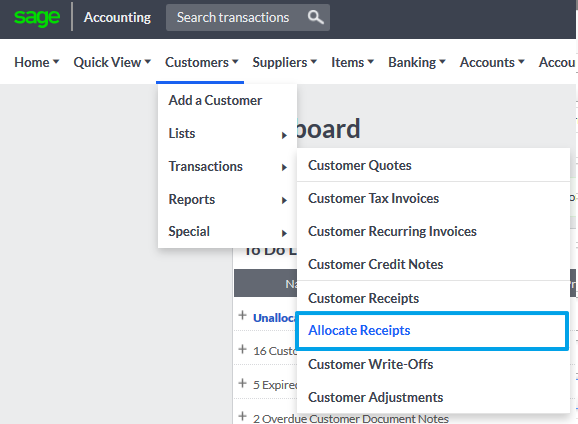
Step 5: Match the Adjustment to the Invoice on Sage One.
On Sage One, Go to Customers – transactions – Allocate Receipts. Choose the customer who’s receipts you want to match to invoices and click on the refresh button. As soon as these payments have been matched, you will be able to update the customer’s age analysis on HeroTill and send them a new statement showing the correct balance.