
Month-end billing run:
Webinar: Month-end Billing Run
Video: Billing Run (Part 1)
Video: Billing Run (Part 2)
Step 3: Archive previous invoices
Step 4: Generate recurring billing entries
6.2. Push all to Sage – Invoices screen
6.3. Push all to Sage – Month-end processing screen
6.4. How do I know if the invoices were pushed successfully?
Step 7: Generating Debit Order batch
7.1. Month-end processing screen
7.2. Generate debit batch screen
Step 8: Reconcile and downloading the debit order batch
8.1. Reconcile the debit order batch
8.2. Editing Debit Order amounts
8.3. Updating the batch after any changes have been made
8.4. Download the debit order batch
Introduction
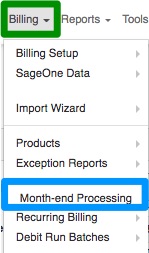
The purpose of this document is to serve as a guideline for completing the monthly billing run that needs to take place. There are eight steps in completing this process and all steps are explained below. To get the process started, go to “Billing” and then click on the “Month-End Processing” option.
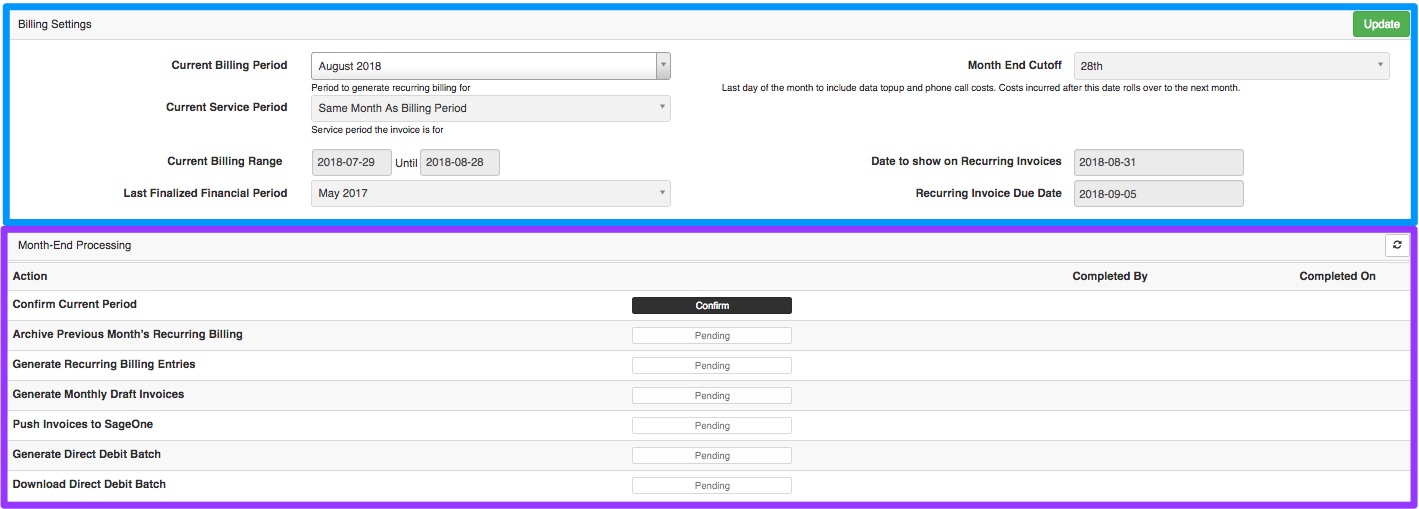
On the month-end processing screen, you will see all the necessary “information” that needs to be completed as well as the “steps” that need to be taken to complete the billing run.
Remember that should you feel the need, you can run this process twice in one month. All customer who have already been successfully billed, will not be billed for a second time.
Step 1: Set the dates
Start the billing run by setting and checking that all the dates are correct. Once you are done, click on the “Update” button found in the corner on the right-hand side of the page.

First, you will need to choose the “current billing period”, or in other words, the month for which you would like to do the billing run for. After choosing the relevant month, check that you are happy with the rest of the settings.
| Orange: | This will determine the last date of the month for which invoices should be included. This needs to be determined before you do your first billing run and will then be the same every month as this date influences the billing range. |
| Red: | Here, you will be able to view the current service period. This can either be:
This needs to be determined before you do your first billing run and will be the same every month. |
| Pink: | In this section, you will be able to view the billing range, or date range, for which invoices should be included. This date range is dependent on the day set in the month-end cutoff section. |
| Purple: | Here, you will be able to see what the date on the invoices will be. |
If any of these settings or dates need to be changed, you will be able to do this from your billing setup screen. If you are happy with these settings, click on the “Update” button.
See full guide on the billing settings on the month end processing screen here: Month-End Processing’s Billing Settings Explained
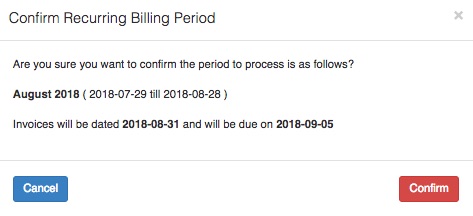
Step 2: Confirm the dates
For the second step, you need to confirm that the dates chosen are correct. You do this by clicking on the “confirm” button.

On the pop-up screen, click on the “confirm” button.
All old invoices from the previous month now need to be archived. You can do this by clicking on the “Archive” button. You will notice that as you complete the billing run steps, they will turn green. You will also be able to see who completed the step as well as the date and time the step was completed.
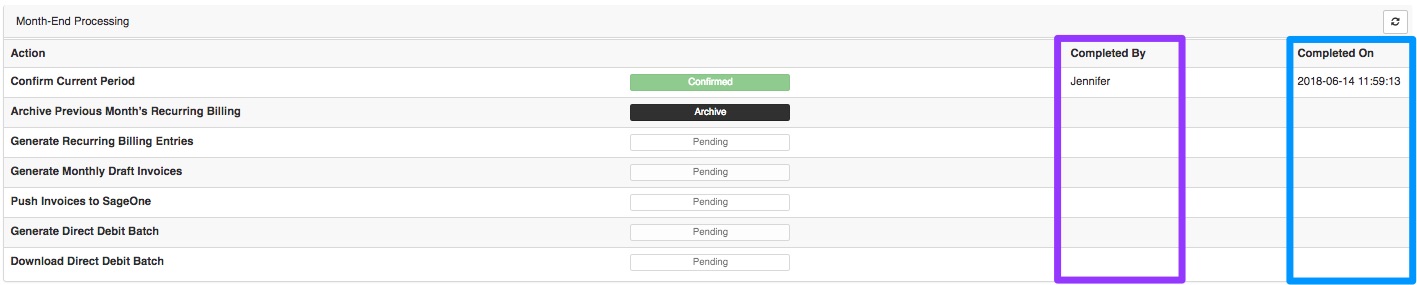
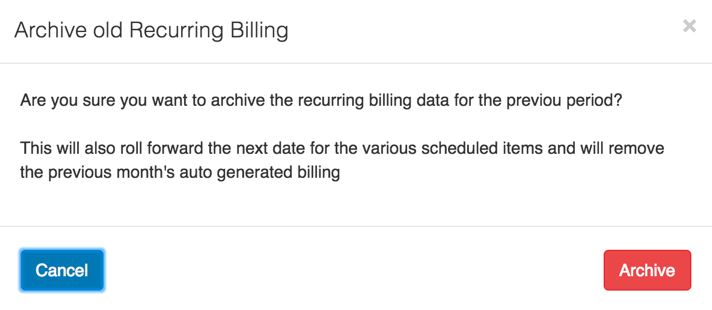
Step 3: Archive previous invoices
After clicking on the “Archive” button, a pop-up screen will appear. Click on the “Archive” button to confirm the action.
Step 4: Generate recurring billing entries.
The next step is to generate the recurring billing entries. This button serves as a refresh function to ensure that all customer’s recurring billing is refreshed and added to the list that needs to be billed. This does not generate draft or actual invoices.

Click on the “Generate Recurring” button and on the pop-up screen on the “Generate Now” button to start the process.
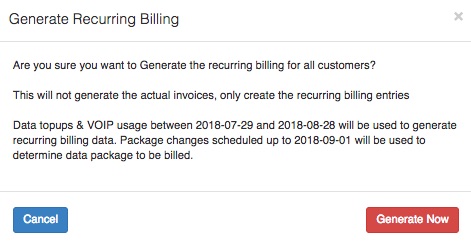
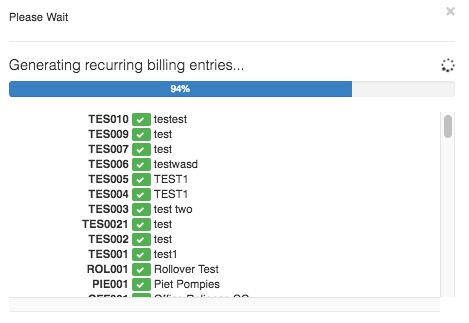
Please note that this will take a while to complete, but that it is crucial to complete this step before generating the draft invoices. Once all customer billing entries have been refreshed, you will see the following:
A list of all the recurring billing entries can be seen by going to Billing – Recurring Billing – Recurring billing entries.
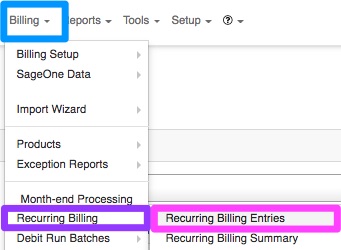
On the screen, you will see the list of recurring items. You will be able to see on which customer profile the product is, the product as well as the price for the product. The “Generate Billing” button in the black section, has the same function as the “Generate Recurring” button found at the beginning of step 4.

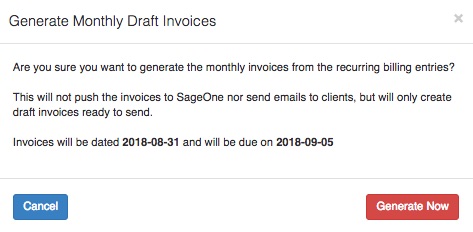
Step 5: Generate Invoices
After all billing entries have been refreshed, it is time to generate the DRAFT invoices. All the monthly invoices will now generate, but they will not be sent to the customer yet and can still be edited if needed. Click on the “Generate Invoices” button.

Next, you will need to click on the on the “Generate Now” button found on the pop-up screen.
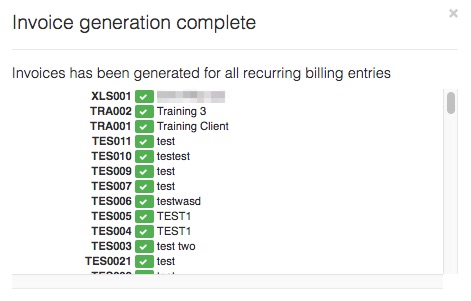
Once all the draft invoices have been generated, you will see the following screen.
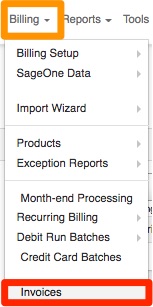
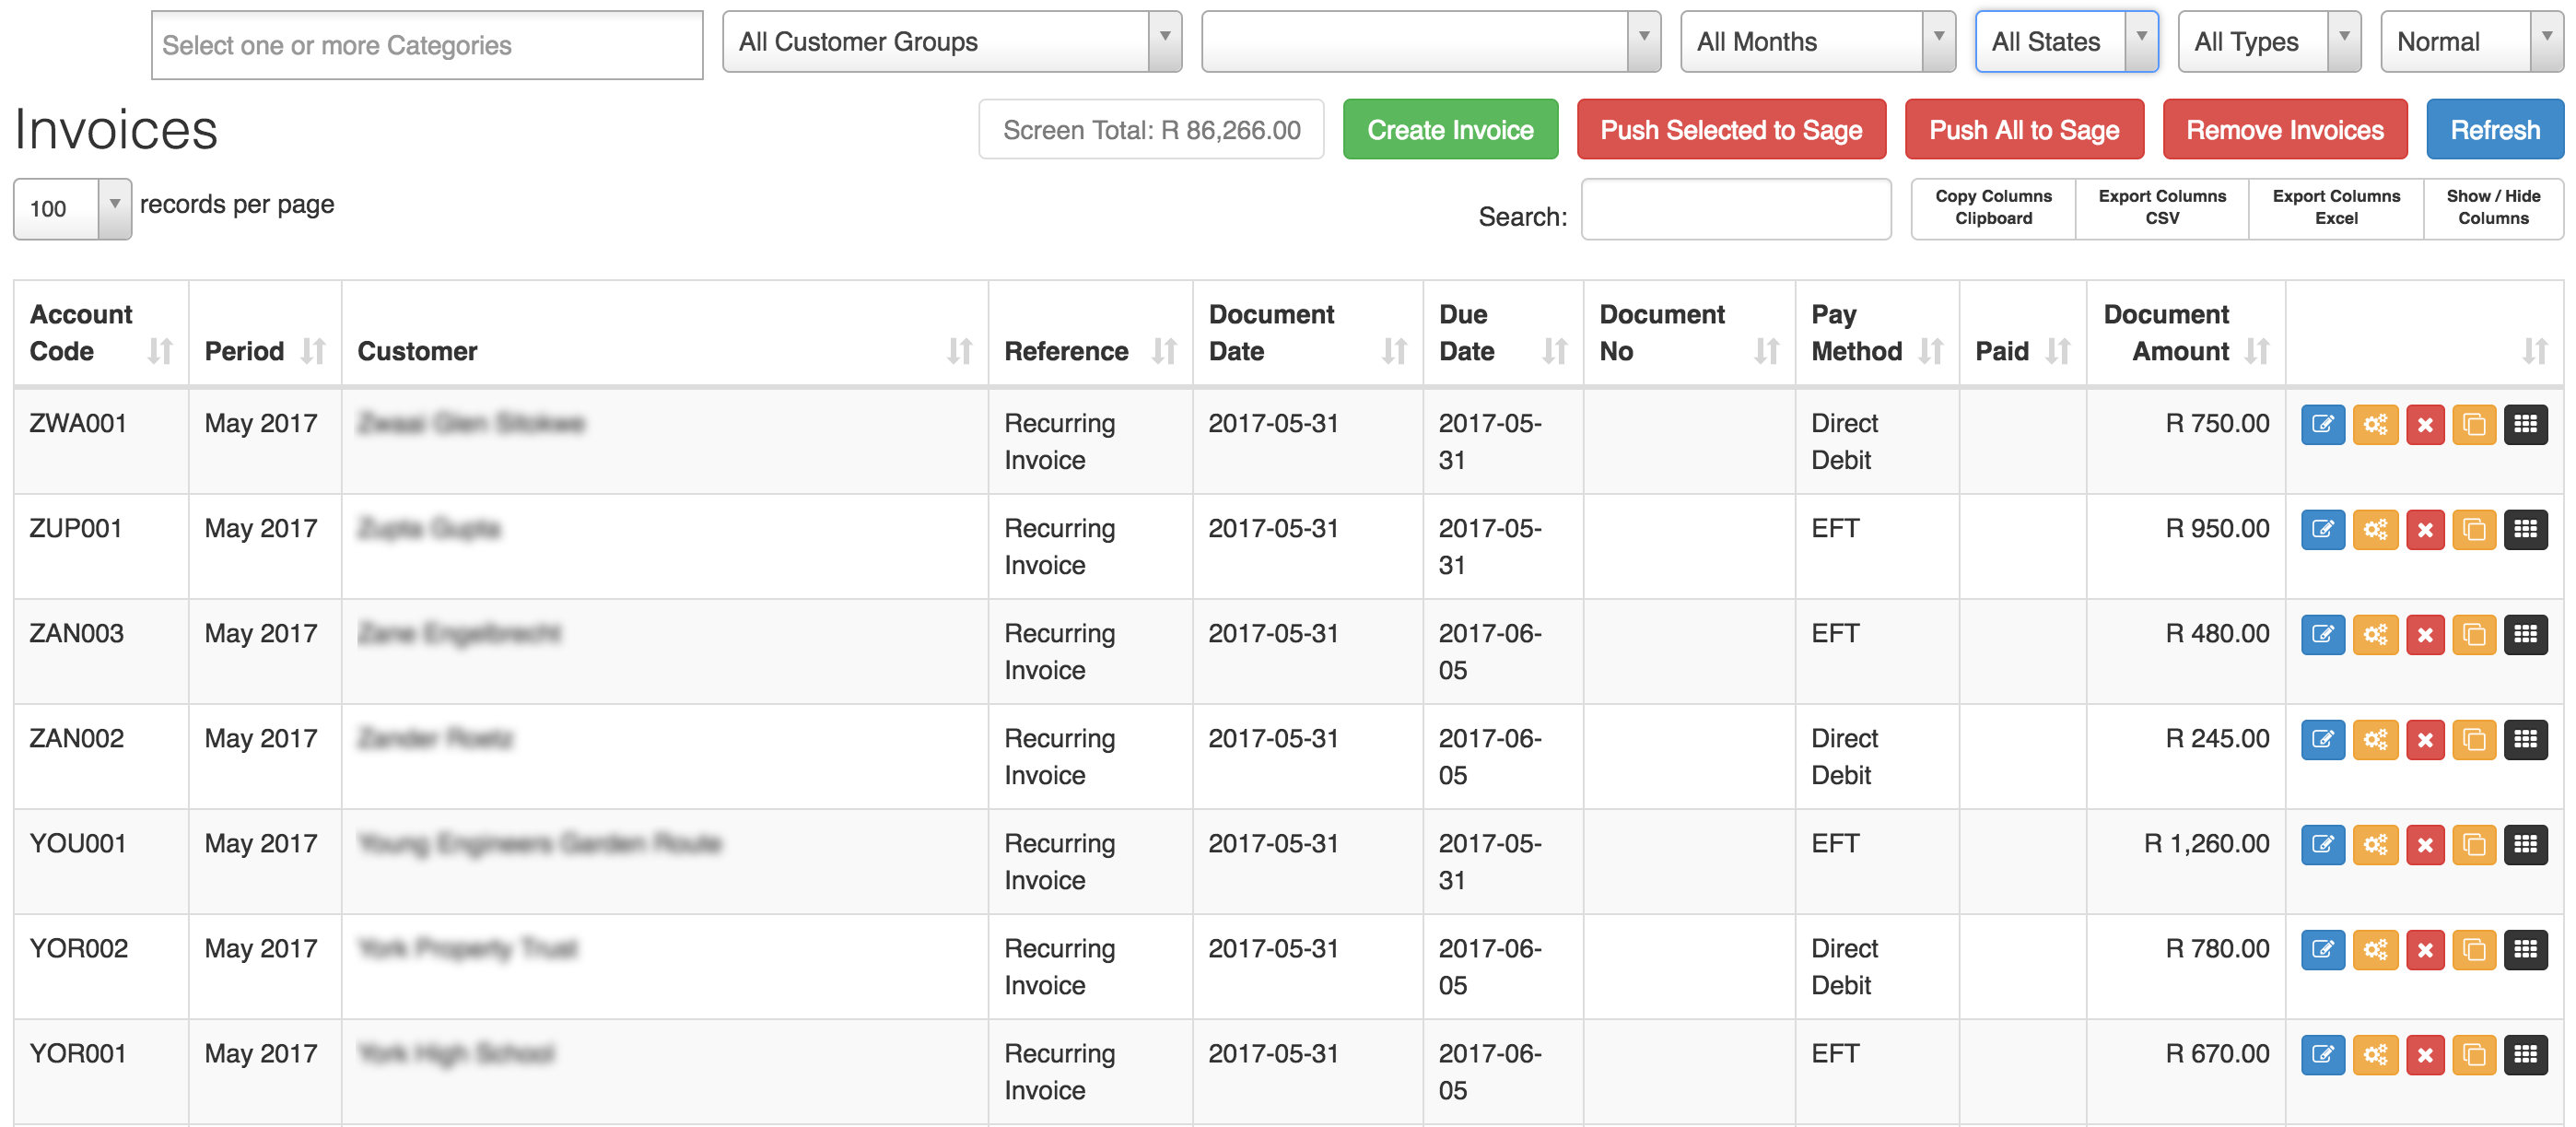
A list of all DRAFT invoices can be found by going to “Billing” – “Invoices”.
Once the screen is done loading, you will be able to see all the draft invoices that have been generated
Step 6: Push to Sage
After all invoices have been checked, the draft invoices need to be pushed to SageOne. Once the invoices have been pushed to SageOne, the invoice will be sent to the customer and you will no longer be able to edit the invoice. There are three different ways in which these invoices can be pushed to SageOne.
For quality control purposes, it is advised that the invoices be pushed to SageOne in different batches by making use of the different “labels”, “categories”, “billing groups”, “customer groups” or pushing invoices to SageOne via specific payment methods.

6.1. Pushing selected to Sage
The first red button at the top of the screen, will allow you to “Push Selected to Sage”. Please note that this will only push the lines that you can view on the screen. In other words, if you need to push 200 invoices, but you can only see 50 of those 200 invoices on the screen, then only those 50 invoices that you can view will be pushed to SageOne. You can change the number of rows that you can view in the blue section.

After clicking on the “Push Selected to Sage” button, you will see the following pop-up screen. Click on the “Push Now” button to push the selected invoices to SageOne.
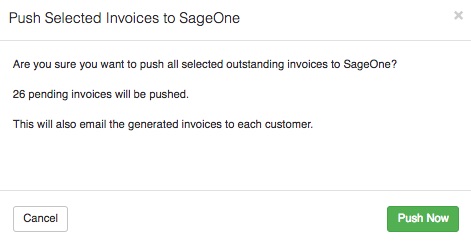
The selected invoices will then start to be pushed through to SageOne.
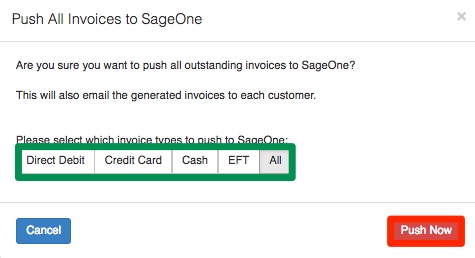
6.2. Push all to Sage – Invoices screen
The second way to push the invoices through to SageOne, is by using the “Push All to Sage” button. This is the second red button found at the top of the screen. With this button, you can either push all invoices at once, or push invoices according to their payment method.

To start, click on the “Push All to Sage” buttxon. On the pop-up screen, choose the payment type you want to push, and then click on the “Push Now” button.
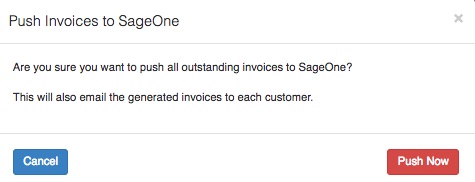
6.3. Push all to Sage – Month-end processing screen
The third way you can push invoices to SageOne, is by sending all invoices at once without doing any quality control checks. Please note that although it is not wrong to do it this way, we would advise that you do quality checks. To push all invoices in this way, go to the month-end processing screen. Once the screen has finished loading, click on the “Push to SageOne” button.

Click the “Push Now” button on the pop-up screen.
6.4. How do I know if the invoices were pushed successfully?
Once the selected invoices have been pushed through to SageOne, you will see a pop-up screen similar to this one.
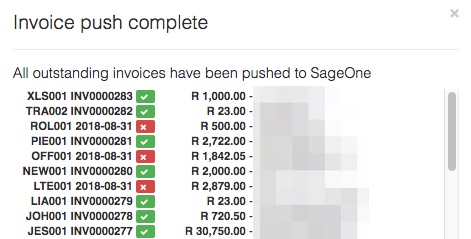
All invoices that have been pushed to SageOne successfully, with be marked with a green tick. All invoices that have not been pushed to SageOne, will be marked with a red cross. If you need any assistance in getting these invoices pushed to SageOne, please do not hesitate to contact our support team.
Step 7: Generating Debit Order batch
After all invoices have been successfully pushed to SageOne, you will need to generate your Debit Order batch(es). You can do this either from the month-end processing screen or die generate debit batches screen.
The system will generate a separate debit batch for each billing run that you have. In other words, if you only have one debit order a month, the system will only generate one debit batch. If you have multiple debit order runs a month, then the system will generate multiple debit batches – one for each billing run.
Please note that when generating your debit batch, that invoices added to previous debit batches will not be taken into account.
7.1. Month-end processing screen:
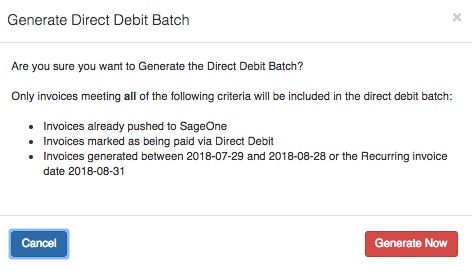
After all invoices have been successfully pushed to SageOne, you will need to generate the Debit Order batch. You can do this by either clicking on the “Generate Direct Debit Batch” button.

After clicking on the “Generate” button, you will see the following pop-up screen. Click on the “Generate Now” button.
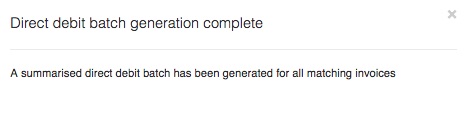
Once the debit order batch has completed generating, you will see the following message.
After the debit batch has generated, you will be able to download the debit batch(es) from the month-end processing screen or the generate debit batch screen (section 7.2).

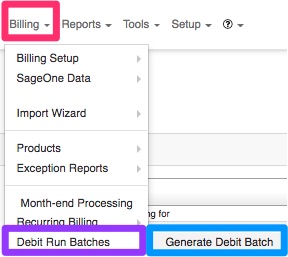
7.2. Generate debit batch screen
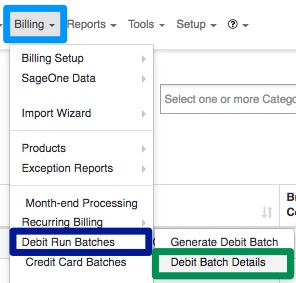
Alternatively, you can generate the debit order batch by going to “Billing” – “Debit Run Batches” – “Generate Debit Batch”.
After the screen has loaded, you will see the screen below. The screen will automatically be filtered according to the specific month’s billing run that you are busy with.

To generate a debit batch from this screen, click on the “Generate Batch” button. You will then see the following pop-up screen:
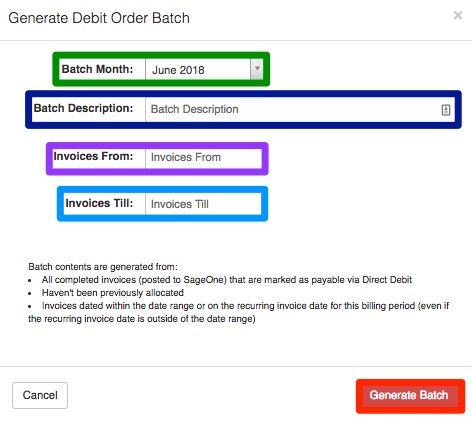
| Green: | Ensure that you have chosen the correct month. |
| Dark Blue: | Give the batch a name:
– For example: September batch 20170801 |
| Purple: | Select the first dates from which all invoices need to be included. You can view this date on the month-end processing screen. |
| Light blue: | Select the last date for which invoices need to be included. You can view this date on the month-end processing screen. |
Please note that all your recurring invoices will be allocated to this batch, even though they are outside of the “Invoices Till” date. After completing the details, click on the “Generate Batch” button.
To download your debit batch, please refer to section 8.4.
Step 8: Reconcile and downloading the debit order batch
8.1. Reconcile the debit order batch
Before downloading and submitting the debit order batch, you will need to check the list for any irregularities as well as ensure that all requested changes have been brought into effect. To do this, go to “Billing” – “Debit Run Batches” – “Debit Batch Details”.
On the following screen, you will see a list of all debit orders that have previously been processed.
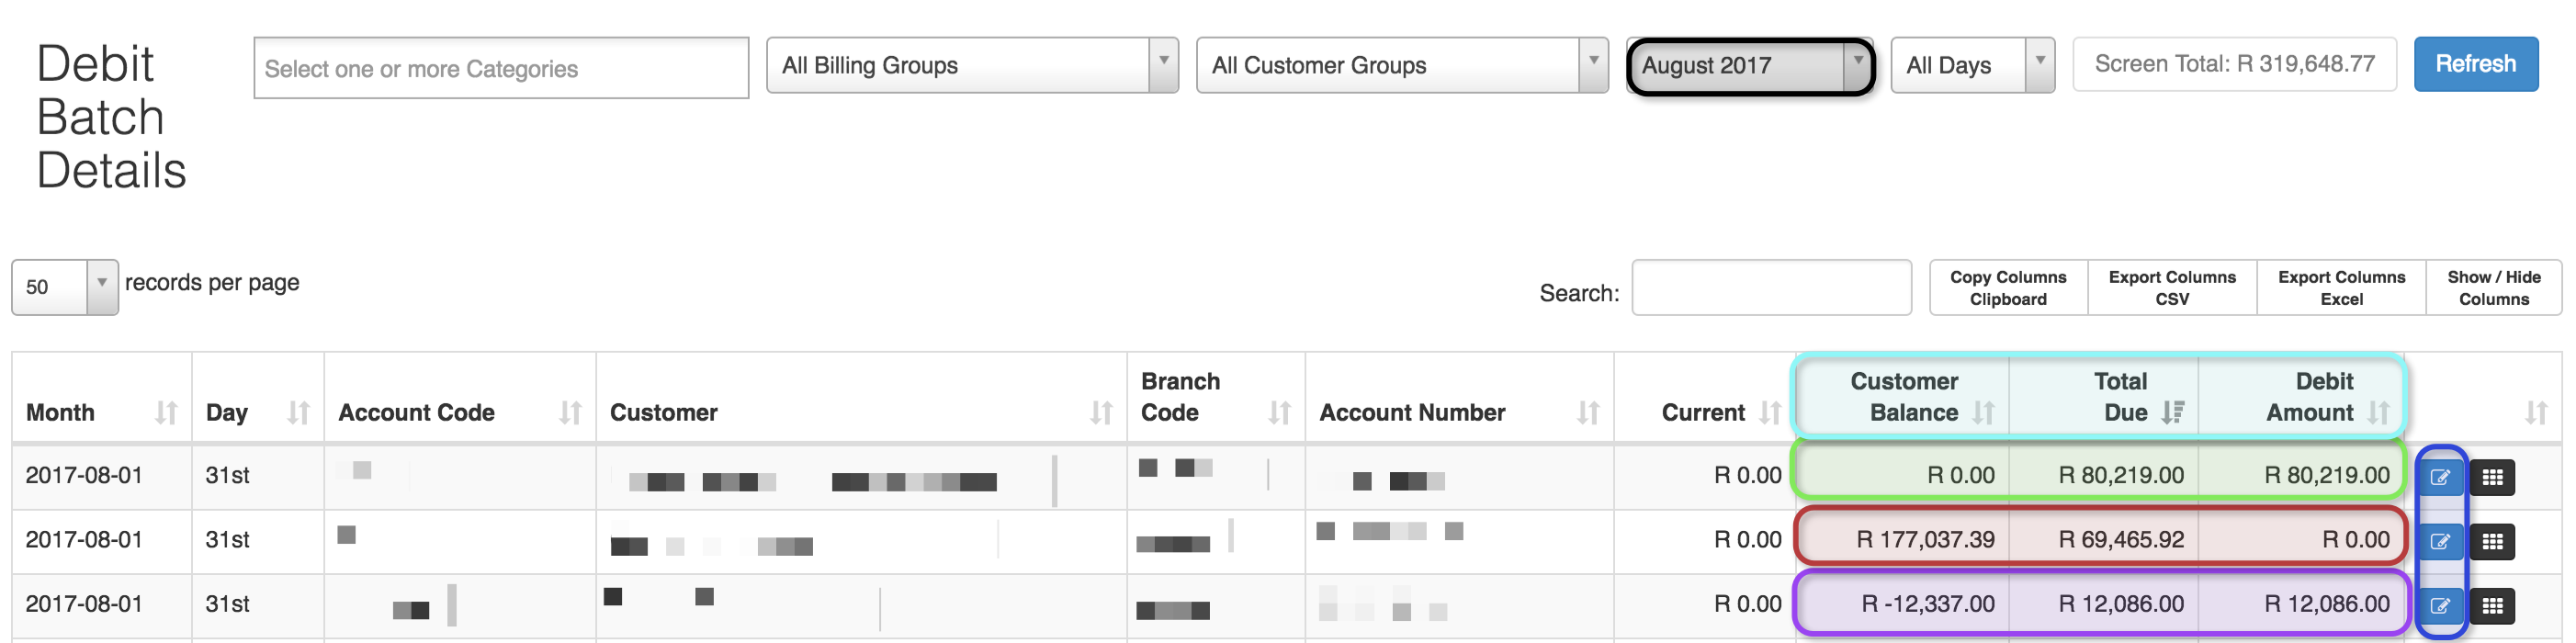
| Black: | In this section, you need to choose the date for the debit order details that you want to view. |
| Light Blue: | Customer Balance:
This is the customer balance according to the age analysis. Remember, that this amount should be considered before debiting the customer’s account.
Total Due: This is the total amount due for all Debit Order invoices generated on the customer profile in that month.
Debit Amount: This is the amount that the customer’s account will be debited with. The debit amount should always be checked as it doesn’t take the age analysis into account. |
| Green: | This is an example of a perfect debit order line item. You can see that the Total Due is the same as the Debit amount. |
| Red: | In this section, you can see an example of a debit order line item that is incorrect. The “Customer Balance” and the “Total Due” amount both suggest that a debit order needs to be submitted for the customer, but in the “Debit Amount” block, you can see that no debit order will be submitted for the customer as the amount entered is R0. |
| Purple: | In this example, you can see in the “Customer Balance” section that the customer has credit. You can also see that the credit is more than the “Total Due” amount. This means that the customer’s “Debit Amount” should be changed to R0. |
| Dark Blue: | In cases where you need to change the customer’s “Debit Amount”, you can click on the “Edit” button to change the amount. |
8.2. Editing Debit Order amounts
In cases where you need to edit the customer’s debit order amount, look for the customer and then click on the edit button found on the right-hand side of the screen. After you have clicked on the edit button, you will see the following pop-up screen.
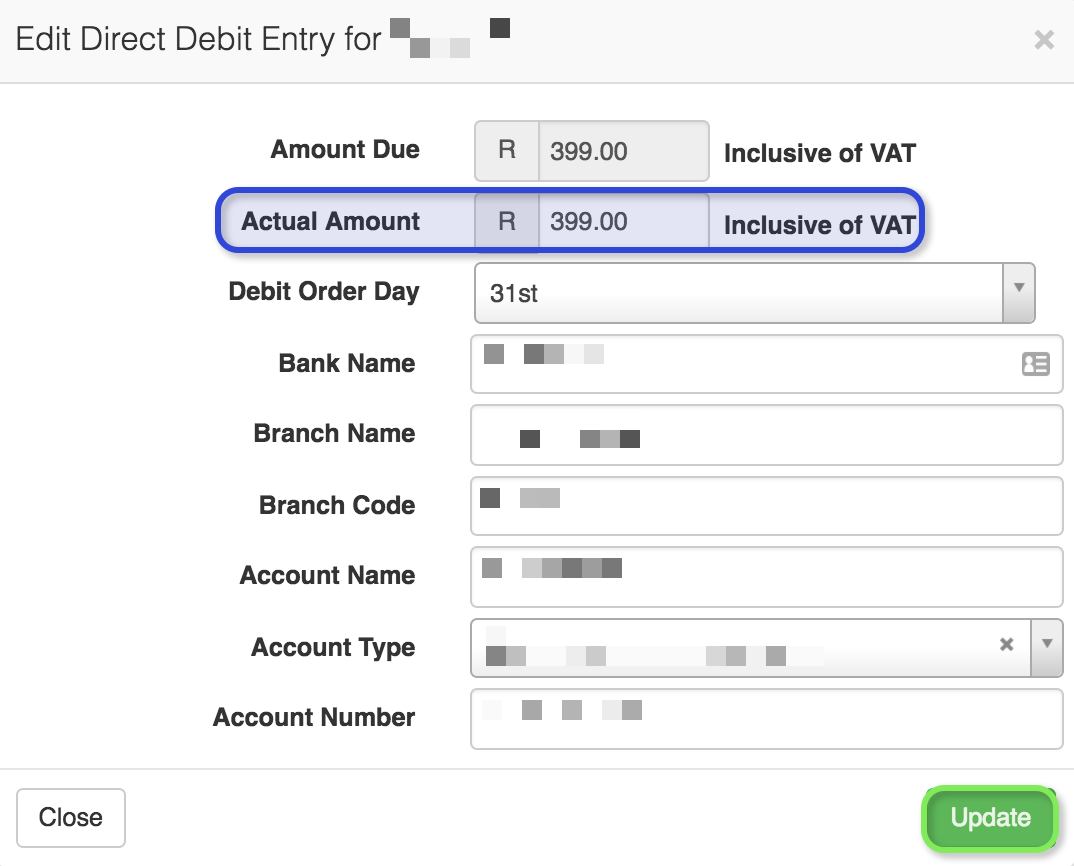
Edit the “Actual Amount” to the amount that this should be and then click on the “Update” button. One would usually edit the debit order amount for customers who have credit on their profiles or customers who have special payment arrangements.
8.3. Updating the batch after any changes have been made
After any changes have been made debit order amounts, you will need to re-generate the batch. To do this, go “Generate Debit Batches”. When the screen is done loading, look for the debit order batch you want to regenerate and then click on the orange button found on the right-hand side.

After clicking on the “re-generate” button, you will see the following button. Click on the “OK” button if you are sure that you want to re-generate the debit batch.
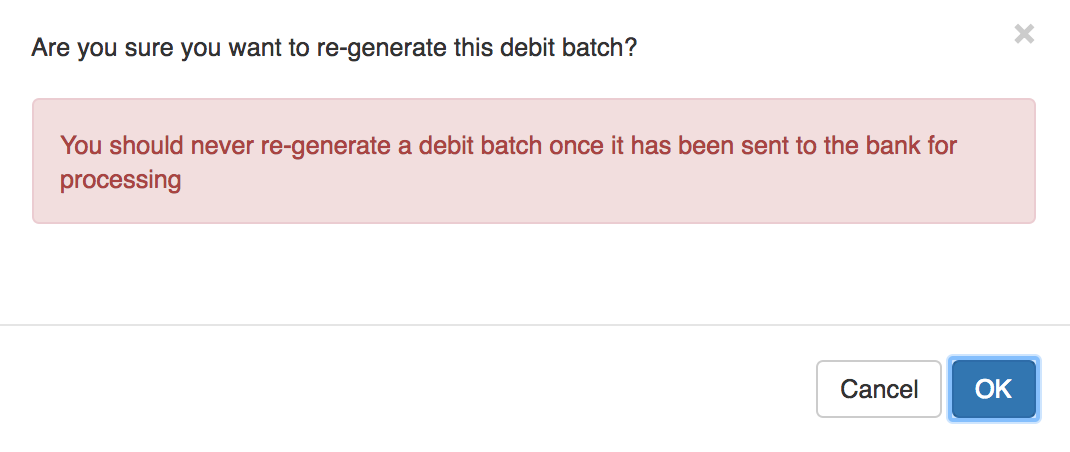
Please note that you should never re-generate a batch after the batch have been submitted to SagePay for processing.
8.4. Download the debit order batch
To download the debit order batch, click on the blue button found under “Batch Breakdown”.

Once the debit order batch is done generating, you will see the following pop-up screen. On this screen, you will be able to choose whether you want to download the “Old SagePay Format” or the “New SagePay Format”.
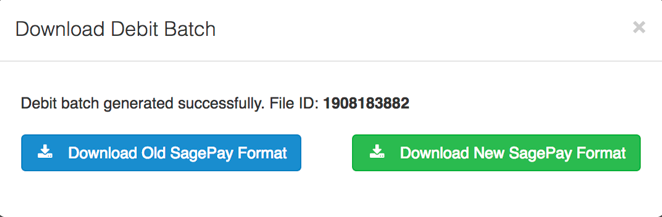
After you have downloaded the debit order batch, it will be in the correct format for you to import the document into SagePay.