Different Types of User Imports
The purpose of this guide is to provide you with more information on the different types of user imports as well as in what order we would advise you do these imports with your initial HeroTill setup.
We would advise that new customers do the imports in the following order:
- Import customers
- Import products
- Radius Import Wizard (Import from Radius Manager)
- Radius Import Wizard (Import from CSV file)
- Import Customer <-> Radius Links
- Import Recurring Billing
- Import Invoices and Credit Notes
- Import Invoices (CSV)
- Import Adjustments
- Import Receipts into SageOne
When populating these import files, please keep the following in mind:
- Dates must be in the following format: 2018-04-27 (- as separator)
- Numbers with decimals must be separated with a full stop and not a comma: 0.14
- Numbers must be listed in number formats
- Import files should be saved in CSV format.
1. Import Customers
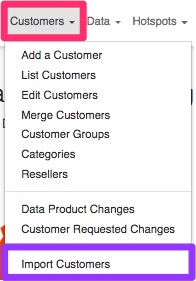
The first step will require you to import your customers. Please note that before you import your customers, you will need to create your customer groups. To create customer groups, please go to customers –>Import Customers.
After successfully adding your customer groups, you will now be able to start building and import your customer list. To do this, go to“Customers” and then click on the “Import Customers” option.
You will now see the following screen:

Step 1: Creating your import template
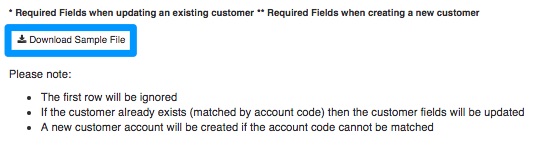
This import wizard will allow you to import or update your customer information by making use of a CSV file. Start by downloading the “Download Sample File”.
After downloading the template, you will need to complete the following information for each customer:
- Account Code (customer code)
- Customer group
- Customer Type (Individual / Customer)
- Company Name (If applicable)
- Contact name
- Tel No
- Cell No
- VAT Number (If Applicable)
- Physical Address (123 Sands Rd, Wilderness,6560)
- Postal Address (123 Sands Rd, Wilderness,6560)
- Payment Method (EFT, Cash, Direct Debit, Credit Card)
- Bank Name
- Branch Code
- Account Name (If on Debit Order)
- Account Type (If on Debit Order)
- Account Number (If on Debit Order)
- Debit Date (If on Debit Order)
- Login Username (Customer Portal – If the customer previously had one)
- Login Password (Customer Portal – If the customer previously had one)

After creating your import template, remember to save it in CSV format. Next, you will need to validate your information.
Step 2: Validating your import template
To get to step 2, you will need to click on the “Next” button found in the top right-hand corner.

You will now be able to upload your CSV file on the right-hand side of the screen.
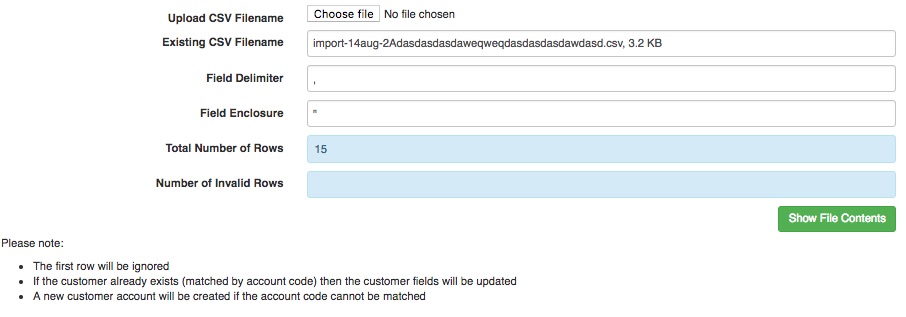
After uploading your file, click on the “Show File Contents” button and then on the “Validate File” button which will appear. This will allow for the data on the file to be validated and in return show you any data which could be obscured. If any of the data is obscured, then you will most likely have to change the field delimiter.
Before continuing to step 3, it is important that you ensure that there are no invalid rows in your file. If all the data in the file is correct and validate, all line items will appear green.

Click on the “Next” button found in the top right-hand corner to continue to step 3.
Step 3: Import or delete rows
In step three you get the option to either delete imported rows or to import these rows.

Delete rows
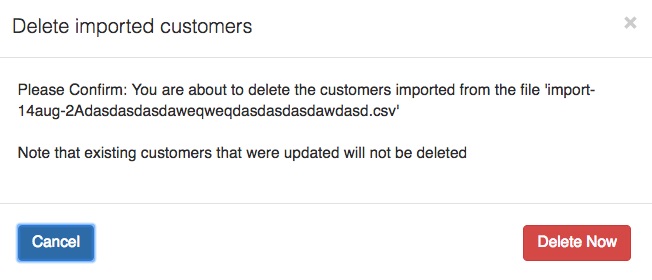
Deleting imported rows will delete all the customers that you originally imported with your CSV file. Click on the “Delete Imported Rows” button to continue deleting the relevant rows.
On the following pop-up screen, click on the “Delete Now” button to continue with the process.
Import Rows:
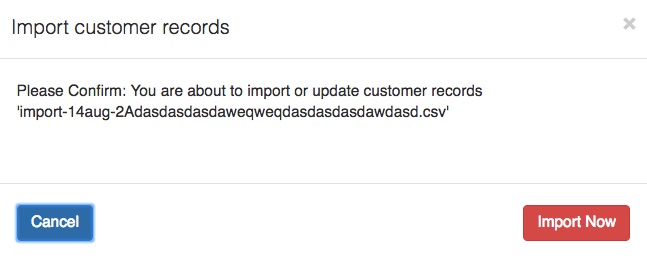
Importing rows means you are either importing new data or replacing old data. Click on the “Import Rows” button to continue importing the relevant rows.
On the following pop-up screen, click on the “Import Now” button to continue with the process.
2. Import Products
Next, you will need to import your products. Please note that before being able to import your product list that you will need to create your product types. For more information on how to do this, please refer to section 3.1. of our Billing Guide.
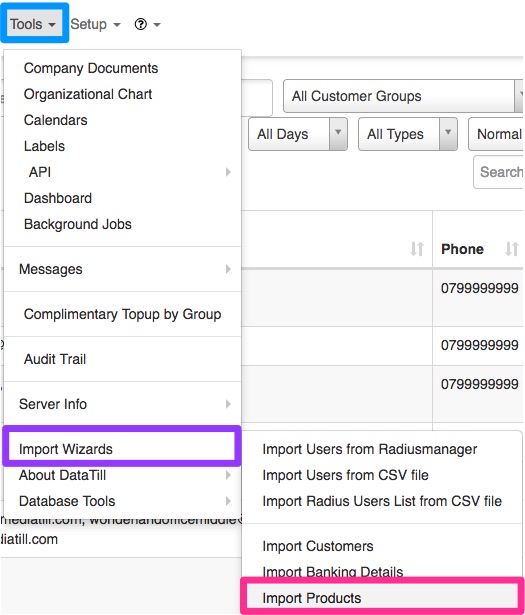
To find the product import wizard, you will need to go to “Tools” – “Import Wizards” and then click on the “Import Products” option.
You will now be able to see the following screen:
Step 1: Creating you import template:
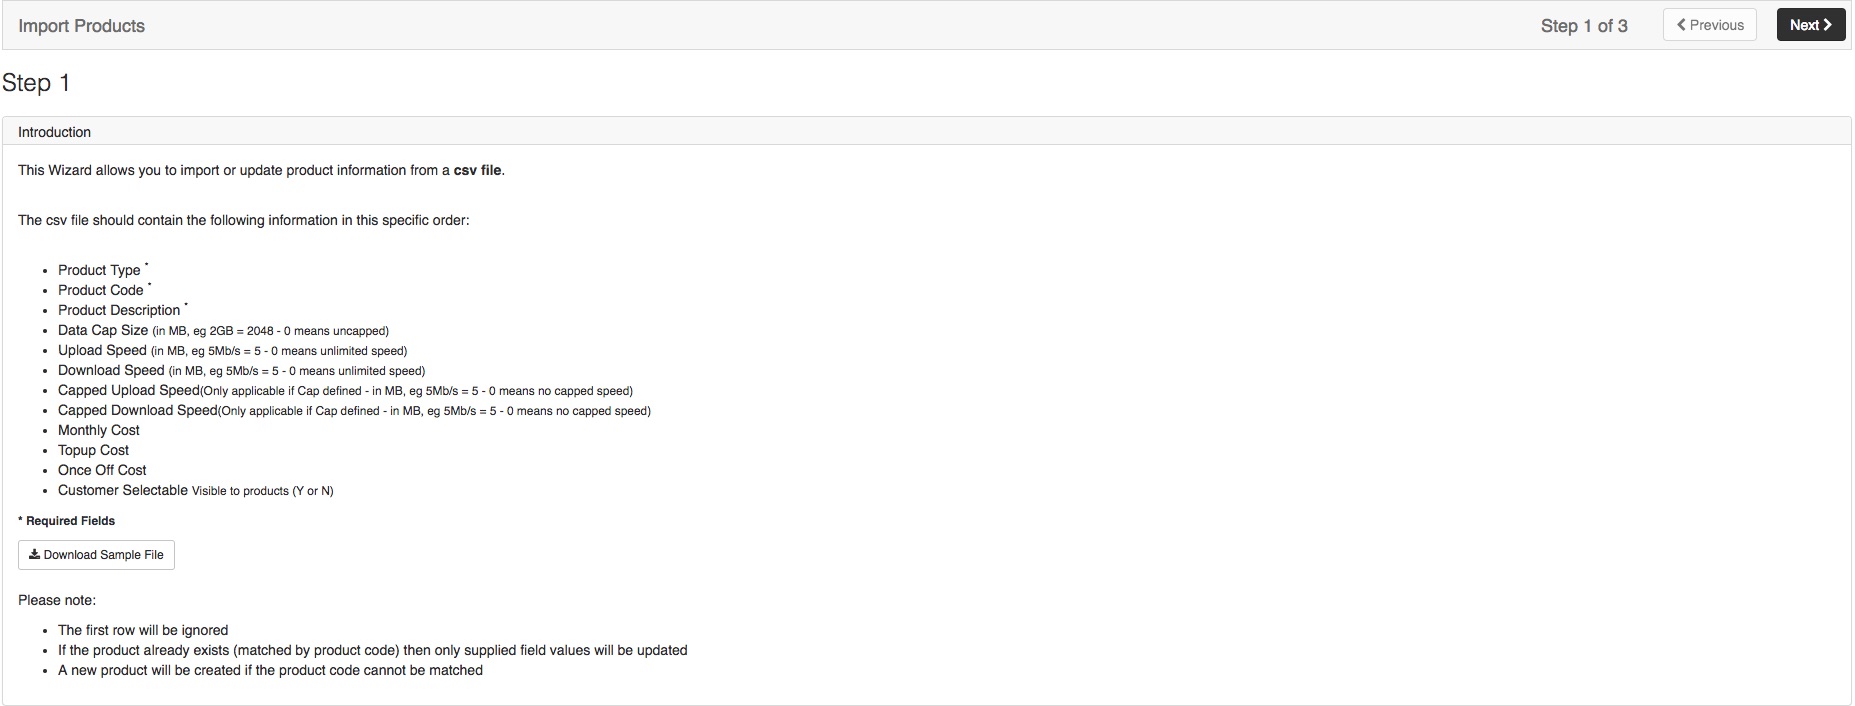
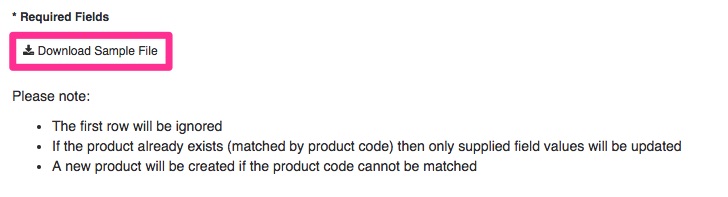
This import wizard will allow you to import or update your products by making use of a CSV file. Start by downloading the “Download Sample File”.
Your CSV document should contain the following information (in this specific order):
- Product Type
- Product Code
- Product Description
- Data Cap Size (In MB, e g 5Mb/s = 5 – 0 means unlimited speed)
- Upload Speed (in MB, eg 5Mb/s = 5 – 0 means unlimited speed)
- Download Speed (in MB, eg 5Mb/s = 5 – 0 means unlimited speed)
- Capped Upload Speed (Only applicable if Cap defined – in MB, eg 5Mb/s = 5 – 0 means no capped speed)
- Capped Download Speed (Only applicable if Cap defined – in MB, eg 5Mb/s = 5 – 0 means no capped speed)
- Monthly cost
- Top-up Cost
- Once off Cost
- Customer Selectable (Visible to customers – Y or N)

After creating your import template, remember to save it in CSV format. Next, you will need to validate your information.
Click on the “Next” button found in the top right-hand corner to continue to step two.
Step 2: Uploading your document
You will now be able to upload your CSV file on the right-hand side of the screen.
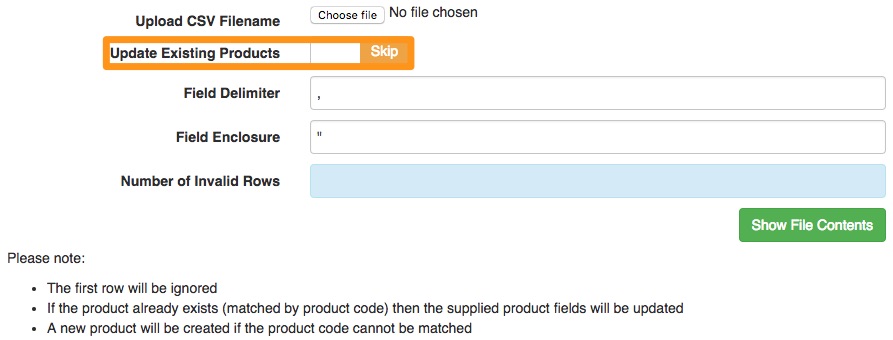
After you have uploaded your file, you will be able to determine whether or not you would like to update existing products or not. Next, you will need to click on the “Show File Contents” button and thereafter on the “Validate File” button.
This will allow for the data on the file to be validated and in return show you any data which could be obscured. If any of the data is obscured, then you will most likely have to change the field delimiter.
Before continuing to step 3, it is important that you ensure that there are no invalid rows in your file. If all data in the file is correct and validate, all line items will appear green. Click on the “Next” button found in the top right-hand corner to continue to step 3.
Step 3: Delete of Import rows
In step three you get the option to either delete imported rows or to import these rows.

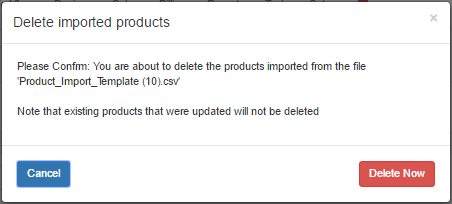
Delete Imported Rows:
Deleting imported rows will delete all the products that you originally imported with your CSV file. Click on the “Delete Imported Rows” button to continue deleting the relevant rows.
On the following pop-up screen, click on the “Delete Now” button to continue with the process.
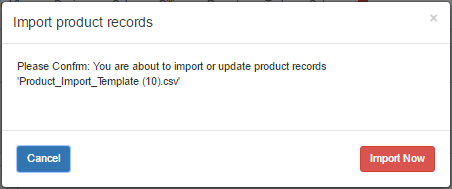
Imported Rows:
Importing rows means you are either importing new data or replacing old data. Click on the “Import Rows” button to continue importing the relevant rows.
On the following pop-up screen, click on the “Import Now” button to continue with the process.
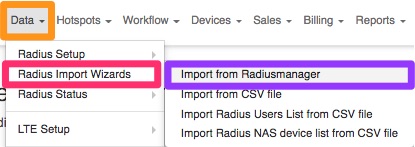
3. Radius Import Wizards
There are two different ways in which you will be able to import radius. The first method will be by importing from RadiusManager and the second method will be to import from a CSV file.
3.1. Import from RadiusManager
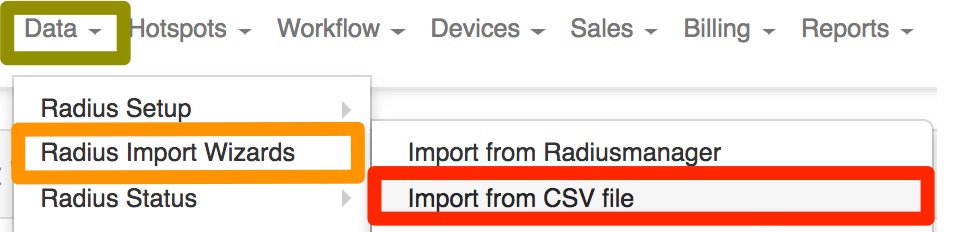
To find the RadiusManager import file, go to “Data” – “Radius Import Wizards” and then click on the “Import from RadiusManager” option.
After the screen has loaded, you will see the following:
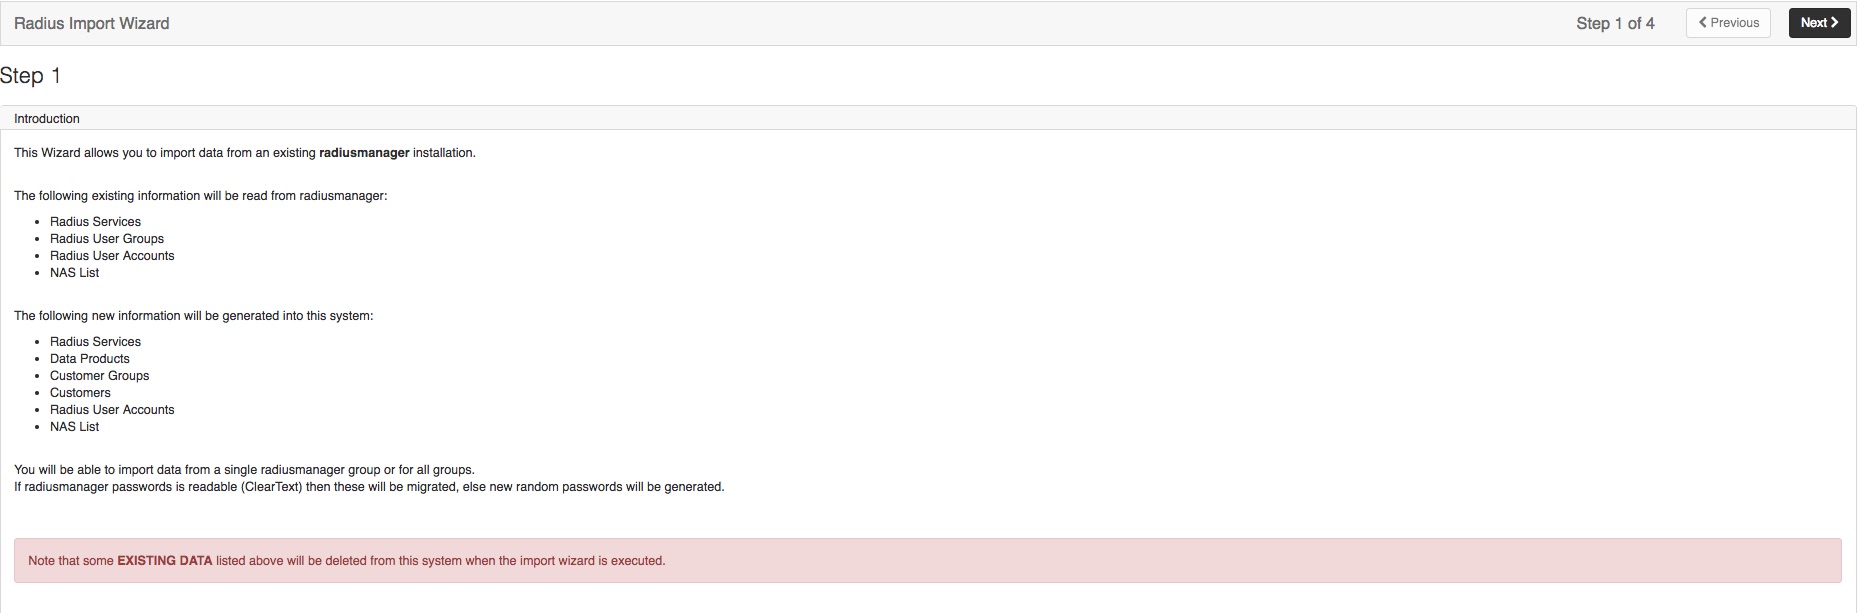
Step 1: Introduction to the Import Wizard
By making use of this import wizard, you will import the following items:
- Radius Services
- Radius User Group
- Radius User Accounts
- NAS list information.
By using the information above, the following new information will then be generated:
- Radius services
- Data Packages
- Customer Groups
- Customers
- Radius Users Accounts
- NAS list
You will be able to import data from a single radiusmanager group or for all groups. If radiusmanager passwords are readable (ClearText) then these will be migrated, otherwise, new random passwords will be generated.
Click on the “Next” button on the top right of the page to continue to Step two.
Step 2: RadiusManager Databas Connection Details
In this section, you will be required to add the following details of your RadiusManager:
- Server IP Address
- Database Name
- RadiusManager Username
- RadiusManager Password
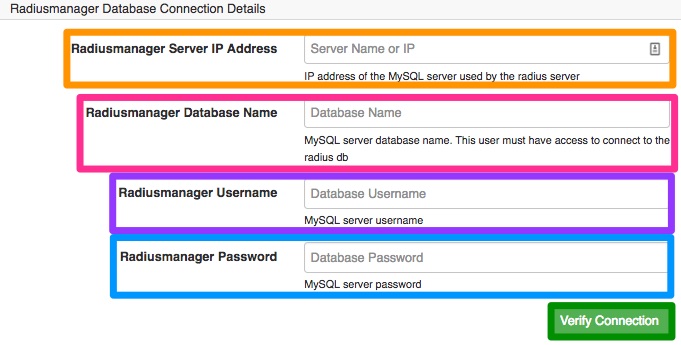
After adding all the information, click on the “Verify Connection” button to verify that the details were typed incorrectly. If you get a notification that says “You have successfully connected to the RadiusManager database”, then you have added all details correctly and you can continue to the next step.
To continue to the next step, click on the “Next” button found in the top right-hand side of the screen.
Step 3: Select Data to Migrate
You will now be able to select all the data which you wish to migrate.
Please note the following:
- If all the “Migrate” toggle buttons are switched to yes, it means that every user group and every radius customer will be imported.
- You can order the wizard to update or ignore any information that is already in the database by clicking on the “duplicates” toggle button.
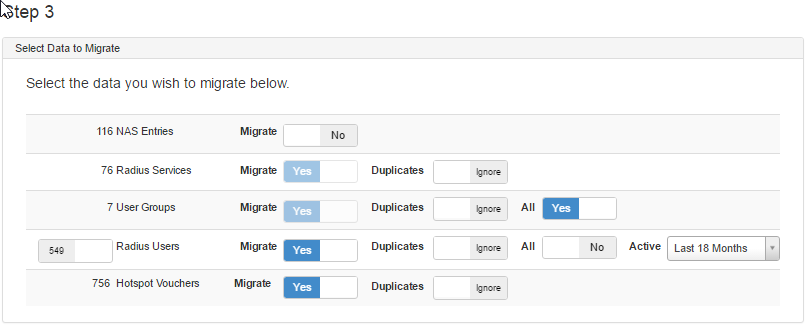
After selecting the relevant information which needs to be migrated, click on the “Next” button to continue to step 4.
Step 4: Perform Migration
Step 4 will allow you to either delete the imported data or to import the new data into the system.
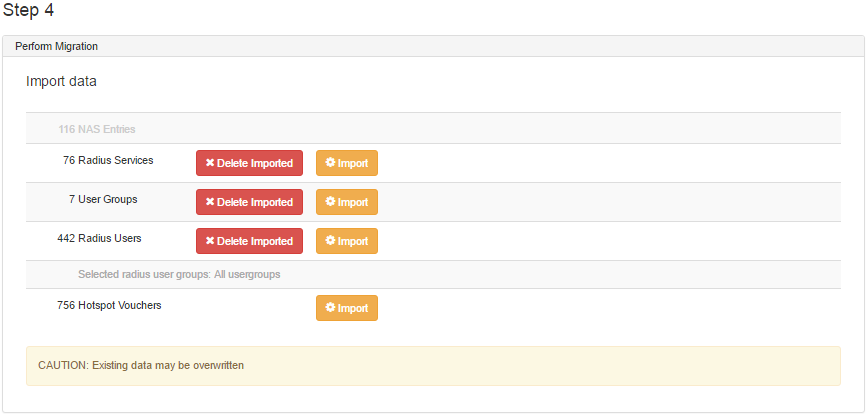
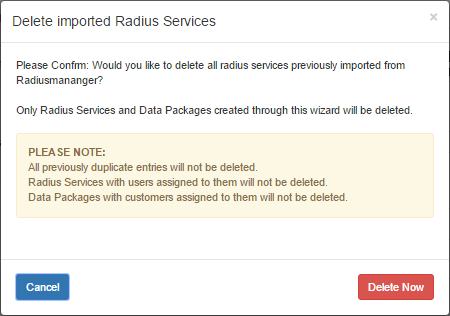
Delete Imported Radius Services:
To delete the imported radius services, click on the “Delete Imported” button. You will now see the following pop-up screen. Click on the “Delete Now” button to continue with deleting the information.
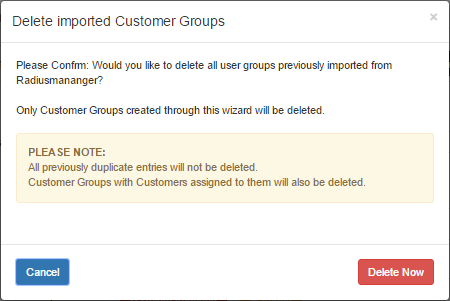
Delete Imported Customer Groups:
To delete the imported customer groups, click on the “Delete Imported” button. You will now see the following pop-up screen. Click on the “Delete Now” button to continue with deleting the information.
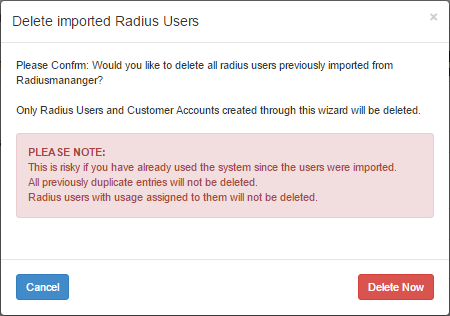
Delete Imported Radius Users:
To delete the imported radius users, click on the “Delete Imported” button. You will now see the following pop-up screen. Click on the “Delete Now” button to continue with deleting the information.
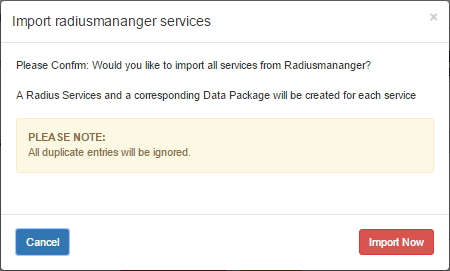
Import Radius Manager Services:
To import the radius manager services, click on the “Import” button. You will now see the following pop-up screen. Click on the “Import Now” button to continue with deleting the information.
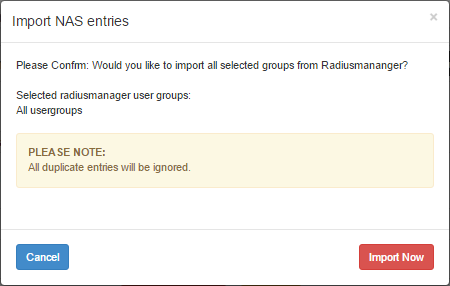
Import NAS entries:
To import the NAS entries, click on the “Import” button. You will now see the following pop-up screen. Click on the “Import Now” button to continue with deleting the information.
3.2. Import from CSV file
This Radius Import Wizard allows you to import data about a radius from a CSV file. To use the import from CSV method, go to “Data” – “Radius Import Wizards” and then click on the “Import from CSV file” option.
You will now see the following screen providing you with information on what should be on your CSV file.
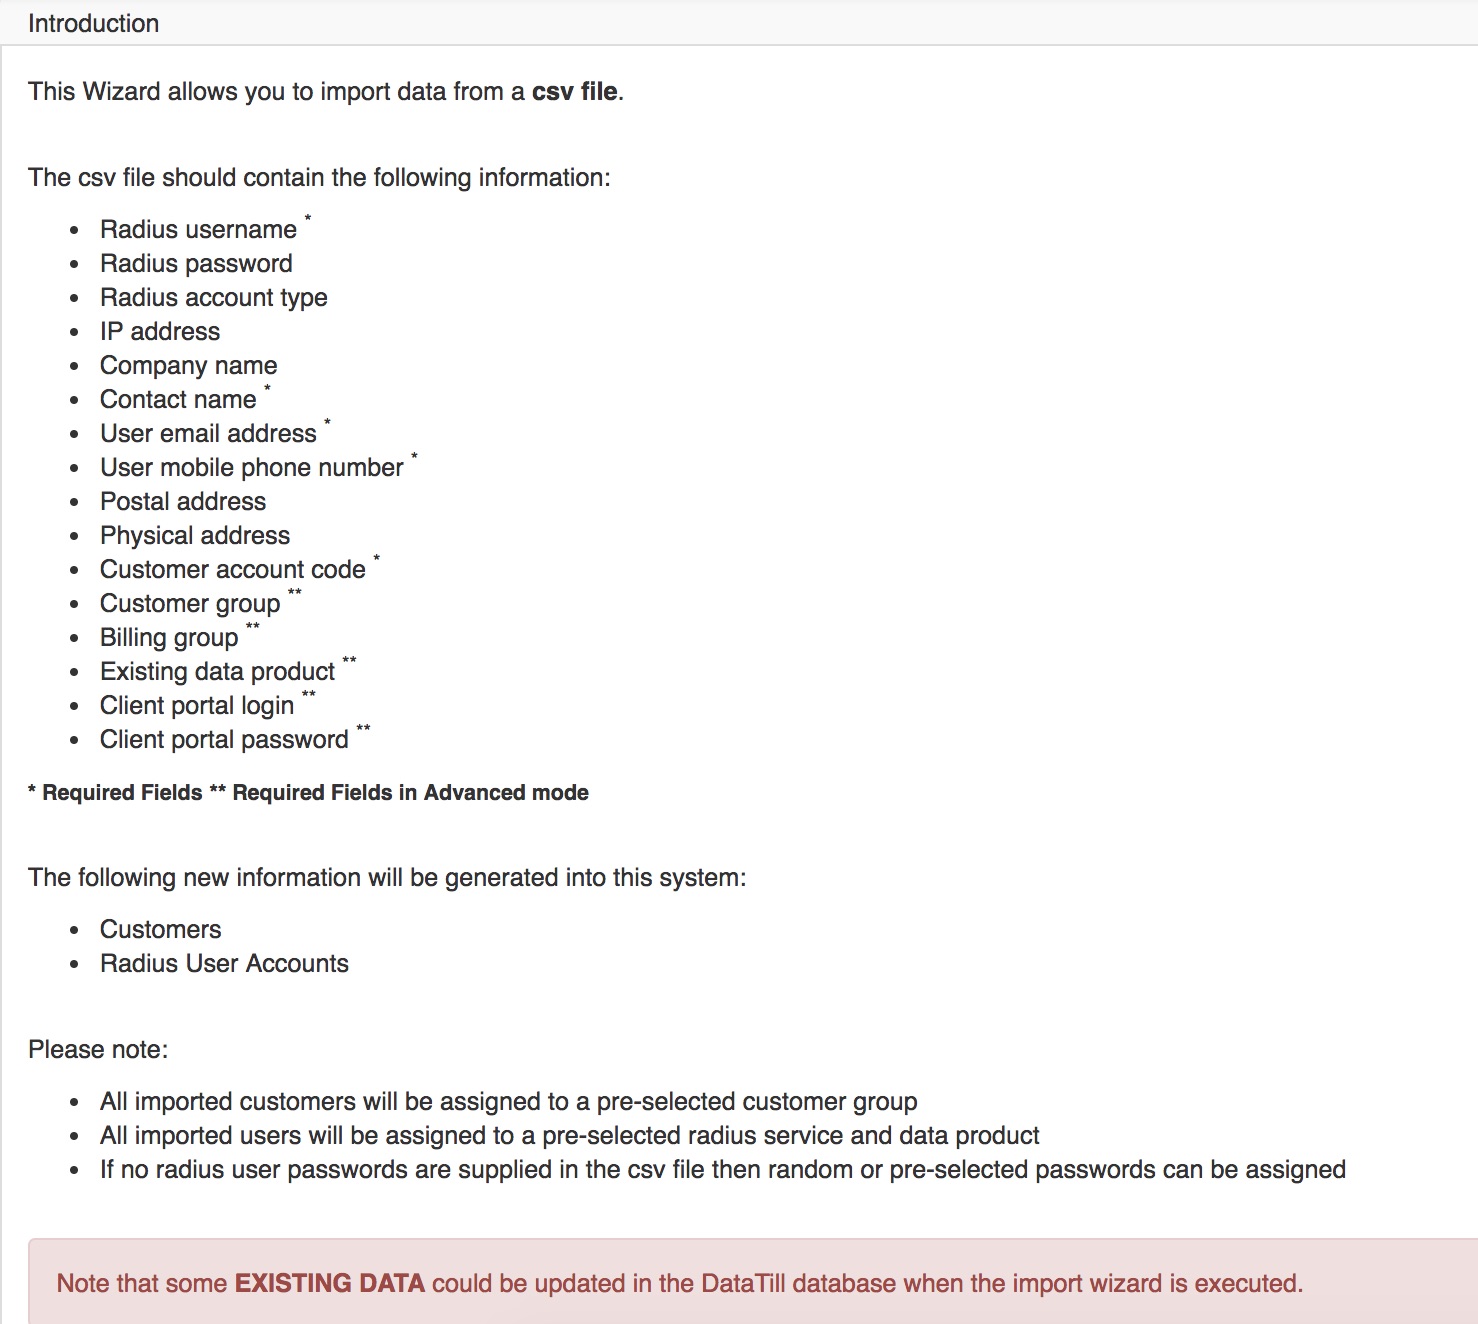
Step 1: Creating you import template:
To make use of this method, you will need to have the following headings in your CSV document:
- Radius username
- Radius password
- Radius account type
- IP address
- Company name
- Contact name
- User email address
- User mobile phone number
- Postal address
- Physical address
- Customer account cod
- Customer group
- Billing group
- Existing data product
- Client portal login
- Client portal password
The Import Wizard will add both a Radius User and a Customer.
Please note that:
- Every customer created will be assigned to your default customer group,
- All imported users will be assigned to a pre-selected radius service and data package and
- If no radius user passwords are supplied in the CSV file then random or pre-selected passwords can be assigned.
- Some existing data will be updated when the import wizard is executed.
Remember to save your file in CSV format. Click on the “Next” button found in the top right-hand corner to continue to the next step.
Step 2: CSV file upload
This step will require you to upload your CSV document with all of the data which you would like to use. Ensure that you are using the correct field delimiter and field enclosure. After uploading your document, click on the “Verify CSV File” button. This will determine whether the data in the file is usable or not.
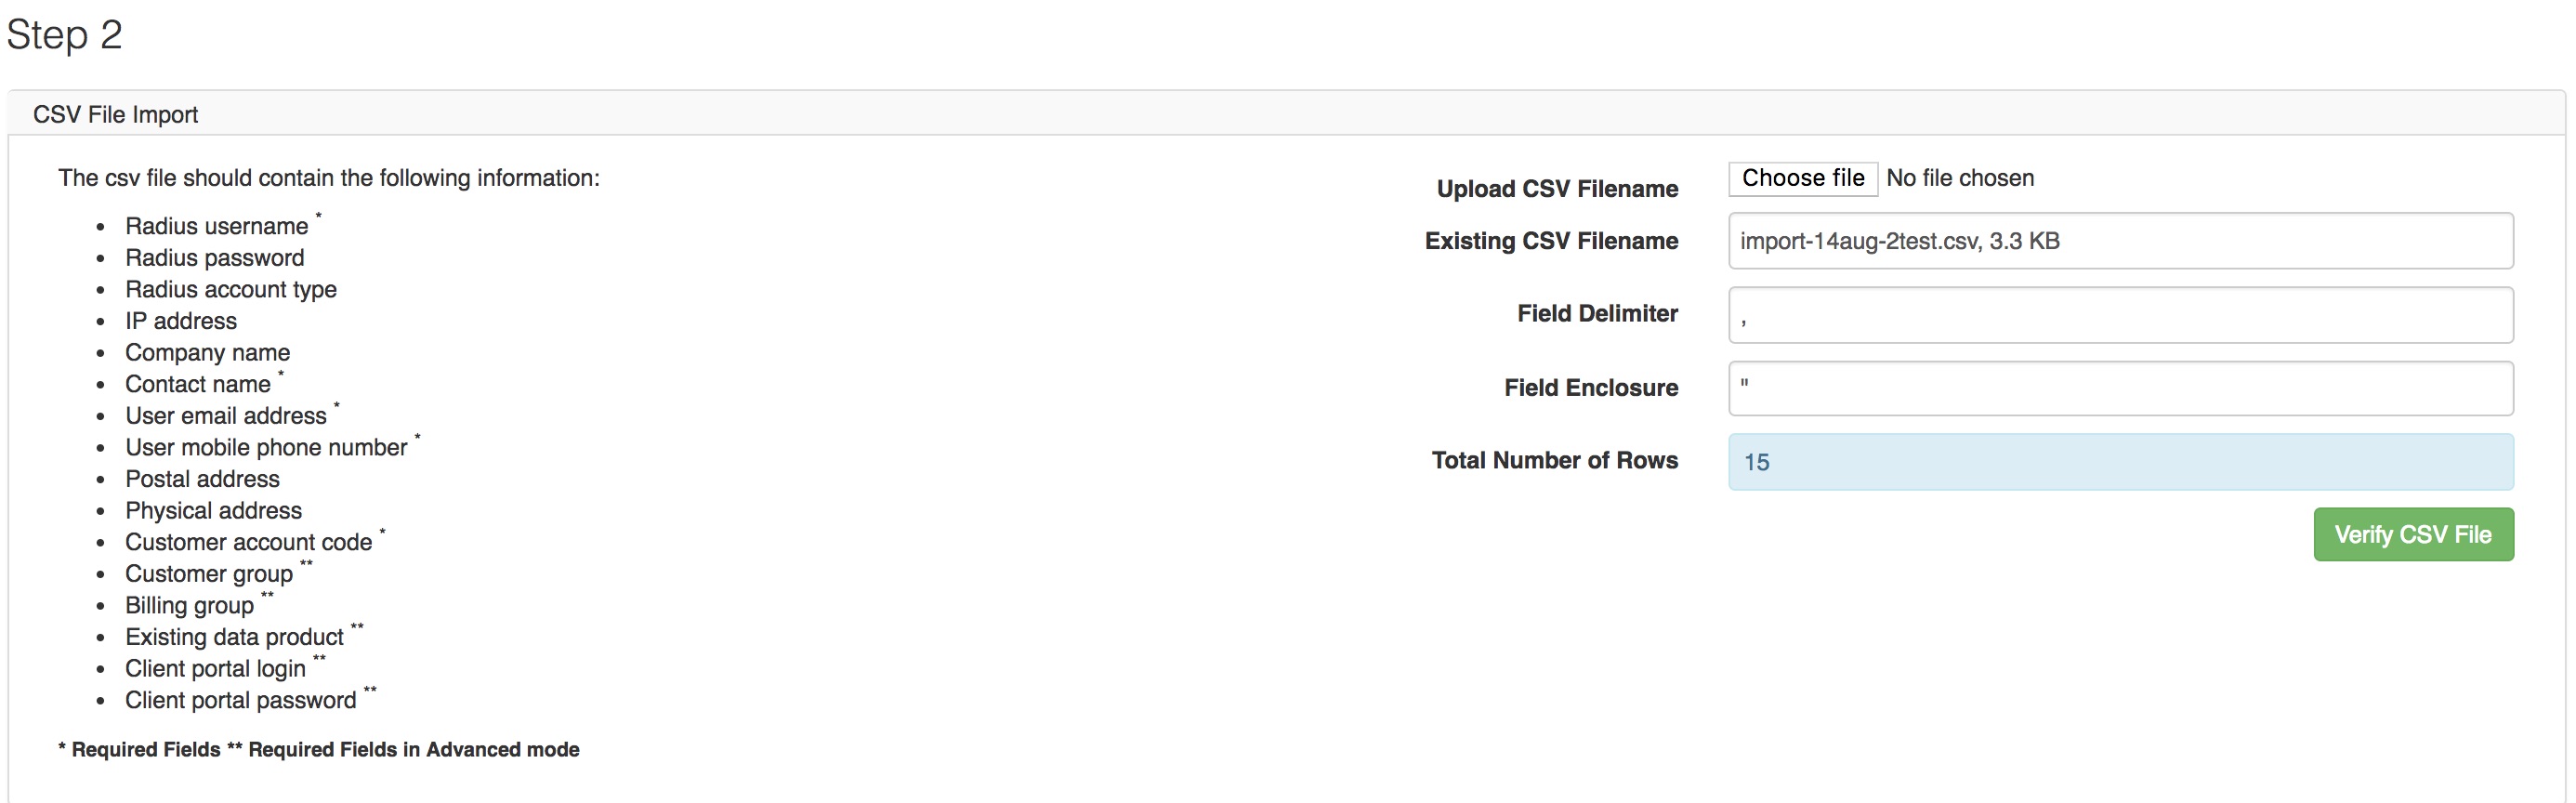
If the data is usable, then click on the “Next” button in the top right-hand corner to continue to step 3.
Step 3: CSV file import
There are two different modes this import wizard can be used for:
- Advanced Mode: This will add the ability to import additional columns such as data product ID, customer group ID, billing group ID, client portal login & password and more.
- Prepaid mode: These imports customers as unverified prepaid customers. If you have set a default prepaid customer group it will be used. To enable this mode, switch the toggle button to yes.
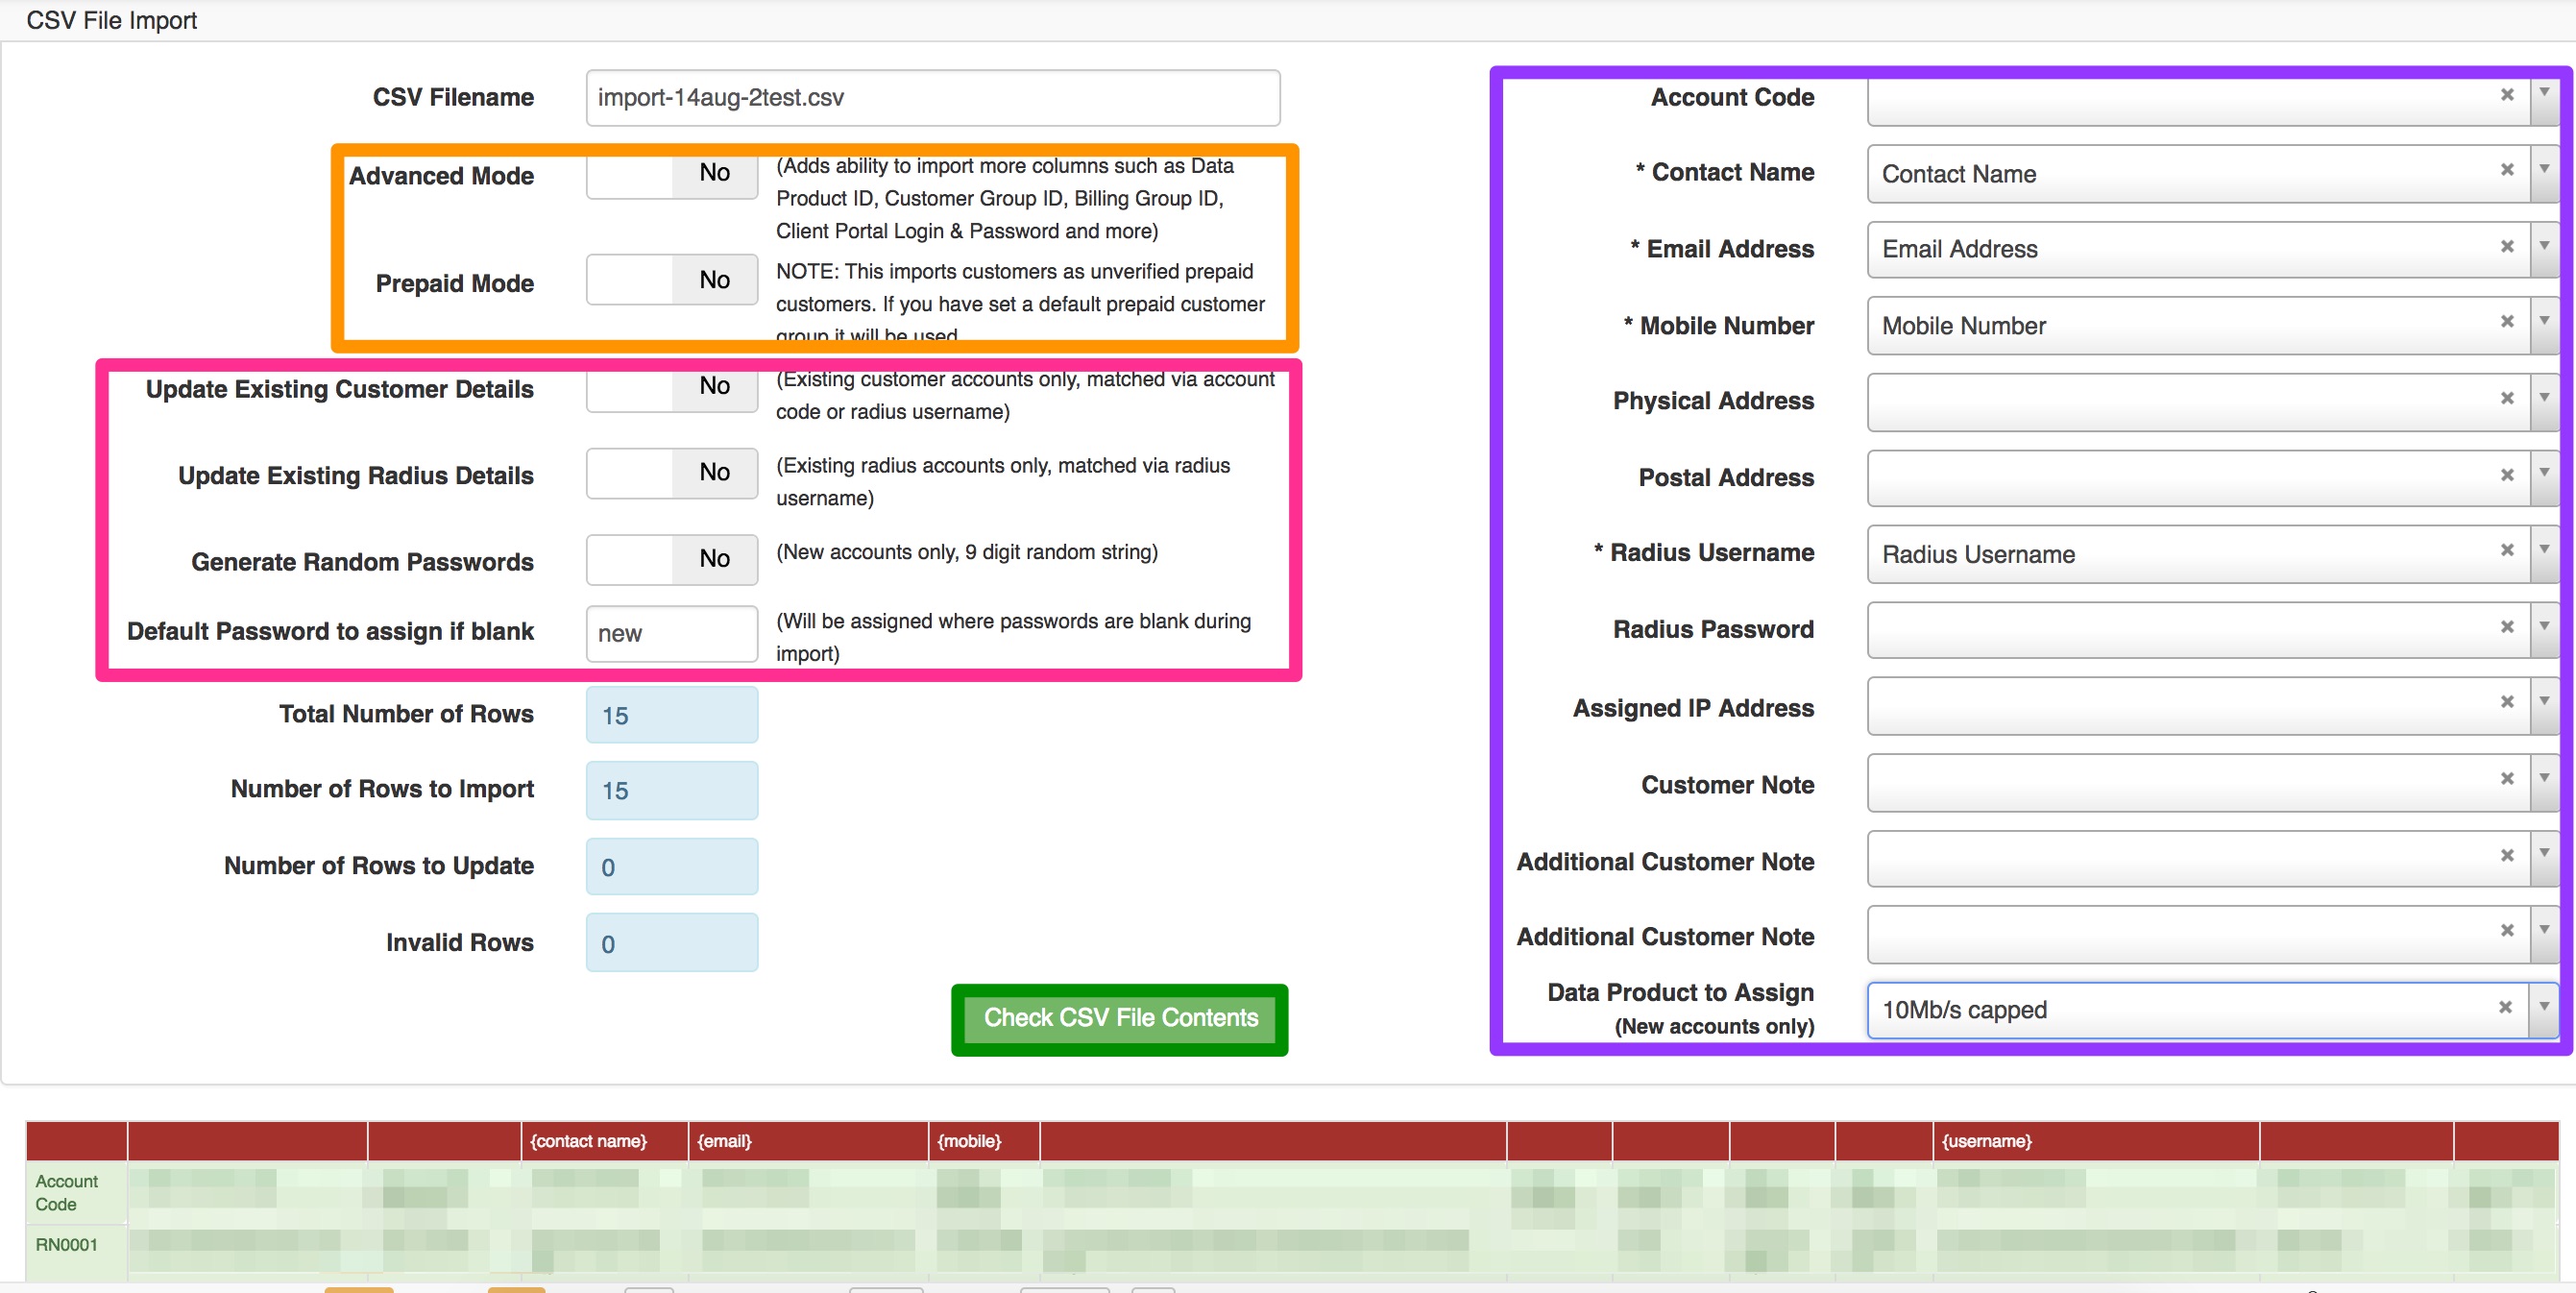
After selecting your mode, there will be settings that need to be authorised:
- Update existing customer details: this will update existing customer accounts only, matched via account code or radius username.
- Update existing radius details: this will update existing radius accounts only and will be matched via radius username.
- Generate random passwords: When this option is enabled, the system will set a random 9 digit password to new accounts only.
- Default password to assign if blank: this will allow you to pre-determine what password needs to be imported should there be blank space underneath the password heading.
You will now need to start linking the correct tables names to the section on the left. First, do all the items marked with a * next to them and then click on the “Check CSV File Contents” button. This will allow you to see the layout of your CSV file at the bottom of the page and you can check that all information is in the correct places.
If everything looks to be in place, go back to the top of the screen and link the rest of the tables to the correct names. Click ‘Next’ at the top right-hand corner of the page to continue to step four.
Step 4: Delete or Import rows
Step four will allow you to either delete or import the new.
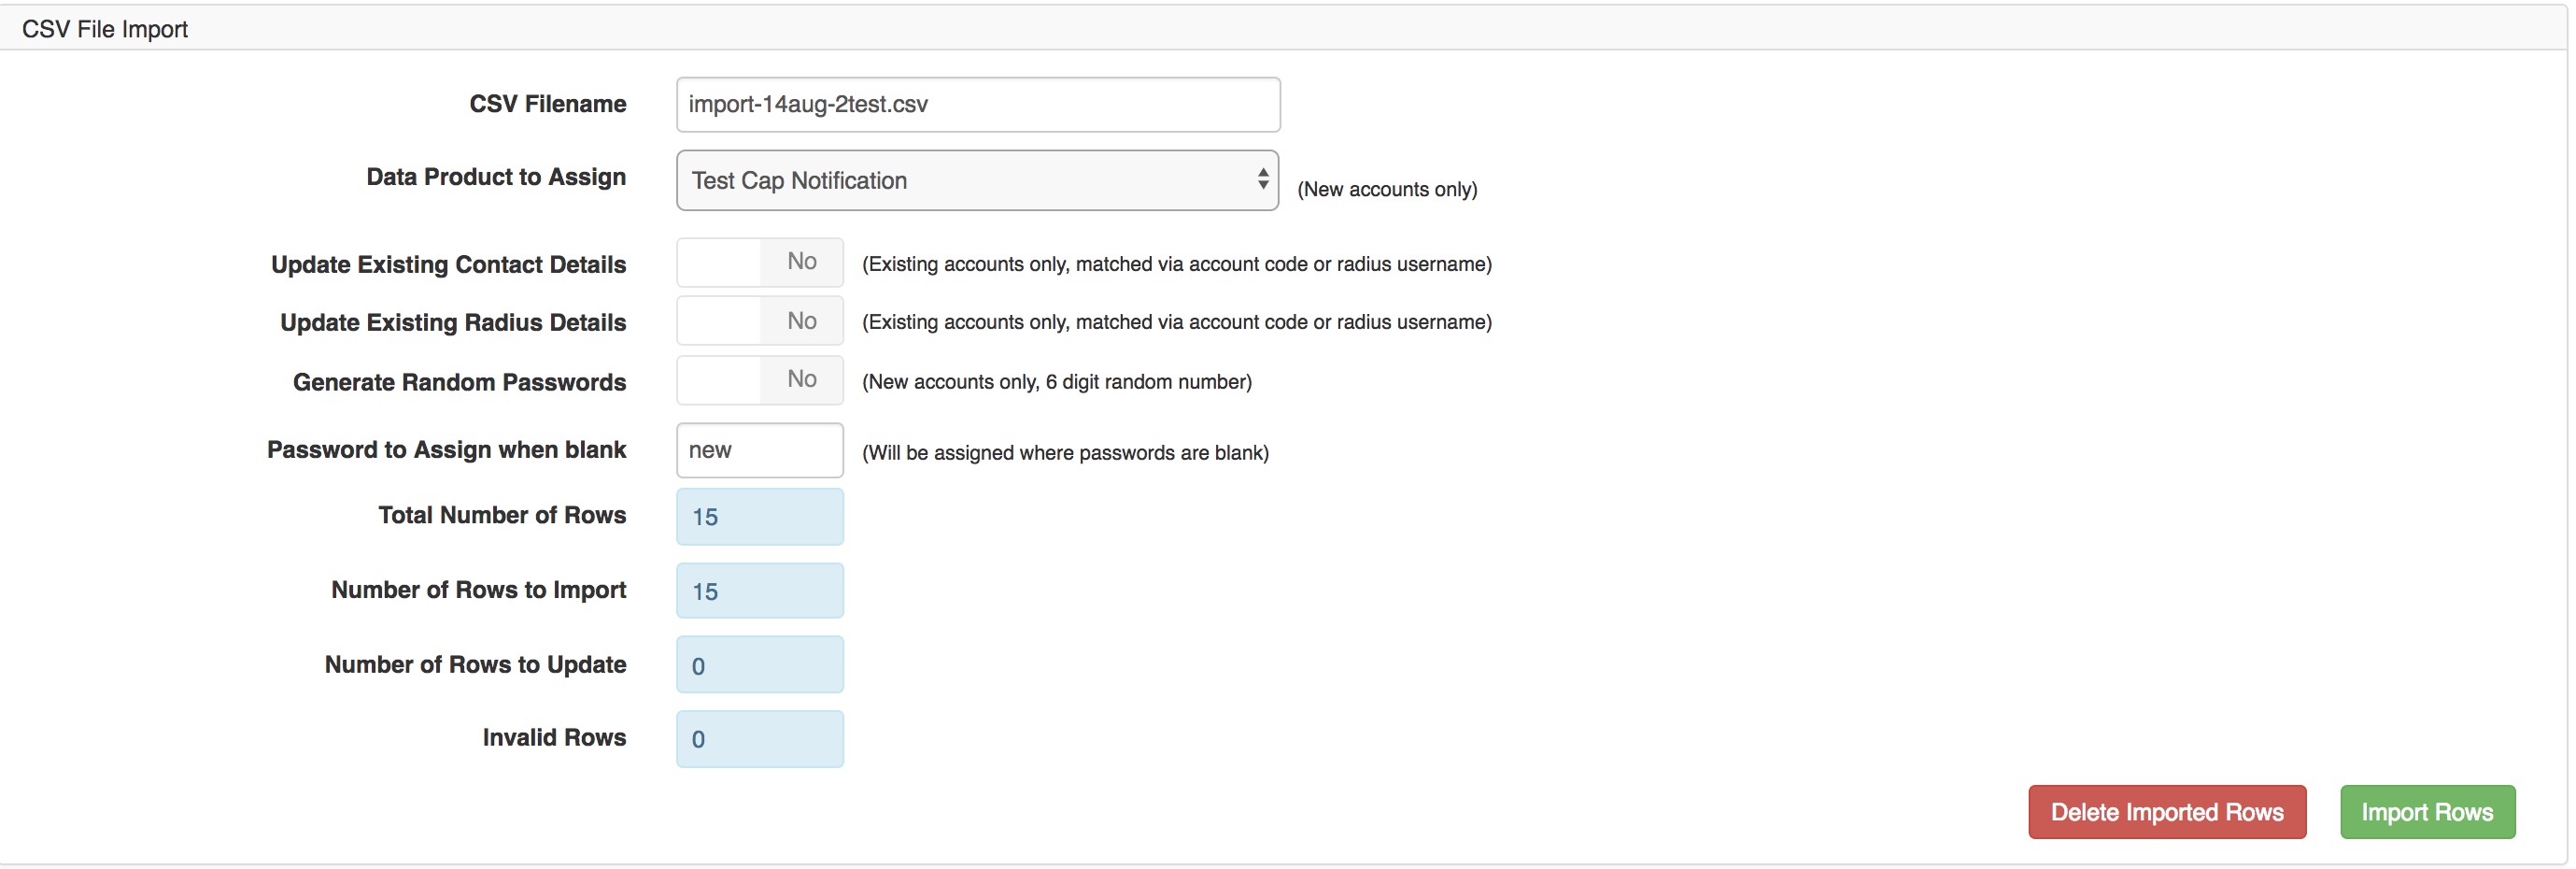
Delete Imported Rows:
To delete the imported CSV entries, click on the “Delete Imported Rows” button. You will now see the following pop-up screen. Click on the “Delete Now” button to continue with deleting the information.

Import Rows:
To import the radius manager services, click on the “Import Rows” button. You will now see the following pop-up screen. Click on the “Import Now” button to continue with deleting the information.
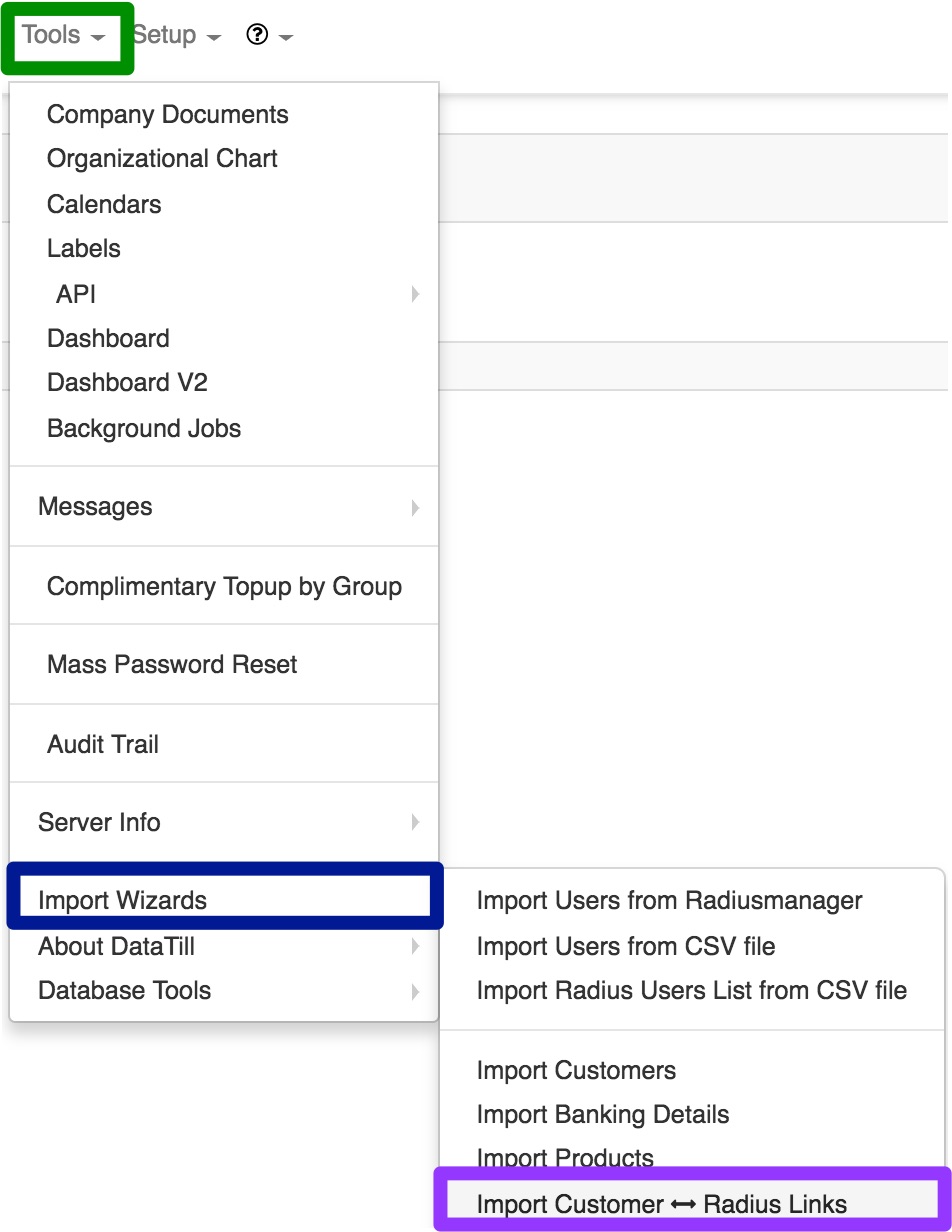
4. Import Customer Radius Links
This Wizard allows you to import or update customer radius product link information from a CSV file. To find this wizard, go to “Tools” – “Import Wizards” and then click on the “Import Customer <–> Radius Links” option.
On the following page, you will be able to download the import template to use.
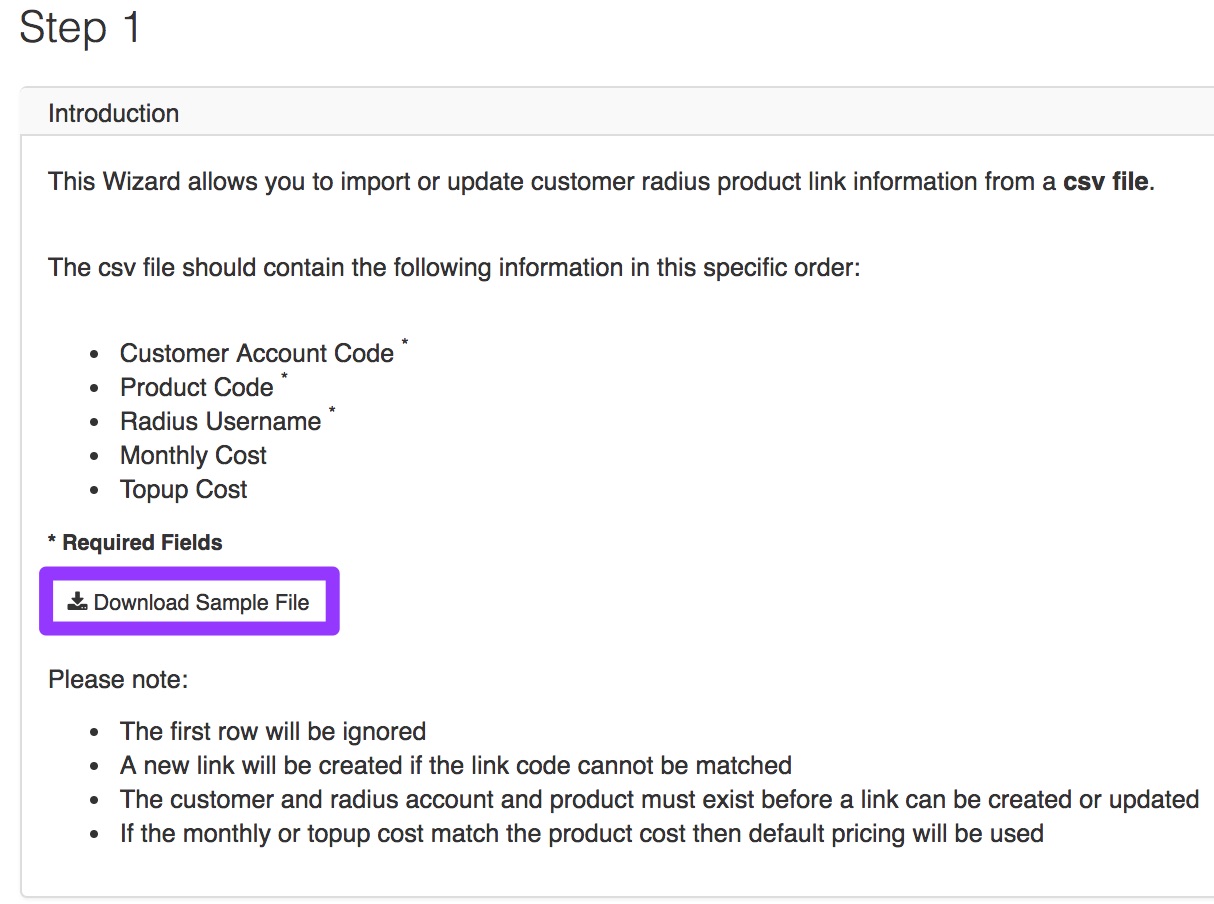
Step 1: Creating your CSV file
Make sure your CSV file contains all the information asked for in the specific order. You will need to have the following information on your sheet:
- Customer Account Code
- Product Code
- Radius Username
- Monthly costs
- Top-up cost
Remember to save your file in CSV format before trying to import it. Click on the “Next” button found in the top right-hand corner to continue to step 2.
Step 2: Customer Radius Product Link File Upload
In this step, you have to upload the CSV file with the data you would like to import. After uploading the document, click on “Show File Contents” and then on “Validate File” button. Make sure that there are no invalid rows picked up by the import wizard.
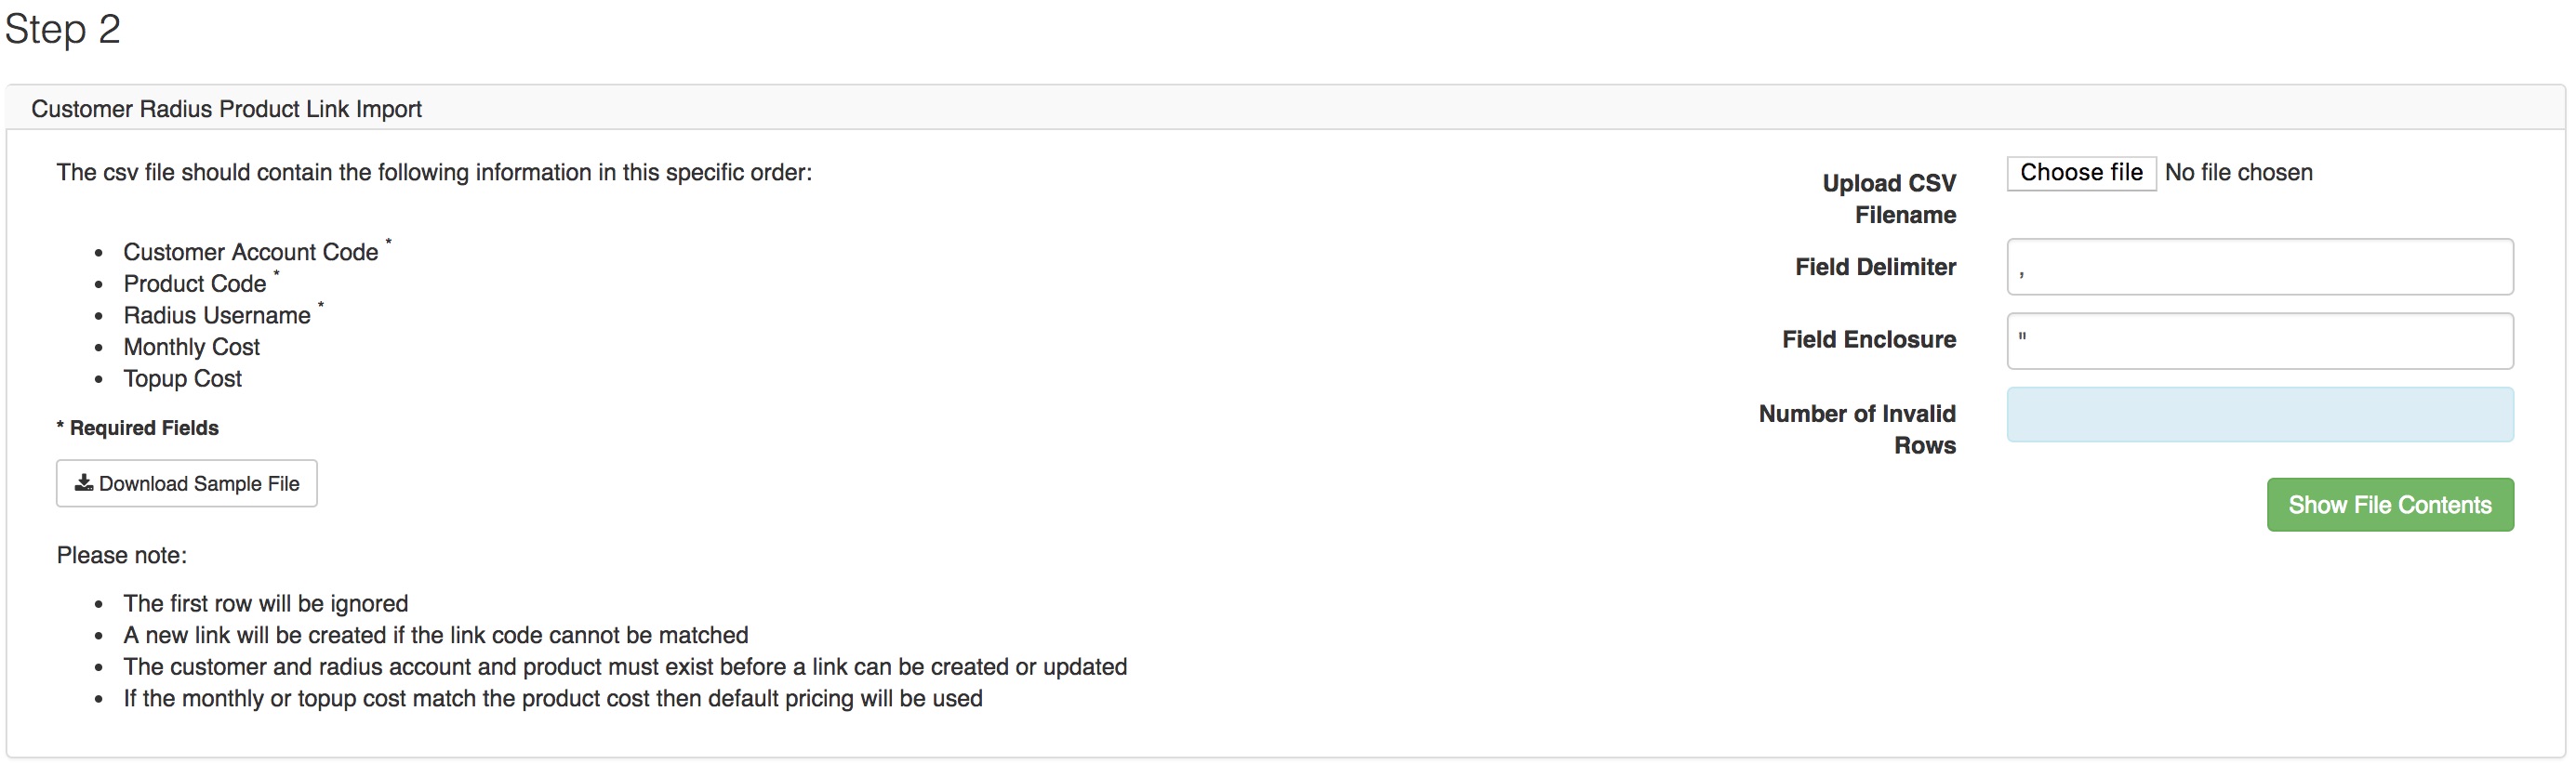
If all lines are validated, click on the “Next” button found in the top right-hand corner to continue to step 3.
Step 3: Customer Radius Product Link Import
In this step, you will now import the data from your CSV file. To do this, click on the “Import Rows” button.

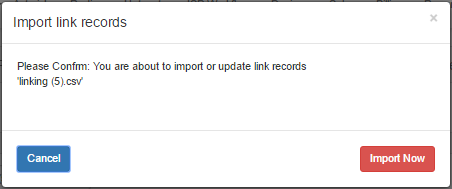
Import Rows:
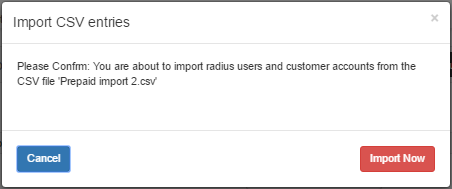
After clicking on the “Import Rows” button, you will see the screen below. Click on the “Import Now” button to continue the importing process.
5. Import NAS List
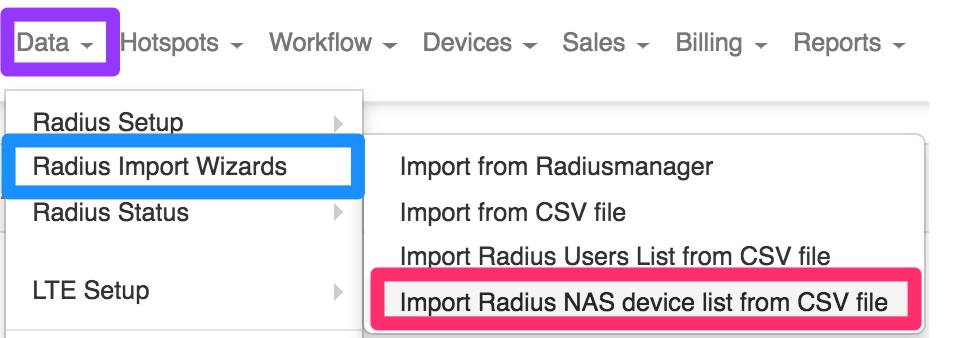
This Wizard allows you to import or update your NAS list from a CSV file instead of manually having to add each NAS. To find you NAS import list, go to “Data” – “Radius Import Wizards” and then click on the “Import Radius NAS device list from CSV file”.
You will now see the following screen:
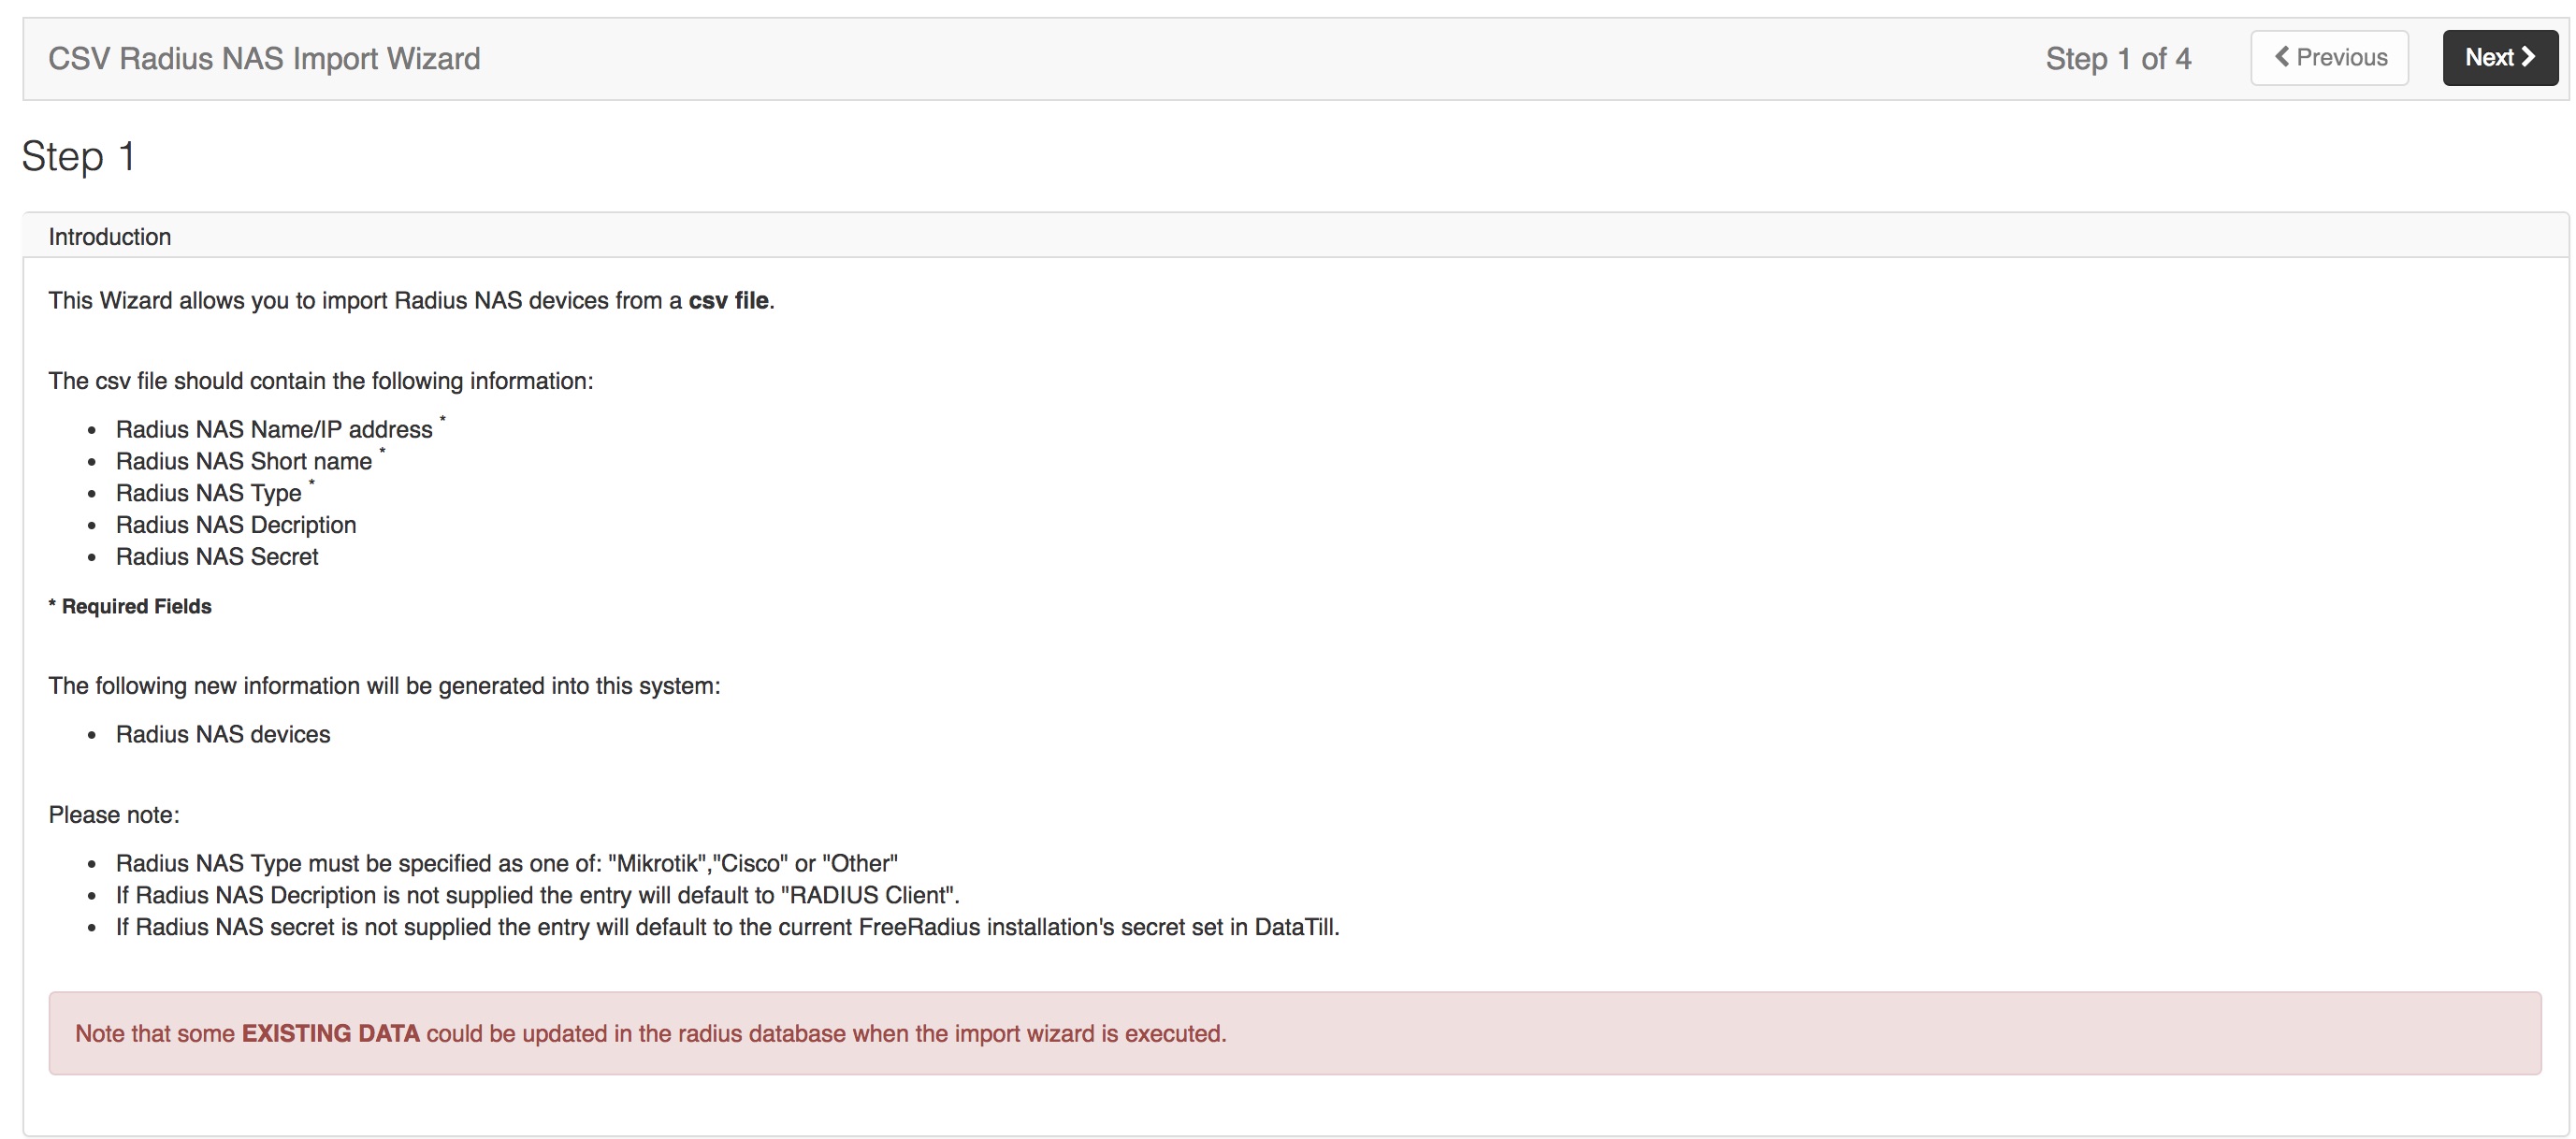
Step 1: Create CSV File
By making use of this import wizard, you will import the following items:
- Radius NAS Name / IP Address
- Radius NAS Short name
- Radius NAS Type
- Radius NAS Description
- Radius NAS Secret
By using the information above, the following new information will then be generated:
- Radius NAS devices
Please note:
- Radius NAS Type must be specified as one of: “Mikrotik”,”Cisco” or “Other”
- If Radius NAS Description is not supplied the entry will default to “RADIUS Client”.
- If Radius NAS secret is not supplied the entry will default to the current FreeRadius installation’s secret set in HeroTill.
Step 2: File import
This step will require you to upload your CSV document with all of the data which you would like to use.
Ensure that you are using the correct field delimiter and field enclosure. After uploading your document, click on the “Verify CSV File” button. This will determine whether the data in the file is usable or not.
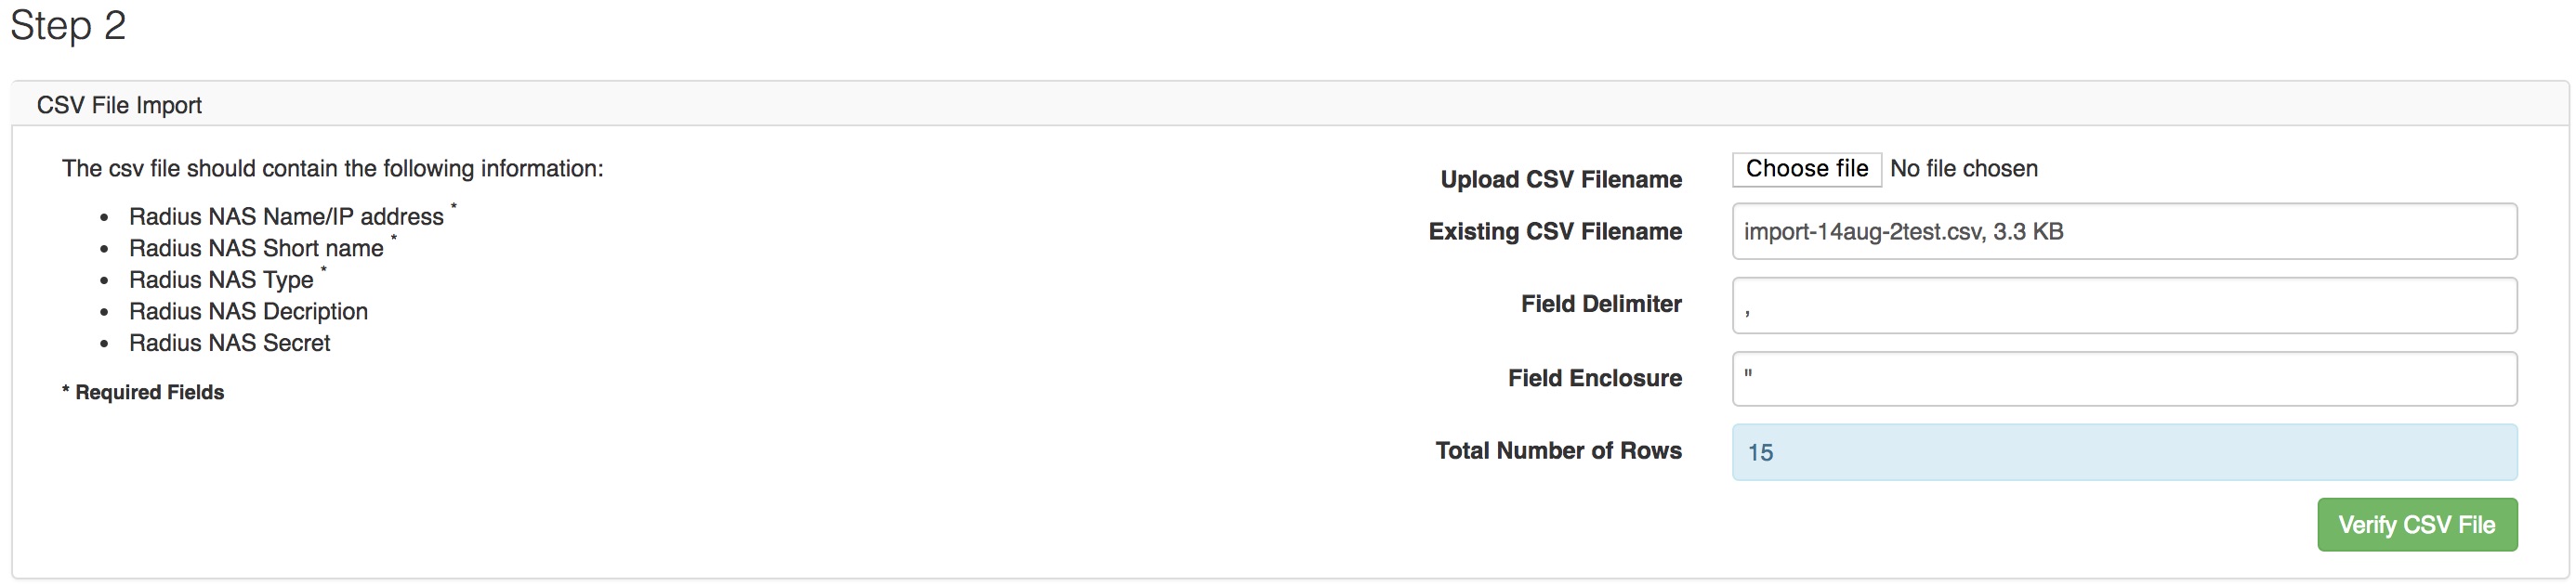
If the data is usable, then click on the “Next” button in the top right-hand corner to continue to step 3.
Step 3: NAS Linking
On this screen, you will be able to determine whether or not you would like to update the current NAS list or not. If the update existing NAS details toggle button is switched to off, then you will be importing a new NAS list.
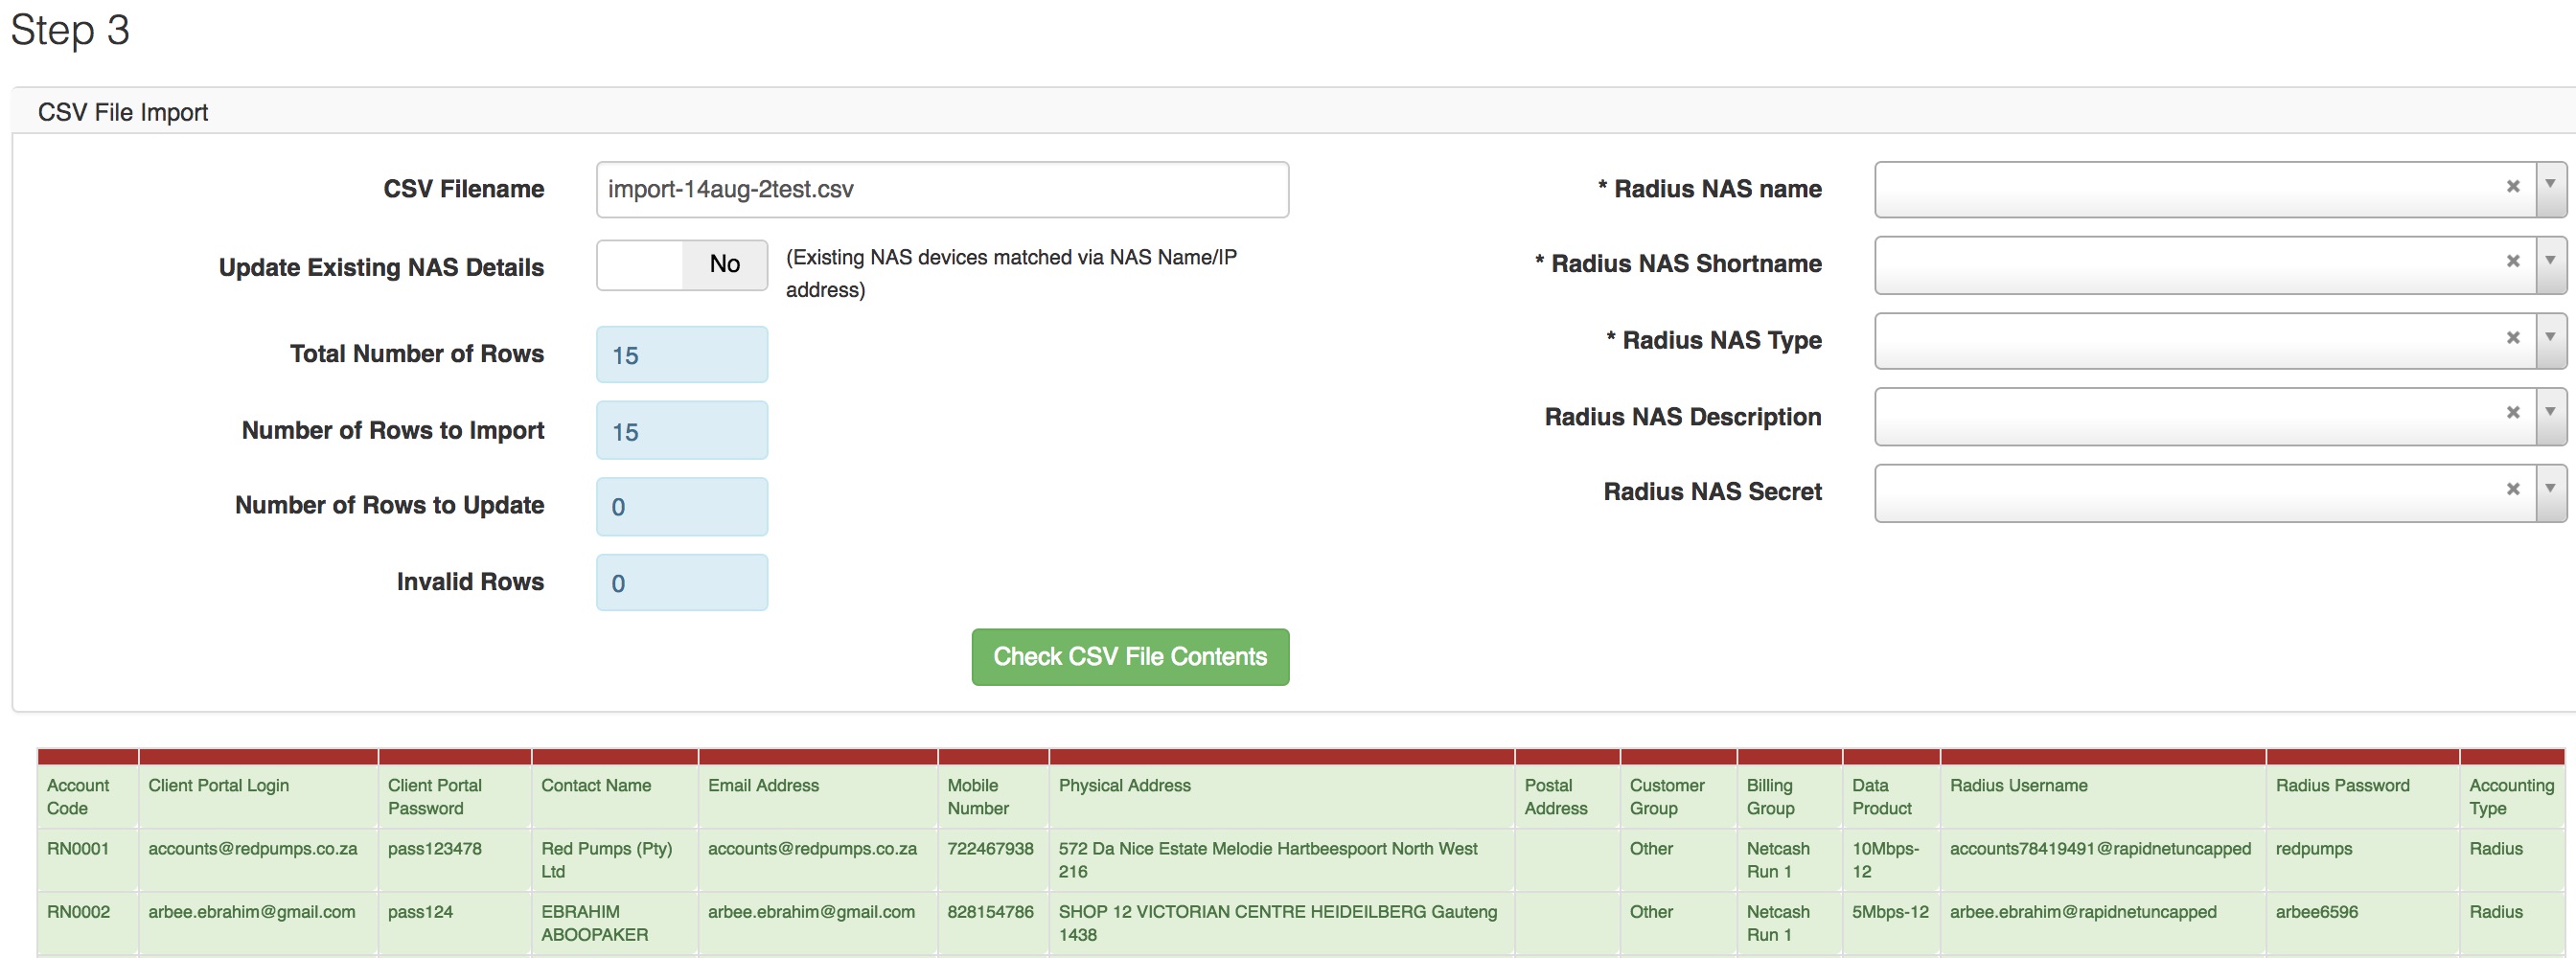
You will now need to link the table on the right-hand side with the relevant headings. After you have done this, click on the “Check CSV File Contents” button to check that all information is in the correct place. If all is in order, continue to step 4 by clicking on the “Next” button in the top right-hand corner.
Step 4: Delete or import rows
In step 4, you will have the option to either delete the imported rows or to import the rows.
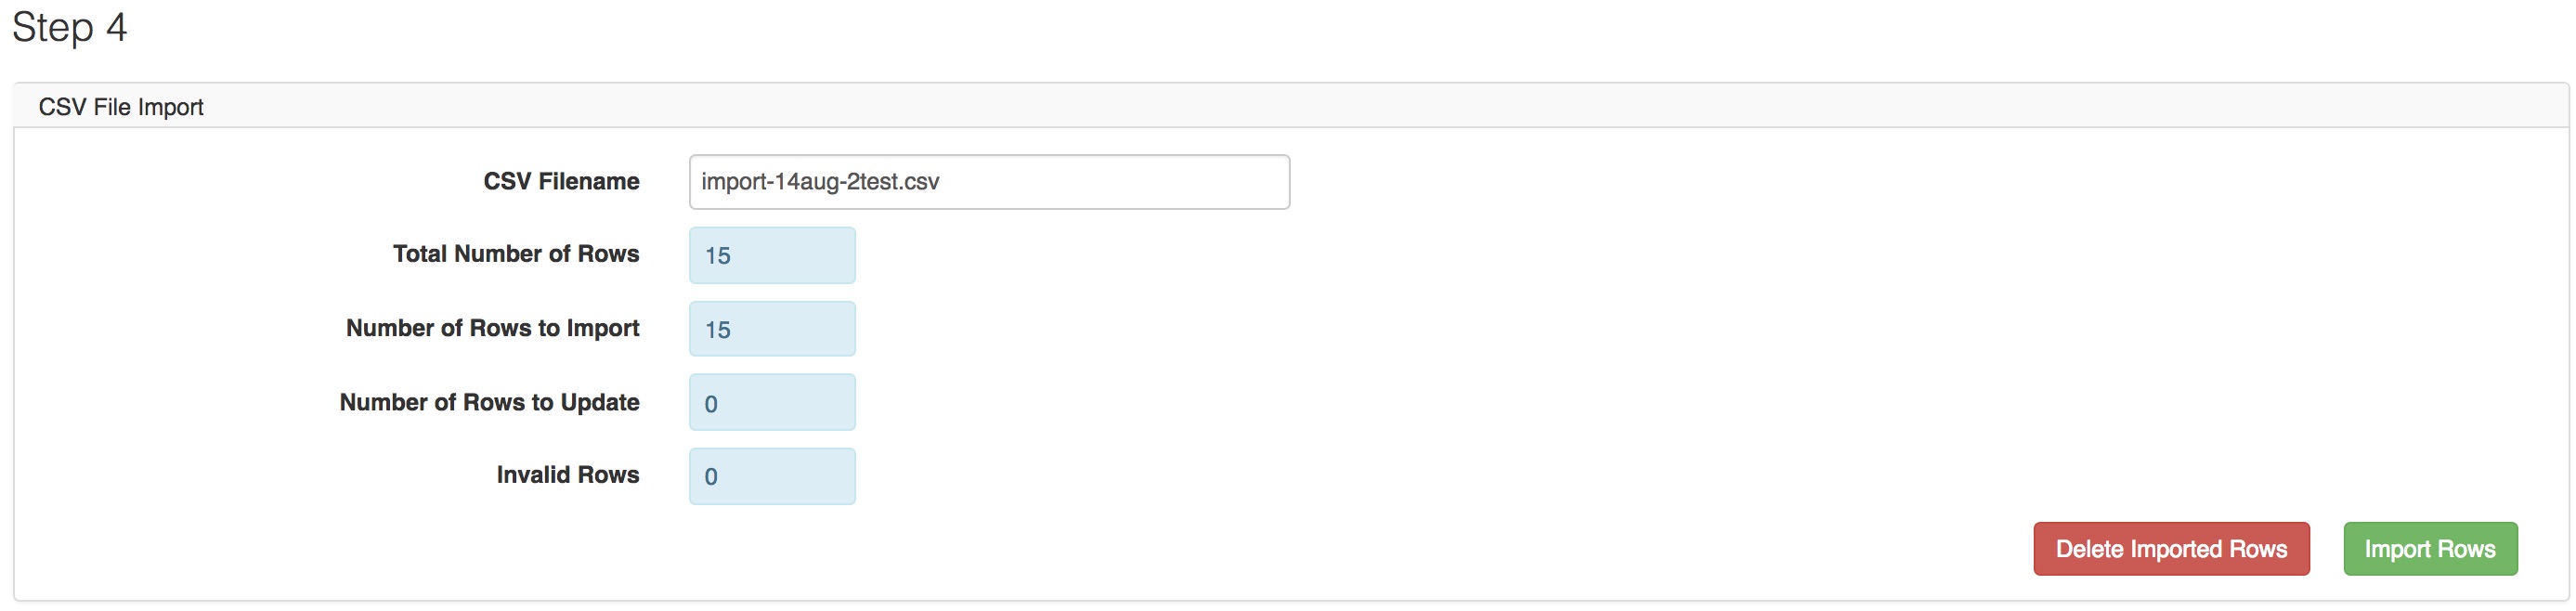
Delete Imported Rows:
To delete the imported CSV entries, click on the “Delete Imported Rows” button. You will now see the following pop-up screen. Click on the “Delete Now” button to continue with deleting the information.

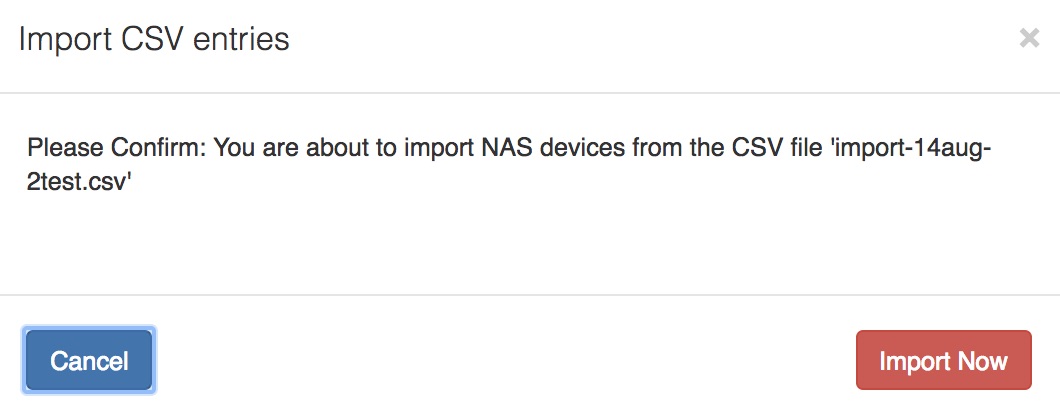
Import Rows:
To import the radius manager services, click on the “Import Rows” button. You will now see the following pop-up screen. Click on the “Import Now” button to continue with deleting the information.
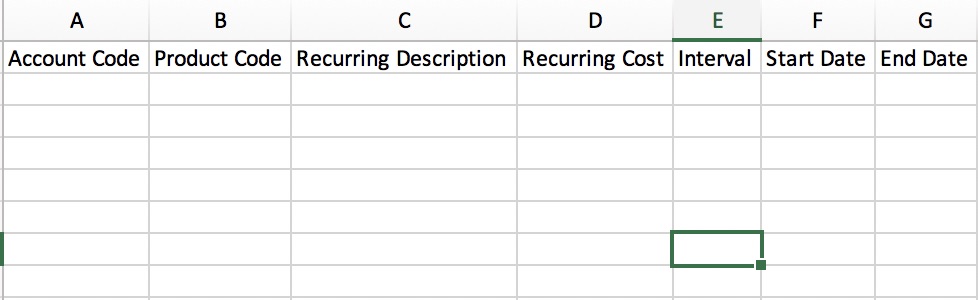
6. Import Recurring Billing
This Wizard allows you to import recurring billing information from a CSV file. To find the import wizard for recurring billing, go to “Tools” – “Import Wizard” and then click on the “Import Recurring Billing” option.
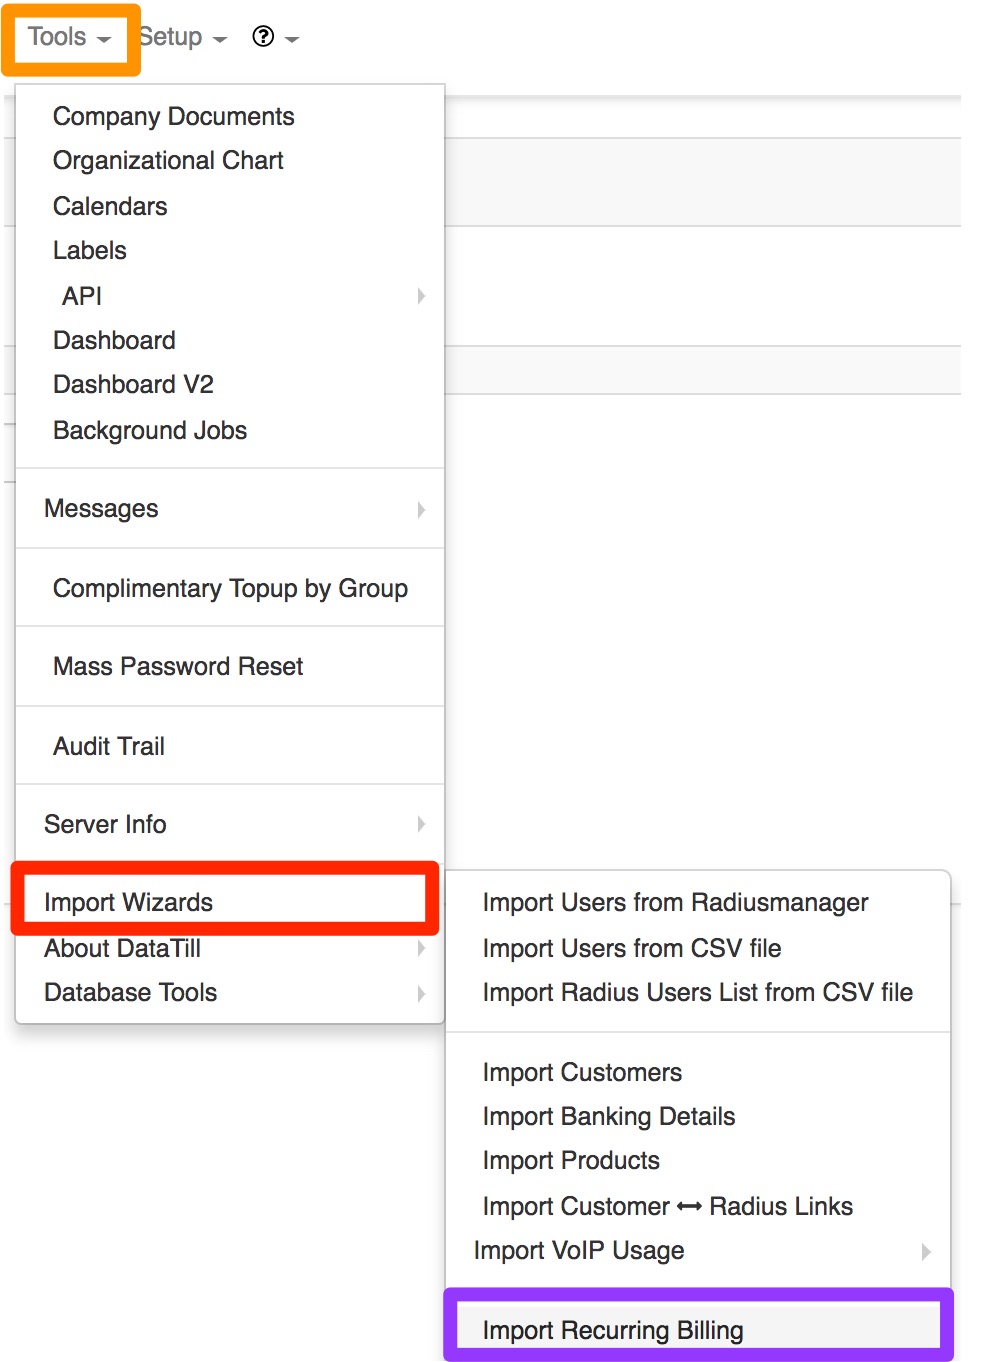
On the following page, you will be able to download the import template to use.
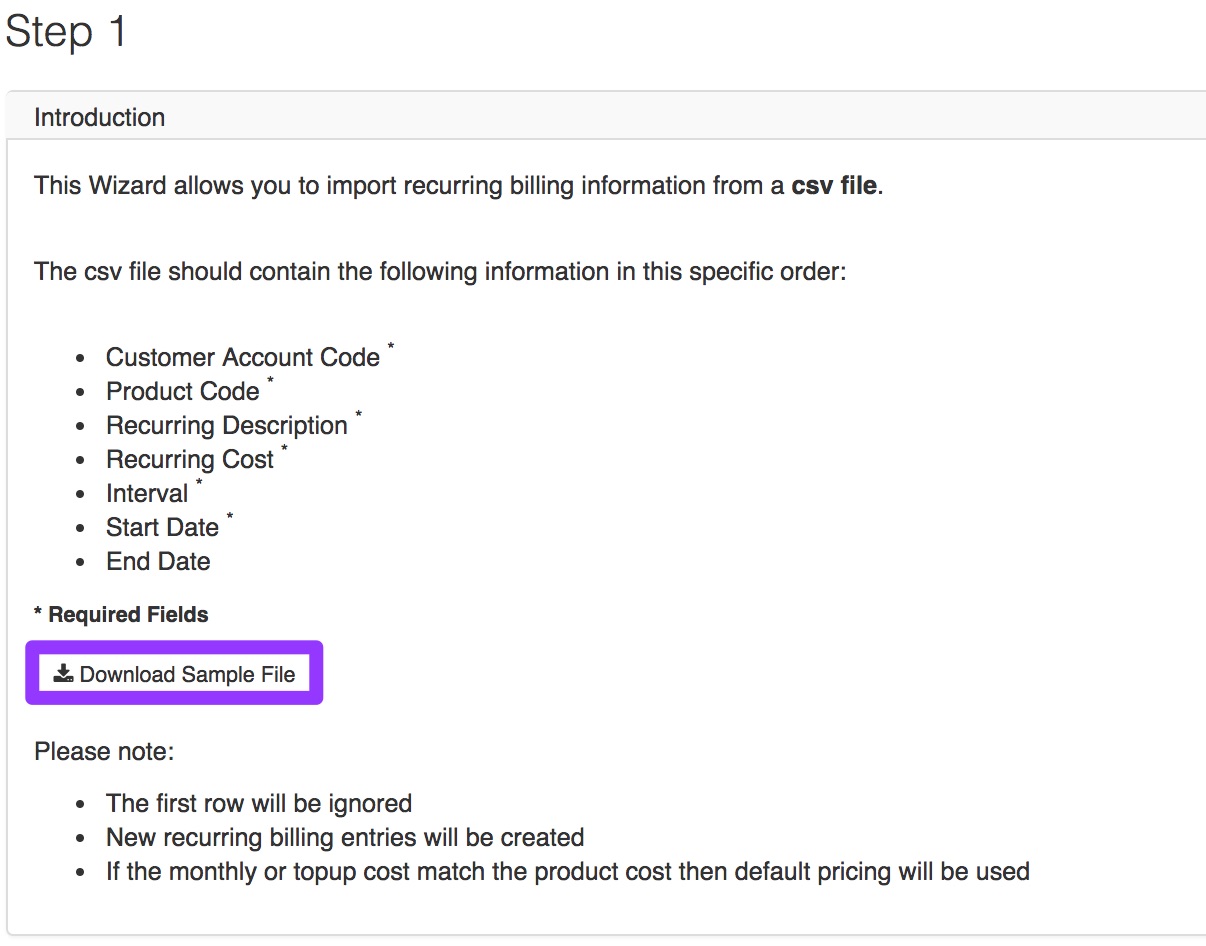
Step 1: Creating your CSV document
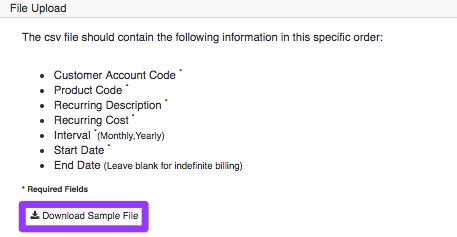
By making use of this import wizard, you will import the following items:
- Customer Account Code
- Product Code
- Recurring Description
- Recurring Cost
- Interval
- Start Date
- End Date
After creating your file, remember to save it in CSV format. You can continue to step 2 by clicking on the “Next” button in the top right-hand corner.
Step 2: Uploading your CSV document
This step will require you to upload your CSV document with all of the data which you would like to use. Ensure that you are using the correct field delimiter and field enclosure. Next, you will need to click on the “Show File Contents” button and thereafter on the “Validate File” button. This will determine whether the data in the file is usable or not.
If the data is usable, then click on the “Next” button in the top right-hand corner to continue to step 3.
Step 3: Import or delete rows
In step 3, you will need to determine whether you want to import or delete the rows.

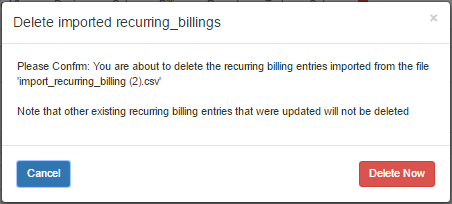
Delete Imported Rows:
To delete the imported CSV entries, click on the “Delete Imported Rows” button. You will now see the following pop-up screen. Click on the “Delete Now” button to continue with deleting the information.
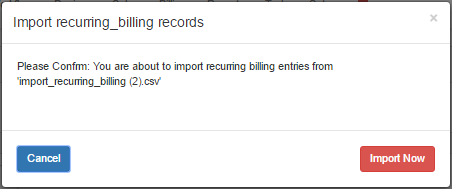
Import Rows:
After clicking on the “Import Rows” button, you will see the screen below. Click on the “Import Now” button to continue the importing process.
7. Import Billing documents
7.1. Import invoices and credit notes
In this section, you will now need to start importing your invoices and credit notes. To find you import template for your invoices and credit notes, you can go to “Tools” – “Import Wizards” and then click on the “Import Invoices & Credit Notes” option.
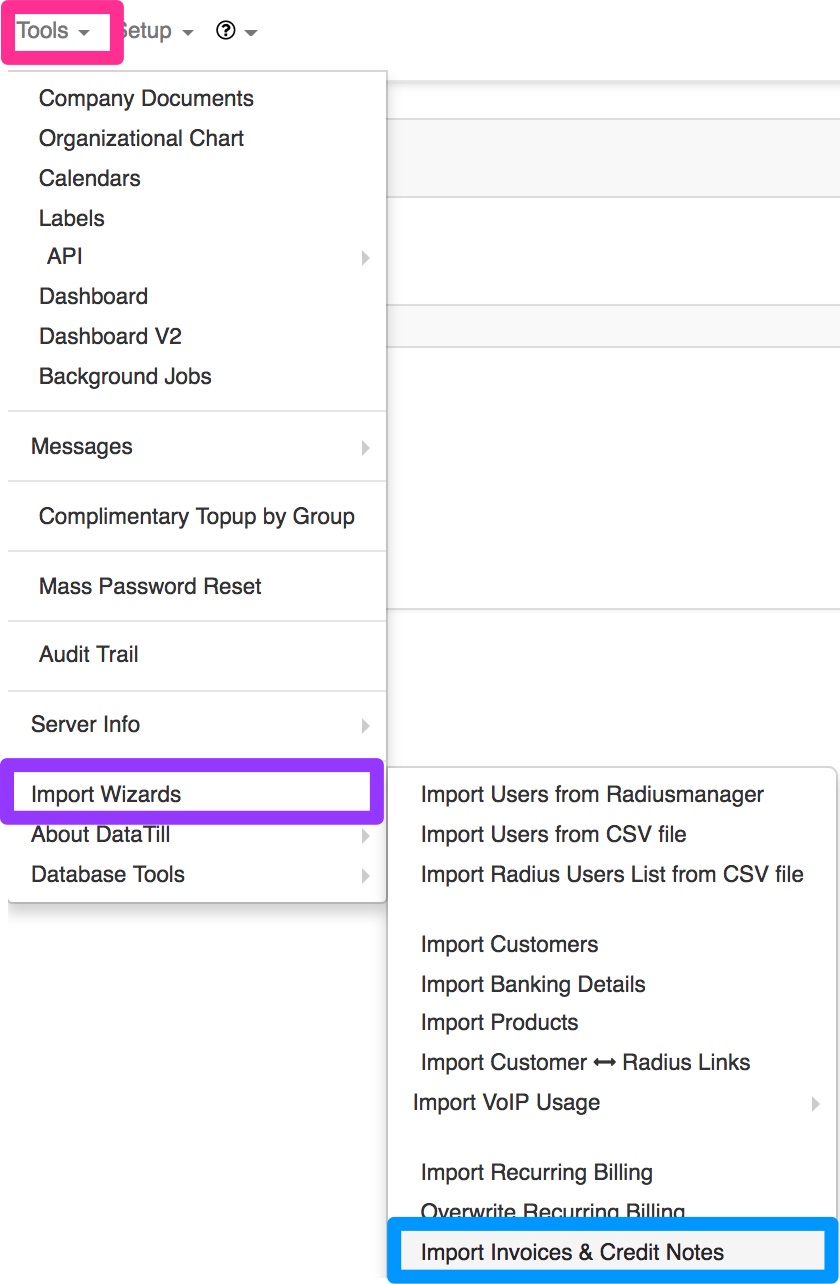
On the following page, you will be able to download the import template to use.
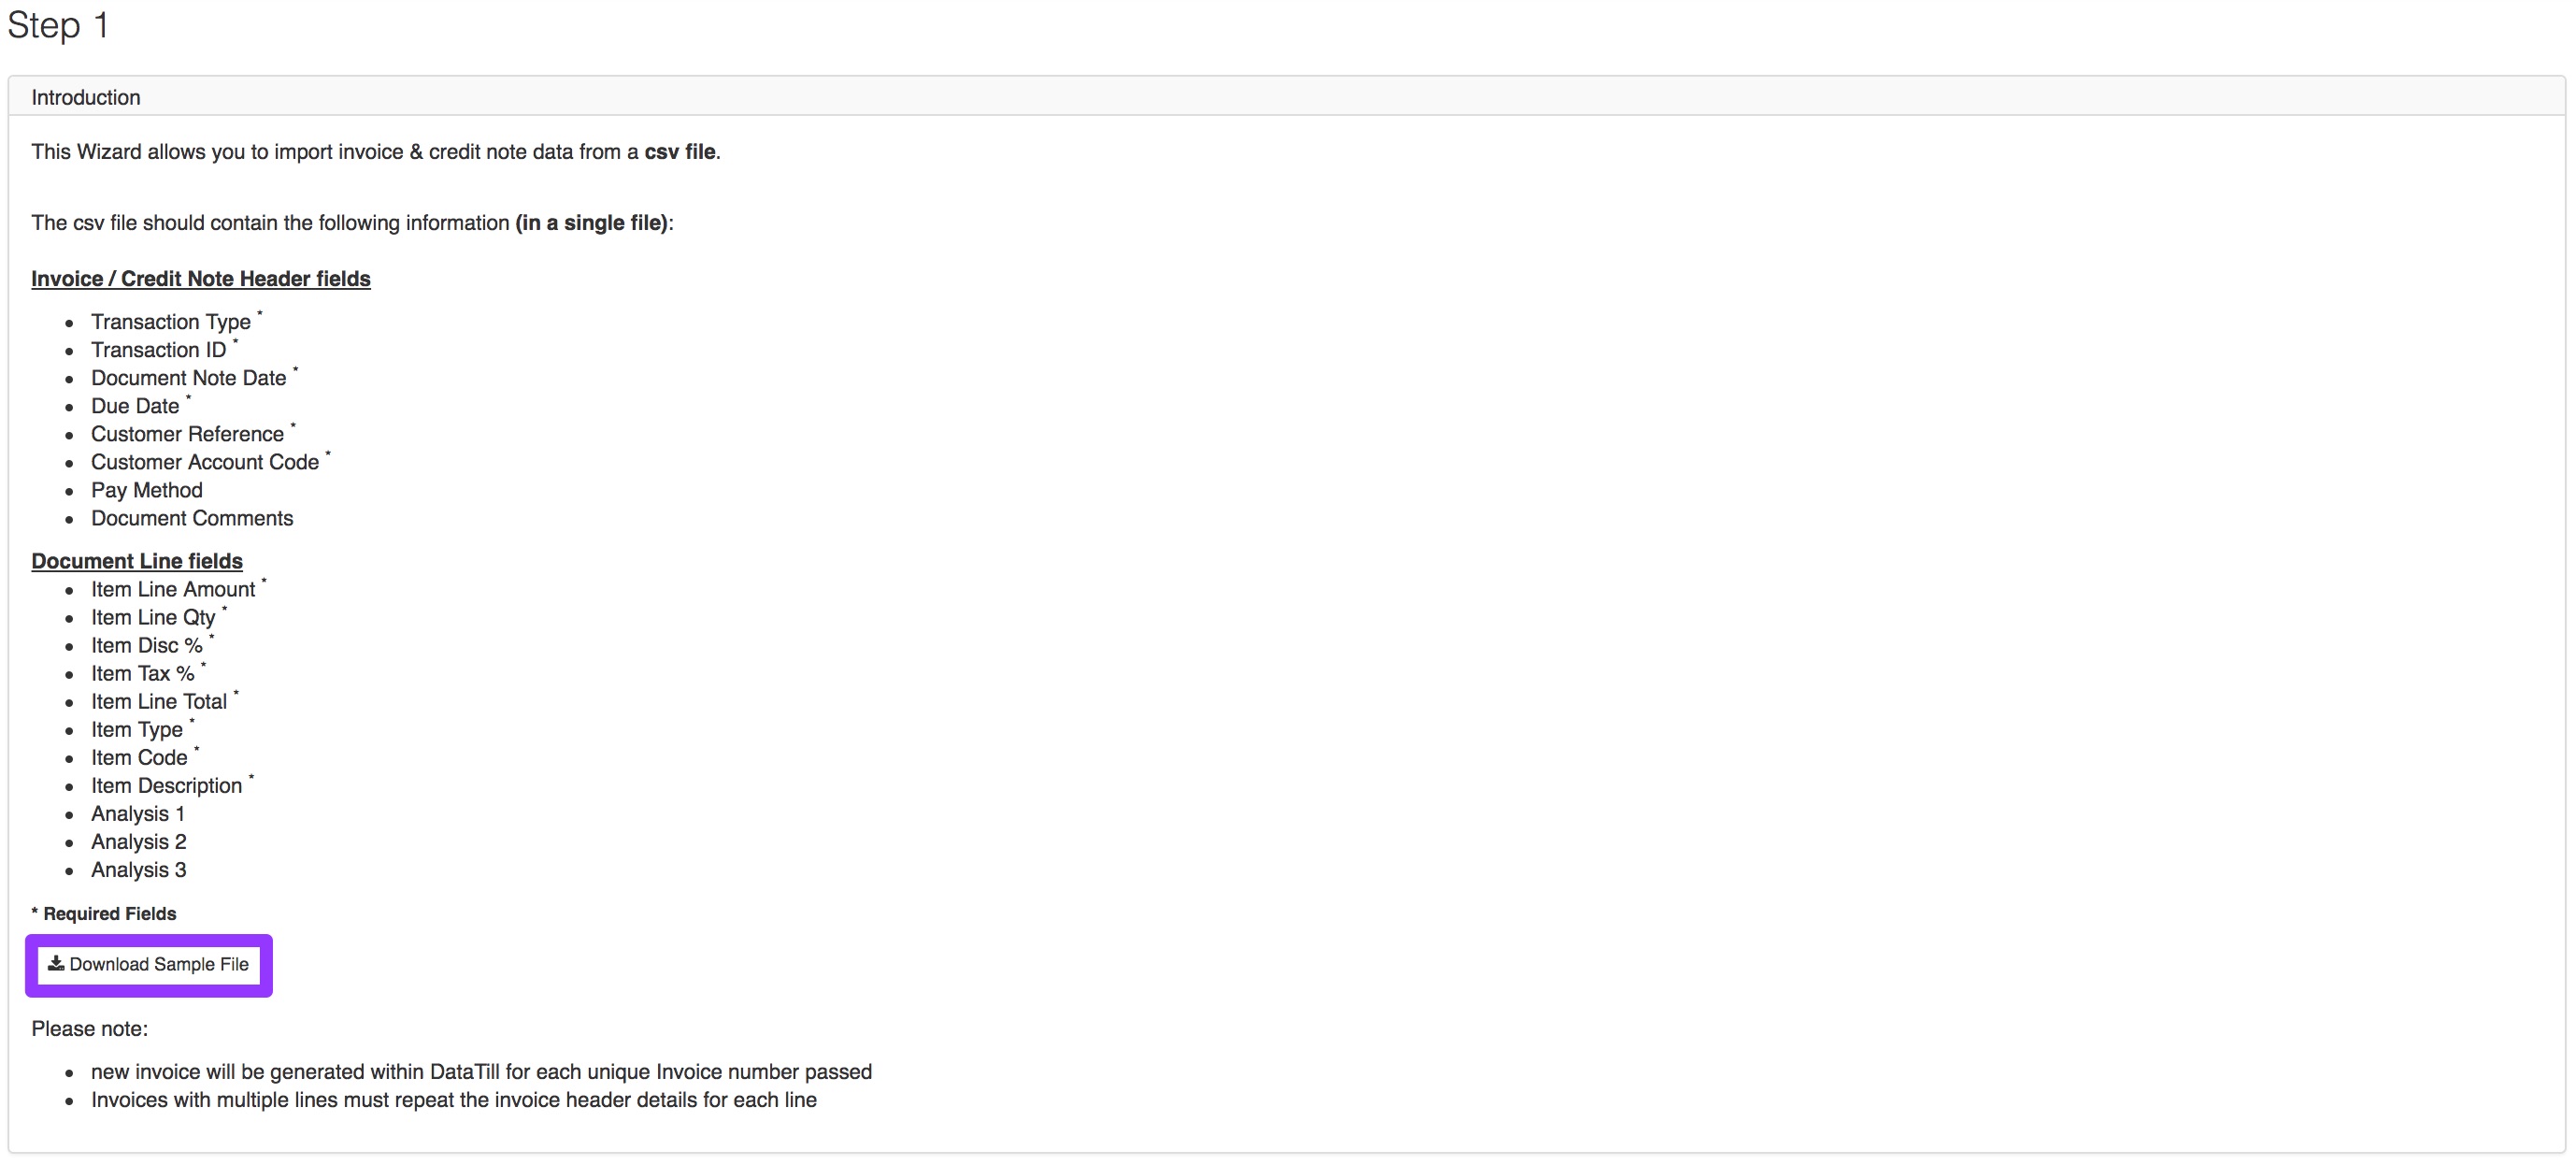
Step 1: Creating your CSV Document
The CSV file should contain the following information (in a single file):
Invoice / Credit Note Header fields
- Transaction Type *
- Transaction ID *
- Document Note Date *
- Due Date *
- Customer Reference *
- Customer Account Code *
- Pay Method
- Document Comments
Document Line fields
- Item Line Amount
- Item Line Qty
- Item Disc %
- Item Tax %
- Item Line Total
- Item Type
- Item Code
- Item Description
- Analysis 1 (if applicable)
- Analysis 2 (if applicable)
- Analysis 3 (if applicable)
When populating the CSV, it is important to remember that different line items of the same invoice or credit note should have the same transaction ID. See example below:
ID: 001 Line 1
ID: 001 Line 2
(Both will appear on the same invoice)

You can continue to step 2 by clicking on the “Next” button in the top right-hand corner.
Step 2: CSV File import
This step will require you to upload your CSV document with all of the data which you would like to use. Ensure that you are using the correct field delimiter and field enclosure. Next, you will need to click on the “Show File Contents” button and thereafter on the “Validate File” button. This will determine whether the data in the file is usable or not.
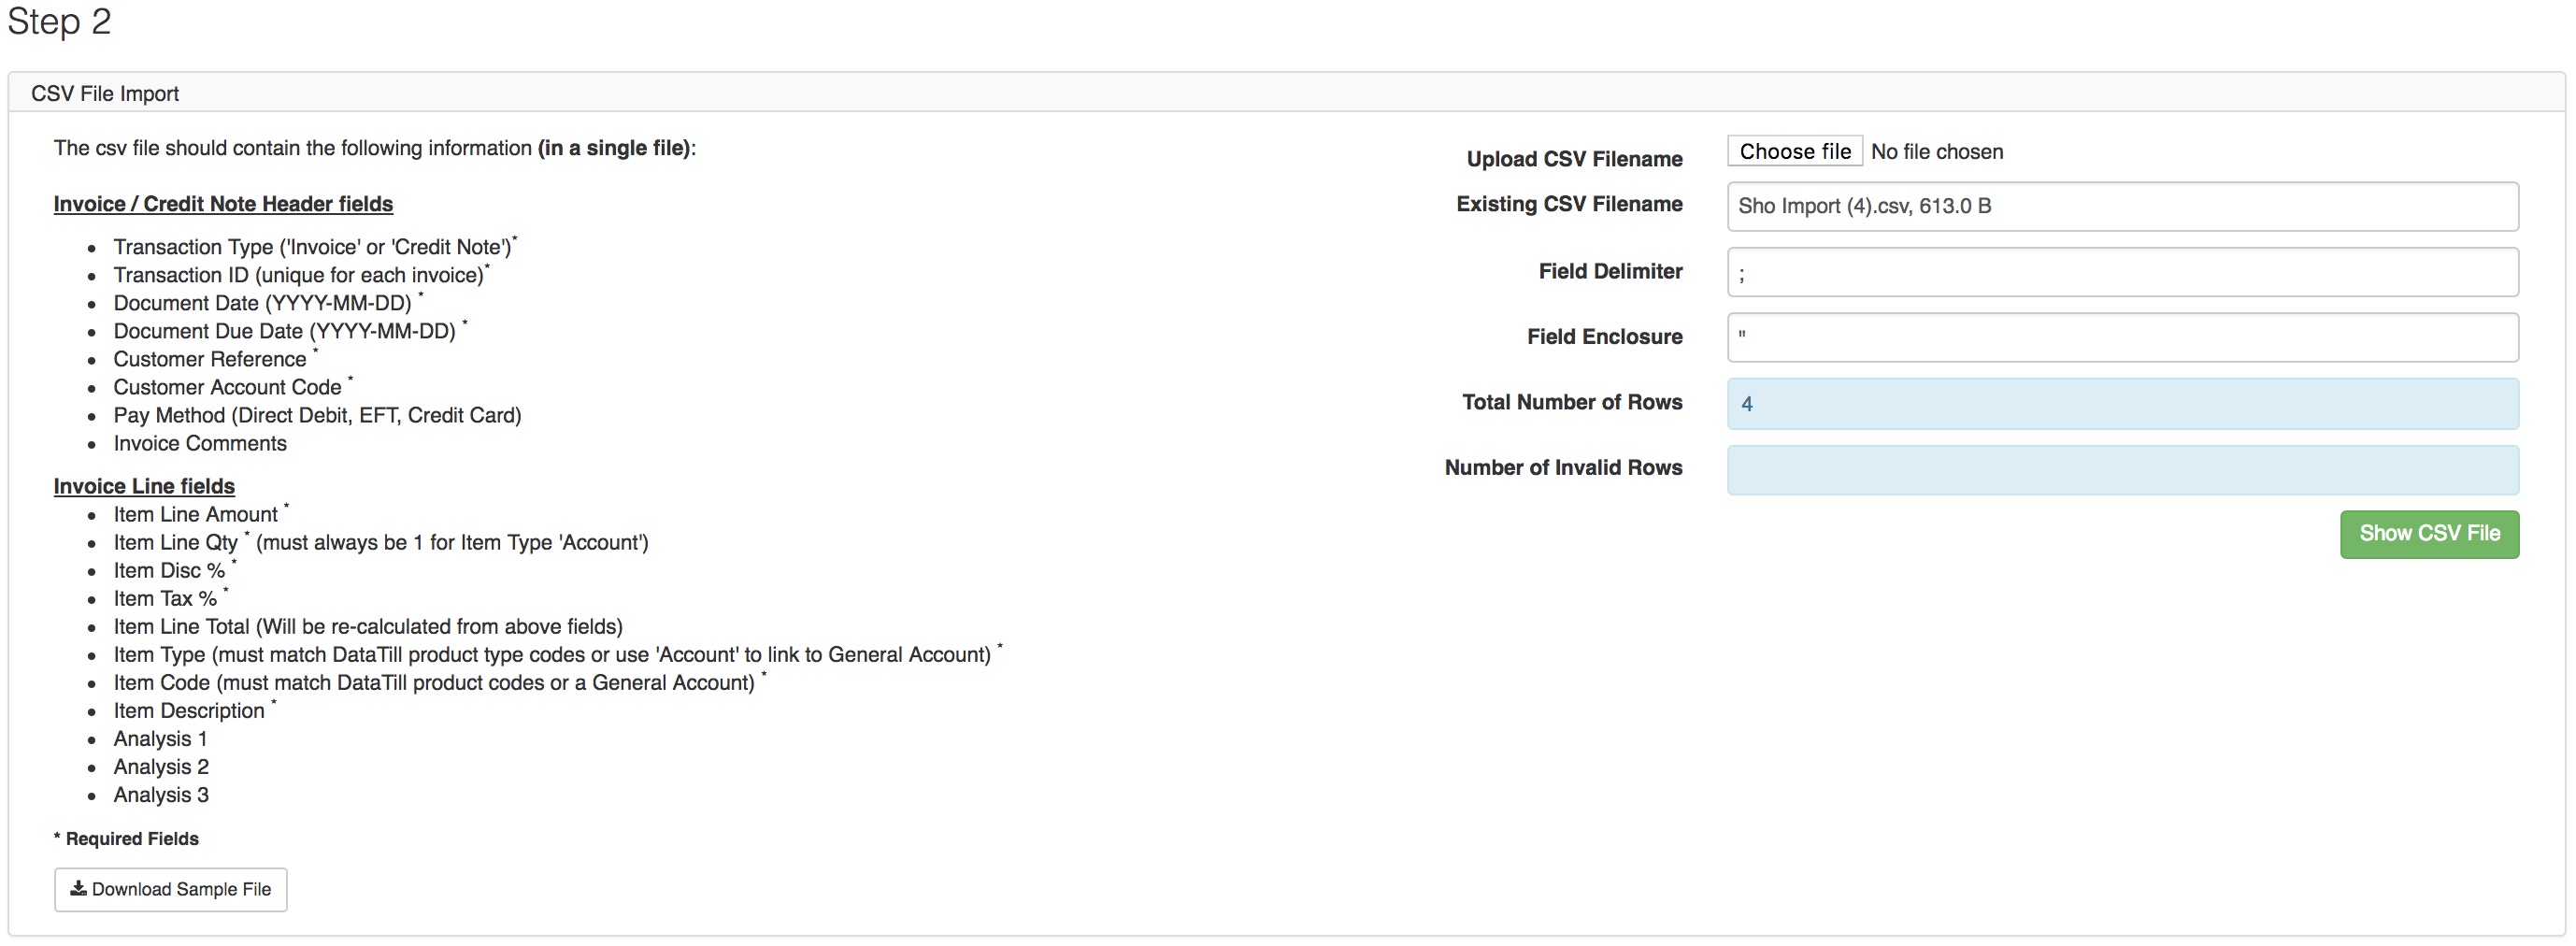
After creating your file, remember to save it in CSV format. You can continue to step 2 by clicking on the “Next” button in the top right-hand corner.
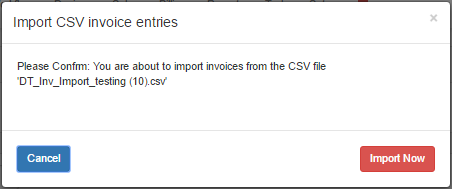
Step 3: Delete or import rows
In step 3, you will have the option to either delete the imported rows or to import the rows.

Delete Imported Rows:
To delete the imported CSV entries, click on the “Delete Imported Rows” button. You will now see the following pop-up screen. Click on the “Delete Now” button to continue with deleting the information.

Import Rows:
To import the radius manager services, click on the “Import Rows” button. You will now see the following pop-up screen. Click on the “Import Now” button to continue with deleting the information.
7.2. Importing adjustments
In this section, you will now need to start importing your invoices and credit notes. To find you import template for your invoices and credit notes, you can go to “Tools” – “Import Wizards” and then click on the “Adjustments” option.
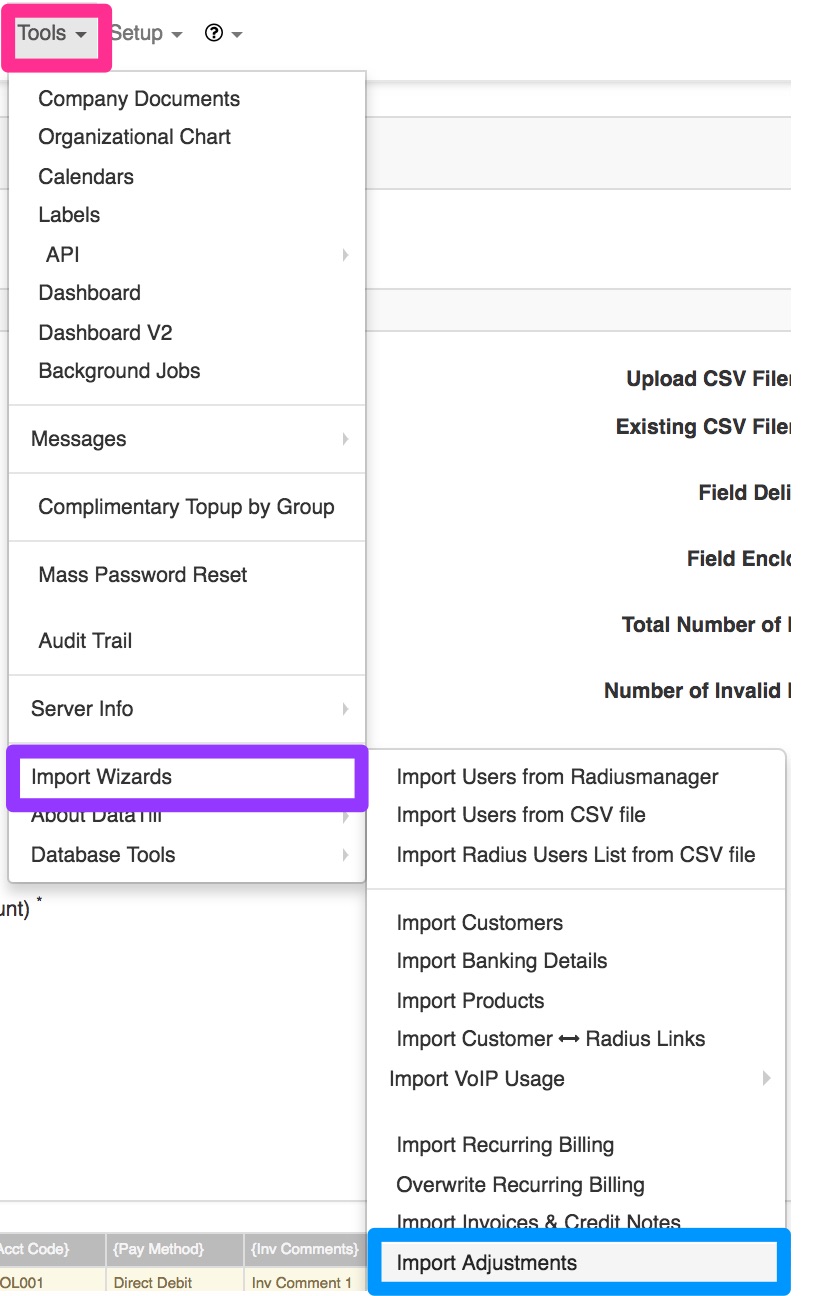
On the following page, you will be able to download the import template to use.
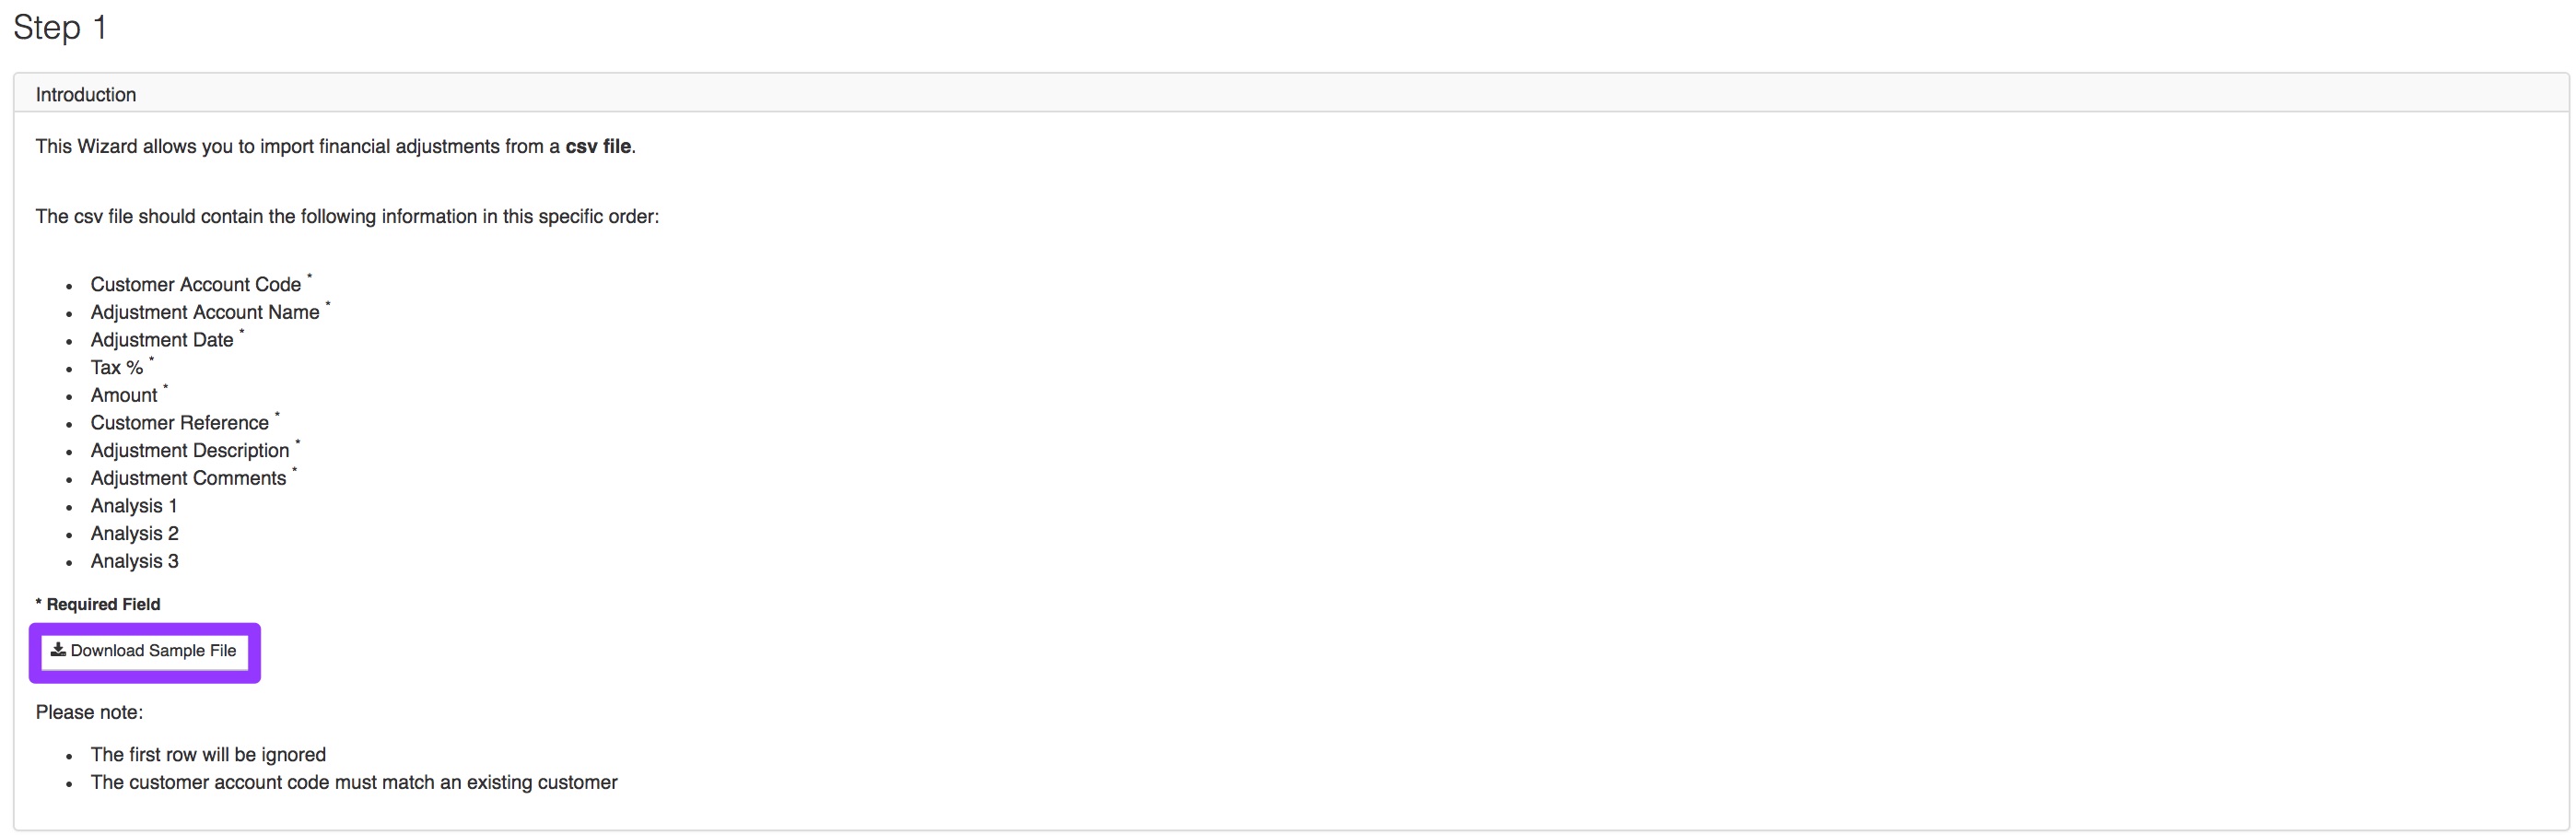
Step 1: Creating your CSV Document
The CSV file should contain the following information in this specific order:
- Customer Account Code
- Adjustment Account Name
- Adjustment Date
- Tax %
- Amount
- Customer Reference
- Adjustment Description
- Adjustment Comments
- Analysis 1 (if applicable)
- Analysis 2 (if applicable)
- Analysis 3 (if applicable)
You can continue to step 2 by clicking on the “Next” button in the top right-hand corner.
Step 2: CSV File import
This step will require you to upload your CSV document with all of the data which you would like to use. Ensure that you are using the correct field delimiter and field enclosure. Next, you will need to click on the “Show File Contents” button and thereafter on the “Validate File” button. This will determine whether the data in the file is usable or not.
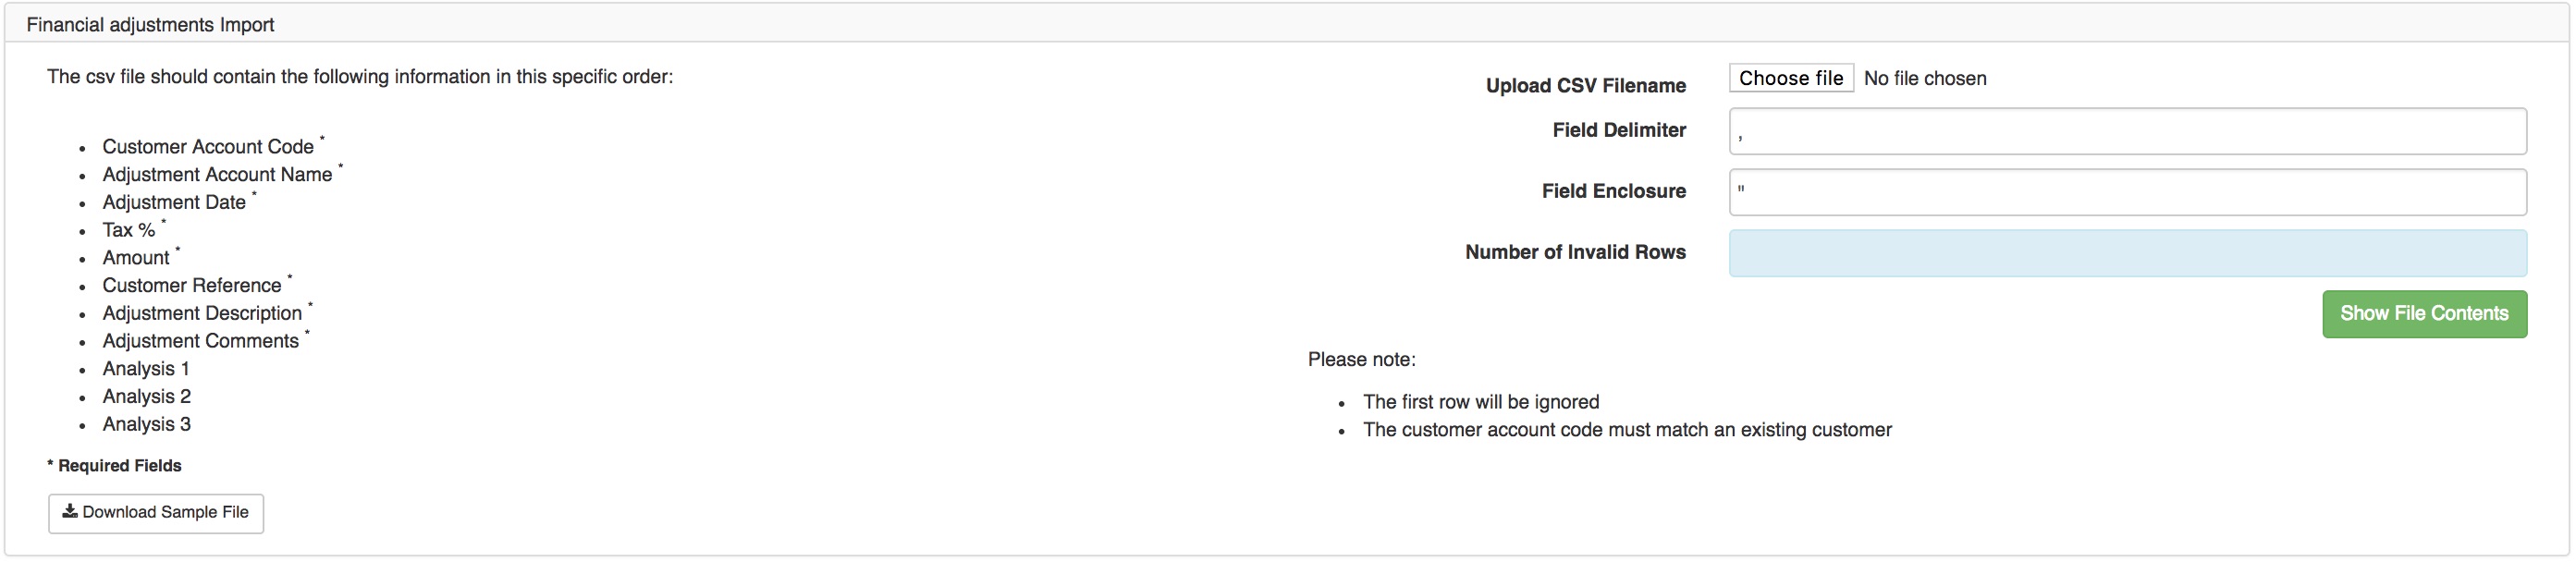
After creating your file, remember to save it in CSV format. You can continue to step 2 by clicking on the “Next” button in the top right-hand corner.
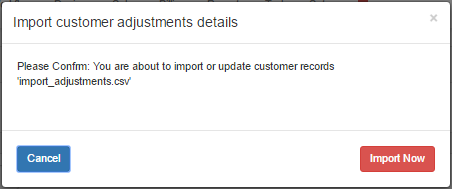
Step 3: Import Adjustments
In step 3, you will have the option to import the rows.

Import Rows:
To import the radius manager services, click on the “Import Rows” button. You will now see the following pop-up screen. Click on the “Import Now” button to continue with deleting the information.
8. Import receipts into SageOne
To import your receipts into SageOne, you will need to follow the steps below:
- Log into your online banking
- Export the bank statement for the relevant bank account.
- Create a CSV document for your banking with the following headings:
- Date
- Description
- Save the document as a CSV file.
- Import the document into your bank account in SageOne (Banking – transactions – banking).
- Please ensure that your bank account reconciles with your SageOne bank account before you start allocating payments and receipts.
For more information on how SageOne works, please refer to the SageOne website:
http://help.accounting.sageone.co.za/en_za/accounting/banking.html
9. Overwriting Recurring billing entries
This Wizard allows you to delete or update recurring billing entries from a CSV file. For more information on how to enable this function, please refer to our Overwriting Recurring Billing Entries Guide.
Please be diligent when completing this process as once you have overwritten a recurring billing entry, the old entry will be deleted. This process cannot be undone, and it is advised that you use this functionality with extreme care.
To find your “Tools” – “Import Wizard” and then click on the “Overwrite Recurring Billing” option.
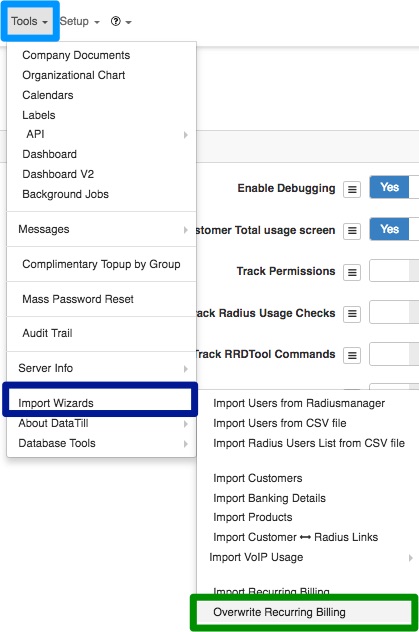
You will now see the following screen:
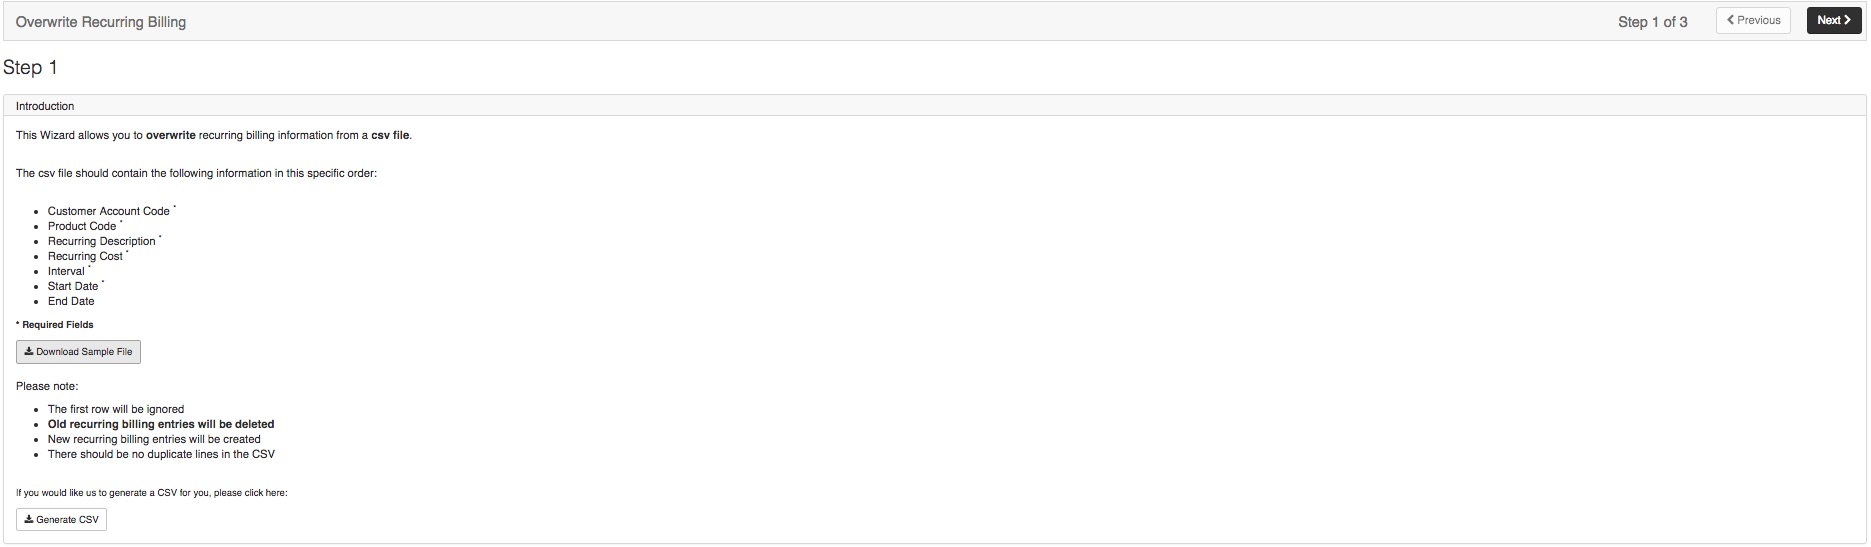
Step 1: Introduction
In your introduction, you will be able to see the following information:
You will have one of two options when you are overwriting recurring billing entries:
| Purple: | This will allow you to create your own import template. |
| Blue: | This button will allow you to extract a list of specific non-data recurring. |
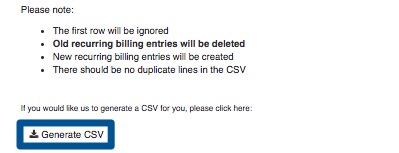
Please note:
- The first row will be ignored.
- Old recurring billing entries will be deleted.
- New recurring billing entries will be created.
- There should be no duplicate lines in the CSV document.
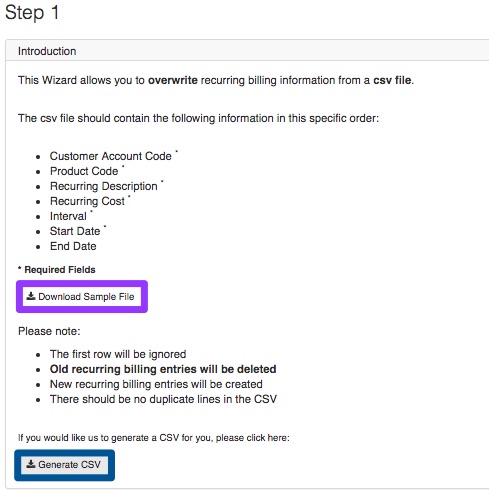
Creating your own templates:
To populate the import template with your own information, click on the “Download Sample File” button to download the import template.
After the template has downloaded, click the downloaded document to open it.
After populating your document, save it as in CSV format and then continue to step 2 of the process.
Overwriting only specific items
You will also have the option to export and override only specific non-data recurring billing items. To do this, you will need to click on the “Generate CSV” button.
After clicking on the “Generate CSV” button, you will be redirected to the following screen:
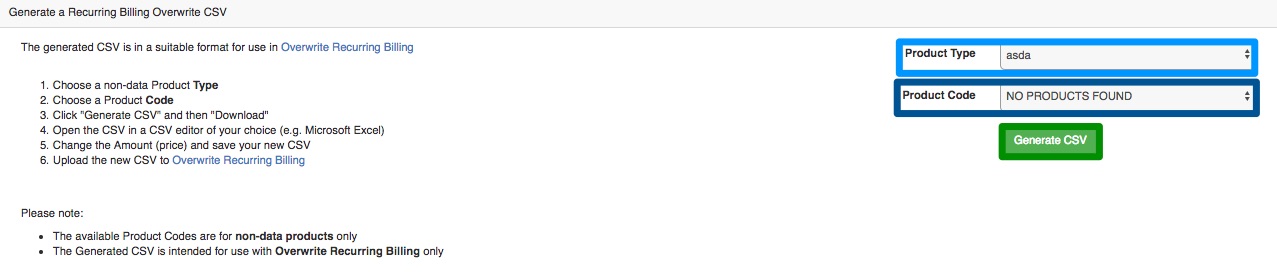
Choose the relevant “Product Type” and then the specific “Product Code” that you would like to overwrite. After choosing the relevant product type and code, click on the “Generate CSV” button. If there are no products for the specific product type, then the product code section will display “NO PRODUCTS FOUND” as in the screenshot above.
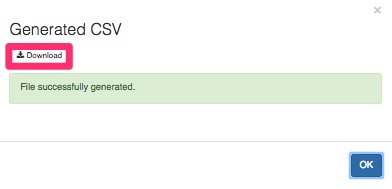
Once the CSV file has generated, then you will be able to download the CSV document.
When you open this CSV, all the relevant information will already be populated with a list of the relevant customer codes and other information. You will now just be able to change the relevant section. Remember to save your document as a CSV document and then you can continue to step 2 of this process.
*Please Note: End Date
If there should be no end date linked to the product, please ensure that the field is empty. If there should be an end date, please ensure that the correct end date has been entered.
Remember to double check that there are no duplicate entries in your document.
Step 2: File upload and validation
On the next screen, you will need to “Upload CSV Filename” and then click on the “Validate File” button.
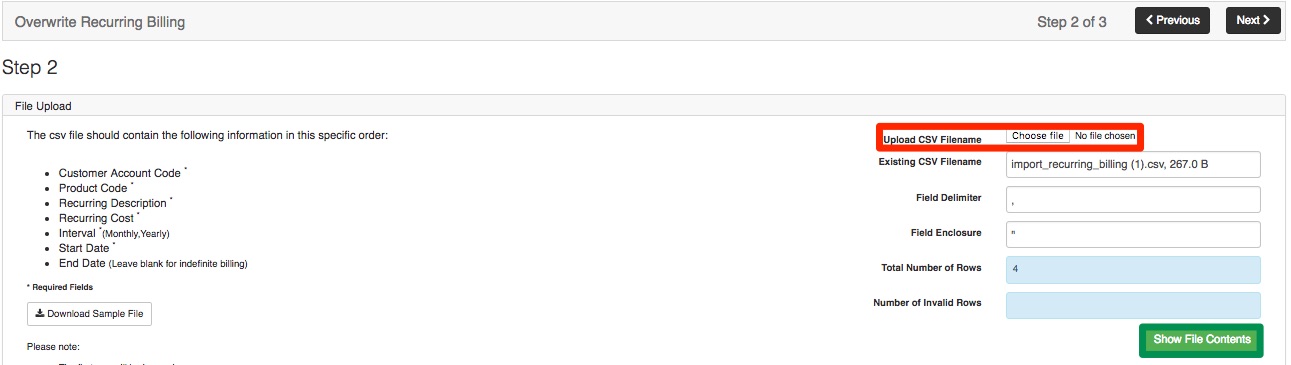
At the bottom of the screen, you will now see whether all lines are validated or not. If the lines are not validated, they will be displayed in red. Fix the unvalidated lines first before continuing to the next step. If the lines are validated, they will be displayed in green (as seen below) and you can continue to step 3.

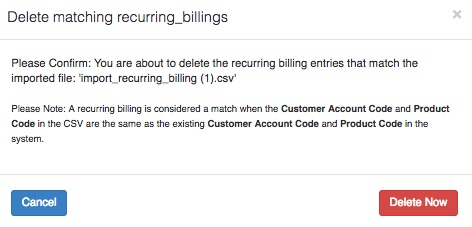
Step 3: Overwrite
On the following screen, you will either be able to delete the selected recurring billing items from customer profiles or you will be able to delete the selected recurring billing items and overwrite it with new ones.
Deleting recurring billing entries
To only DELETE recurring billing items, please click on the “Delete Imported Rows” button. Click on the “Delete Now” button to continue with deleting the information.
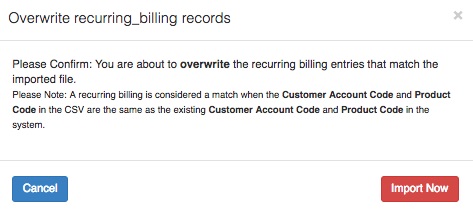
Overwriting recurring billing entries
To DELETE and OVERWRITE recurring billing entries, please click on the “Delete Imported Rows and Overwrite” button. Click on the “Import Now” button to continue with deleting the information.