
Customer Portal Guide
Webinar: Customer Portal
2.2.1 Updating your account information:
2.2.2 Updating your billing information:
2.4.2 Pulling invoices and statements:
2.5 Helpdesk Tickets:
2.5.1 Create a new note
2.5.2 View, respond or rate tickets
1. Logging in to your profile
To access your online customer profile, you will need to log into your portal.
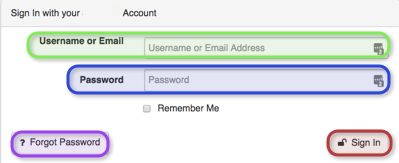
| Green: | In this section, enter your account code or email address. |
| Blue: | Here you need to enter your password. |
| Purple: | In the case that you have forgotten your password, click on the “Forgot Password” button. Follow the instructions to reset your password. |
| Red: | After filling in your username and password, click on the “Sign In” button. |
2. Your Online Profile
After you have successfully logged into the customer profile, you will see the following screen:
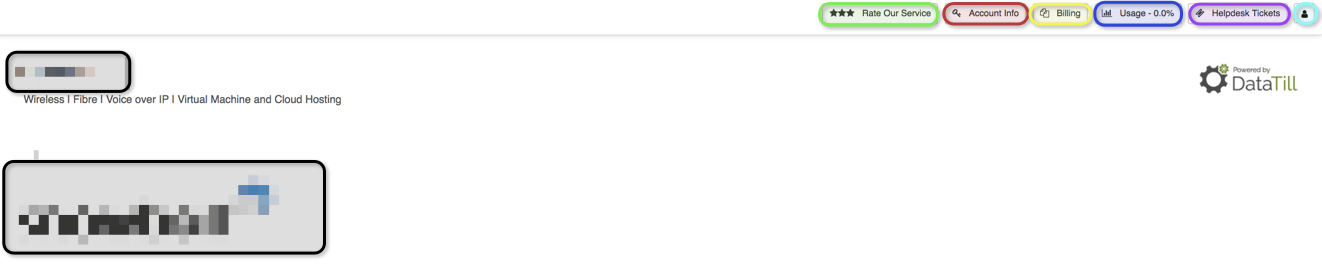
| Green: | Click on this button to submit a rating for your service provider. |
| Red: | Here you can view and update your account information. |
| Yellow: | In this section you can view your billing as well as download invoices and statements. |
| Blue: | Click on this button to view your usage details or submit top-ups. |
| Purple: | In this section you will be able to view your previous and or current helpdesk tickets, as well as submit a new ticket if need be. |
| Light Blue: | Click on this button to view your account information or to logout of your account. |
| Black: | This will be the company name and logo of your service provider. |
2.1. Rate our service
To rate your experience and services that you receive from your service provider, click on the “Rate Our Service” button. You will then see the following page:

On the left-hand side of the screen, you will be able to view all “previous ratings” submitted by you. On the right-hand side, you will be able to submit a new rating. In the blue section, choose the amount of stars that you want to rate your service provider. In the purple section, you will be able to add any additional comments or feedback that you want the WISP to know about. When you are happy with your new rating, click on the “Submit Rating” button.
2.2. Account info
After clicking on the account info button, you will be redirected to the following screen.
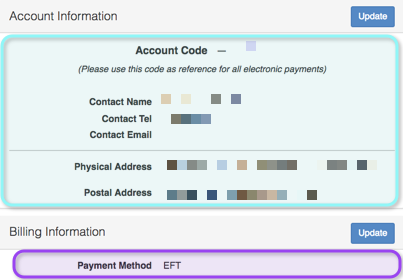
In the blue section you will be able to see information like the contact name and details, the account code and address. In the purple section, you will be able to view our current billing method and details.
2.2.1. Updating your account information:
To request an update for your account details, click on the “Update” button found on the right-hand side of “accounting Information”.
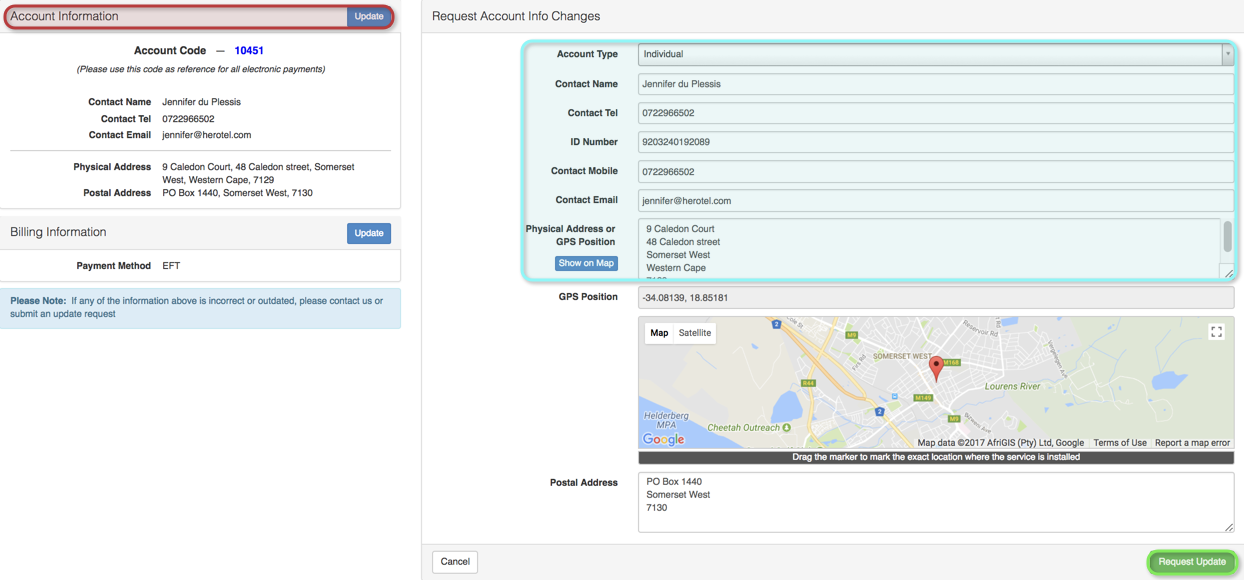
In the blue section, you will be able to update the following:
- Account type – Individual or Company
- Company Name – Company only
- Company Reg Number – Company only
- VAT number – Company only
- Contact Name
- Contact Tel
- ID Number
- Contact mobile – Individual only
- Contact Email
- Physical Address
- Postal Address
When you have updated your details accordingly, click on the “Request Update” button. The company will then receive your request and can then either accept or reject your changes.
2.2.2. Updating your billing information:
To request an update for your account details, click on the “Update” button found on the right-hand side of “Billing Information”.
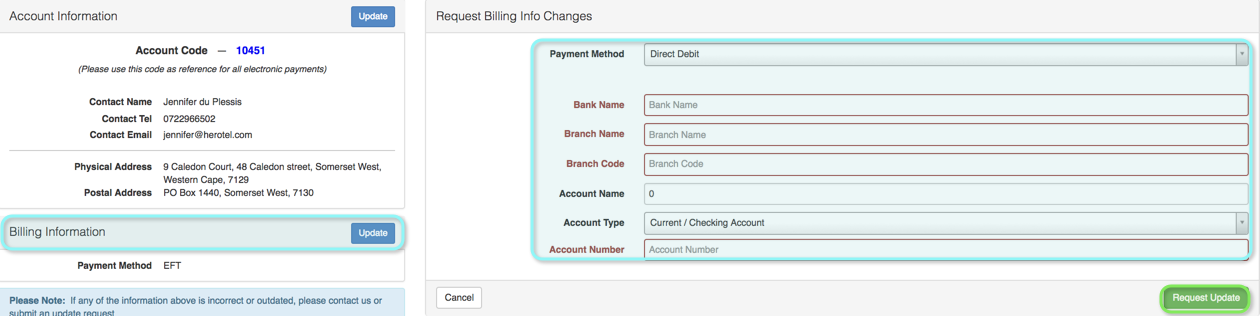
In the blue section, you will be able to update the following:
- Payment Method
- Direct Debit
- EFT
- Credit Card
- Cash
If you choose Direct Debit, you will be requested to fill in your debit order details online as well as fill in a debit order form from your service provider.
If you choose to pay via credit card, the service provider will send you credit card verification email. Simply follow the online instructions and verify your credit card. To ensure that the verification is successful, a payment of R1 will be deducted from your credit card.
When you have updated your details accordingly, click on the “Request Update” button. The company will then receive your request and can then either accept or reject your changes as well as send any necessary documentations or emails to ensure that your details can be updated.
2.3. Billing:
From this page you will be able to view all paid and unpaid invoices. You will also be able to pay outstanding invoices with your credit card – even if it is not your preferred method of payment.

| Green: | In this section you can view the invoice details like:
– Invoice number – Invoice Date – Due date – And status (Paid, unpaid or overdue) |
| Purple: | This will show you the invoice amount. |
| Red: | In the red section, you will have the option to pay the invoice via credit card. |
| Blue: | In the blue section you will be able to view the invoice. If you are not able to view the invoice, please check that you have allow the site to have pop-up blockers and then try viewing the invoice again. |
2.4. Usage
After clicking on the usage button, you will see the following screen:
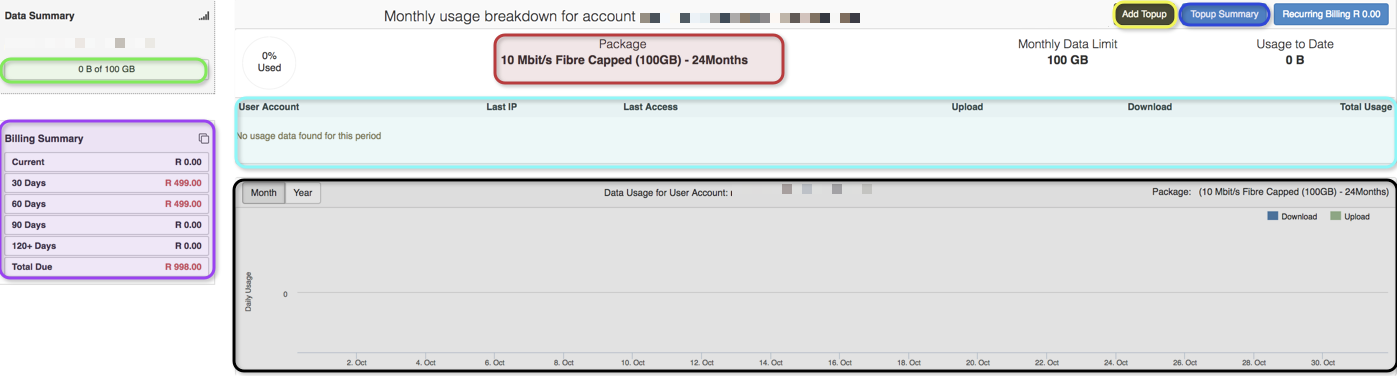
| Green: | In this section, you will see how much of you cap you have used. |
| Red: | Here you will be able to see on what data package you are currently on. |
| Yellow: | If you need to add a top-up to your account, click on the black button found in the yellow section. Please refer to 2.4.1. For more information on adding top-ups. |
| Blue: | Here you can view a list of all your requested top-ups. |
| Purple: | In this section, you will be able to view your age analysis. This section will also allow you to see how many months are outstanding (if any), to pull the invoices and to even pull a statement of your account. |
| Light blue: | This will give you more information on when your last at active session was. |
| Black: | In this section, you will be able to see a graph of your data usage. |
2.4.1 Adding top-ups:
To add a top-up, click on the “Add Topup” button. The following pop-up screen will now appear.
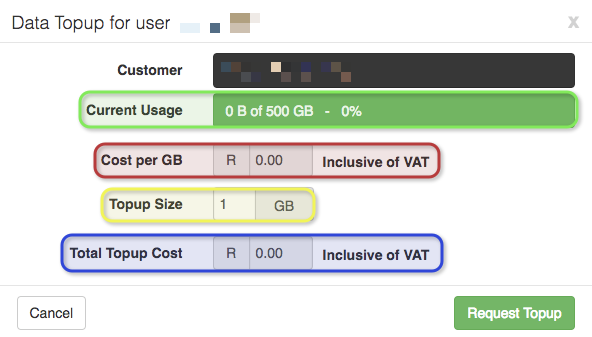
| Green: | Here you can see how much your cap you have used. |
| Red: | This will show you the amount that you will be charged per Gigabyte. |
| Yellow: | In this section you can choose how many gigabytes you want to add to your account. |
| Blue: | In the blue section you will be able to see what the total is that you will need to pay at the end of the month. |
When you have chosen how many gigabytes you want to add to your profile, then you can click on the “Request Topup” button. Please note that all your top-ups throughout the month will be added to your invoice at the end of the month.
2.4.2. Pulling invoices and statements:
To pull invoices and statements for your account click on either the current, 30 Days, 60 Days, 90 Days, 120+ days or total due option. The page will then provide you with a billing summary accordingly.
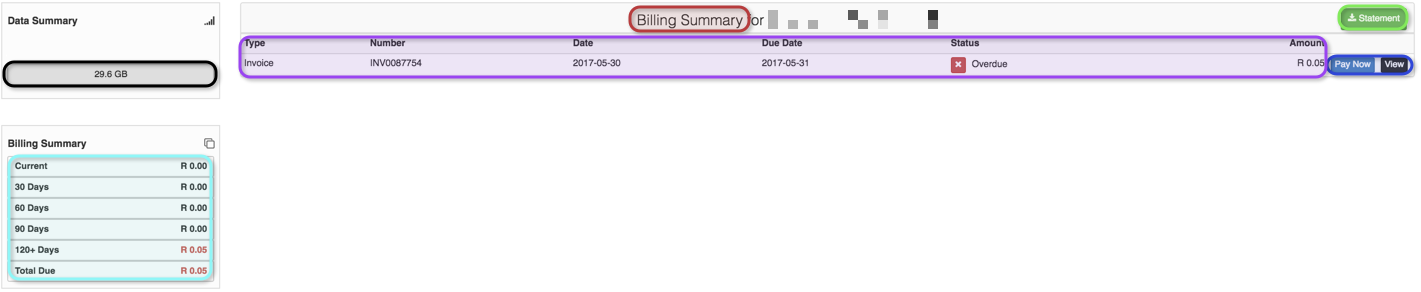
In the black section, you will be able to see how much data you have used. You are also able to see the invoice details for each invoice, pay or view the invoices and download a statement for your account.
2.5. Helpdesk Tickets:
Once you have clicked on the helpdesk tickets button, you will see the following screen. 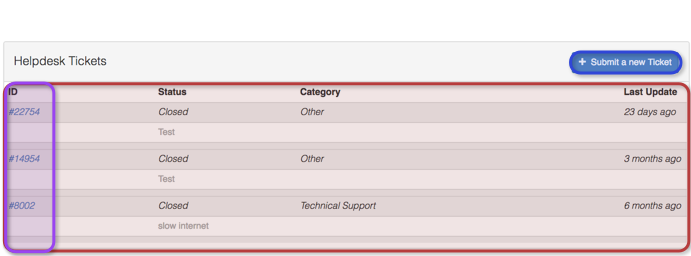
On this screen, you can view your ticket history, submit a new ticket, or view ticket details by clicking on the ticket ID.
2.5.1. Create a new note
To submit a new ticket, click on the “Submit a new Ticket” button. You will now see the following pop-up screen.
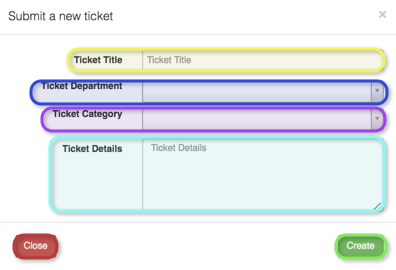
| Yellow: | Insert your ticket title. This is equivalent to a subject line in an email. |
| Blue: | In this section you will select to which department the ticket should be assigned.
– For example: Accounts |
| Purple: | Here you need to select the relevant category.
– For example: Accounts enquiry |
| Light blue: | In this section, you will start to type your message to the department. |
| Red: | Should you change no longer feel the need to create a ticket, click on the close button. |
| Green: | Should you wish to continue with the ticket and all information has been completed, click on the create button. |
After your ticket has been created, it will be assigned to the accounts department and someone will attend to the ticket as soon as possible. The ticket details can now be viewed under your ticket history.
2.5.2. View, respond or rate tickets
To view the ticket details or respond to an existing ticket, simply go to your ticket history and click on the ticket number found under ID.
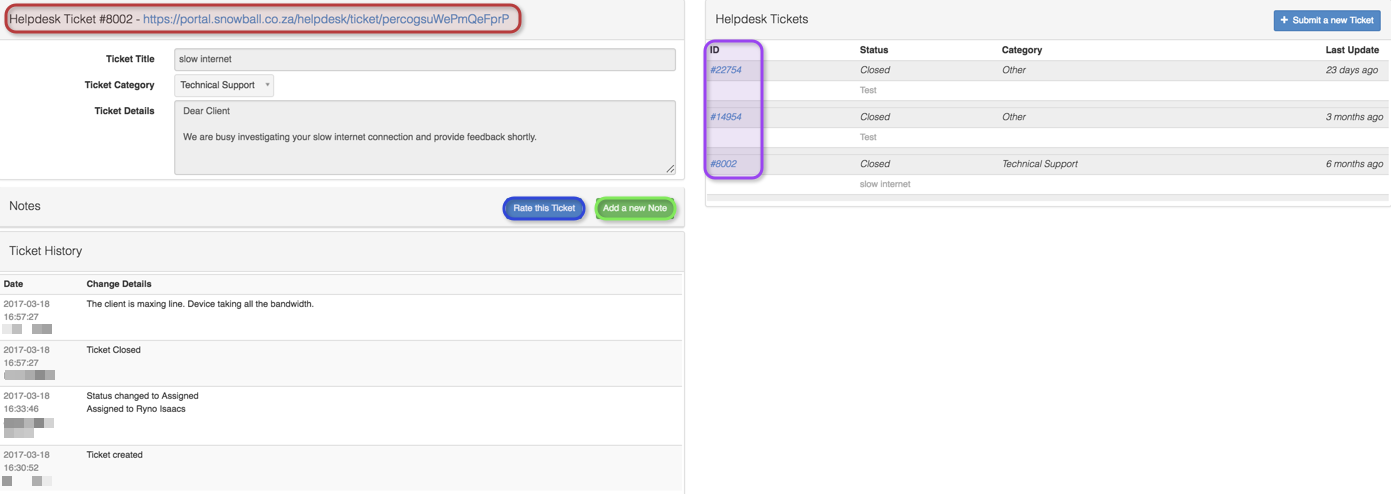
Once you have clicked on the relevant ticket number, the ticket details will open to your left-hand side. On the red section, you can click on the link to view all messages that have been seen sent between the customer and the relevant department.
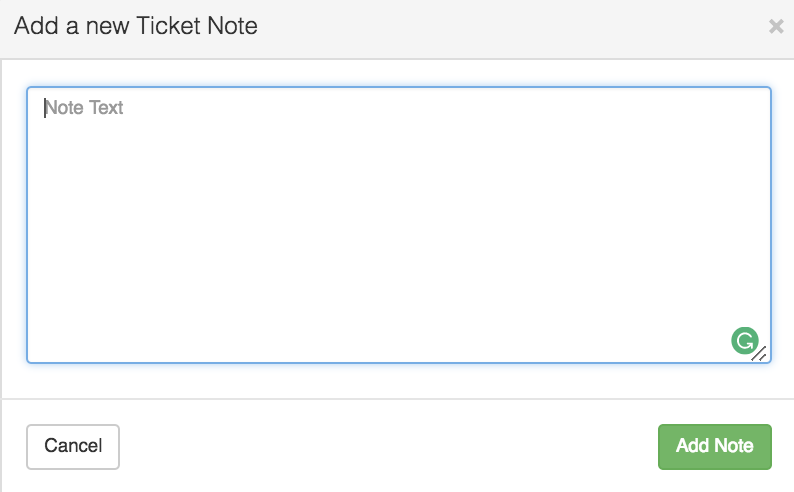
If you would like to submit a rating as to the service you have received with the current issue logged in the ticket, you can do so by clicking on the “Rate this Ticket” button. If you would like to respond to this particular ticket, you can to do by clicking on the “Add a new Note” button. On the pop-up screen, type your message that you would like to send, and then click on the add note button.
Please note that if the ticket has been closed and you submit a new note, that the ticket will be re-opened.