
Billing Guide
Webinar: Month-end Billing Run
Video: Billing Run (Part 1)
Video: Billing Run (Part 2)
Video: Exception Reports
Video: Creating Invoices and Credit Notes
Video: Adjustments and write-offs
See also our user guide on completing the month end billing run: 11. How to complete the month end billing run on HeroTill
- Billing Setup
- View Imported SageOne Data
- Product Pricing
- Finance Guide
- Finance in the Customer Menu
- Debit-Run Batches
- Customer Portal
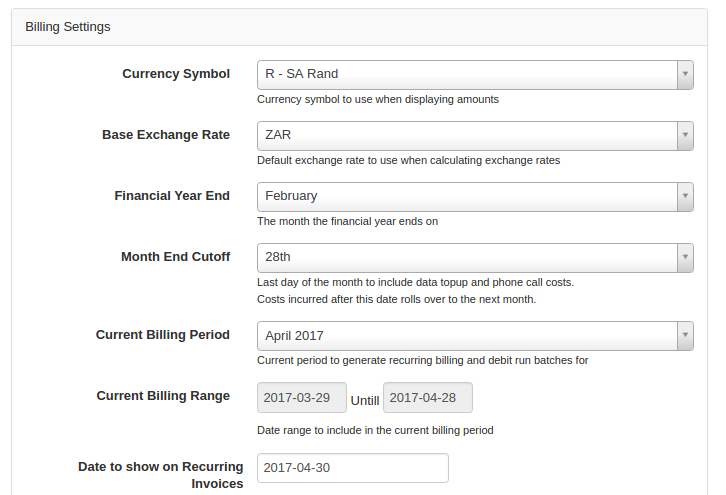
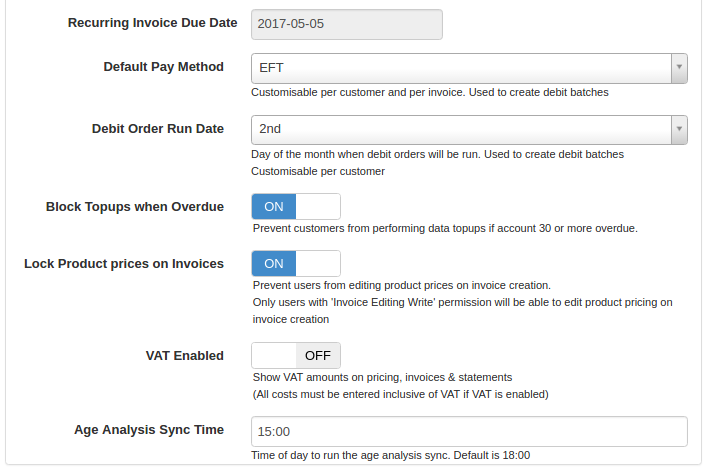
1. Billing Setup
In order to use the billing functions the billing needs to be setup. This involves setting up the Billing setup, creating billing groups and setting up the Accounting integration. Currently, only Sage one integration is supported.
1.1 Setup steps
- Go to Billing -> Billing Setup
- Billing settings include:
- Currency
- Financial year end
- Month end cut-off
- VAT
- Don’t forget to click on the update button.
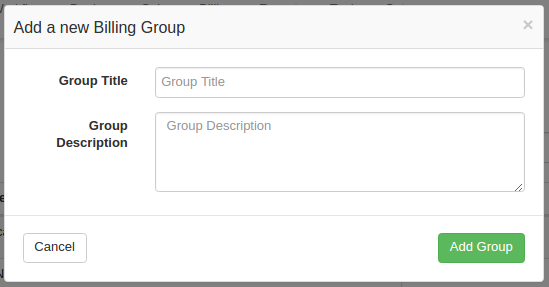
1.2 Billing Groups
-
- Go to Billing -> Billing Setup -> Billing Groups
- Click on “+ Add Group”
- Insert a Group title and a group description
- Click on “Add Group”
- At least one billing group needs to be created. Customers cannot be created without a billing group.
- Billing groups are used to group all the customers of the same billing date, e.g. customers who want a debit order on the 1st of each month will be put in one group, so all the customers who want to be billed on a specific day will be grouped accordingly.
- The Billing Group will be synced to sage.
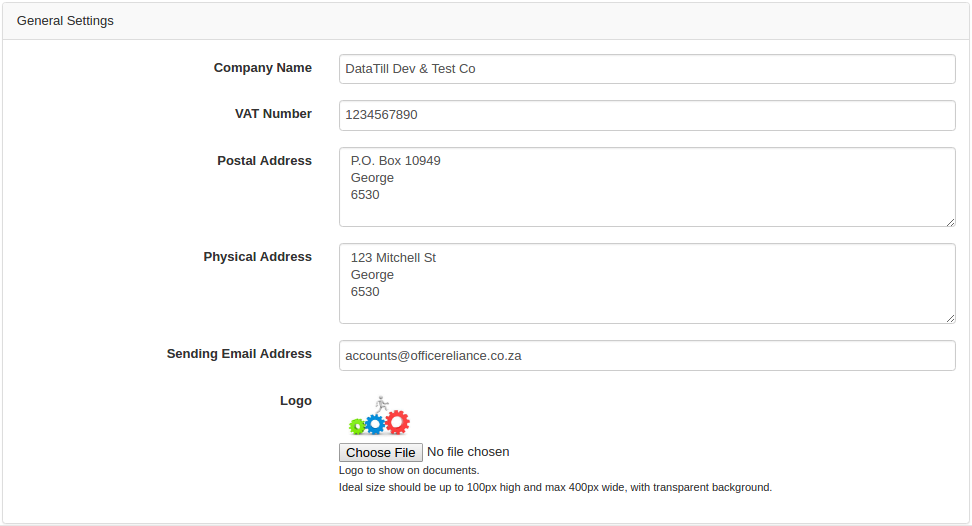
1.3 Invoice Setup
-
-
- Go to Billing -> Billing Setup -> Inv & Credit Note Setup
- Fill out the General Settings.
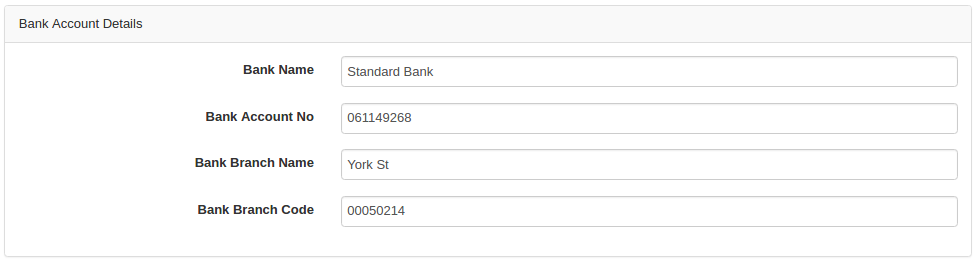
- Add Bank Account Details
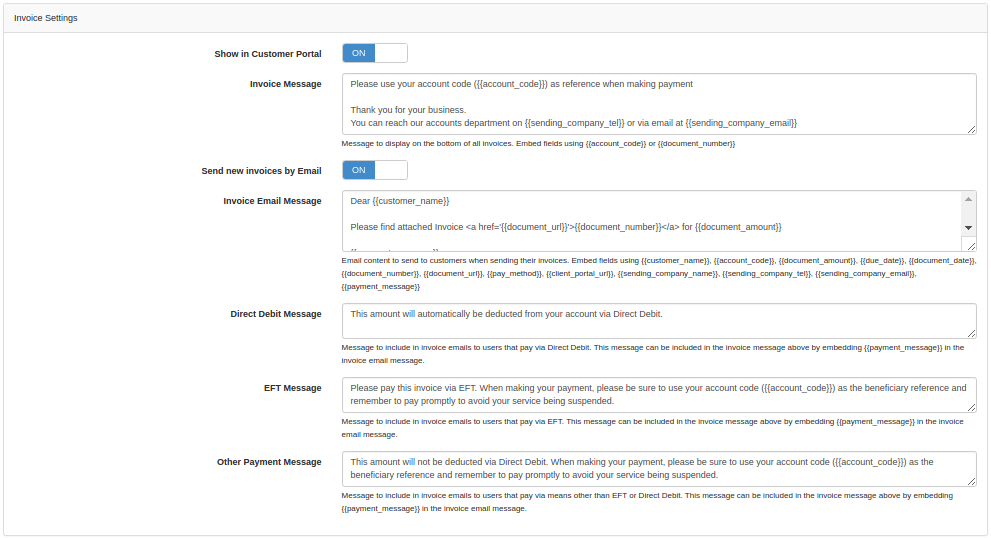
- Setup how you want your invoices.
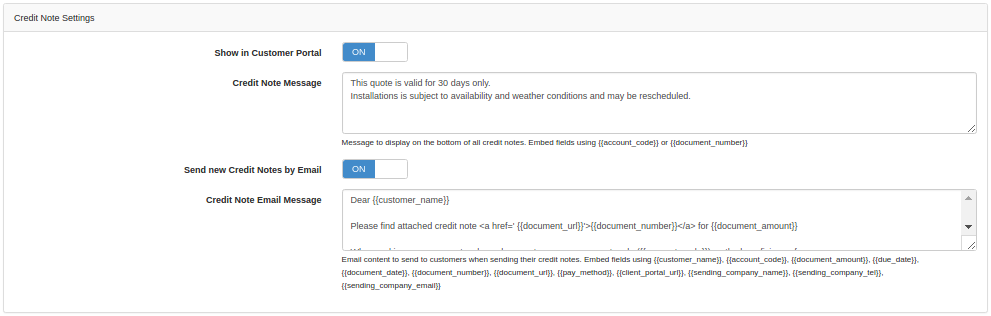
- Add in Credit Note Settings.
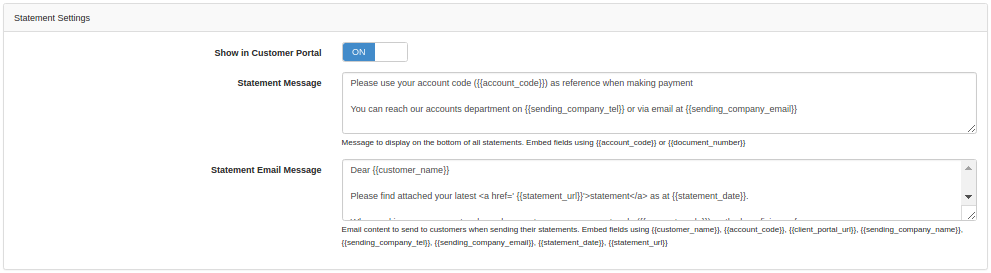
- Statement Settings.
- Click update at the bottom of the page after your setup and changes has been done.
-
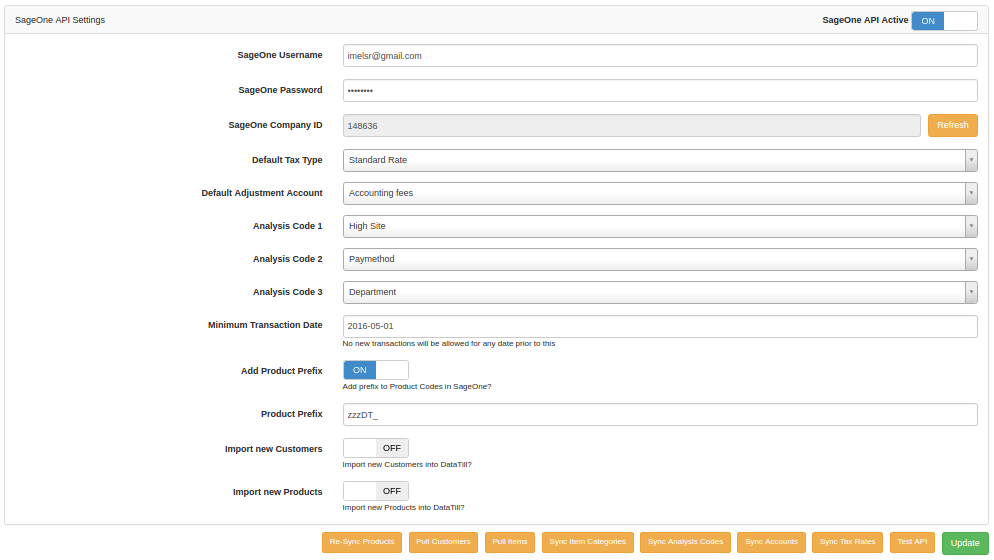
 1.4 Accounting Integration Setup
-
-
- First create a dedicated API user in sage with full administrator rights, for datatill.
- Then on HeroTill go to Setup -> System Settings -> Accounting Integrations.
- Fill in these details in this form. A minimum transaction date is critical. Note for products you cannot have the same in datatill as in SageOne, so just make some slight variance of the names in either Sage or in HeroTill.
- This is Absolutely Critical. If the API test is successful then you can proceed with syncing.
- Fill in all the necessary information, Test the API.
- If the API test is successful then update the settings. sync: item categories, analysis codes, account list and Tax rates. Make sure you click on all the sync buttons at the bottom.
- Please avoid generating test data that you would like to delete, If you would like to delete information. please contact us and we will guide you through the correct process.
- If you do this incorrectly you can run into major problems.
- The 3 analysis codes are the analysis codes that can be used in Invoices. eg. the invoice can be linked to a Highsite or payment method, ect. .
-
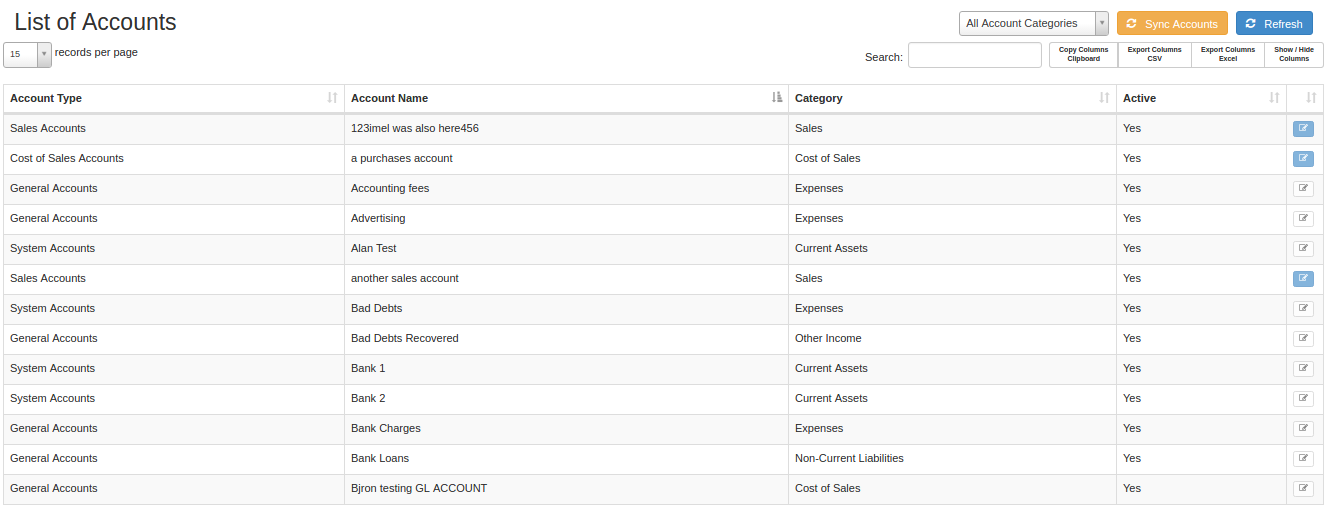
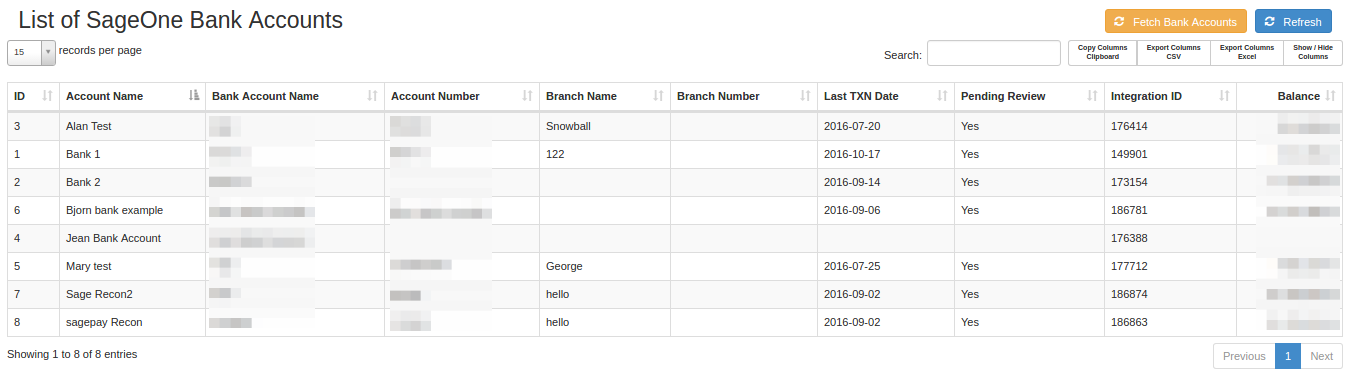
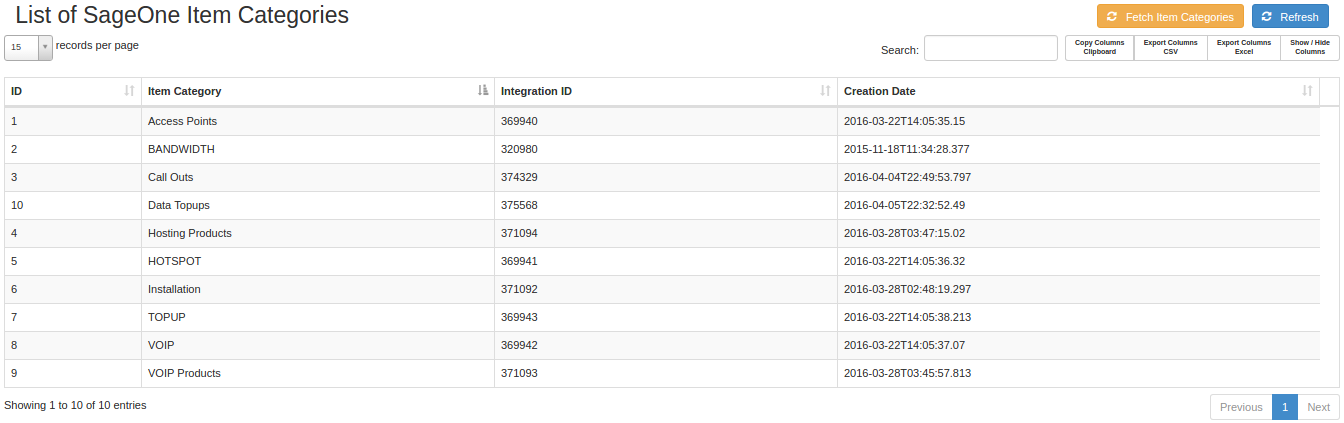
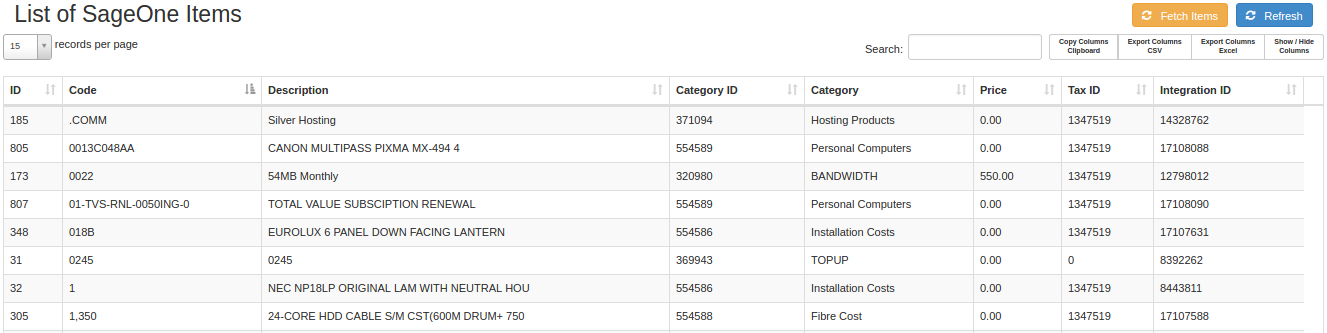
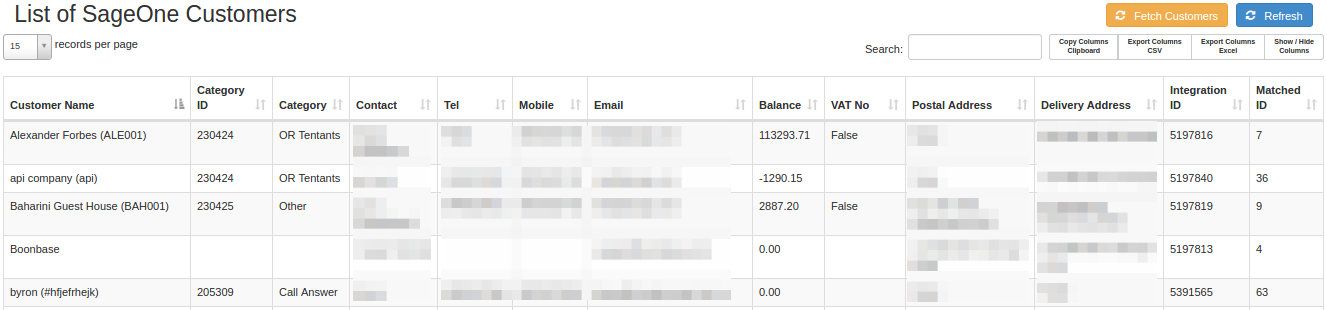
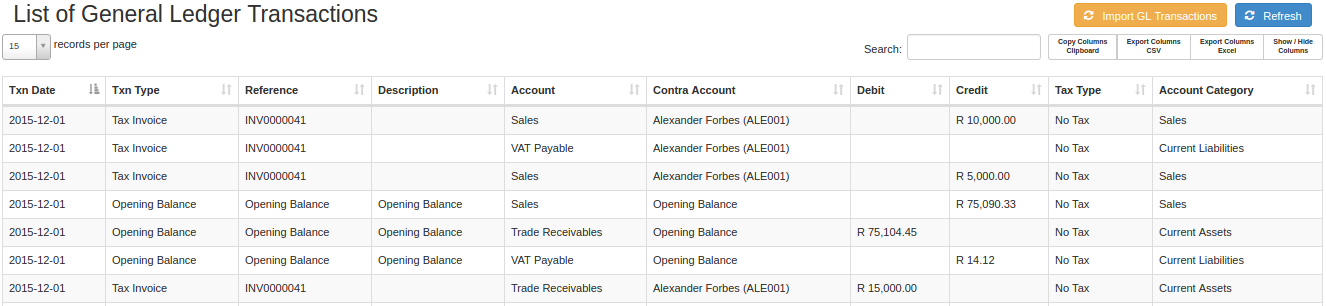
2. View Imported SageOne Data
-
-
- Go to Billing -> SageOne Data.
- Here yo will see a list of account, bank accounts, item categories, items, customers and GL transactions.
- These are all details that are synced with sage, They can only be edited in sage, but are used in HeroTill.
-
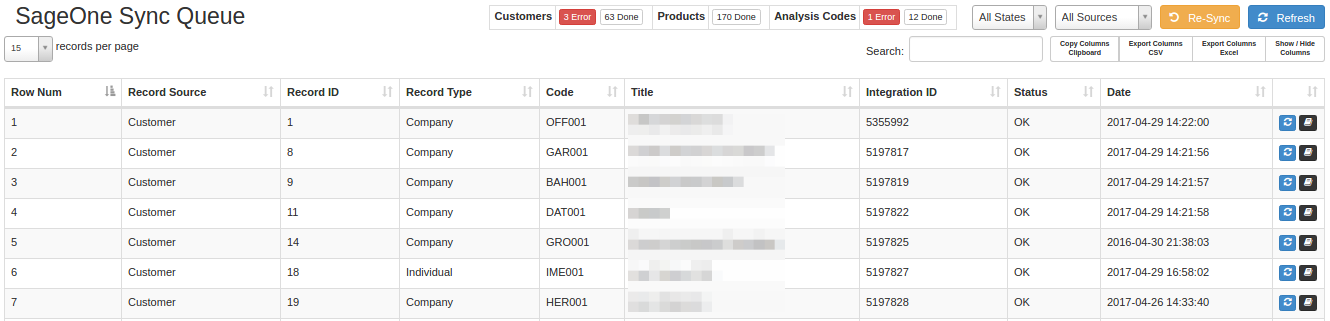
Sage One Sync queue
-
-
- Go to Billing -> SageOne Data -> Sync Queue.
- Any records that do not sync successfully will be listed here.
- You can try and sync items individually by clicking on the little refresh button on each row.
- Check the sync queue regularly to see if there are any syncing errors.
-
 3. Product Pricing
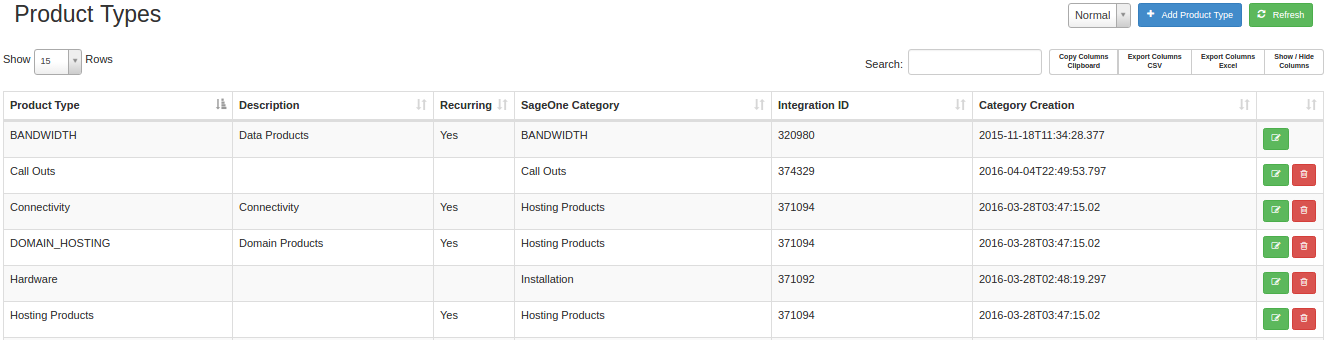
3.1 Product Types
-
-
- Go to Billing -> Products -> Product Types.
- These are basically product groups.
- Each type is dependent on a SageOne category, Therefore the product type needs to first be created in SageOne and then created here.
-
 3.2 Non-Data Products
-
-
- Go to Billing -> Products -> Non Data Products.
- Click on
 to create a product.
 - Add you desired product. There can be many products for each product type.
- Each Product is linked to a Sales Account, these Sales accounts come from Sage, so if you need a sales account not listed then it needs to be created in Sage.
- Products cannot be disabled for selection.
- Make sure to add in a product cost.
-

3.3. Data Products
These are just your Radius Data Packages.
-
-
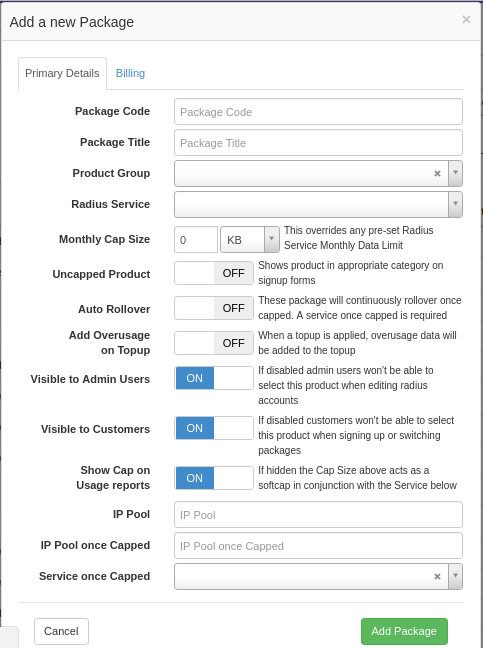
- They can be added by either going to Radius -> Data Packages or Billing -> Products -> Data Products.
- Click on
 to add a data packages
 - See the Radius Guides on how data packages work.
-
3.4 Data Pricing Matrix
Please refer to the Radius Guide for a better explanation of this.
This page is part of Radius. The data pricing matrix is an easy way to create and manage related Radius data products. Each Pricing Cell represents a Radius Data Package. Each row The Unshaped button just add a ‘U’or a ‘S’ to end of the Product code for the data packages. You can view the various product code’s by hovering your mouse over the cells.
4. Finance
4.1 Invoices
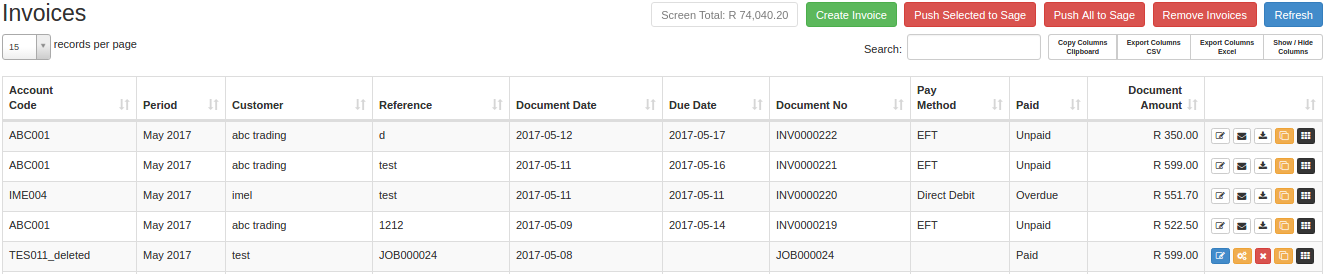
In the screenshot, you can see the invoices page. It gives you a list of all the invoices that have been created. To create an invoice, click on the “Create Invoice” button. While the invoice is still in draft status, you will be able to “edit” the invoice details as well as “Remove Invoices“.
Once an invoice has been created, it has to be generated. To do this click on ![]() . Once generated, the invoice will be synced with Sage one and HeroTill will generate a .pdf version and email it to the client. Once the invoice has been generated, you will not be able to edit it again which is why you need to be sure that the invoice is 100% correct before pressing the generate button.
. Once generated, the invoice will be synced with Sage one and HeroTill will generate a .pdf version and email it to the client. Once the invoice has been generated, you will not be able to edit it again which is why you need to be sure that the invoice is 100% correct before pressing the generate button.
To send the invoice to the client, you can:
– Download the invoice by clicking on ![]() and add it to your ticket.
and add it to your ticket.
– Click on ![]() to send it to the client or an alternative email address.
to send it to the client or an alternative email address.
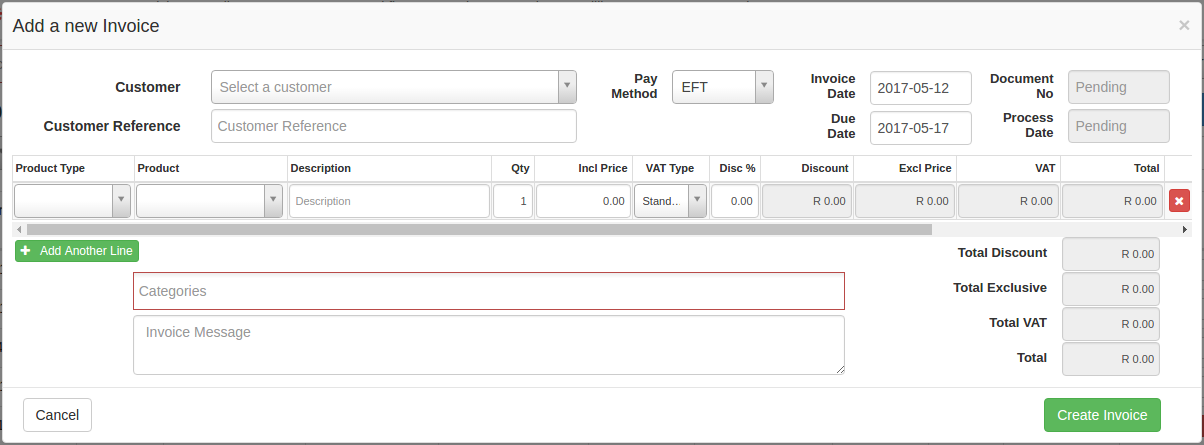
4.1.1 Creating a New Invoice:
The important thing to remember when creating invoices is to add the analysis codes. You can add these by scrolling all the way right on the invoice pop-up screen. The analysis codes are usually as follows: High site, Jobs and Projects. You can, however, change the analysis codes according to your needs in the Accounting integration settings. The analysis codes need to be set up in Sage One first though and will then be imported from Sage One to HeroTill.
-
-
- Start by going to Billing -> Invoices.
- Click
 to bring up the create invoice menu.
 - Select the Customer that is being invoiced.
- Select the Payment Method.
- Make sure the Invoice Date and the Due Date is correct.
- Add a Customer Reference if necessary (this could be a ticket number in most cases).
- Add the Product Type on the first line.
- Then add the Product on the same line.
- Double check if the Prices are correct.
- You can bill the same product more than once by increasing the Qty from 1 to how many you need.
- Click
 to add another Product line.
 - You can select a Catagory if necessary.
- You can type an Invoice Message if necessary.
-
*If the Select Customer menu does not work properly then try using Google Chrome. Make sure that there is a minimum transaction date set in the accounting integration settings. For the customer reference, try using the ticket number if a ticket exists.
4.1.2 Recurring Invoices
Recurring invoices are invoices that are repeatedly created at a set date and for a set period. HeroTill will only generate recurring invoices for clients who have a constant month to month service with you. The product for which you would like to invoice must also be listed in datatill. All the Recurring Invoices will auto generated at the specified date you choose for your billing run. Please see the screenshot below to see what fields a recurring entry has. Recurring invoices can be used for the following examples.
-
-
- Monthly capped or uncapped packages.
- Monthly domain renewals.
- etc.
-

-
-
- Go to Billing -> Recurring Billing -> Recurring Billing Entries.
- Click
 to add a recurring entry.
 - Select the Customer for which the recurring billing is.
- Select the Product Type.
- Select the Product.
- Select a Category if necessary.
- Type in a Description of the recurring billing if necessary.
- Set a Start Date for the recurring billing.
- Set the Interval for the recurring billing (Weekly, Monthly, Bi Monthly, Quarterly, Bi Yearly, Yearly).
- Set the End Date for the recurring billing.
- Set the Recurring Ammount.
- You can add a Discount if necessary.
- Enable or Disable the recurring billing by clicking on the on/off switch if in use or not.
- Then once all this has been done click
 to add the recurring entry.
-
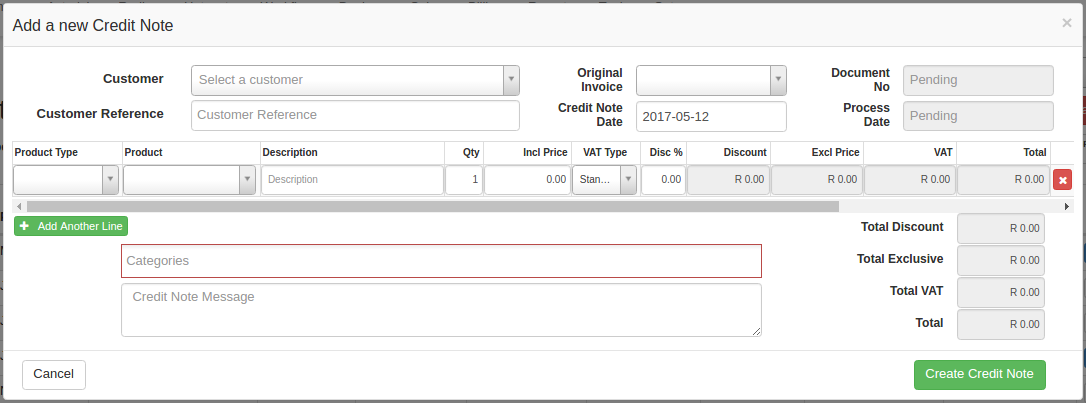
4.2 Credit Notes
Credit notes work similar to invoices in HeroTill, so they also need to be generated. To generate a credit invoice you need the “modify accounting adjustments permissions”. Once generated the credit note will be pushed through to Sage and the customer will be sent the credit note.
-
-
- Go to Billing -> Credit Notes.
- Click on
 to create a Credit Note.
 - Select the Customer for which this credit note is for.
- Select the Original Invoice that needs to be credited.
- Set the Credit Note Date.
- If there is no original invoice then you can manually add the products in the Product Line by adding the Product Type, Product, Descpription, Qty, and Incl Price.
-
4.3 Adjustments
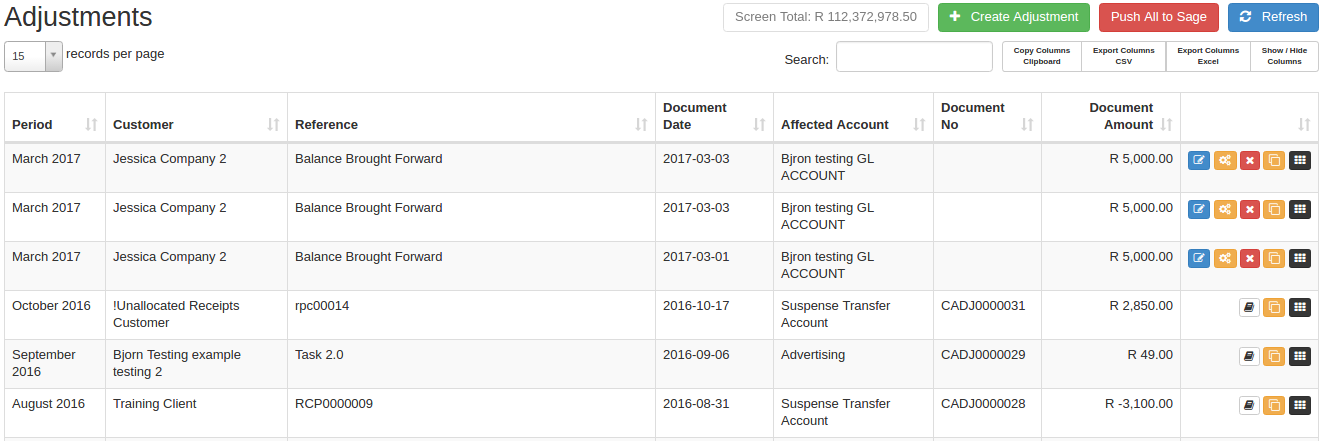
Adjustments are used to load balance brought forward etc.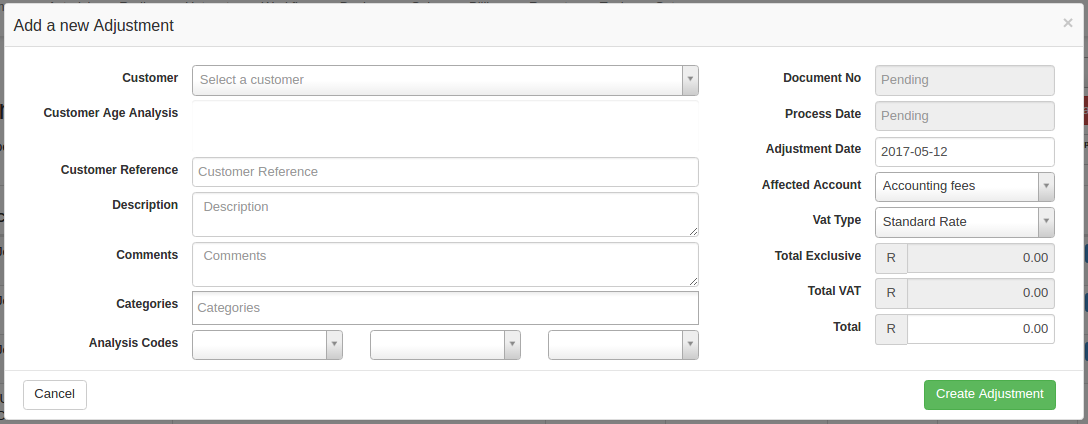
-
-
- Go to Billing -> Adjustments.
- Click on
 to create a Adjustment.
 - Select the Customer that requires the adjustment.
- Add a Customer Reference if necessary.
- Add a Discription for the adjustment.
- Add Comments if necessary.
- Select Categories that are related to the adjustment.
- Set Analysis Codes if necessary.
- Set the Adjustment Date.
- Select the Affected Account (SageOne Account).
- Select the Vat Type if not using the default vat rate.
- Type in the Total of the adjustment.
-
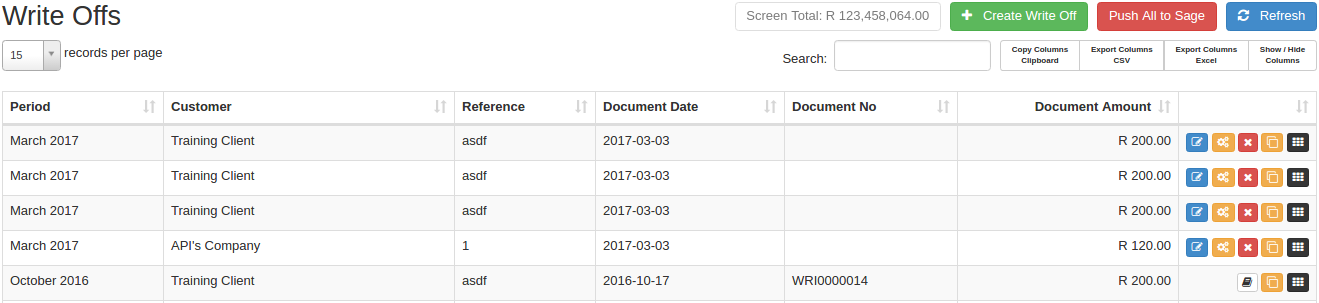
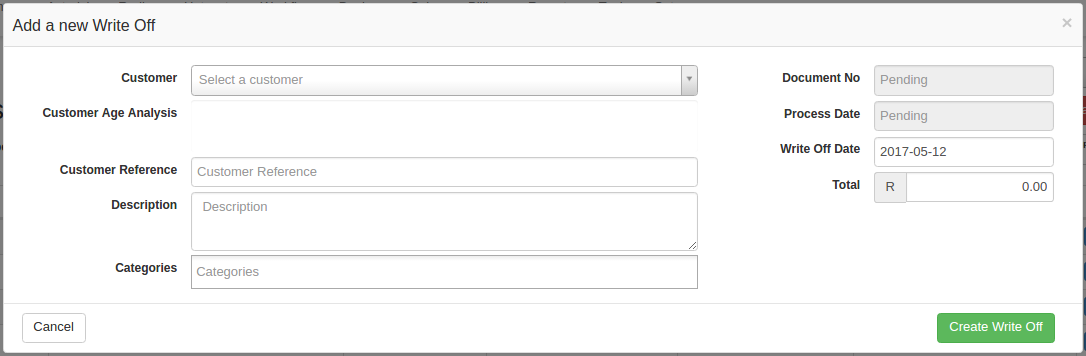
4.4 Write-Offs
-
-
- Go to Billing -> Write Offs.
- Click
 to add a write off.
 - Select the Customer that needs the write off.
- Add in a Customer Reference.
- Add in a Description for the write off.
- Add in a Category if necessary.
- Set the Write Off Date.
- Set the Total of the write off.
- Click
 to create the write off.
-
4.5 All Documents
Go to Billing -> All Documents.
This is a list of all the finance documents in HeroTill. ie Invoices, CreditNotes, Adjustments and Write Offs.

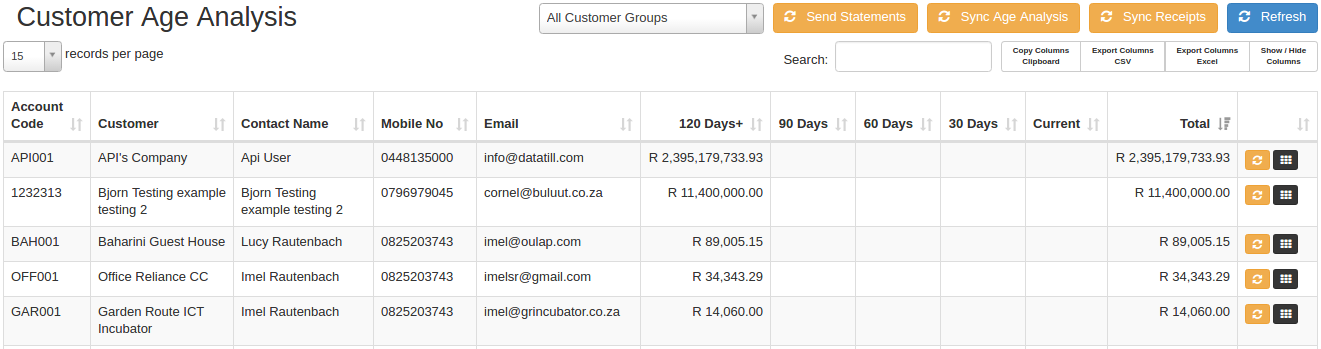
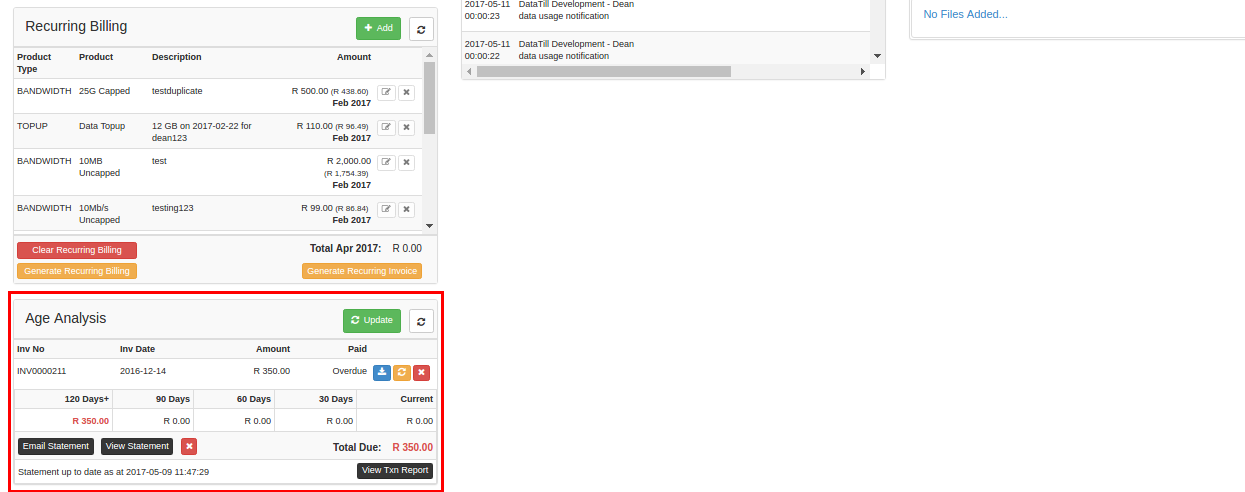
4.6 Age Analysis
5. Finance in the customer menu
These are the finance forms found in the customer menu. Go to customers->Total Usage List->Edit and the forms will be at the bottom left of the page. The Finance info in the edit customer screen.
Go to the customer menu. (Go to Customers -> Edit Customers and search the customer name or code)
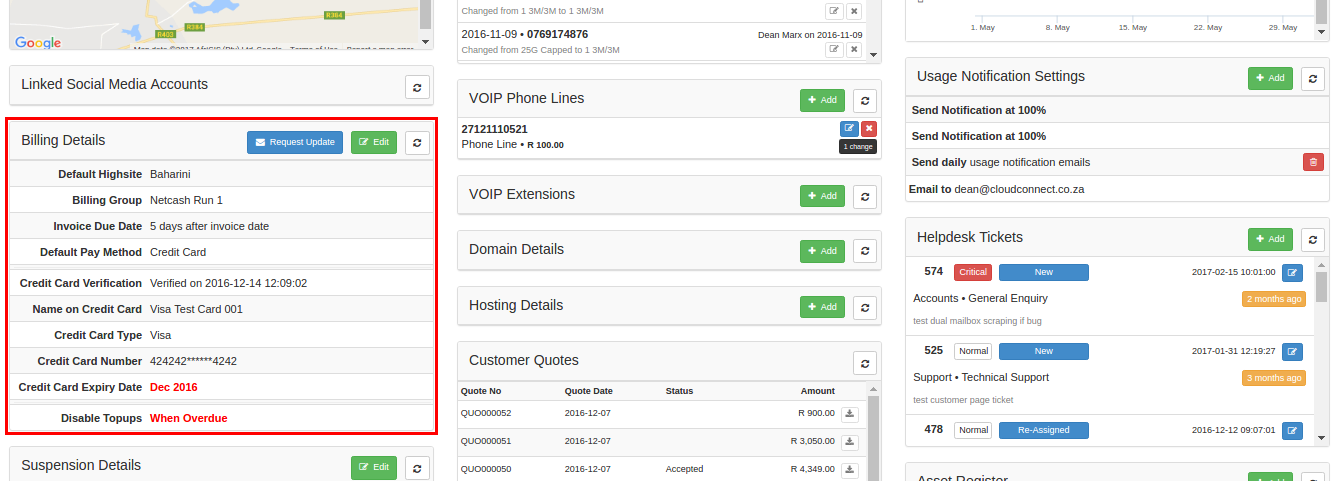
5.1 Billing Details
each customer has a default highsite. this will be the default highsite selected for invoices.
5.2 Age Analysis
All the invoices pertaining to the customer can be viewed here.
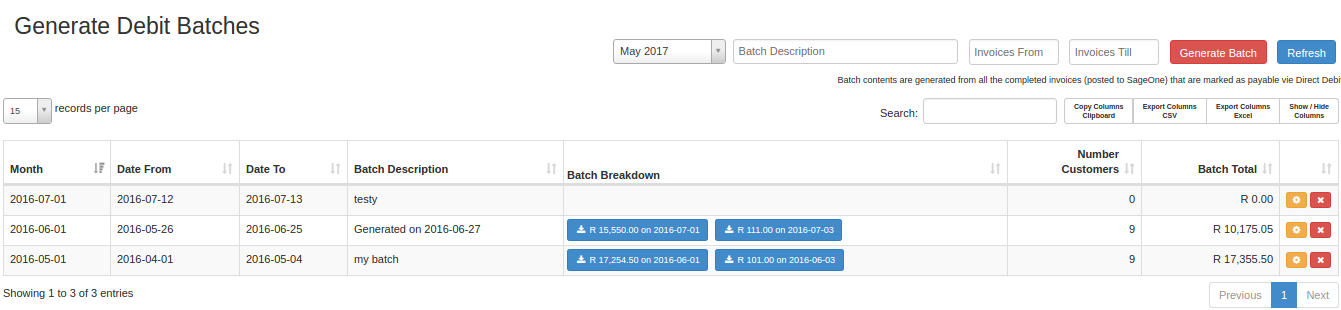
6. Debit-Run Batches
Generate Debit Batches
-
-
- Go to Billing -> Debit Run Batches -> Generate Debit Batches.
- Select the Debit Date month and year.
- Add in a Batch Discription.
- Set the Invoices From an Invoices Till date.
- Click
 to generate the batch.
 - Click on the blue Batch Breakdown button to download the debit batch in .csv format.
- Not that you can click
 to re-generate the debit batch if necessary.
-
7. Customer Portal
Here is a snapshot of what billing information the customer can see in the customer portal. The customer must log into the portal and click on the billing tab.

See also our user guide on completing the month end billing run: 11. How to complete the month end billing run on DataTill