Lead to receipt:
1. Overview and general actions
Lead to receipt is a process that was created to improve the quality of information collected from customers to determine their specific needs, as well as improve the workflow between the different departments. This includes all steps in the process, from the initial customer request up until where the customer has an active working service that we can bill them for. Leads can be submitted in one of the following ways:
- Lead creation on the customer edit screen.
- Manual lead creation from sales agents.
- Leads submitted by customers via online applications.
- Leads submitted by customers via email.
1.1. User permissions:
Remember that you will only be able to see the workflow sections that are applicable to your specific role within the company. To ensure that you can completely fulfill your role, you need to ensure that your user permissions are set up correctly. If you suspect your user permissions are set up incorrectly, please speak to your financial manager or refer to the sales set up manual.
1.2. Icons used:
1.2.1. Icons used throughout the different phases of lead to receipt:
| Icon | Action |
| View sales lead. (This icon can be green or blue) | |
| |
View ticket |
| Close Sales Lead | |
| |
Site Survey |
| |
Create customer |
| |
Add Payment method |
| |
Edit Customer Details |
| |
Recurring billing completed |
| |
View Job card |
| |
View Invoice |
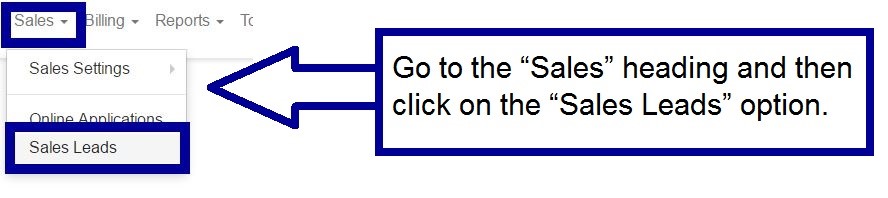
1.3. How to get to the sales leads page:
Once the page has finished loading, you will see the following screen:
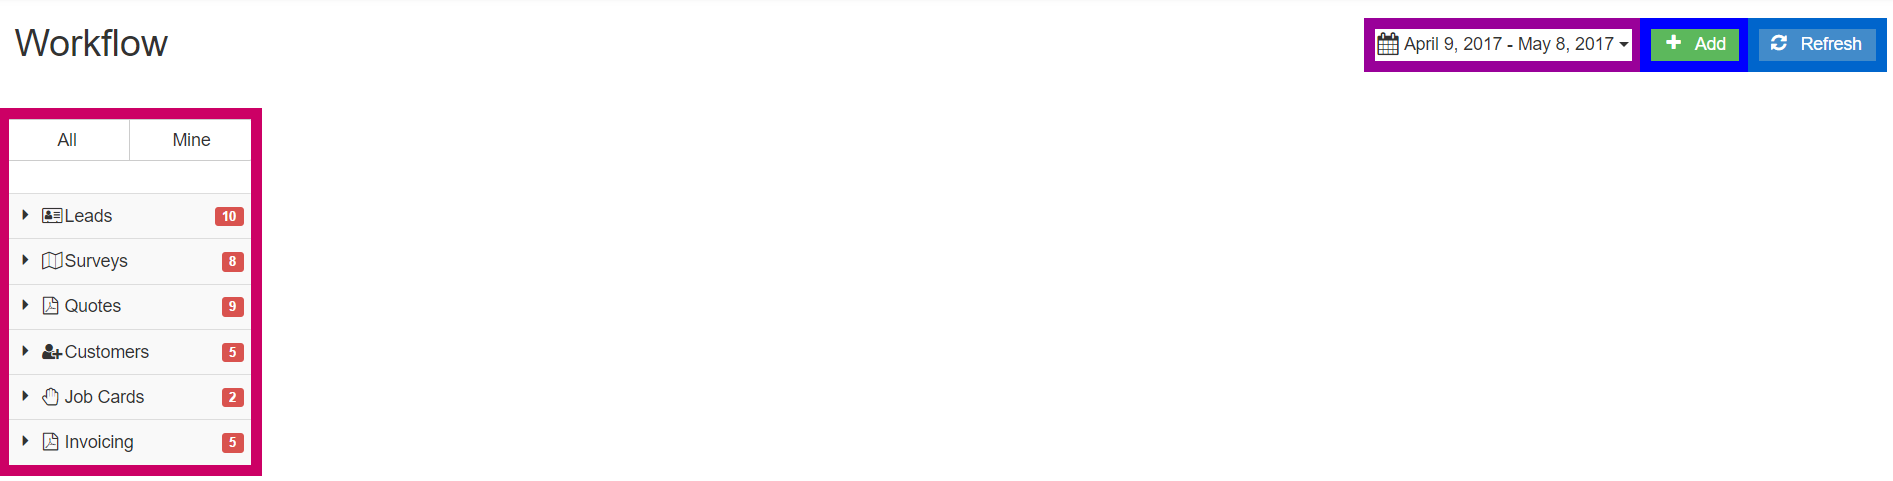
| Pink: | This is the main workflow phases. Please refer to (1.2) Error! Not a valid bookmark self-reference. for more information on how this works.
|
| Purple: | In this section, you can change the dates to view leads/tasks in only certain time periods.
|
| Dark Blue: | Click on the “+Add” button to submit new sales leads.
|
| Light Blue: | By clicking on this button, it will refresh the leads page and show any new leads that might have come in or updates that have been made to leads. |
1.4. Workflow phases and subsections:
When the sales lead screen has finished loading, you will see that there are certain phases to the workflow.
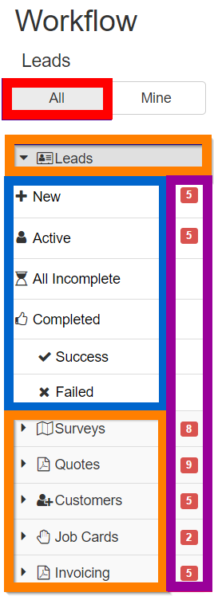
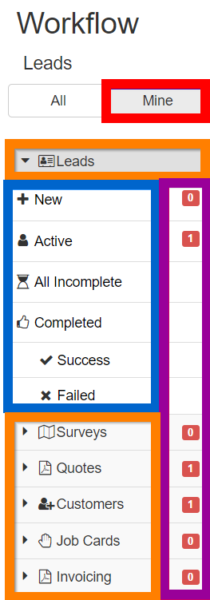
| Red: | Here you can choose whether you want to view all leads or only those that have been assigned to you.
|
|
| Orange: | These are the main workflow phases. Please note that you will only see the phases that are applicable to your department and/or job requirements. For example:, Someone in the sales department will only be able to see:
– Leads, Quotes and Customers
|
|
| Blue: | Under each of the main workflow phases, there are subheadings. These subheadings include:
New: A lead/task that has not yet been attended to.
Active: All leads/tasks that are being attended to.
All incomplete: A list of all new and active leads/tasks.
Completed: All leads and tasks that have been completed. The completed tasks can also be split to see which ones were successful and which ones failed.
|
|
| Purple: | The numbers found in each red block gives you an idea of the total tasks that still need to be completed for each workflow phase. Once you open phases, the total will be split so you can see how many are “New” and how many are “Active”. To open a phase, click on the heading (marked in orange).
Please note that these numbers will also differ depending on whether you are viewing “All” or “Mine”. See two screenshots above as an example:. |
|
1.5. Assigning and reassigning leads:
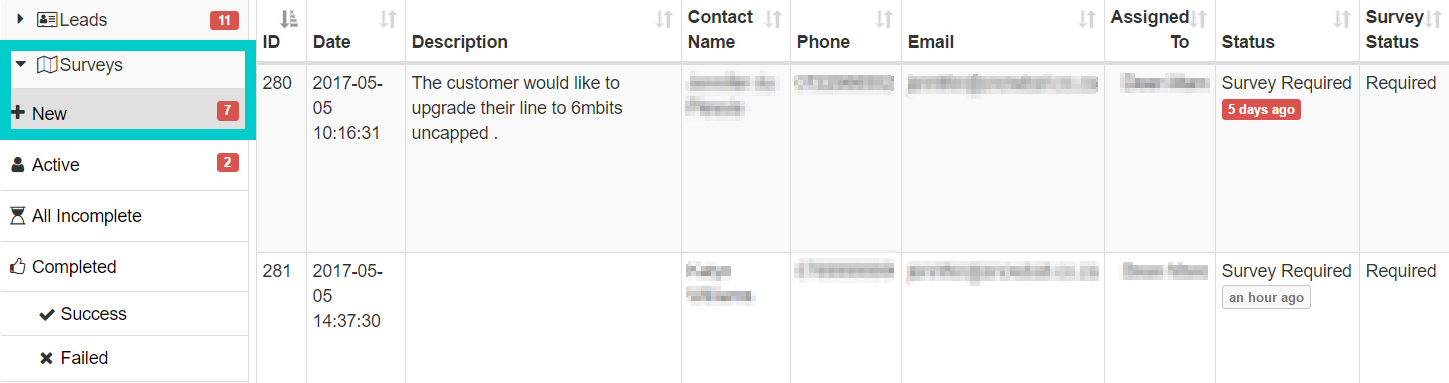
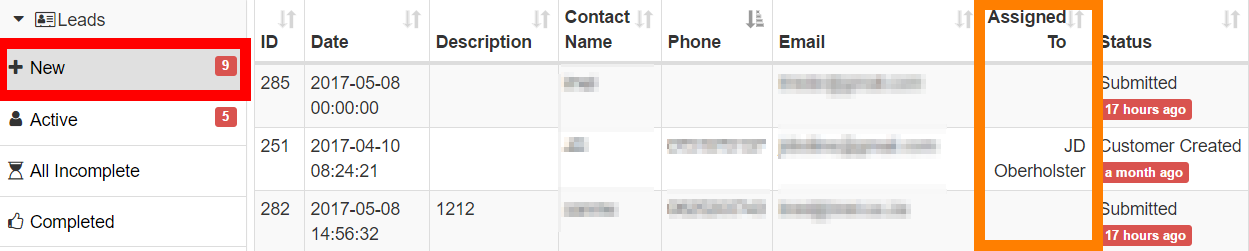
To see whether leads have already been assigned, go to the “New” subheading found under leads and look for the “Assigned to” column. If the lead is assigned to a sales agent, you will be able to see a name. If the lead is still unassigned, then the block will be empty. As a sales agent, you can then open and assign this lead to yourself.
1.5.1. Assigning leads:
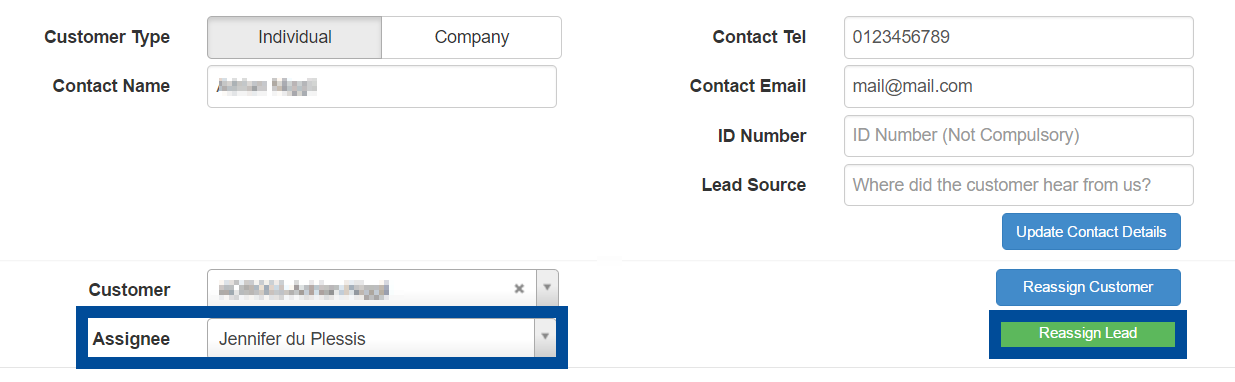
To assign a lead, choose the lead that you want to assign and go the right-hand side of the screen. Look for the green button and then click on it.

Once the lead edit screen has opened, look for the “Assignee” block. The field will automatically be filled with the words “Assign To Me”. If the lead needs to be assigned with you, then you do not need to change it. If the lead needs to be assigned to another staff member, then click on the drop-down menu and choose the person to whom the lead should be allocated to. If you are happy with the name to whom the lead should be allocated to, then click on the “Assign Lead” button.
1.5.2. Re-Assigning leads:
To re-assign leads, you will follow the same process as with assigning leads. First, you need to find the lead you wish to re-assign (remember that with this process the lead can be under either the New or the Active subheading). Once you have located the lead, look for the blue edit button on the right-hand side of the screen and then click on it.
Choose the new “Assignee” and then click on the “Reassign Lead” button. You will notice that the process is exactly the same.
1.5.3. But I can’t assign leads?
It is advised that a dedicated person should be chosen to equally and fairly assign and re-assign leads to sales agents. This means that if you cannot assign or re-assign leads that your company has a dedicated person who will do this or that your permissions have not been set up correctly. Please speak to your manager to for more information on how the assigning and re-assigning of leads works within your WISP.
1.6. Editing Sales Leads:
To edit a lead, choose the lead that you want to edit and go the right-hand side of the screen. Look for the edit button and then click on it.
1.6.1. Summary
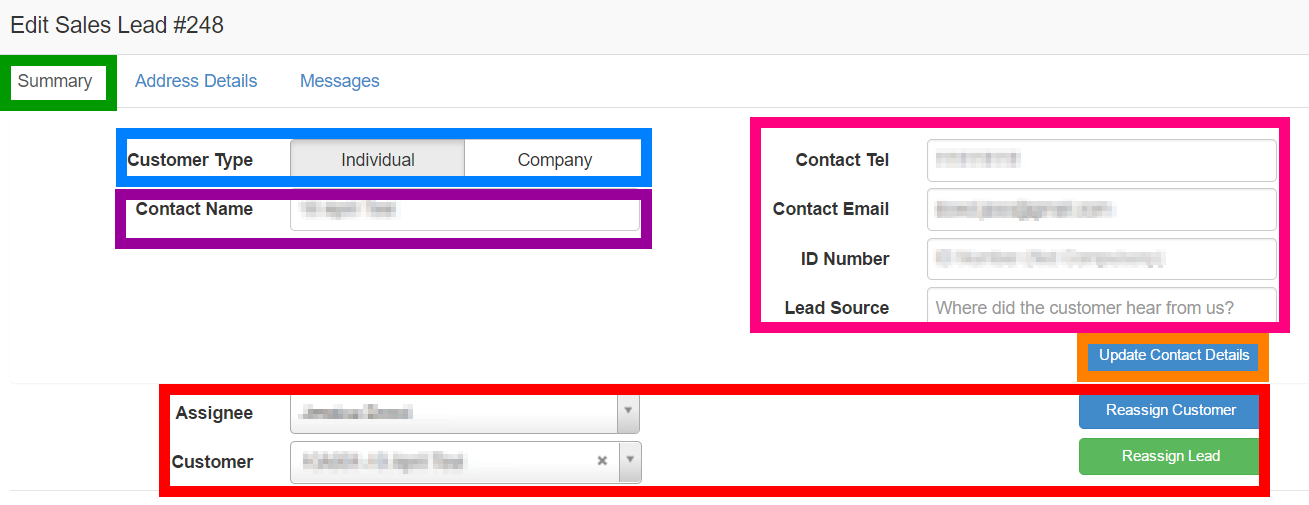
| Green: | This shows you that we are currently on the “Summary” tab of the edit sales lead screen.
|
| Blue: | Here you can choose whether the lead is for an individual customer or a company.
|
| Purple: | Individual setting.
Here you can change the contact name.
Company setting: Here you have options to change the Company Name and the contact name.
|
| Pink: | This section allows you to update the customer’s contact details, ID number (not compulsory) and where the customer heard about us. |
| Orange: | Once the customer details have been updated accordingly, remember to click on the “Update Contact Details” button.
|
| Red: | You can use this section to assign the lead to a staff member or a certain customer. See section 1.4. |
1.6.2. Address Details:
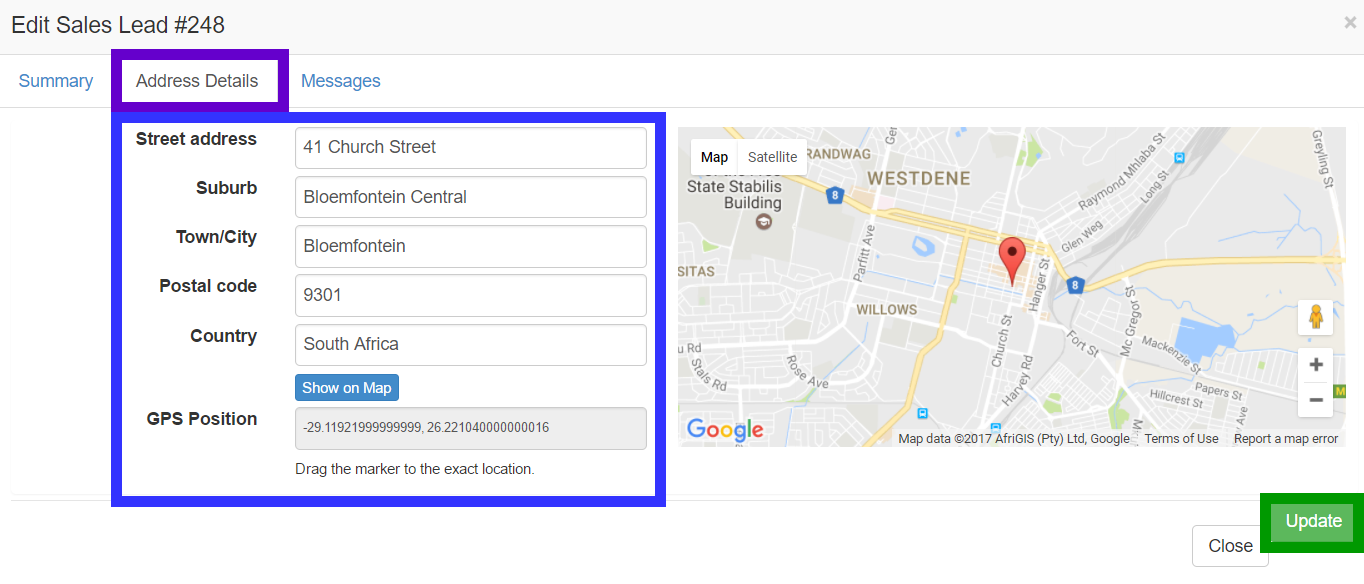
| Purple: | This shows you that we are now on the “Address Details” tab.
|
| Blue: | Here you can update the customer’s address details. Once you are done updating the details, remember to click on the “Show on Map” button to ensure that the map shows the correct location.
|
| Green: | Once you are done updating the details, click on the “Update” button to save your changes. |
1.6.3. Messages
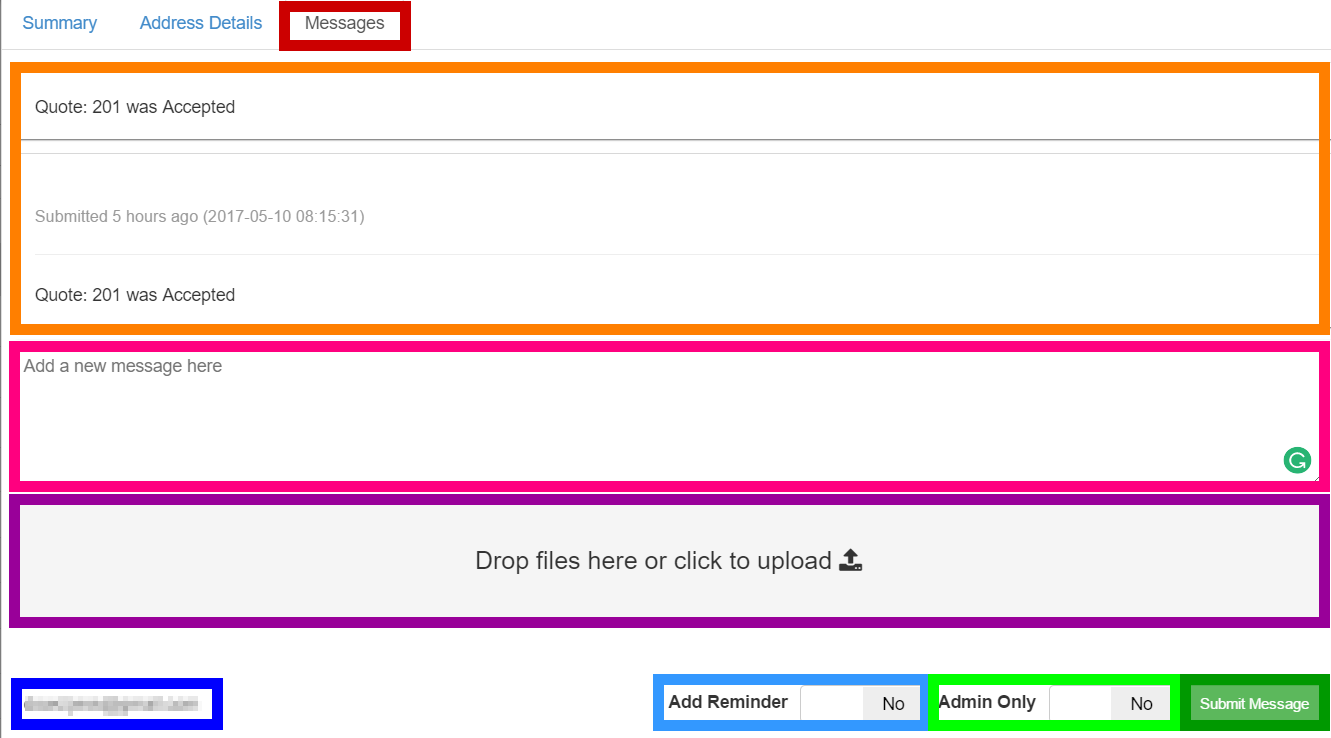
| Red: | This shows you that we are now on the “Messages” tab.
|
| Orange: | In this section, you can see all communication with the customers as well as admin notes that have been submitted by staff members.
|
| Pink: | This is where you type all new messages that you want to submit or add any admin notes.
|
| Purple: | Drop all files that you want to add to the ticket in this section.
|
| Dark Blue: | This will show you the email address that the message will go to. You are able to change the email address here. Should you need to add an additional email address, add a comma after the first one and then type the second email address:
For example: mail@mail.com, mail@mail.com
|
| Light Blue: | No:
If you don’t add a reminder, then nobody will receive a reminder. Yes: If you choose to add a reminder, then you will have the option to choose which department it is that you want to remind to follow up on this ticket as well as the date and time that they need to follow up on.
|
| Light Green: | No:
If this button is on no, the customer will receive the message that you submit.
Yes: If you choose yes, then the customer will not be able to see the message that you submit.
|
| Dark Green: | When you are happy with your message, click on the submit button to either send your message to the customer or add it as an admin note to the ticket. |
1.6.4. Editing and updating sales leads:
As sales agent, you should only be able to edit and update your own sales leads. The permissions have been set up in this way to ensure that your leads remain your own and that another sales agent does not “steal” your lead.
This means that if need be that you will only be able to update the customer’s details, but you will unfortunately not be able to submit the lead for a site survey, create or edit the quote, create the customer or mark the customer’s billing and details as confirmed.
Should another sales agent try to work on your lead, they will receive a notification to inform them that the lead does not belong to them. Please see an example on the next page.
For example:
If you try to submit a site survey on a lead that does not belong to you, you will receive the following notification (please see screenshot on the next page).
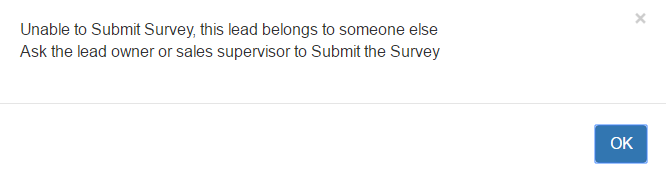
*For more information on how the ticketing system works, please see the manual on tickets.
1.7. Closing Sales Leads:
To close the sales lead, look for the cross on the right-hand side of the screen. Once you click on the Red X, the following pop-up screen will appear.
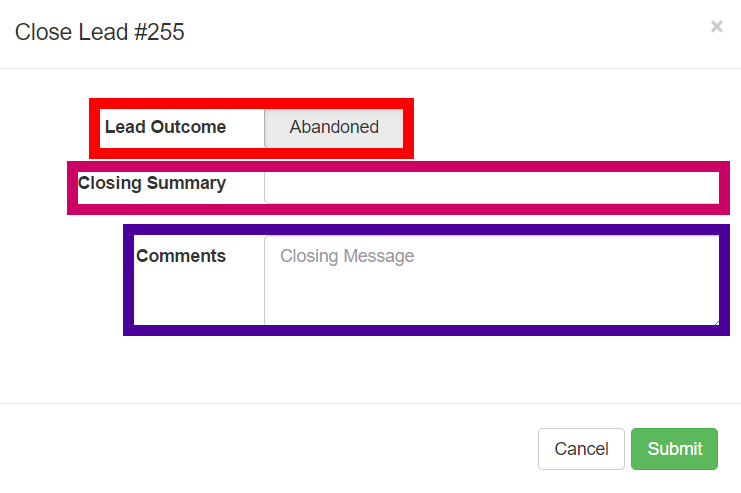
| Lead Outcome: | This will be automatically marked as Abandoned. |
| Closing Summary: | Here you put a short reason in for the abandonment:
– No LOS – Calendar too full. |
| Comments: | In this section, you can put more information as to the reason for the abandonment.
– The customer has no LOS due to trees that are in the way and we do not provide fibre in this area yet. – There was no spare time to do a site survey for the customer. |
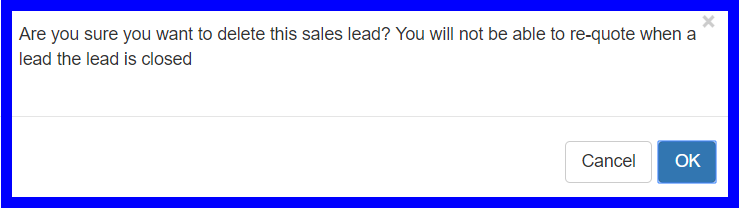
Once you click on the submit button, a screen will pop-up asking if you are sure that you want to delete this sales lead. If you are sure there is nothing further that you can do for the customer, click on the OK button to close the lead.
All abandoned leads can be found under the Completed – Failed subheading.