
The Calendars in HeroTill are a great way of scheduling events like installations, maintenance, operations, sales, site surveys, standby rosters and many more to your convenience. Staff can also be paired in teams and assigned to the appropriate event on the calendar.
 What this guide will cover:
- How to add Calendars.
- How to add Teams.
- How to add Events and assign Calendars and Teams.
- How to navigate the different views the Calendar has to offer.
- How to set up the Calendar so that it syncs up with your phone’s Google Calendar on android and iOS.
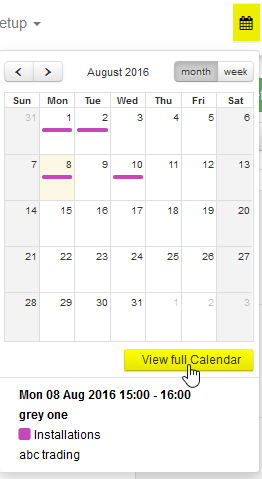
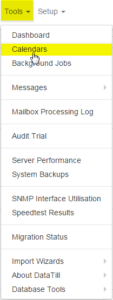
You can find the Calendars here: Click on ‘Tools -> Calendars’ or click on the calendar icon at the top right of the page to have a quick view of the Calendar and then click ‘View full Calendar’ to get the normal full view of the Calendar (Note that you can hover over the events in the Calendar quick view too to view information about them). The quick view will show you everything in month or week view. You can navigate by clicking on the left or right arrows. The quick view will also show all events scheduled for the day at the bottom of the Calendar.
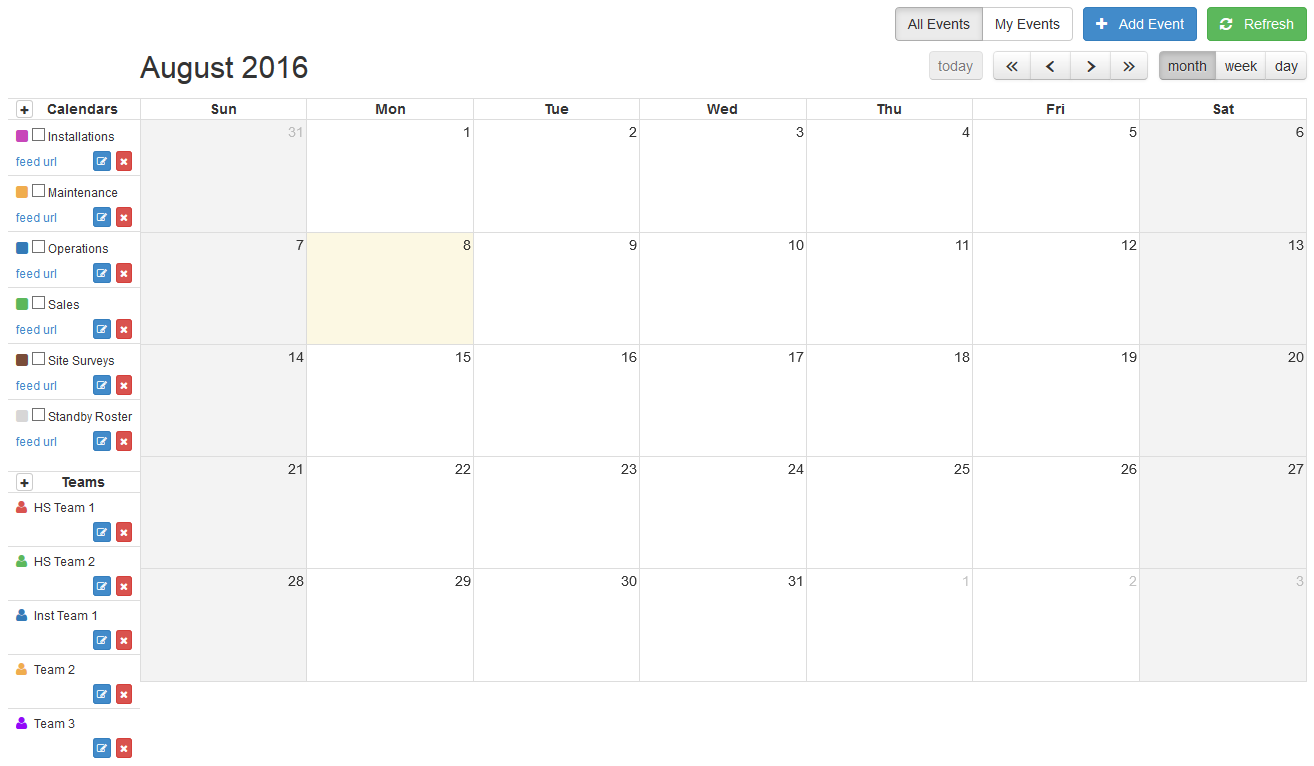
Adding Calendars
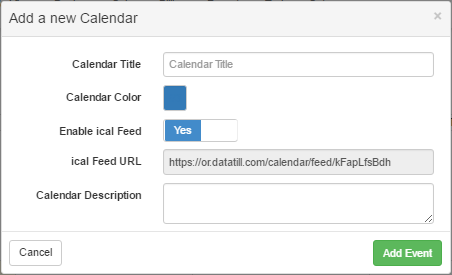
 Click the “+” button in the top left of the Calendar to add a new Calendar type.
- Then type in the appropriate Calendar Title.
- Select a Calendar Color (Clicking on the color box will bring up an color palette where you can choose the color for the calendar.
- Enabling iCal Feed will allow you to view the calendar from your Google Calendar app on your phone.
- Note that you can tick and untick calendars if you want them to show or not.
- Type in a Calendar Description if necessary.
Adding Teams
- Same as adding Calendars, click on the “+” button next to ‘Teams’ to add new Team.

- Then type in the appropriate Team Name.
- Select a Team Color by clicking on the color box and choose the color you would like to use for the team by using the color palette.
- Then assign the appropriate staff as team members by typing in their name and clicking on the admin account that fits the name (make sure the team member is an admin user). Note that the assigned team members will be part of the event if the team is assigned to it.
- Type in a Description for the team if necessary.

Adding events
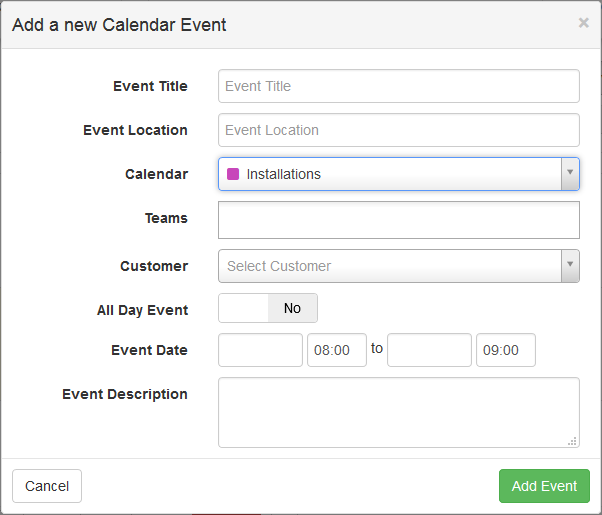
- Start by clicking ‘Add Event‘ at the top right of the page. You can also click on the specific day of the month day take place on the calendar, it will then open up the Add Event menu with the date selected. If an event takes place over more than one day, click and drag the mouse from the starting day to the finishing day, it will then open up the Add Event menu with the dates selected.
- Type in an Event Title (usually the name of the customer and what the task at hand is, considering the type of event).
- Type in the Event Location (usually the town or suburb or city or address).
- Choose which Calendar is responsible for this event.
- Select the team that is responsible for the event.
- Select the customer that is involved in the event.
- Specify whether the event will be an All Day Event or not.
- Specify the date and time the event takes place (if you have selected the date on the calendar before entering the event menu the date will be filled in automatically).
- Add a description for the event if necessary.
- Then click on ‘Add Event’.
Navigating through the Calendar

The navigation functions for the buttons above:
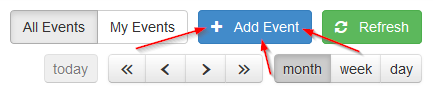
- All Events – This button will set the Calendar to show all events for the selected Calendars.
- My Events – This button will set the Calendar to show all the events that you added personally.
- today – This button will set the Calendar to go back to the current date, whether it is set to month, week or day.
- month – This button will set the Calendar to show only the days of the month.
- week – This button will set the Calendar to show only the days of the week.
- day – This button will set the Calendar to only show the time of day the event has been set to.
 – This button will jump back to the previous year.
 – This button will jump to the next year.
 – This button navigates back to the previous month, week or day.
 – This button navigates forward to the next month, week or day.
Setting up your Calendar on your Google Calendar app
Setup for Android: Setting up your Calendar in HeroTill onto your Google Calendar on your phone has to be done from the Calendar app on your PC’s Google Chrome browser.
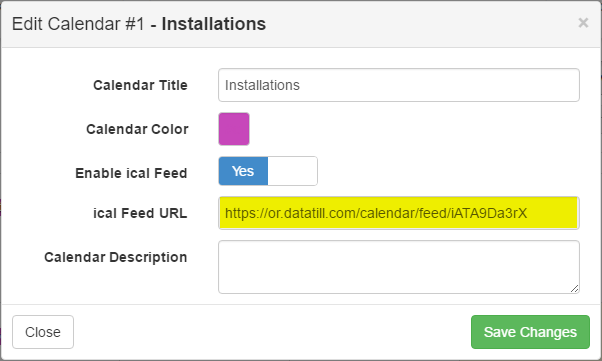

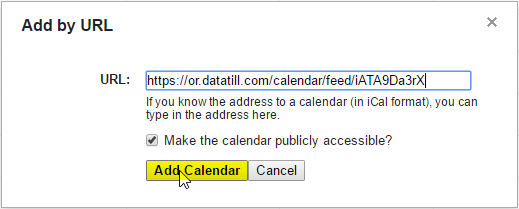
Firstly you’ll need the Calendar app open in your google chrome browser (Google Calendar) on your PC. Then go to the Calendar in HeroTill and click on the blue ‘Edit Calendar’ button and highlight and copy the iCal feed URL provided to you. Then go to the Google Calendar app on your PC web browser (make sure that you are logged in with the email you use on your android smartphone) and click on the down arrow on the ‘Other Calendars’ tab. Then click on ‘Add by URL’ and paste in the link you have copied from your HeroTill Calendar and tick ‘Make the calendar publicly accessible’. After this is setup on your Gmail account open up the Google Calendar app on your android smartphone and settings. Look for the email address that you added the Calendar in and press on ‘Show more’ and then the name of the Calendar you added from your HeroTill should pop up. Tap on it and tick the ‘Sync’ button as ‘true’. If you go out of the settings the events you populated your HeroTill calendar should begin to show up, if not refresh the Calendar by tapping on the three dots at the top right and then ‘Refresh’. Then you will have your HeroTill calendar set up on your phone in real time and all updates will come from the HeroTill Calendar.