1. The suspension module:
Youtube: Suspension Module Demo
The suspensions module was created to ensure that we can have better control over our debtors with overdue accounts. In the new suspension module, HeroTill will populate a list of all customers with overdue accounts. With this module, you will be able to suspend individual customers as well as individual reseller (master accounts), an individual reseller customer (sub-accounts) or you can bulk suspend the reseller along with all his or her customers.
Once the suspension has been approved, the customer will receive a first and second warning notification and will then finally automatically be suspended. The timeline for when these notifications gets sent out, as well as when the actual suspension takes place, can be set up under the billing setup section.
After the customer has been suspended, you will have the option to pause their suspension (unsuspend the customer) as per the time allocation setup in your billing settings. This will allow time for the customer to make that payment and send the proof of payment. When the time limit has been reached and the customer has not made any payment, the customer will be suspended again.
In the case that the customer has received either their first or second warning notification(s) and has made payment, you will be able to reset the suspension process. Please note that the suspension reset should only be done for customers whose suspension process have already been approved. When un-suspending customers, you can either do this the manual way, by clicking on the reset function, or the suspension will automatically be reset once the payment reflects in HeroTill.
Important: Please note that when the customer’s account is suspended, that the billing will not be stopped. In other wordes, even though the account is suspended, the customer will receive their monthly invoice.
2. Setting up the suspension settings:
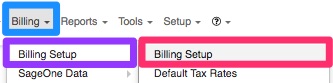
First, you will need to enable the suspension settings. To do this, go to “Billing” – “Billing Setup” and then click on the second “Billing Setup” option.
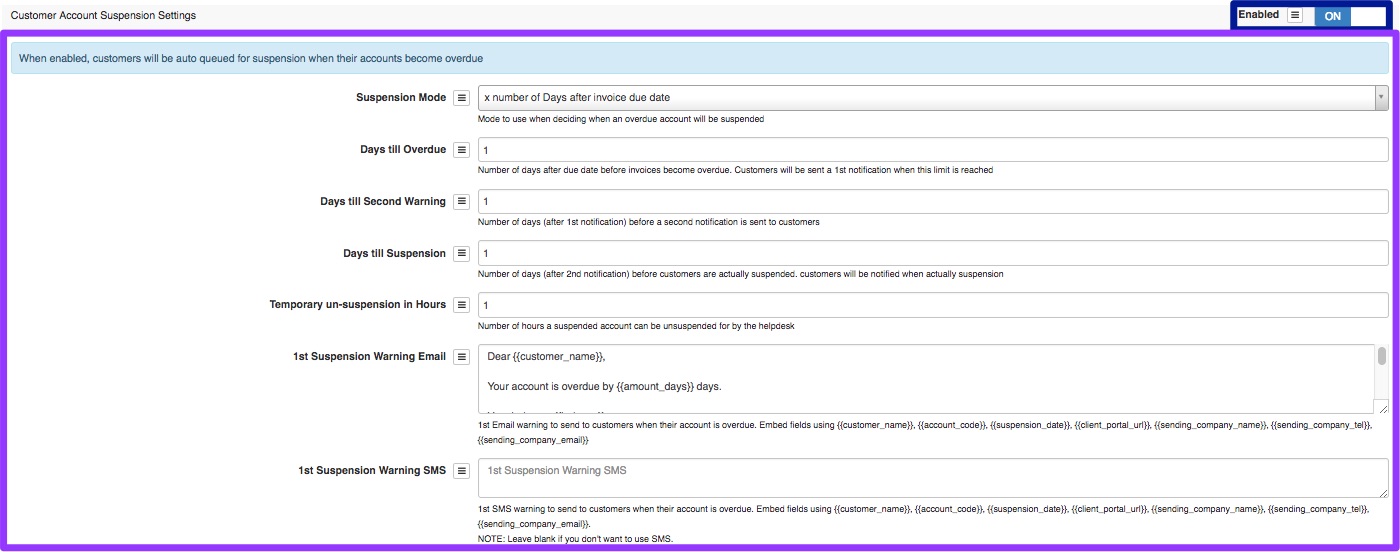
Look for the “Customer Account Suspension Settings” and then click on the toggle button next to “Enabled” to change it to “ON”.
![]()
Once the toggle button has been switched to “ON”, a list of settings will appear at the below.
2.1. Settings
2.1.1. Suspension Mode
In this section, you will determine the suspension mode to use when deciding when an overdue account will be suspended. Currently, the only option available is the “x number of Days after invoice due date”.

2.1.2. Days till overdue
The number you insert here will determine how many days, after the invoice due date, the invoice status will turn to overdue. When this limit is reached, you will then have to manually approve the suspension, and when you have done this, the customer will receive their first suspensions warning email.

2.1.3. Days till Second Warning
This number will determine after how many days the second notification should be sent. Please note that this is the number of days AFTER the first notification has been sent.

2.1.4. Days till Suspension
In this section, you will enter the number of days, AFTER the 2nd notification has been sent, the customer will be suspended. All customers whose accounts are suspended will be notified of the suspension.

2.1.5. Temporary un-suspension in Hours
Here you will be able to determine the number of hours that the helpdesk can suspend the customer for. Once the customer reaches the time limit, they will automatically be suspended again.

*Please note that the number filled in here is in hours and not in days as per the previous sections.
2.1.6. 1st Suspension Warning Email
In this section, you will be able to view and edit the 1st suspension warning email that is sent out to the customer. You can scroll down with the bar in the green section to read the whole message.

Please note that all fields that start with {{ and end with }} are embedded fields and will pull through from the customer profile. The red and green fields will be applicable to all warning emails and SMS sections.
2.1.7. 1st Suspension Warning SMS
Here you will be able to view and edit the 1st suspension warning SMS that gets sent to the customer. If you do not want the customer to receive an SMS when the 1st notification gets sent, please remove all text from the block and leave the field blank.

2.1.8. 2nd Suspension Warning Email
In this section, you will be able to view and edit the 2nd suspension warning email that is sent out to the customer.

2.1.9. 2nd Suspension Warning SMS
Here you will be able to view and edit the 2nd suspension warning SMS that gets sent to the customer. If you do not want the customer to receive an SMS when the 2nd notification gets sent, please remove all text from the block and leave the field blank.

2.1.10. Actual Suspension Warning Email
In this section, you will be able to view and edit the email that the customer will receive when their account is suspended.

2.1.11. Actual Suspension Warning SMS
Here you will be able to view and edit the SMS that the customer will receive when their account is suspended. If you do not want the customer to receive an SMS when their account is suspended, please remove all text from the block and leave the field blank.

After you have made any changes to the settings or messages that get sent to the customer, please scroll down to the bottom of the page and then click on the “Update” button.
2.2. Suspended Account Blocking
There are three different ways in which suspended accounts can be blocked:
- Address List
- IP Pools
- Radius Block
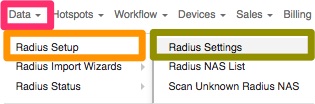
To find these settings, go to “Data” – “Radius Setup” and then click on the “Radius Settings” option.
Once the page has loaded, scroll down to the “Suspended Account Blocking” section. You will now be able to choose the relevant option which you would like to use when your accounts get suspended.

2.2.1. Address List
All suspended data accounts with fixed IP addresses will be assigned to an address list. Data accounts without a fixed IP address will be blocked by radius from authenticating. A firewall will need to be configured to redirect users in the suspended address list to a static page.
2.2.2. IP Pool
All suspended data accounts will be assigned an IP from an IP Pool. This pool must exist either in HeroTill or on the highsite NAS router. If a suspended data account has a fixed IP assigned, this IP will be ignored when the account is suspended.
2.2.3. Radius Block
All suspended data accounts will be blocked by radius, so the account will not be able to obtain access to the network. This is the preferred blocking method.
2.3. Notification Settings
As a part of the setup, you will also need to determine what time the suspension SMS’s should be sent out to your customers. You will also be able to determine whether resellers should be notified when their customers are queued for suspension.
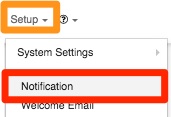
To find your notification settings, go to “Setup” and then click on the “Notification” option.
2.3.1. Account Suspension Notifications
On the following screen, under the notification setup section, you will be able to determine
- whether customers should be notified when their accounts are suspended
- during which times the suspension SMS notifications should be sent out.

2.3.2. Reseller suspension notifications
On this screen, you will also be able to determine whether or not resellers should be notified when their customers are queued for suspension or not. To do this, switch the “Reseller Suspension Notification” toggle button to “ON”.

Please note that you will still need to activate this section on the reseller profile as well and that resellers will receive a daily email listing all customers who are queued for suspension. For more information on how to activate this for your reseller, please refer to our reseller module.
3. Suspension settings for customers
In section 2, you have set up your global suspension settings. In the diagram below, you can see how suspension settings can be applied to either your customer groups or your individual customers.
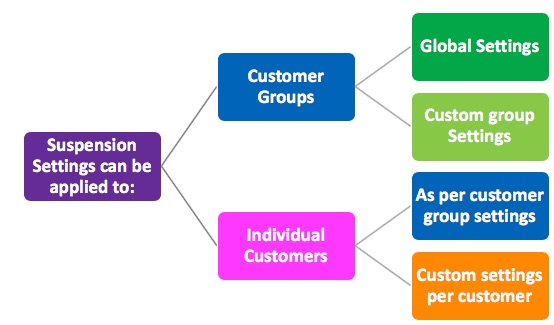
All suspension settings are applied in the following manner:
- Global settings are applied to all customer groups and, therefore, all customers within that group.
- If you customise a customer group’s suspension settings, the customised settings will apply to all the customers within that specific group.
- In other words, customer groups, whether customised or on default, primarily determine each customer’s suspension settings.
- You will also be able to customise a specific customer’s suspension settings. This means that the default settings or customer group settings will not be applicable for this customer.
3.1. Customer Group Settings
3.1.1. Global Settings
The global settings refer to the settings as per section 2.2, 2.3 and 2.4. These are the settings that will be primarily linked to all customer groups and, therefore, all customers.
3.1.2. Customise group settings
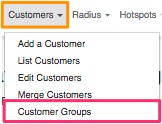
To customise a customer group’s settings, go to “Customer” and then click on the “Customer Groups” setting. Please note that the customer group settings will be applied to all customers linked to the specific group. The only time that these settings will not be applied to a customer linked to the group, is when the specific customer’s suspension settings have been customised.
On the following screen, look for the customer group that you would like to change the suspension settings for and then click on the edit button found on the right-hand side of the group.

After clicking on the edit button, you will see the following screen. On the pop-up screen, go to the “Suspension” tab.
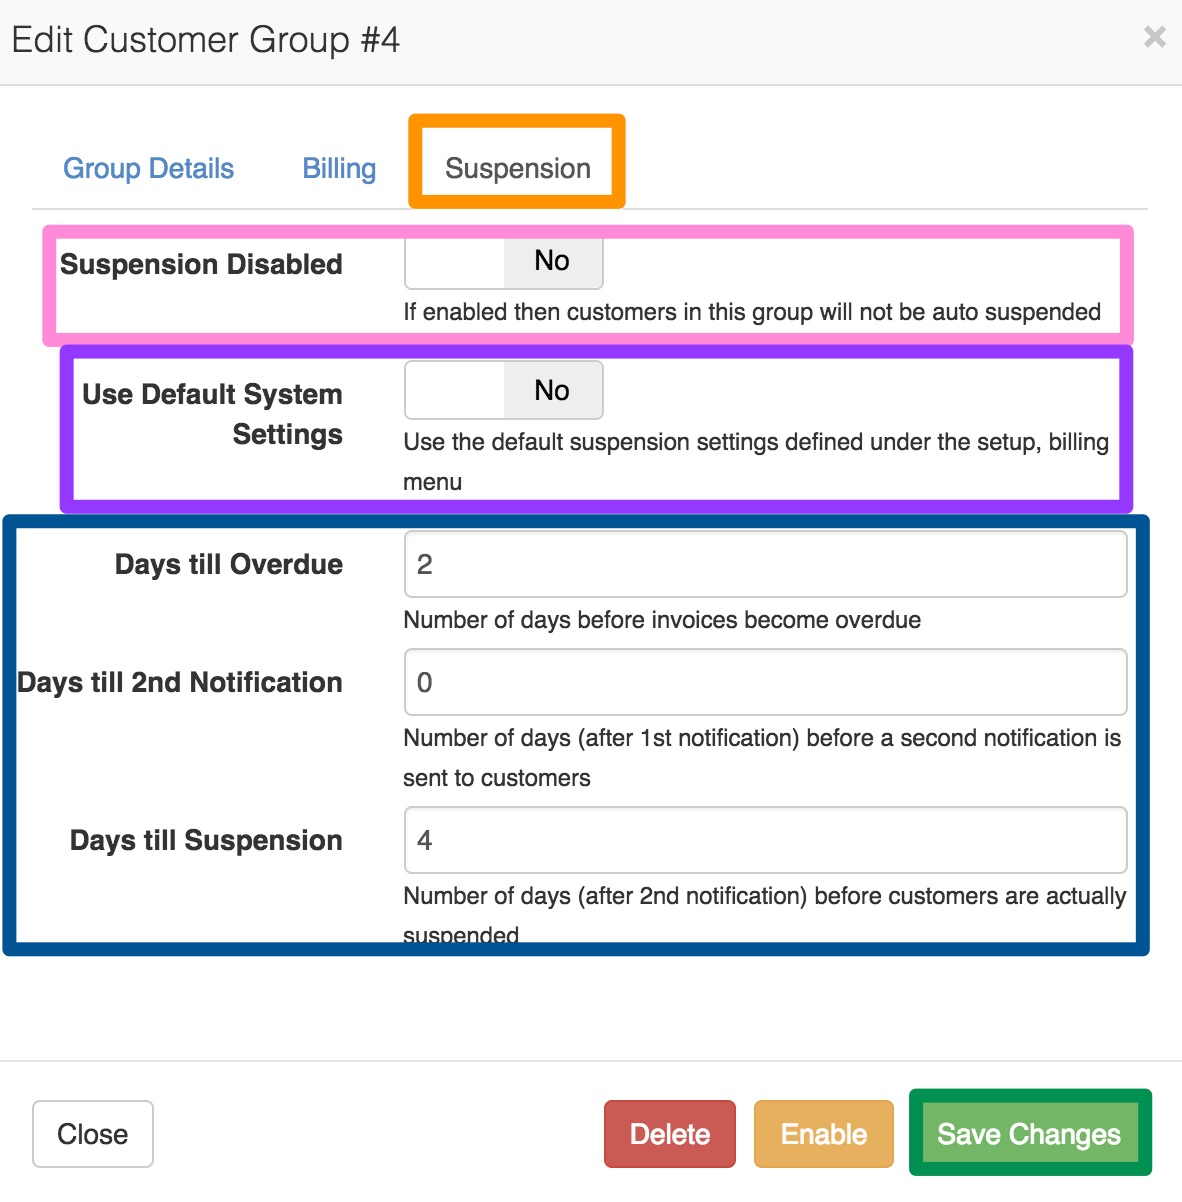
| Pink: | If the toggle button is switched to “Yes”, customers linked to this group won’t be queued for suspensions and you will not be able to see the purple and blue sections. If the toggle button is switched to “No”, customers linked to this group will be queued for suspension when their accounts are overdue. |
| Purple: | In this section, you can choose whether you want to use the global settings as per the set up is done in section 2.2, 2.3 and 2.4 or whether you would like to customise the suspension settings for this group.
If the toggle button is switched to “Yes”, you will use the global settings and will not be able to see the blue section. If the toggle button is set to “No”, then you will be able to determine the customer suspension settings in the blue section. |
| Blue: | In this section, you will be able to determine the custom suspension settings for days till overdue, days till 2nd notification and days until suspension. For more information on this, please refer to section 2.2, 2.3 and 2.4. |
After making any changes, remember to click on the “Save Changes” button.
3.2. Custom Settings
Custom settings are put in place to ensure that you can cater for customers who have special payment arrangements i.e. businesses who have 30-day accounts etc.
3.2.1. Group Settings
Each customer’s suspension settings will firstly be determined by the customer group settings (section 3.1). The group settings will be applicable until you change the customer’s specific suspension settings (section 3.2.2.).
3.2.2. Customise customer settings.
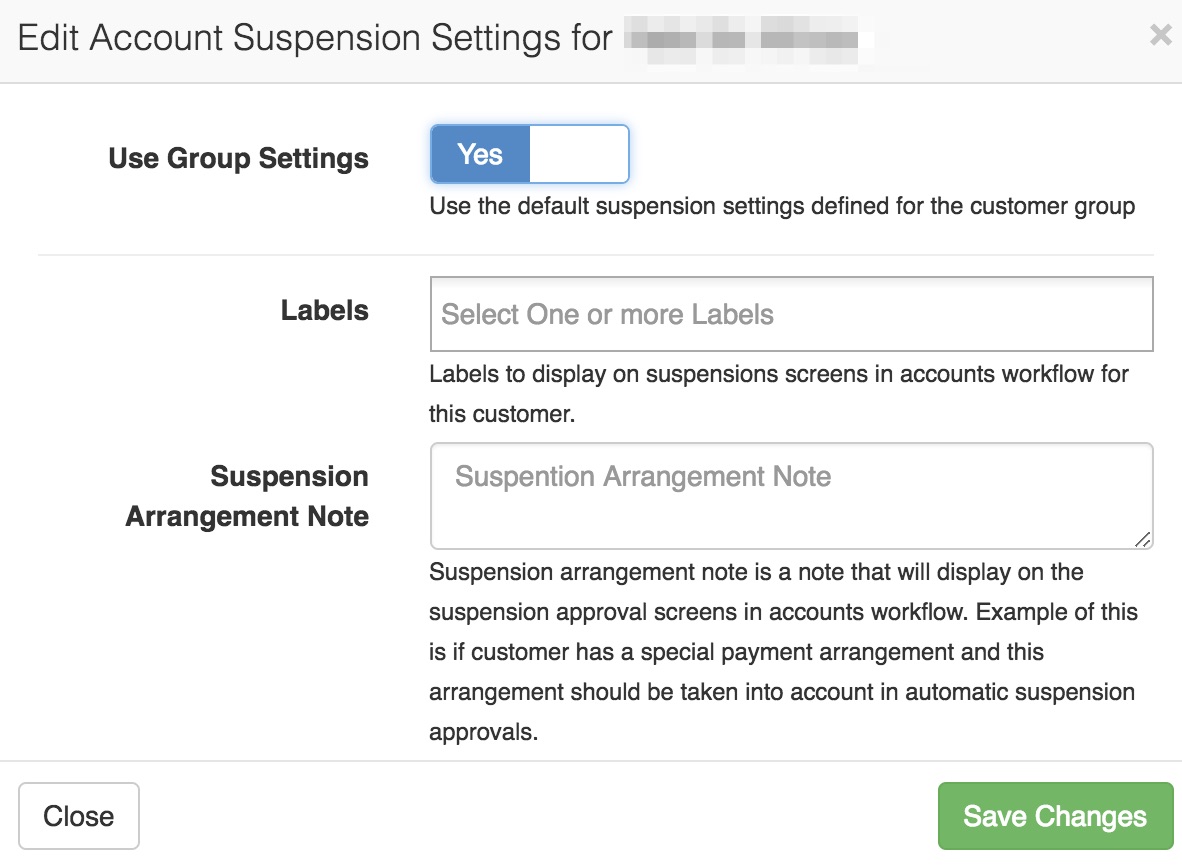
To customise the specific customer’s settings, go to the customer profile and then look for the “Suspensions Details” section on the left-hand side of the screen.
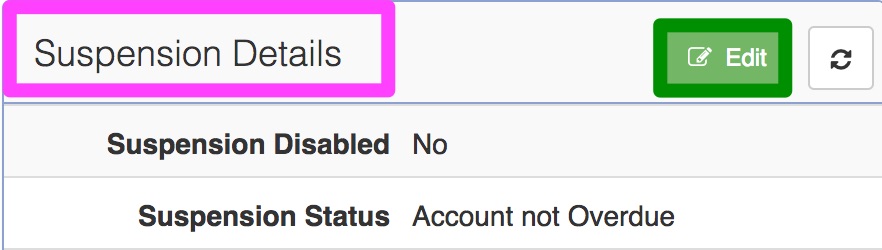
Click on the “Edit” button to customise the customer’s suspension settings.
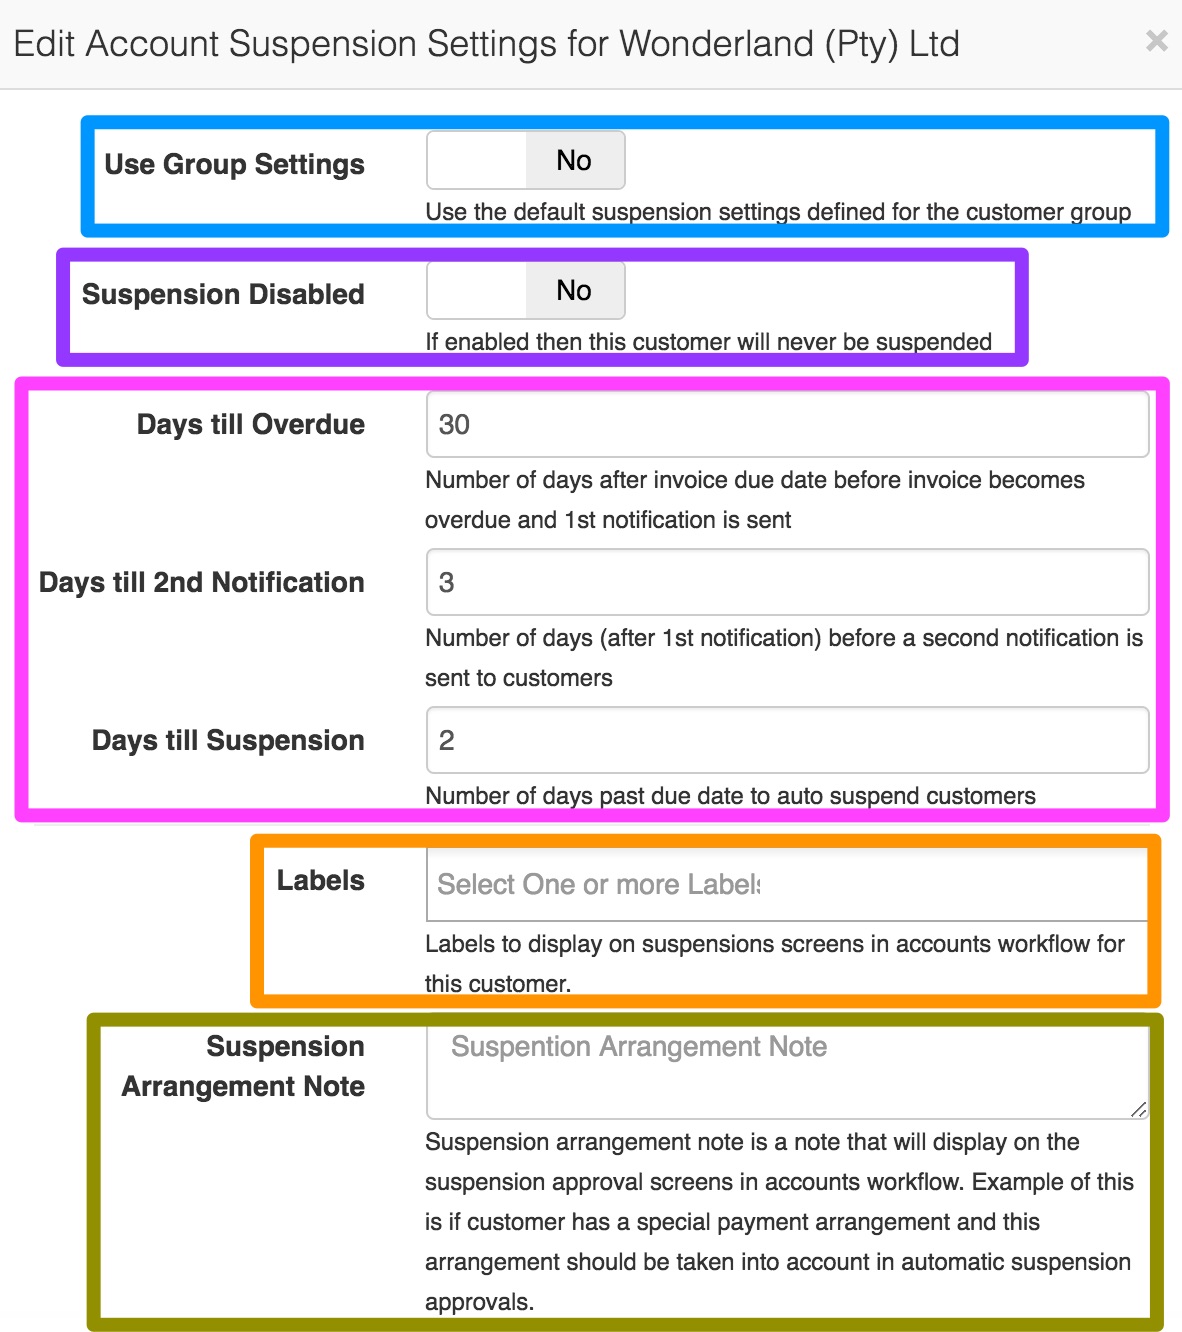
| Blue: | If the toggle button is switched to “Yes”, then the customer will use the group settings. If switched to “Yes”, you will not be able to see the purple or pink sections. If the toggle button is switched to “No”, then you will be able to customise the customer’s suspensions settings. |
| Purple: | If the toggle button is switched to “Yes”, then the customer will never be queued for suspension. If switched to “Yes”, you will not be able to see the blue or pink sections. If the toggle button is switched to “No”, then you will be able to customise the customer’s suspensions settings. |
| Pink: | In this section, you will need to determine the customer’s days until overdue, days until second notification as well as the days until suspension. For more information on this please refer to section 2.2, 2.3 and 2.3. |
| Orange: | Here you will be able to add labels to the customer profile. You will be able to view these labels in the accounts workflow section. |
| Yellow: | In this section, you will be able to add any payment arrangement or suspension arrangement notes to the customer profile. This note will then show up in the suspension list. For more information on this, please refer to section 4.1.1. |
Remember to click on the “Save Changes” button.
4. Customer Suspension Screen
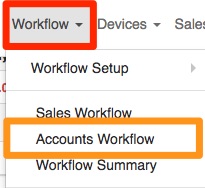
To find a list of all customers who need to be suspended, you need to go to “Workflow” and then click on the “Accounts Workflow” option.
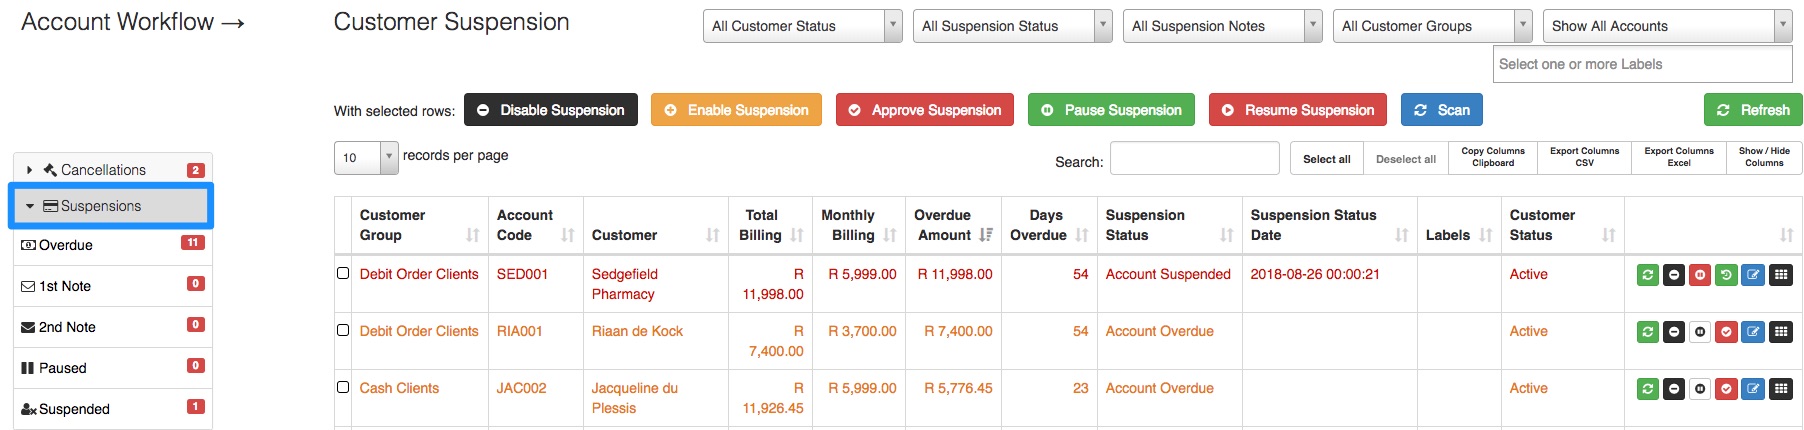
On the following screen, click on the “Suspensions” button to open the suspensions workflow.
4.1. Filter Functions

| Orange: | This will allow you to filter your list for customers who are:
|
| Red: | In this section, you can choose to filter the list of customers to view only customers who are in a specific suspension status:
|
| Pink: | Here, you will be able to filter your list according to customers who have suspension notes or a list of customers who do not have any suspension notes on their profiles |
| Purple: | This filter function will allow you to filter the list according to certain customer groups. |
| Blue: | This filter will allow you to filter according to reseller or master accounts. |
| Green: | Here, you will be able to sort your list according to specific labels. |
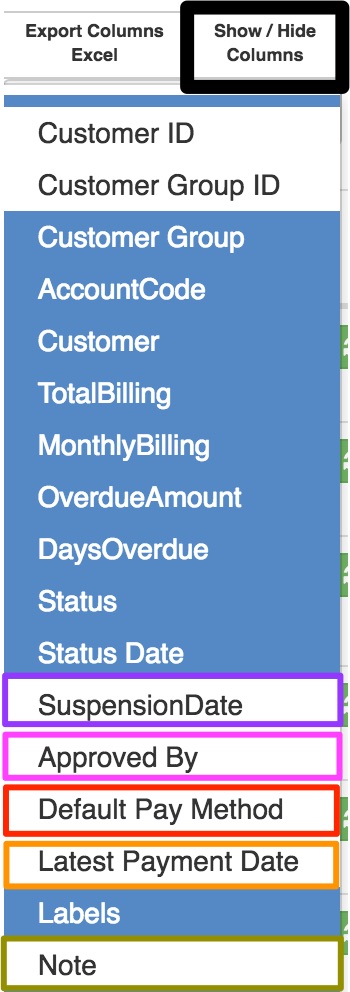
4.1.1. Show / Hide Columns
After clicking on the show / hide columns button, you will be able to see useful additional information such as:
- Suspension Date (only once the customer has been approved for suspension)
- Approved By – Who approved the customer suspension.
- Default Payment Method of the customer
- Latest Payment Date for payments made by the customer
- Note – any payment arrangements or notes regarding the customer’s suspension
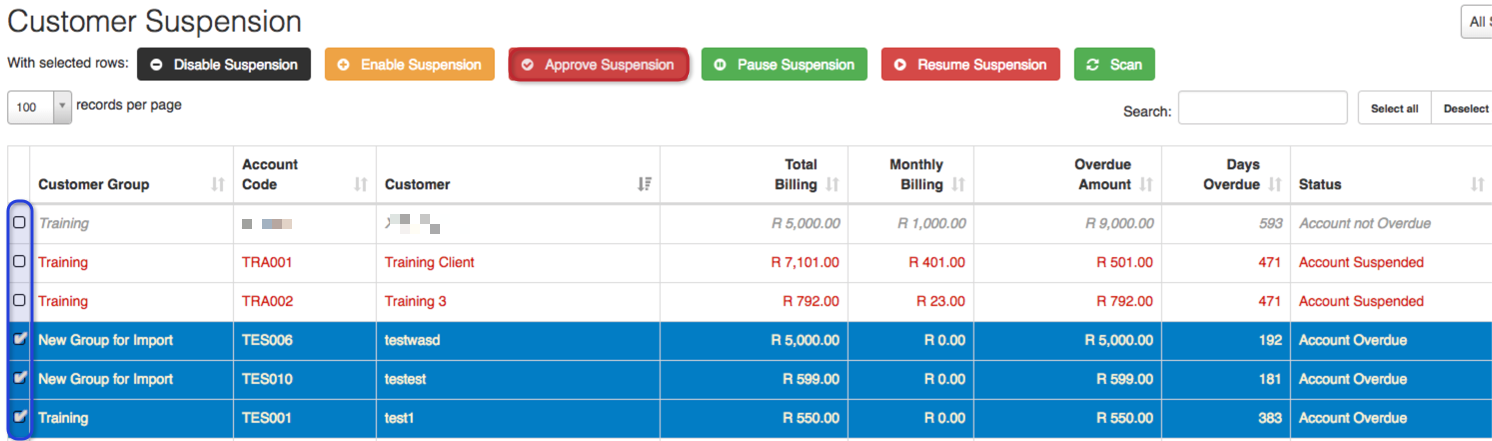
4.2. The suspension list:
In this section, you will view a list of all customers who have a balance bigger than Rnil. All customers who are marked in red, are customers who are suspended. All customers who are marked in orange, are customers who have received a warning or warnings about their account being overdue. All customers who are marked in gray are customers who have the suspensions details disabled on their individual profile or who are marked as VIP customers.

| Black: | In this section, you can view the customer group. |
| Green: | Here you can view the customer’s accounting code (profile number) and customer or company name. |
| Dark Blue: | Here you will be able to view the customer’s billing details;
You will also be able to view how many days the customer is overdue. |
| Light Blue: | In this section, you will be able to view the customer status:
If the customer is suspended, you will also be able to see on which date the customer was suspended. |
| Purple: | Here, you will see any labels which have been assigned to the customer. |
| Pink: | This section will show you whether the customer is still an active customer, or whether it is a customer who has previously cancelled their account with your ISP. |
4.3. Buttons on top of the suspension list.
![]()
| Disable suspension: | The button will allow you to disable the suspension settings for the selected customer(s). |
| Enable suspension: | This button will allow you to enable the suspension settings for the selected customer(s). |
| Approve Suspension: | This button will enable you to approve suspension on multiple customers. When you approve the suspension, suspension process will start and customers will receive their first, second and final warnings as per the settings above. |
| Pause Suspension: | By clicking on this button, you can suspend the customer(s) suspension for a limited amount of time which was set up in your suspension settings. |
| Resume Suspension: | To simultaneously resume suspension for multiple customers, choose the applicable customers and then click on this button. |
| Scan: | HeroTill works on a cron that refreshes daily. To immediately refresh the page or the specific customer, click on the “Scan” button. |
| Refresh: | This button will refresh the page. |
4.4. Buttons on the right-hand side of each line
4.4.1. Refresh Suspension
 |
By clicking on this button, you will refresh the specific customer’s status. If any changes have taken place, you will be able to view them under the status section. |
4.4.2. Disable / enable suspension
4.4.2.1. Enable suspension:
 |
When the customer’s suspension details are disabled, then this button will allow you to enable the suspension details for the customer. |
After clicking on the enable suspension button, you will see the following pop-up screen:
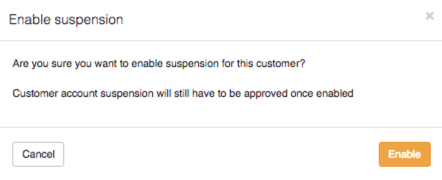
Click on the “Enable” button to enable the customer’s suspension settings.
4.4.2.2. Disable suspension:
 |
This button will allow you to disable the customer suspensions settings for a specific customer. |
After clicking on the disable suspension button, you will see the following pop-up screen.
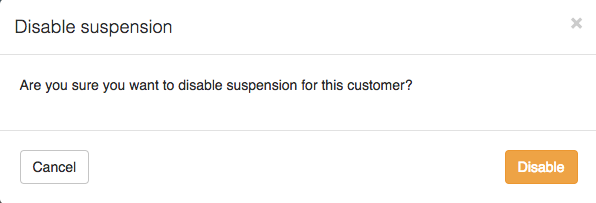
To disable the customer’s suspension settings, click on the “Disable” button.
4.4.3. Pausing or resuming suspension
4.4.3.1. Pause Suspension:
 |
When the customer is suspended, you can choose to manually pause their suspension. This means that the customer will have active services again as per the suspension settings seen in section 1.5. |
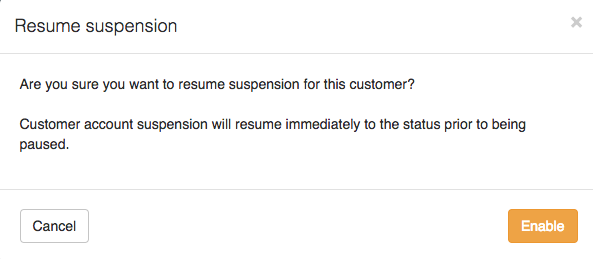
After clicking on the pause button, you will see the following pop-up screen:
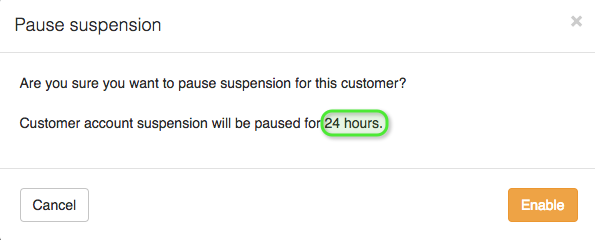
The green section will show you the time that the customer will be unsuspended for, as per the setup in your billing settings. If you are sure that you would like to pause the customer’s suspension, click on the “Enable” button.
4.4.3.2. Resume suspension:
 |
When the suspension has been paused, you have the option to manually resume the suspension again by simply clicking on the “play” button. |
After clicking on the resume button, you will see the following pop-up screen:
To resume the customer’s suspension, click on the “Enable” button. Please note that this option is only when you want to resume the customer’s suspension before it has reached the temporary un-suspend time limit.
4.4.3.3. Greyed out pause button:
 |
The pause button will only be active when the customer account has been suspended. |
4.4.4. Approve Suspension
4.4.4.1. Normal customers
 |
To start the suspension process for a customer, you will need to approve their suspension first. To do this, click on the red tick mark. |
After clicking on the red tick mark, you will see the following pop-up screen:
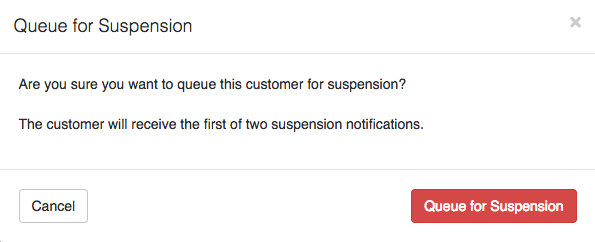
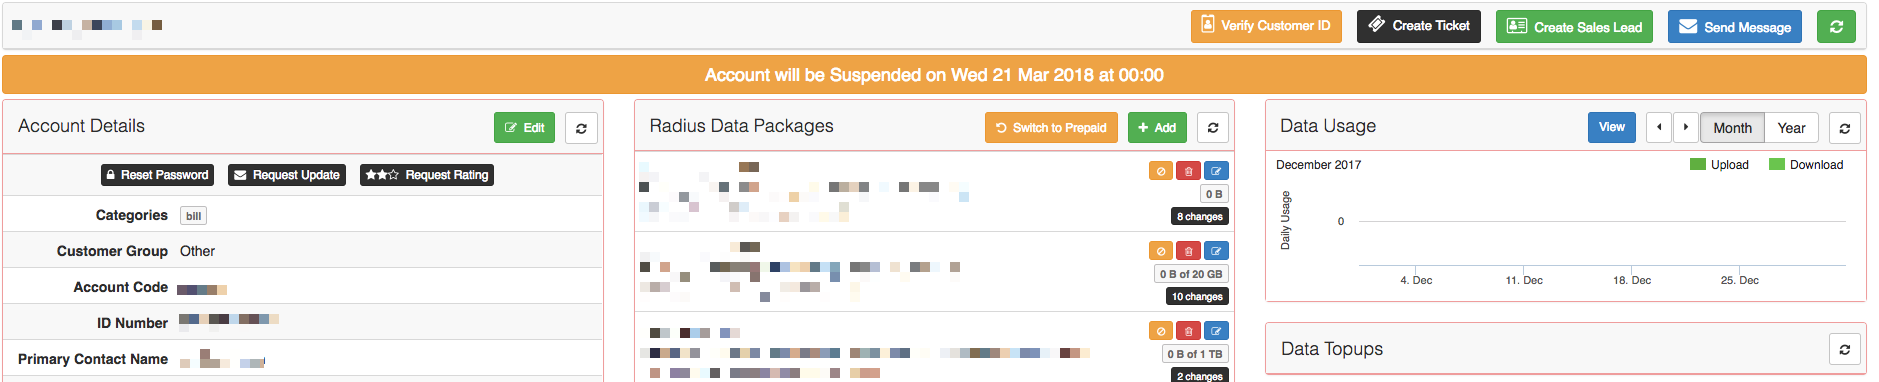
To queue the customer for suspension, click on the “Queue for Suspension” button. The customer will now receive their first and second warnings and then finally get suspended as per your WISPs setup.
After the customer has been queued for suspension, the customer will receive a big orange banner on their profile to state that the customer has been queued for suspension as well as when the customer will be suspended:

4.4.4.2. Resellers and Master Accounts
When approving suspensions for resellers or master accounts, you will be able to choose whether you would like to suspend only the specific reseller or master account or whether you would like to suspend the reseller or master account as well as all the sub-accounts that are linked to them.
To queue the reseller or master account for suspension, click on the approve button found on the right-hand side of the specific reseller or master account. You will now see the following pop-up screen:
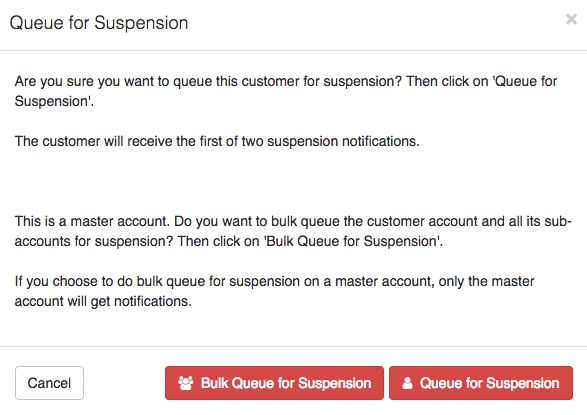
Click on the “Bulk Queue for Suspension” button to queue the reseller or master account as well as all their customers or sub-accounts for suspended. Although all customers and the reseller will be suspended, only the reseller or master account will receive the notifications. If you click on the “Queue for Suspension” button, then only the reseller or master account will be suspended.
4.4.5. Reset suspension:
 |
This button will allow you to stop the customer’s current suspension process or un-suspend customers who have already been suspended. |
4.4.5.1. Resetting the suspension for normal customer accounts
After you have clicked on the reset suspension button, you will see the following pop-up screen:
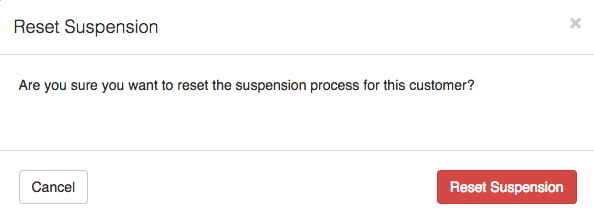
To confirm that you want to reset the customer’s suspension, click on the “Reset Suspension” button.
4.4.5.2. Resetting the suspension for master or reseller accounts
To reset the suspension for master accounts or resellers, click on the reset button found on the right-hand side of the specific reseller or master account.
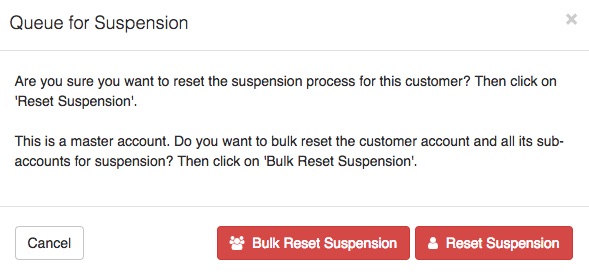
Click on the “Bulk Reset Suspension” button to reset the reseller or master account suspension as well as all their customers or sub-accounts. If you click on the “Reset Suspension” button, then only the reseller or master account will be suspended.
4.4.6. Greyed out tick mark:
 |
When the tick mark button is greyed out, it means that the individual customer’s suspension setting is disabled. |
To enable the customer’s suspension settings, click on the enable button found in section 3.4.2.1. to enable the general suspension settings. If the customer has a special arrangement – for example companies who have 30 days terms, you can edit their individual suspension settings either on their customer profile or by editing their specific details as in section 3.4.5
4.4.7. Edit suspension settings
 |
This button will allow you to edit a specific individual customer’s suspension details. This will only be for customers who need customer suspension settings i.e. companies who have 30 days terms. |
You can customise the customer suspension settings in two places:
- On the customer profile
- In the suspension list.
4.4.7.1. From the customer profile.
To change the customer-specific suspension settings, go to the suspension details section on the customer profile. In this section, you will be able to determine whether the customer should:
- Use customer group settings or not
- Whether suspensions should be enabled or disabled for the customer
- The days until overdue, second notification and suspension.
For more information on how to do this, please refer to section 3.2.2. for more information.
4.4.7.2. From the suspensions list
You will also be able to change the customer specific suspension settings from the suspensions list. To do this, click on the edit button found on the right-hand side of the screen. You will now see the same pop-up screen you see when customising a specific customer’s suspension settings. For more information on how to edit these settings, please refer to section 3.2.2.
4.4.8. Customer Edit Screen
 |
This button will always take you to the customer profile (customer edit screen). |
All customers who are queued for suspension will have an orange banner on top of their profile to show when the profile will be suspended.
All customers who are already suspended, will have a red banner on top of their profile and also gives you information on when the profile was suspended.

5. Suspending and unsuspending customers:
5.1. Suspending
For the suspension process to begin, you will first need to approve the customer’s suspension. This is done from the customer suspension screen. As previously mentioned, all customers marked in red are customers who are suspended, all customers marked in orange are customers with overdue accounts and all customers who are marked in gray, are customers whose suspensions settings are disabled.
Always be sure to check the customer profile first for any debtor notes or tickets relating to special arrangements or payment plans.
5.1.1. Suspending single customer accounts
To approve a single customer’s suspension, look for the specific customer you want to suspend, and then click on the approve button found on the right-hand side of the screen (refer to 3.4.4. for more information).
5.1.2. Suspending multiple customer accounts
To approve multiple suspensions at once, tick all the customers who need to be suspended on the left-hand side and then click on the “Approve Suspension” button.
After clicking on the “Approve Suspension” button, you will see the following pop-up screen.
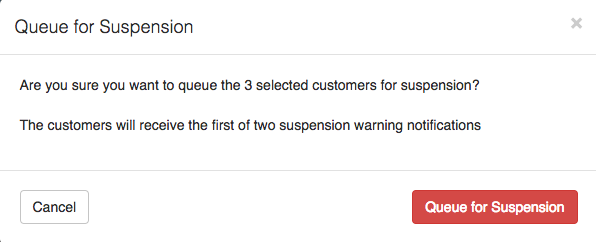
To queue the customers for suspension, click on the “Queue for Suspension” button.
5.1.3. Approved by:
If need be, you are able to view who approved the customer suspension. To do this, go to the customer suspension screen. Click on the “Show / Hide Columns” button and then click on the “Approved By” button.
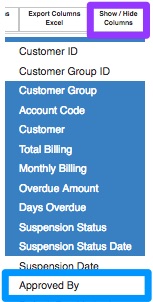
After clicking on the “Approved By” button, click on the “Show / Hide Columns” button again for the menu to disappear. In the customer suspension list, you will now be able to see who approved the suspension.
5.1.4. Immediate / manual suspension
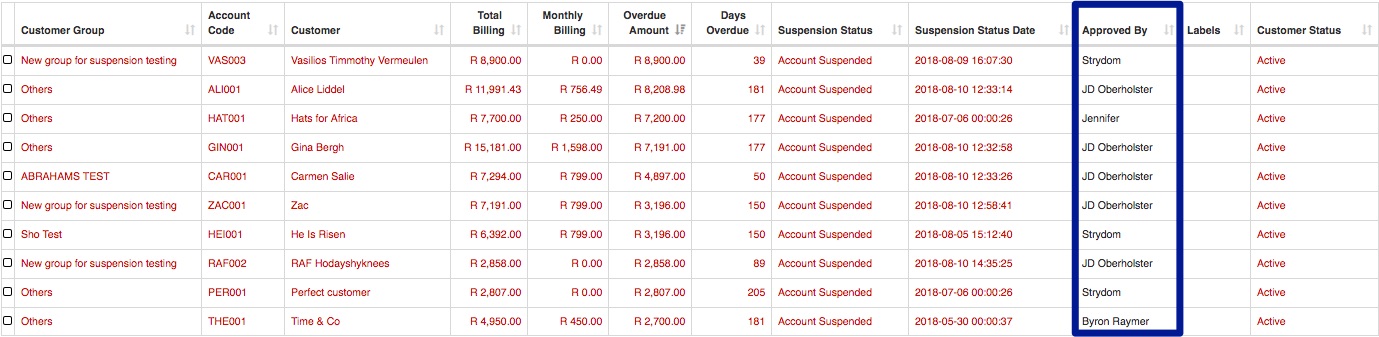
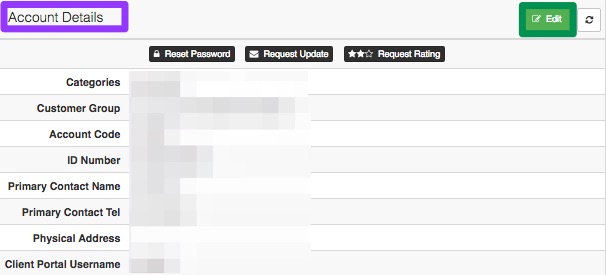
Should you need to immediately suspend a customer, you will be able to do this by going to the customer’s profile. Once the profile has loaded, go to the “Account Details” section and then click on the “Edit” button.

You will now see the following screen:
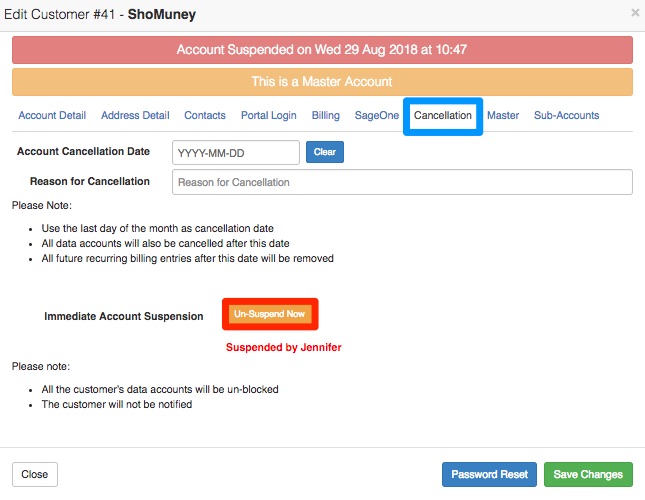
Go to the “Cancellation” tab and then look for the suspension section. To suspend the customer, click on the “Suspend Now” button. After clicking on the suspend now button, you will see the following pop-up screen:
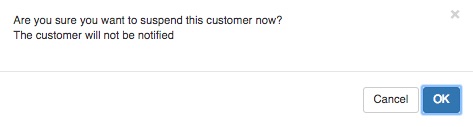
Click on the “OK” button to confirm the customer suspension. You will now be taken back to the “Cancellation” tab screen. In the suspension section, you will now be able to see that the customer is suspended as well as who suspended the customer.
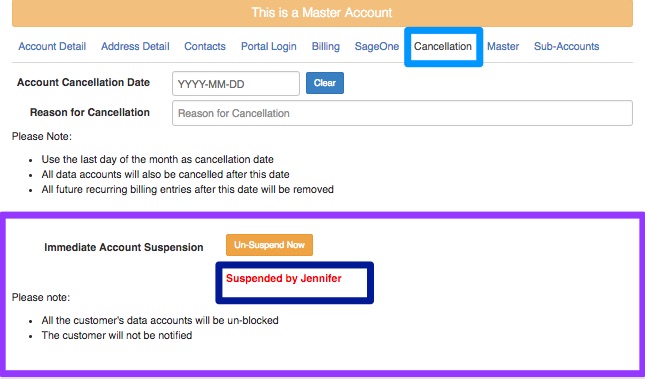
In the red banner on top of the screen, you will be able to see which date and time the customer was suspended. In the suspension section, you will be able to view who suspended the customer. After making any changes, remember to click on the “Save” button.
5.2. Resetting the suspension
Should the customer decide to pay after the suspension process has begun (already been approved), then you will be able to reset the suspension. During the syncing process between SageOne and HeroTill, the system will also automatically pick up which customers have paid their account in full. Should the system pick this up, then the suspension process will automatically be reset. Please note that the automatic suspension reset will happen daily at 00:00 AM. If the customer has already been suspended, you will also be able to un-suspend a customer by clicking on the reset button. For more information, please refer to section 3.4.4.2.
5.3. Un-Suspending customers
5.3.1. Immediate / manual un-suspension
Go to the customer profile, look for the “Account Details” section and then click on the “edit” button.
After clicking on the “Edit” button, you will see the following pop-up screen:
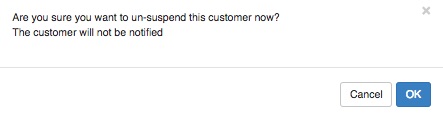
Click on the “Cancellation” tab and then continue to click on the “Un-Suspend Now” button. On the pop-up screen, click on the “OK” button to unsuspend the customer.
Remember to click on the “Save Changes” button after making any changes.
5.3.2. Automatic un-suspensions
The suspension module has been built to automatically un-suspend customers who have paid their account in full. There are however a few things to remember when thinking about the automatic un-suspension:
- Payment first needs to be allocated to the customer profile in SageOne. In other words, the customer’s payment first needs to reflect in your bank account.
- After payment has been allocated, the cron needs to run to pull all new receipts.
- Only later, when the midnight cron runs, will the system be able to pick up that the account has been settled and will the automatic un-suspension take place.
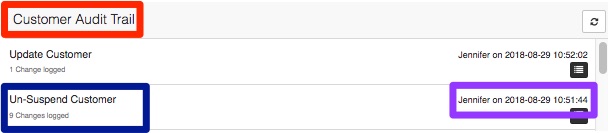
5.3.3. Un-suspended by:
If need be, you will be able to view who un-suspended a specific customer. To view this, you will need to go to the “Customer Audit Trail” found on the customer edit screen (customer profile). In the list of actions, you can look for the “Un-Suspend Customer” heading. On the right-hand side, in the purple section, you will then be able to view who un-suspended the customer as well as which date and time the un-suspension took place.