
Webinar: Reseller Module Webinar
Reseller Portal
The purpose of this guide is to help guide resellers on the different functionality in their reseller portal. It is important to note that each reseller portal might differ depending on their ISP and the access given to the reseller by the ISP itself.
1. Reseller portal
The reseller portal is based on the normal HeroTill customer portal, but with a few additional functions for resellers who are able to manage their customers.
1.1. How to log into my reseller portal?
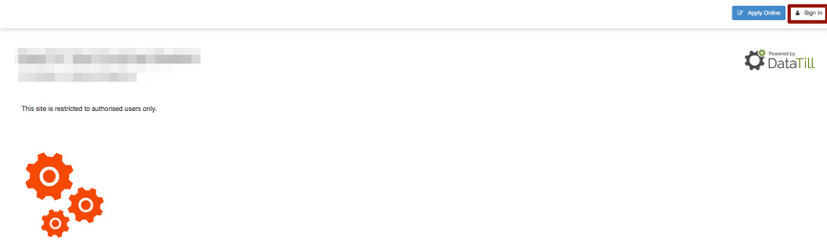
To log into the reseller portal, you will need to open your HeroTill in your browser. In the top right-hand corner, click on the “Sign In” button.
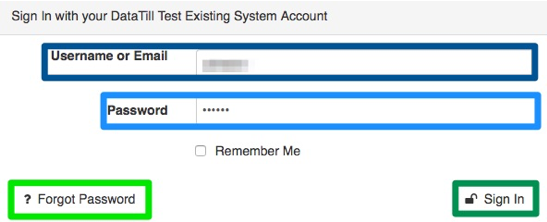
You will now be requested to log into your portal. Enter your “Username or Email Address” and your “Password” and then click on the “Sign In” button. Your username refers to your customer code. If you do not know what your login details are, click on the “Forgot Password” button and follow the instructions or ask your contact person at the ISP to send you a password reset email.
After signing in, you will now see the following page:
1.2. Doing a speed test
This section will allow you to do a speed test on your current internet line. Please note that you should only use this speed test function for your OWN internet connection on your ISP provided connection. In other words, you cannot use this function to do a speed test for your customers (sub-accounts).
To do a speed test, click on the “Speedtest” button.
![]()
On the following screen, click on the “Run Speedtest” button.
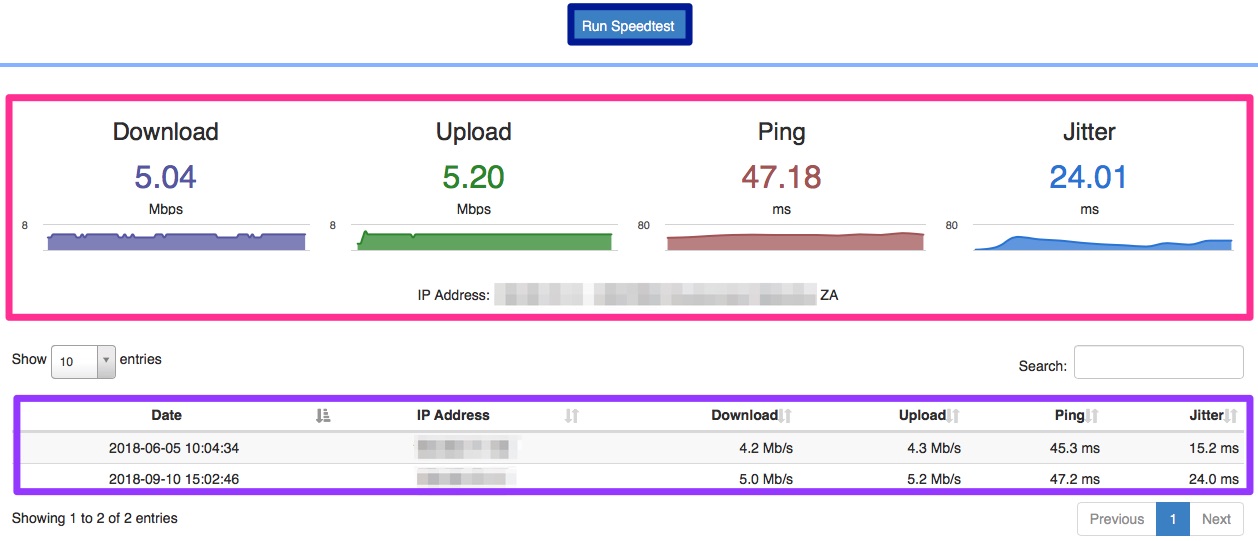
You will be able to see the results for the speed test in the middle section of the screen. At the bottom, you will also be able to see all previous speed tests that have been done. All these results will also pull through to your customer portal.
1.3. Managing your customers
To manage your customers, click on the relevant button which you would like to action.
![]()
| Orange: | This button will allow you to update your or your customer’s details. |
| Red: | In this section, you will be able to view and download invoices and statements for your customers. You will also be able to see whether certain invoices have been paid or not. |
| Pink: | Here you will be able to view your own or the customer’s usage. |
| Purple: | In this section, you will be able to submit and view your own helpdesk tickets. You will also be able to view your customer’s helpdesk tickets, but please note that at this stage you will not be able to submit helpdesk tickets for them. Your customers will need to submit their own helpdesk tickets from their customer portal. |
| Blue: | Here you will be able to view more information about the commission that is owed or has already been paid to you. |
| Green: | This section will allow you to submit new leads for potential customers as well as track the progress of the lead. |
| Black: | In this section, you will be able to view more information about your customer’s account. |
After clicking on one of the above action buttons, an additional field will appear to the right-hand side of the “Customers” button. Click on the drop-down menu to choose a customer’s profile on which you would like to work. Please note that this list consists of customers who have either already received an installation or are in the process of receiving their installation.

*Please note:
Once a customer has accepted the quote, a customer profile will be created for them. Once the customer profile has been created, they will be able to access their own online portal in which they will be able to, do most of the action listed in the following section. For more information on the customer portal, please refer to the customer portal manual.
1.4. Update customer information
In this section, you will be able to update your own information or your customer’s information. Remember that your customers will also be able to update their own information by logging into their customer portal. To update the account information, click on the “Account Info” button.
![]()
After clicking on the “Account Info” button, you will see the following screen:
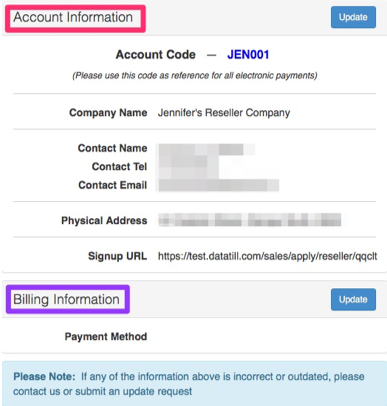
This screen will allow you to update either your own or a customer’s “Account Information” or their “Billing details”. The customer details that you view will default to the details found on your customer profile. If you would like to change one of your customer’s details, remember to select the customer in the dark blue section.
1.4.1. Account information
To request an account information update, click on the “Update” button.
Please note that the information that you can update for companies and individual customers (home users) will differ. In the table below, you can see which information you will be able to requests changes for when it comes to companies as well as individual customers.
Companies:
|
Individual Customers:
|
*All items listed in bold are compulsory fields. You will not be able to request an update if these fields are not completed.
After making any changes, remember to click on the “Request Update” button.
1.4.2. Billing information
To request an update for billing information, please click on the “Update” button.

After clicking on the “Update” button, scroll down to the bottom of the page. There you will see the section where you can update the customer’s or your own billing information.
You will be able to choose between 4 different “Payment Methods”:
- Direct Debit
- EFT
- Credit Card
- Cash
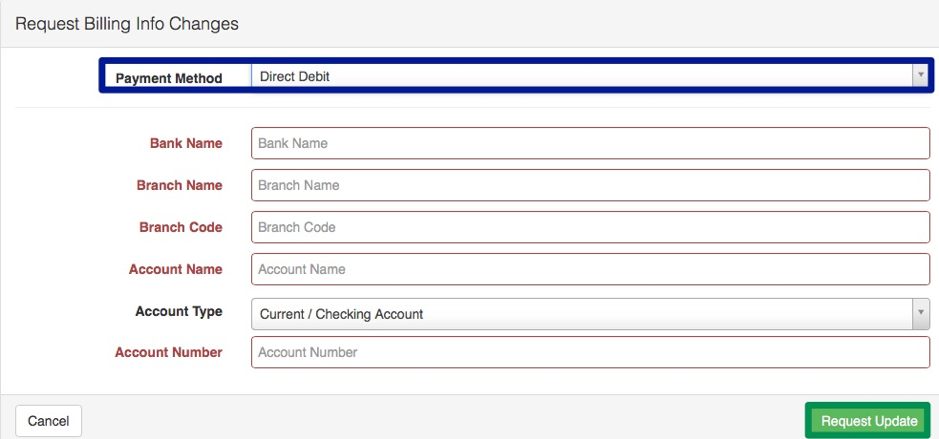
After choosing the relevant payment methods, click on the “Request Update” button. Please note that if you choose direct debit as a payment method, then you will need to provide the customer’s banking details.
1.5. Billing
When it comes to billing, there are two ways in which this can take place.
- Each customer can be billed individually, and they pay the ISP.
- You get billed for each customer, the customer pays you and you pay the ISP.
1.5.1. When your customers are billed for their own account
This means at the end of the month, each one of your customers will receive an invoice form the ISP. It is then the customer’s responsibility to ensure that their account is settled each month. You, as the reseller, will however still be able to download this customer’s invoices and statements and send it to them as well. The customer will also be able to log into their customer portal and download their own invoices and statements.
To do this, go to the “Billing” tab in the reseller portal. Remember to choose the customer’s whose invoices and statement that you want to download.

| Light Blue: | Here you can see what type of document it is i.e. a credit note or invoice as well as what the document number is. |
| Purple: | In this section you will be able to see on which date the document was created as well as when the due date is. |
| Pink: | This section will show you the document status i.e. paid, unpaid or overdue. |
| Orange: | Here you can see what the total for the document is. |
| Green: | Click on the statement button to download a statement. If the document doesn’t open in a new tab, please check for any pop-up blockers. |
| Black: | The view button will allow you to view the document. If the document doesn’t open in a new tab, please check for any pop-up blockers. |
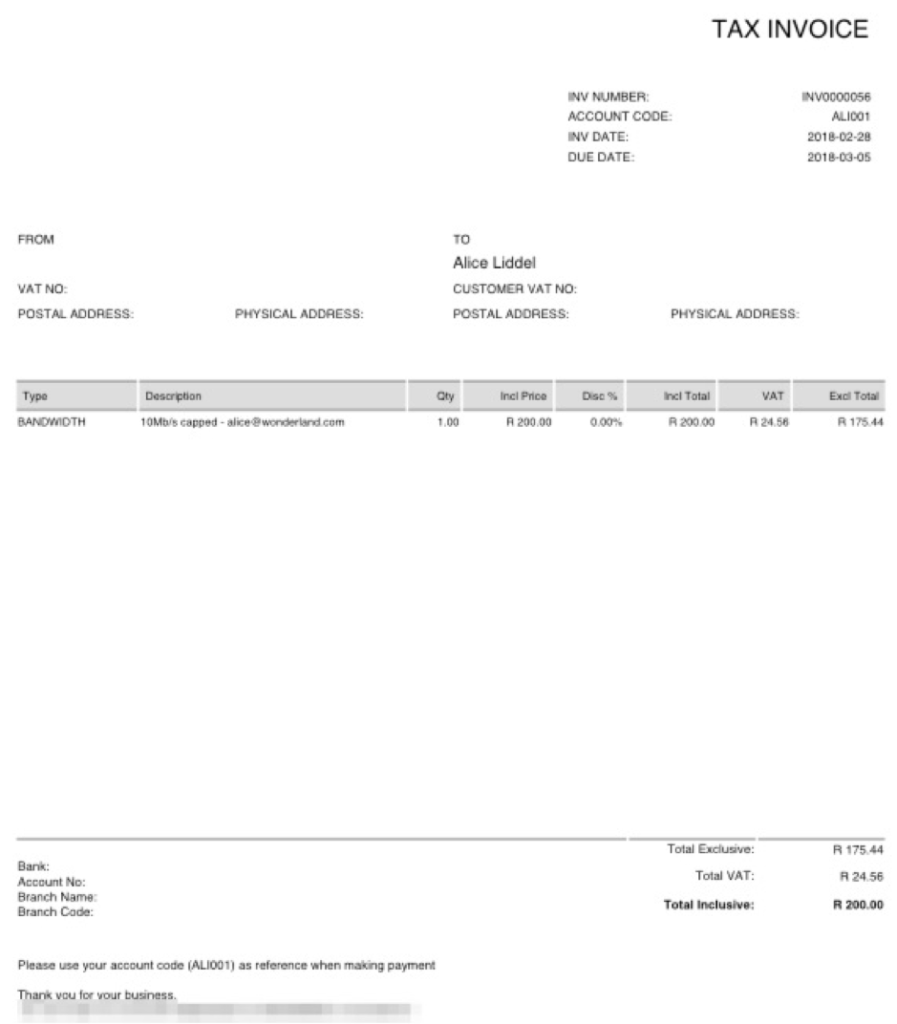
The customer’s invoices will look similar to the screenshot below:
1.5.2. When you are billed for all your customers
This means that you will be billed for each customer linked to your profile. In other words, instead of the customers being billed and held responsible for settling their account with the ISP, it is now your responsibility to settle your customer’s accounts with the ISP.
To do this, go to the “Billing” tab in the reseller portal. Remember to choose your own customer name to be able to download the relevant invoices and statement.

| Light Blue: | Here you will be able to find a list of all invoices made out to you. |
| Green: | Click on the statement button to open your statement. If the statement doesn’t open, please check for any pop-up blockers. |
| Black: | The view button will allow you to view the billing document. If the document doesn’t open in a new tab, please check for any pop-up blockers. |
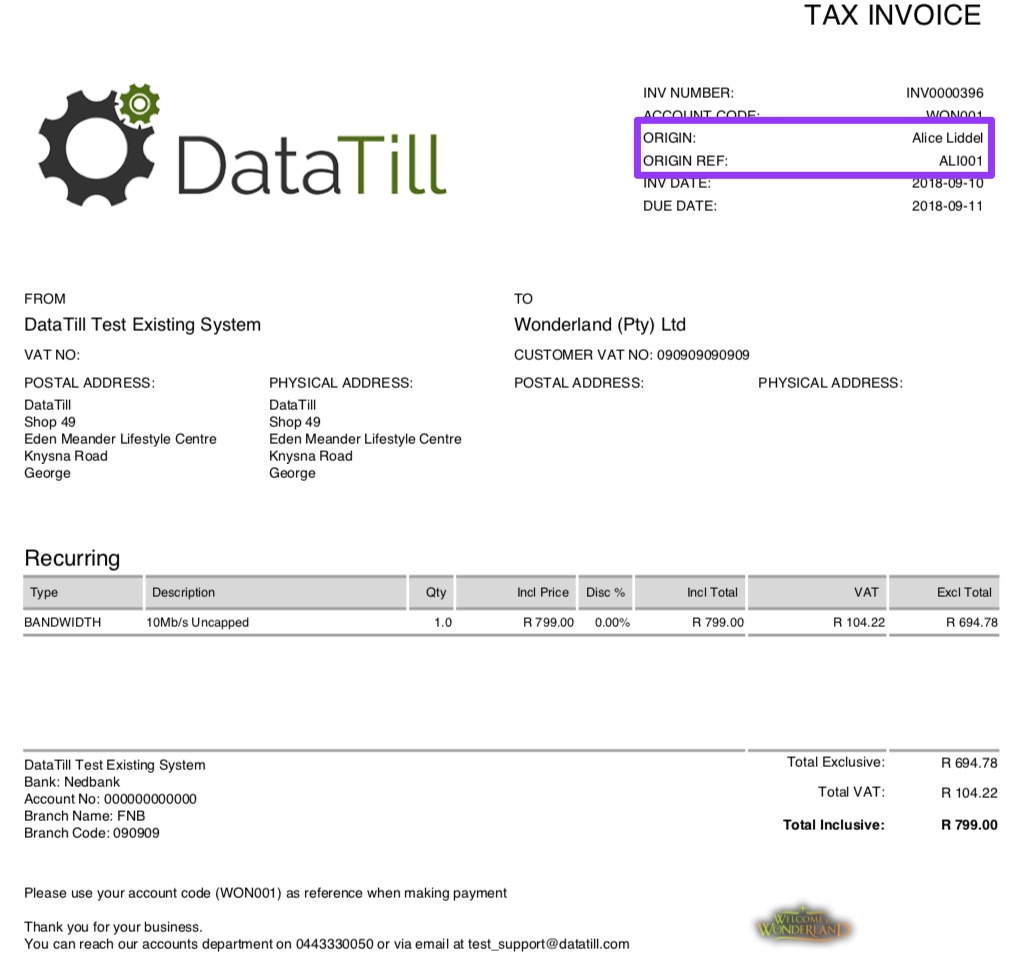
The invoices made out to you as the reseller will look similar to the screenshot below:
1.5.2.1. How do I know for which customer the invoice is?
An important thing to note on this invoice is the “ORIGIN REF” section. In this section, you will be able to see the customer code of the sub-account that this invoice relates to.
1.6. Usage
The reseller will also be able to view their customer’s usage. They will however not be able to request top-ups for their customers. Reseller customers will still need to do this themselves.
To view the customer’s usage, go to the “Usage” tab. Remember your “Customer Filter” should you want to view a specific customer’s usage.
![]()
You will now see a screen that looks similar to the one below:
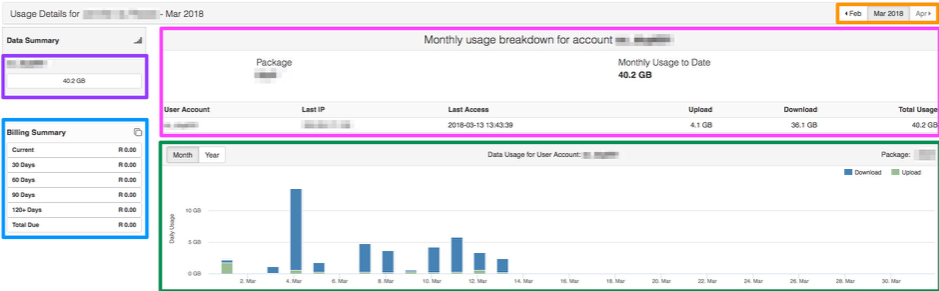
| Orange: | These buttons will allow you to switch between different months. |
| Pink: | In this section, you will be able to see the total usage to date as well as on which package the customer is. |
| Purple: | Here you will be able to see all the customer’s data accounts (if they have more than one) as well as the usage for each account. |
| Blue: | In this section, you will be able to view a summary of the customer’s billing history. |
| Green: | This section will show you a summary of the customer’s daily usage for the month in terms of uploads and downloads. |
1.7. Helpdesk Tickets
In the resellers portal, you will see that there is a section for tickets. From this section, you can:
- Submit your own tickets
- Reply to your own tickets
- View your customer’s tickets.
Currently, there is no functionality to create or manage your customer’s tickets, but you can view them and keep track of any progress. To find the helpdesk tickets, click on the “Helpdesk Tickets” option. The list will automatically be filtered for your tickets. If you would like to see your customer’s tickets, remember to choose their name in the drop-down menu.
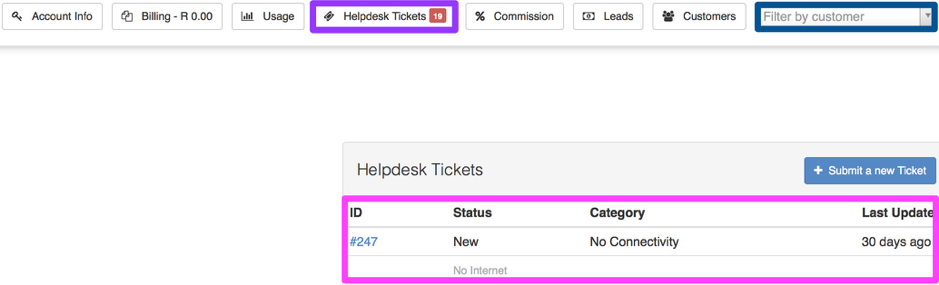
In the pink section, you will see a list of all the tickets relating to either your profile or your customer’s profile.
1.7.1. Creating new tickets
Remember that you can only create new tickets for your own profile. If any of your customers would like so submit support queries etc. then we will encourage that they submit their own tickets from their customer portal.
To add a ticket, click on the “Submit a new Ticket” button.

You will now see the following pop-up screen:
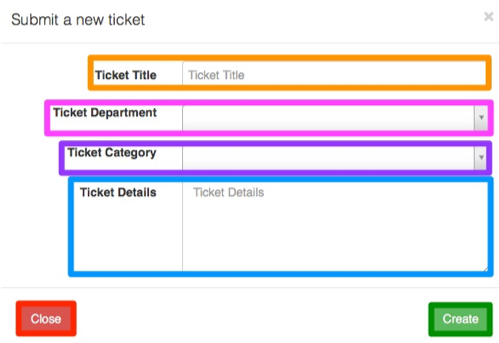
| Orange: | Enter your ticket title here. Your ticket title is equivalent to an email subject. |
| Pink: | Choose your ticket department from the drop-down menu. |
| Purple: | Next, you will need to choose the ticket category i.e. no internet or debit order. |
| Blue: | In this section, you need to type your message. |
After you have completed all the details above, click on the “Create” button. If you would like to cancel the ticket creation, click on the “Close” button.
1.7.2. Viewing Ticket details
To view a specific ticket’s details, click on the ticket “ID”.

After clicking on the ticket ID, the following screen will appear on the left-hand side.
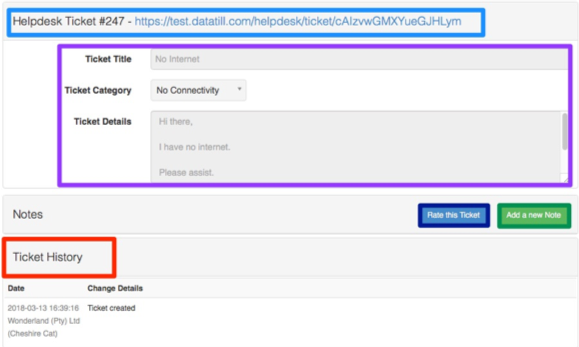
| Light Blue: | By clicking on this link, the ticket will open for you and you will be able to read all messages in a bubble conversation style. |
| Purple: | In this section, you can see all the ticket details you entered when originally creating the ticket. |
| Dark Blue: | After your query has dealt with, you have the option to rate the service you have received. If you choose to rate the service, you will need to choose between 1 and 5 stars and add any additional comments. |
| Green: | If you need to add a new note, you can click on this button. Type your note on the pop-up screen and then continue to click on the add note button. |
| Red: | Here you can see a short history of all actions that have taken place on this ticket. |
1.8. Commission
You will be able to ask your ISP to enable the commission section for you. To view your commission section, click on the “Commission” tab.
![]()
1.8.1. Commission list
On the following screen, you will be able to view the following information:
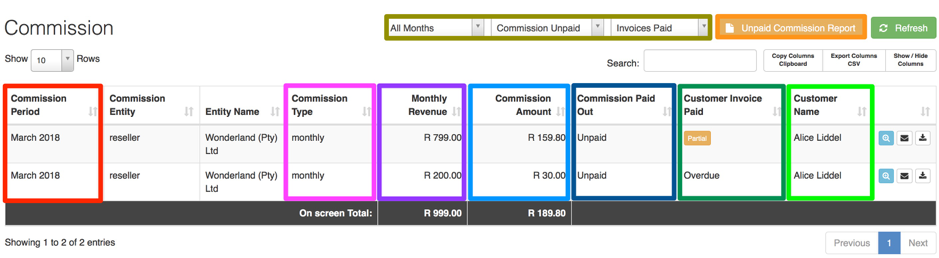
| Yellow: | You can use these filter functions to filter your list according to months, commissions that have been paid out as well as for all invoices that have not been paid by the customers. |
| Orange: | This button will allow you to download an unpaid commission report. This report will give you a better idea of which commissions have not been paid. |
| Red: | Here, you can view the month in which the commission was earned. |
| Pink: | This section will show you the commission type assigned to your profile. It can either be once off or monthly. |
| Purple: | This will show you the customer’s monthly revenue amount. |
| Light Blue: | Here, you can see the amount of commission that you will receive. |
| Dark Blue: | In this section, you will be able to see whether your commission has been paid out or not. |
| Dark Green: | In this section, you will be able to see whether the customer has paid their invoice or not. Please remember that you can only receive commission once the customer has fully paid the outstanding invoice. |
| Light Green: | Here you will be able to view the customer name. |
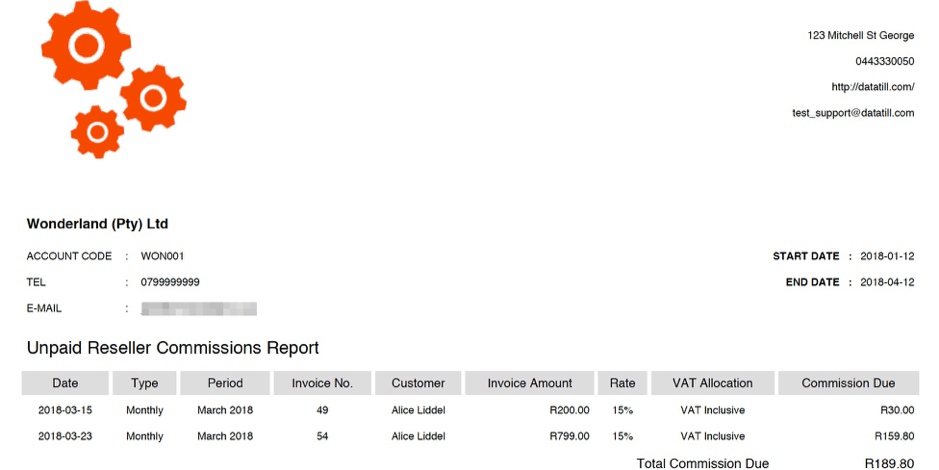
1.8.2. Unpaid Commission Report
Click on the “Unpaid Commission Report” button to download the PDF generated report. The report will look similar to the report
1.8.3. View how the commission is calculated:
From your reseller portal, you will also be able to view how the commission has been calculated for the specific invoice. To do this, click on the “View Commission Calculations” button.
On the following pop-up screen, you will see the following:
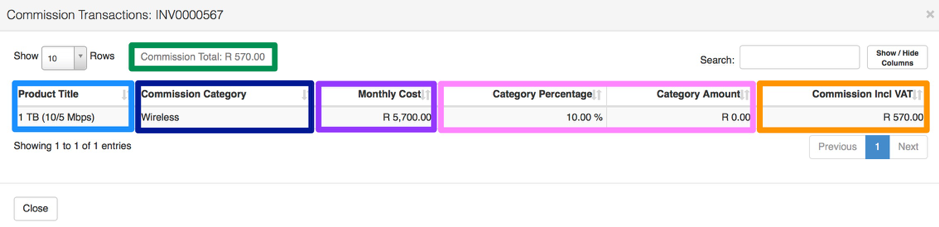
| Green: | This will show you the total amount of commission that you will receive the invoice. |
| Light Blue: | Here you can see on which product you are receiving commission. |
| Dark Blue: | In this section, you can see what commission category the product is. |
| Purple: | This will show you the total monthly cost of the data product. |
| Pink: | You can receive commission in one of two ways:
In this section, you will be able to see either what percentage you will be receiving or what the fixed amount is that you will receive for the product. |
| Orange: | Here you will be able to view the commission amount that you will receive for that specific line item. |
1.8.4. How will I know if the commission item has been paid out?
Depending on your agreement with the ISP, you might still need to send them an invoice or follow up on whether credit has been allocated to your account. Once the ISP has marked the commission item as paid on their side, you will receive an email similar to the one below:
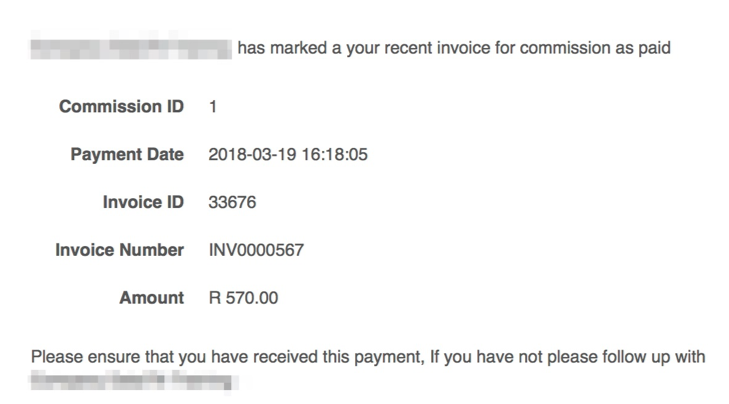
Please ensure that you have received this payment. If you have not received the payment, please follow up with your service provider.
1.9. Leads
All new leads will need to go through the ISP’s normal sales process. For more information on your ISP’s sales processes, please contact your relevant account manager. To find your leads section, log into your online portal and then go the “Leads” section.
![]()
You will now see the following screen:

1.9.1. Add new sales leads
Leads can be submitted in three different ways:
- You can submit your own leads.
- Customers can submit their own leads using your reseller link.
- Sales agents can capture and assign leads to you.
1.9.1.1. Submitting your own leads
To add a new lead, click on the “Add Sales Lead” button.
You will now be redirected to the following screen:
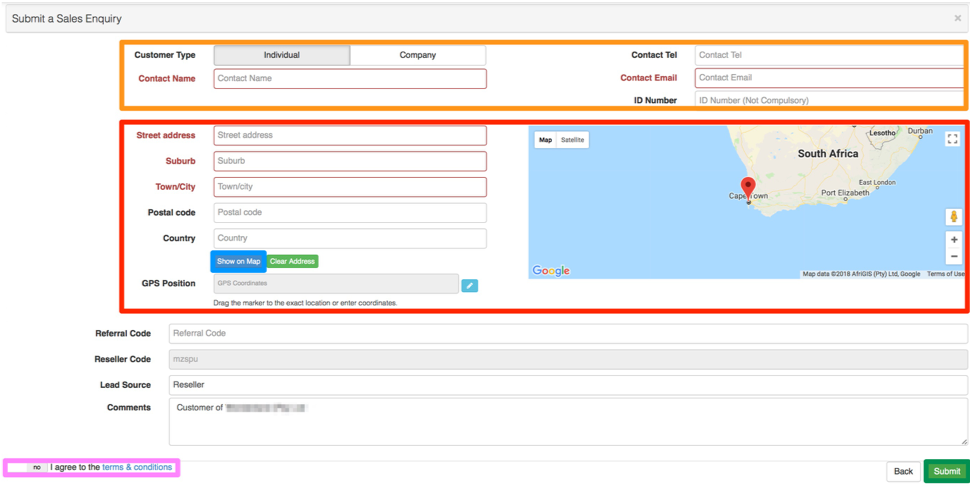
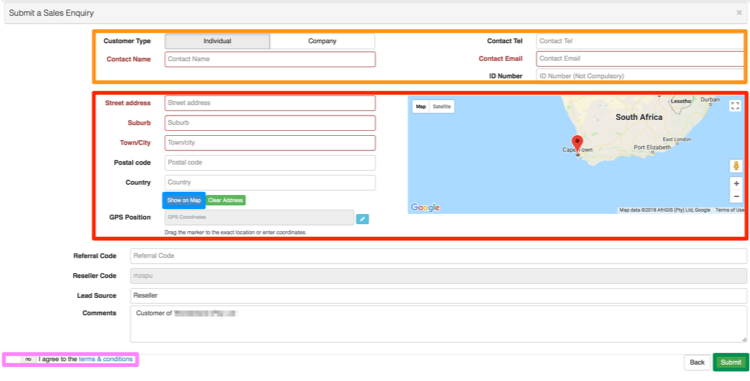
Remember to always add the customer information in a diligent manner to ensure a smoother process.
| Orange: | Here you will need to add the customer contact information. |
| Red: | In this section, you will add the customer’s address. |
| Blue: | After adding the customer’s address, click on the “Show on Map” button. |
| Pink: | You will need to accept the terms and condition in section before being able to submit the lead. |
After all the details have been completed, click on the “Submit” button. If the lead was submitted successfully, you will see the following pop-up screen.
1.9.1.2. Letting the customers submit their own leads
If you would like your customers to submit their own leads, you can do this by copying and sending them your reseller signup URL. You can find this link under your account tab. For more information on how to get to the account section, please refer to section 5.3.
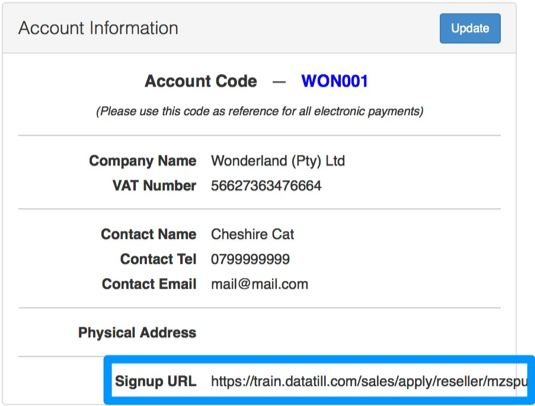
When your customers open the link, they will be redirected to sales lead page where they will need to complete their “Contact Information” and “Address”, accept the “Terms and Conditions” and then click on the “Submit” button.
1.9.1.3. When the ISP sales agent needs to capture your lead
If need be, the sales agent can also capture a lead for you. In the case that this happens, the lead will then just be assigned to you as a reseller and you will still be able to receive your commission.
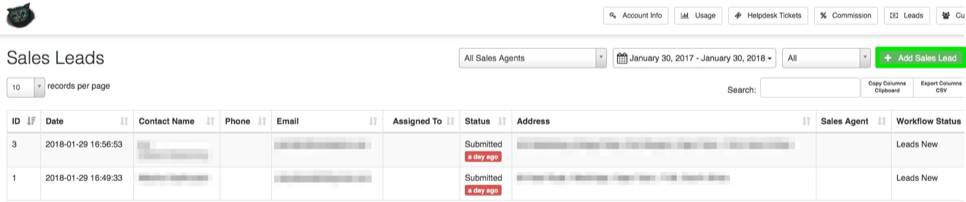
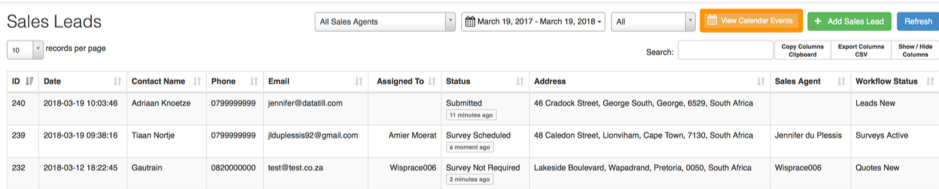
1.9.2. List of all current leads
Under your leads section, you will also be able to see a list of all current leads that are assigned to you.

| Red: | This will show you which date and time the lead was submitted. |
| Pink: | Here you can see the customer’s contact details. |
| Purple: | In this section, you will be able to see the lead status i.e. submitted, survey scheduled etc. |
| Dark Blue: | Here you can see which sales agent is attending to the customer. |
| Light Blue: | This will show you in which workflow section the lead currently is. There are 7 workflow statuses:
|
1.9.3. View all calendar events
From your online portal, you will also be able to view all site surveys and installations that have been scheduled for your customers. To view these events, click on the “View Calendar Events” button.
After clicking on the “View Calendar Events” button, you will be able to see a list of all scheduled events.

You will be able to see information such as the date the job is scheduled, for which customer the job is, what the job type is and where the job will take place.
1.10. Customers
Under the “Customer” section, you will be able to see a list of all the customer’s linked to your profile. You will also be able to filter your customer list to according to certain items such as payment methods, companies or individuals etc.
1.10.1. Filter functions
When viewing your customer list, you will be able to filter your list according to the following:
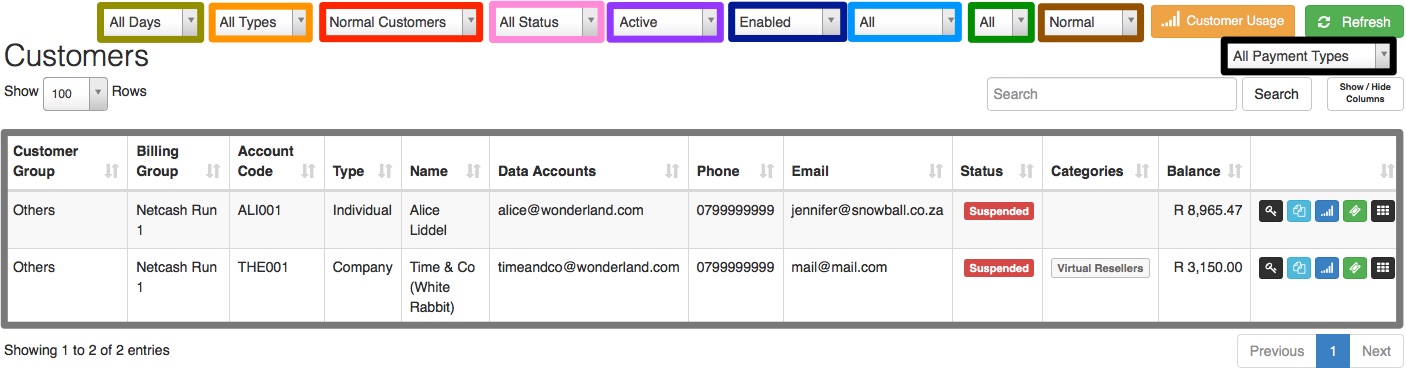
| Yellow: | The date on which the customer’s debit order should be deducted. |
| Orange: | To only see companies or individual customers. |
| Red: | To only see normal or Pre-paid customers. |
| Pink: | For a list of all customers that are verified or customers that are not verified. |
| Purple: | To see a list of all active customer or customers who have cancelled. |
| Dark Blue: | This will filter the list for you to see a list of all customer that are either enabled or disabled. |
| Light Blue: | To be able to see a list of all customers that are currently suspended. |
| Green: | For a list of normal customers or VIP customers. |
| Brown: | For a list of either normal or deleted customers. |
| Black: | According to the specific payment method i.e. debit order. |
1.10.2. Customer List
In your customer list, you will be able to view the following information:
- The customer or business name
- Contact details
- Status (Suspended, Cancelled, cancelling)
- Balance outstanding
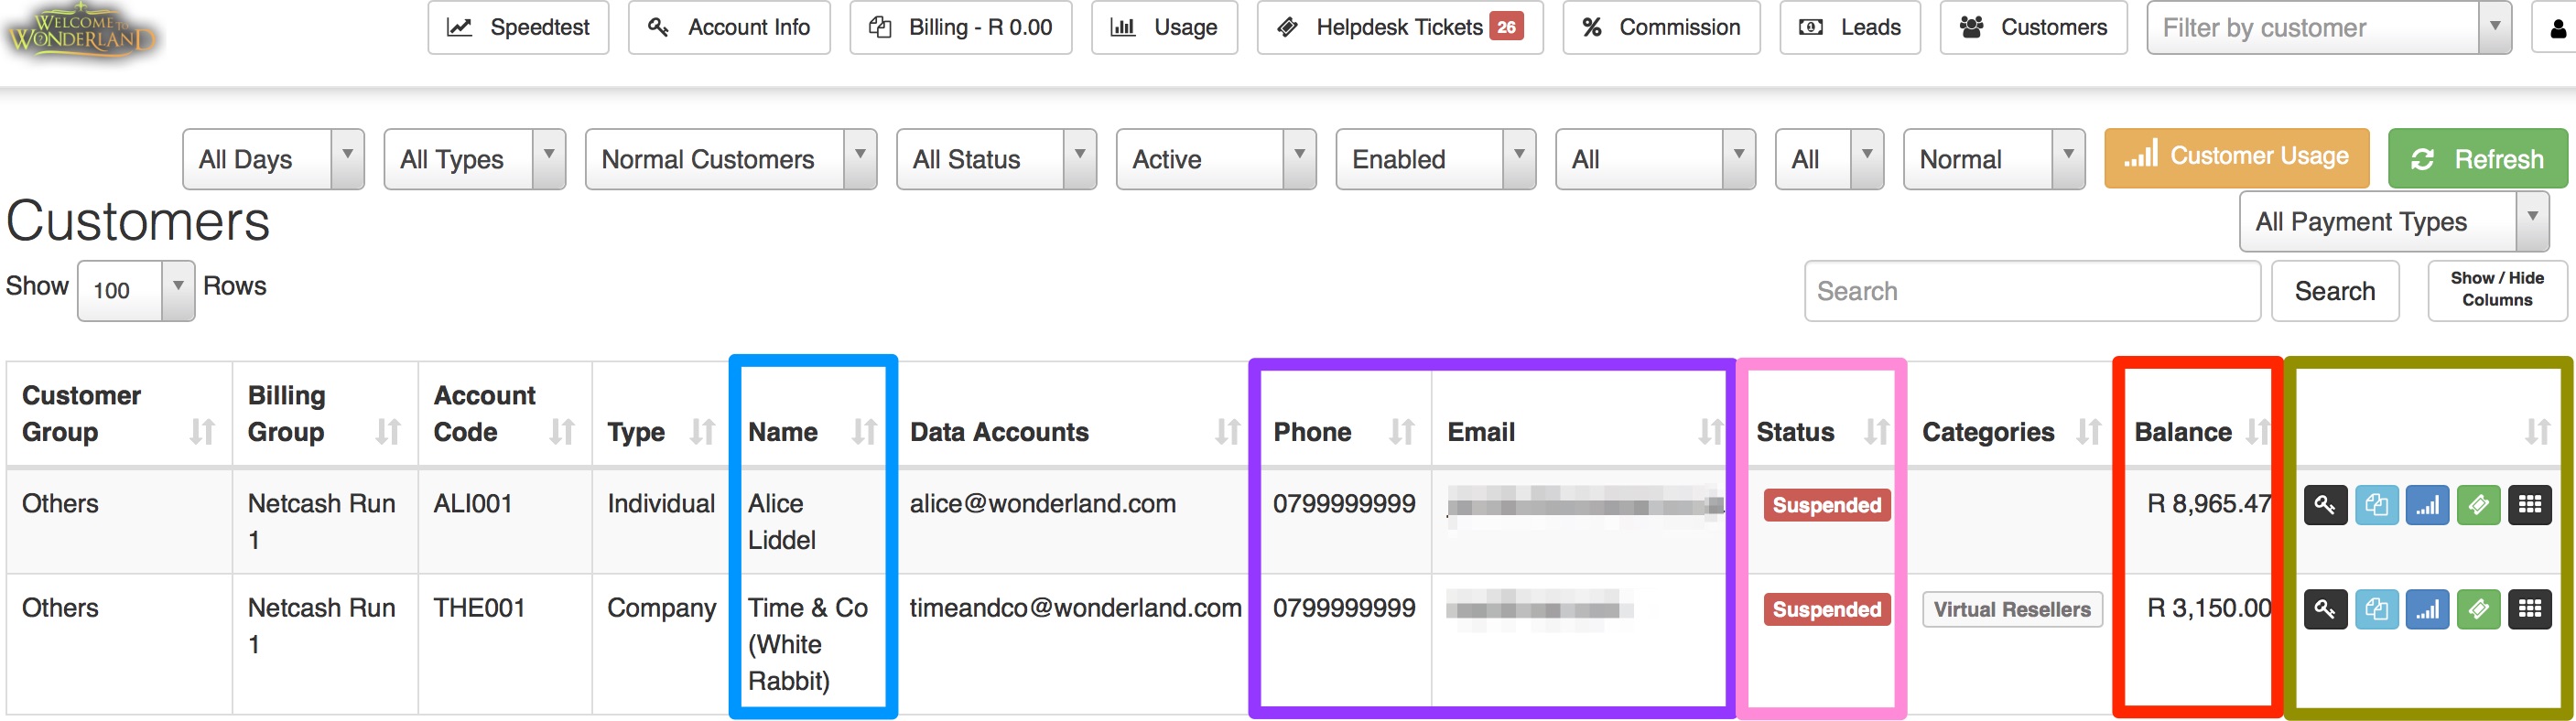
You can also use the buttons on the right-hand side to quickly go to:
- Account information screen for the specific customer
- View the billing for the specific customer
- View the specific customer’s usage
- View the specific customer’s tickets.
1.10.3. The customer’s profile
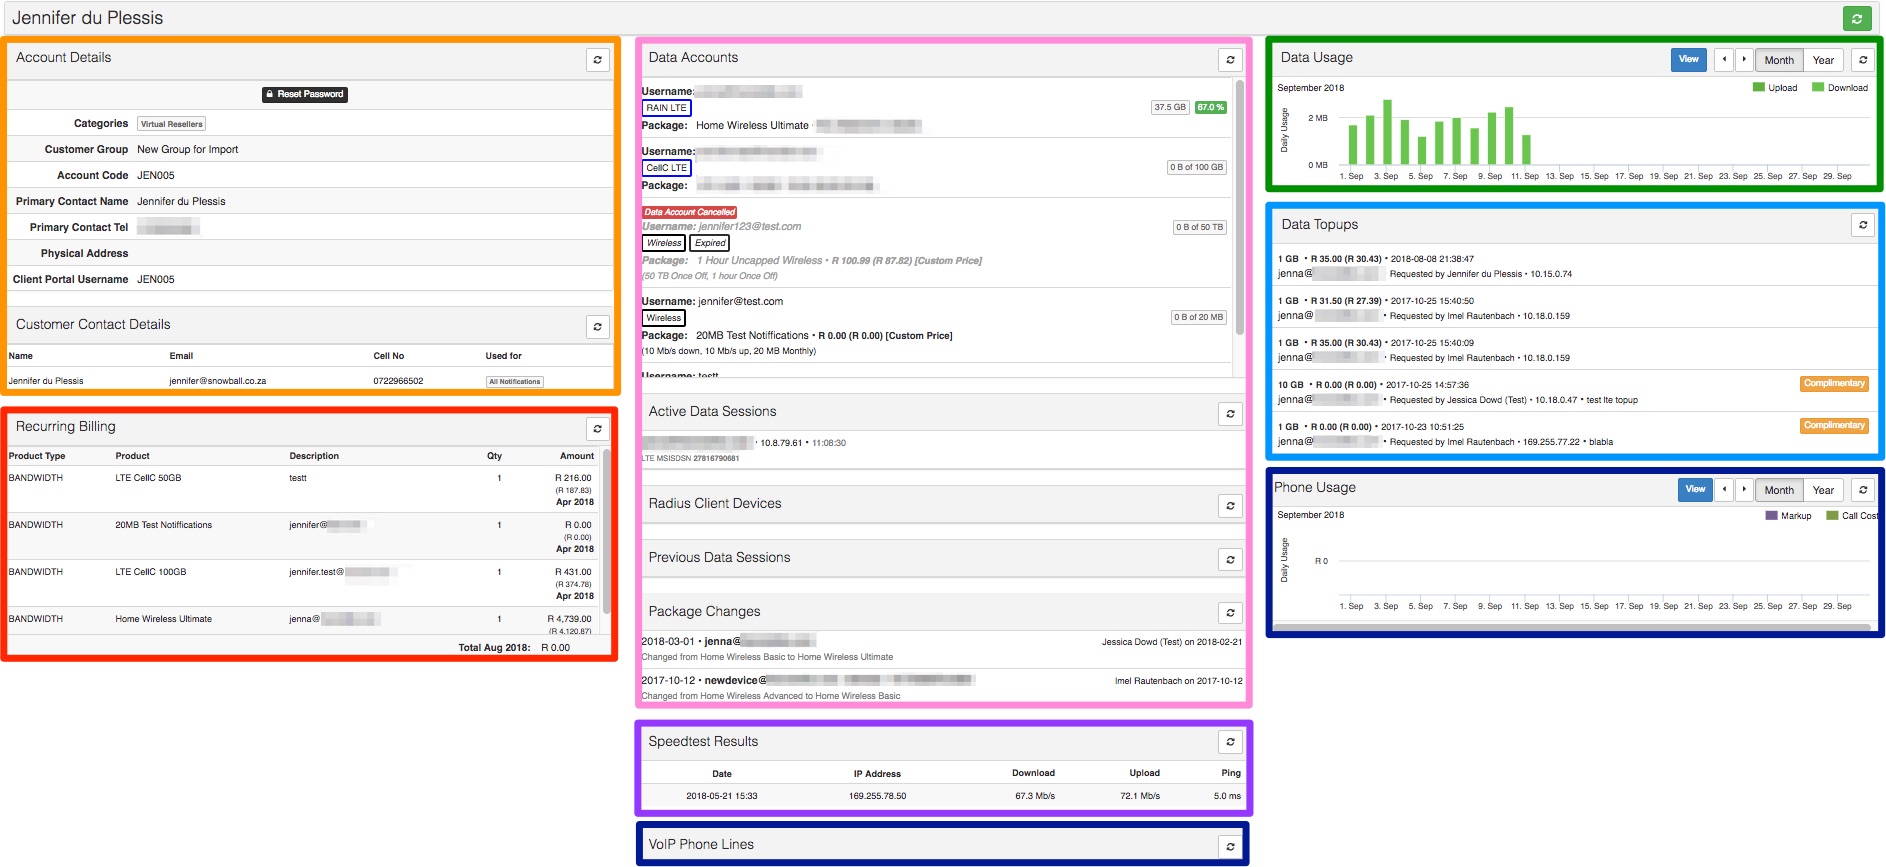
Resellers will now also have the option to view their customer’s (sub-accounts) customer profile. This screen is very similar to the normal HeroTill customer screen, with the exception that the reseller won’t be able to make any changes to these details.
To find the customer profile, click on the black button found on the right-hand side of the customer name.

On the following screen, you will be able to see:
- Customer account and contact information
- Recurring Billing information
- Data account and radius information
- Speed test results for all speed tests submitted by the customer
- VoIP and information (if provided by your ISP)
- A list of all top-ups that have been done
- A summary of data usage.
1.10.4. Customer Usage List
If you would like to view a list of all your customer’s usage, then you can do this by clicking on the “Customer Usage” button.

You will now be redirected to the following page:

You will now be able to view more information on the customer’s data package, cap, which high site they connect to as well as the total monthly billing for the specific customer. You will also be able to filter this according to high site, normal and pre-paid customers and month.
You can also use the buttons on the right-hand side to quickly go to:
- Account information screen for the specific customer
- View the billing for the specific customer
- View the specific customer’s usage
- View the specific customer’s tickets.