
How to top-up your account
Customers who run out of their bundle have the option to either manually top-up their account or to enable the auto-top up functionality. This can be done in the following ways:
- The customer can submit a top-up request to their ISP.
- The customer can do top-ups or configure auto-top up settings from their online portal.
- The customer can do top-ups, configure auto top-ups settings or view a list of previous top-ups from the customer mobile app (if enabled with their ISP).
1. Why can we do auto top-ups and manual top-ups?
1.1. Manually topping up my account:
Manual top-ups allow you to keep better track as to how many times you need to top-up or how much data you have used. This will also give you a better indication of whether or not you should perhaps upgrade your data package.
Manually topping up your account can become an irritating process as you need to phone your ISP or log into your customer account every time you need to top-up.
For example:
Your family is visiting, but you have reached your cap.
Your family continually streams series on Netflix and every time your cap is up, they quickly come running to you with complaints.
Now you need to phone your ISP and ask them to top-up your account or log into your customer profile to do the top-up.
This process can become a pain, therefore we have auto top-ups. If your auto top-ups are set up correctly, you never have to worry about topping your account up yourself or worry about bill shock at the end of the month.
1.2. Auto Top-ups:
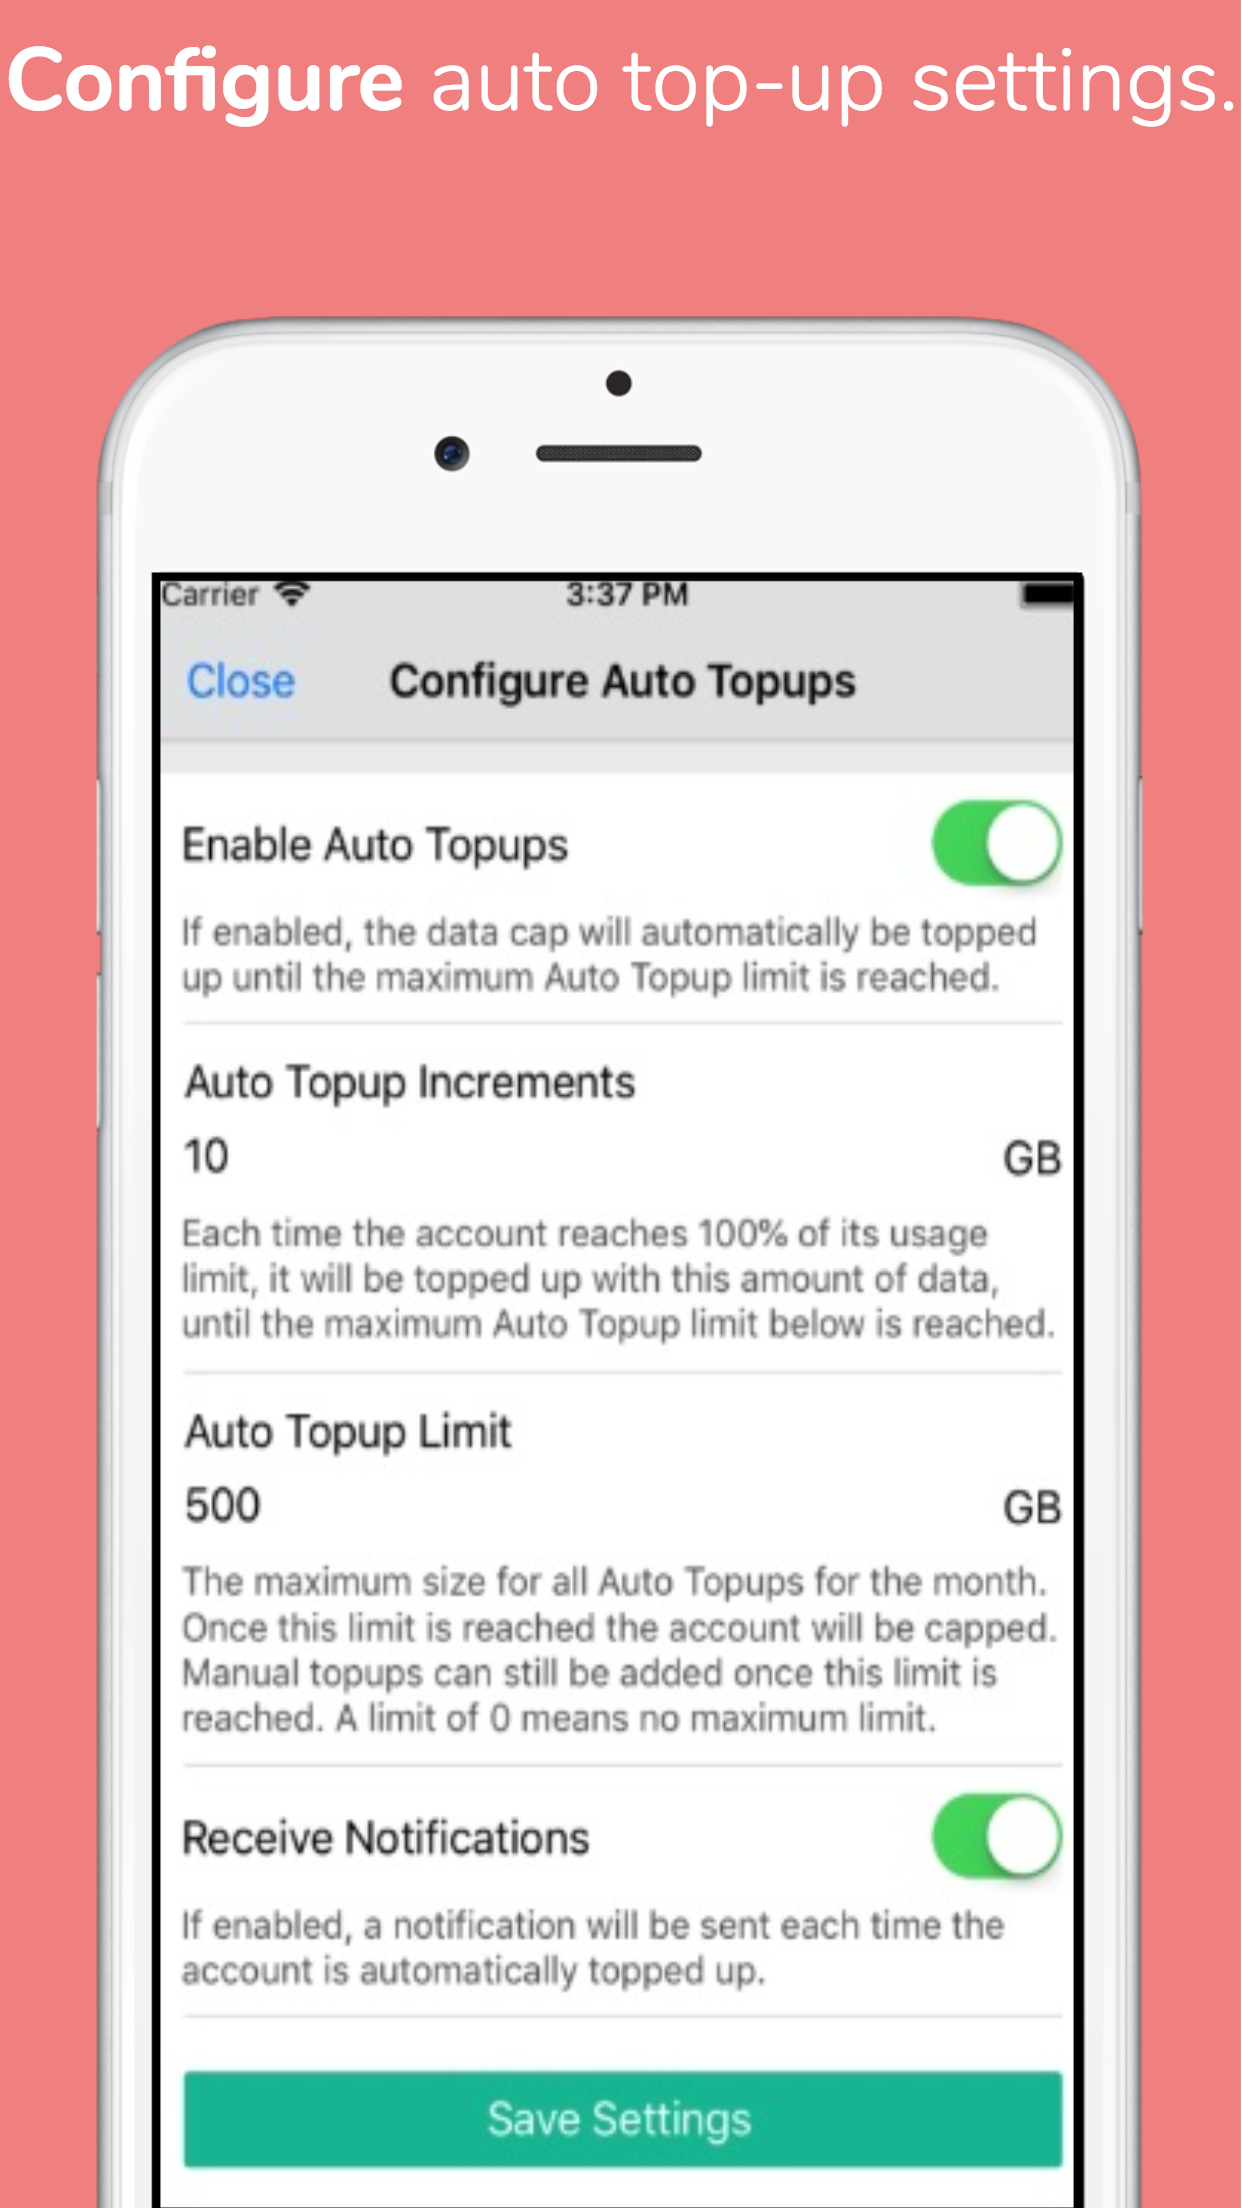
Auto top-ups are a nice function to use as all top-ups happen automatically when you run out of data. But if not set up properly, this can incur some additional unforeseen costs.
For example:
Your family is visiting you, but you have reached your cap.
Now your account starts to do auto top-ups, but when you configured your auto top-ups, you didn’t add a limit for your auto top-ups.
Your family still continually streams series on Netflix and every time your cap is up, another auto top-up kicks in.
At the end of the month, you get bill shock when looking at your invoice.
How to ensure that this doesn’t happen?
When configuring your auto top-up settings:
- ensure that you put a limit on your auto top-up settings and
- ensure that you switch on the notification section as this will notify you every time an auto top-up is done.
2. Doing top-ups from your customer portal
Customers are able to do their own top-ups from their customer portal as well as set up their own auto top-up settings.
2.1. Add a top-up:
To add a top-up, you will need to log into your customer portal. After you have done this, click on the “Usage” button.
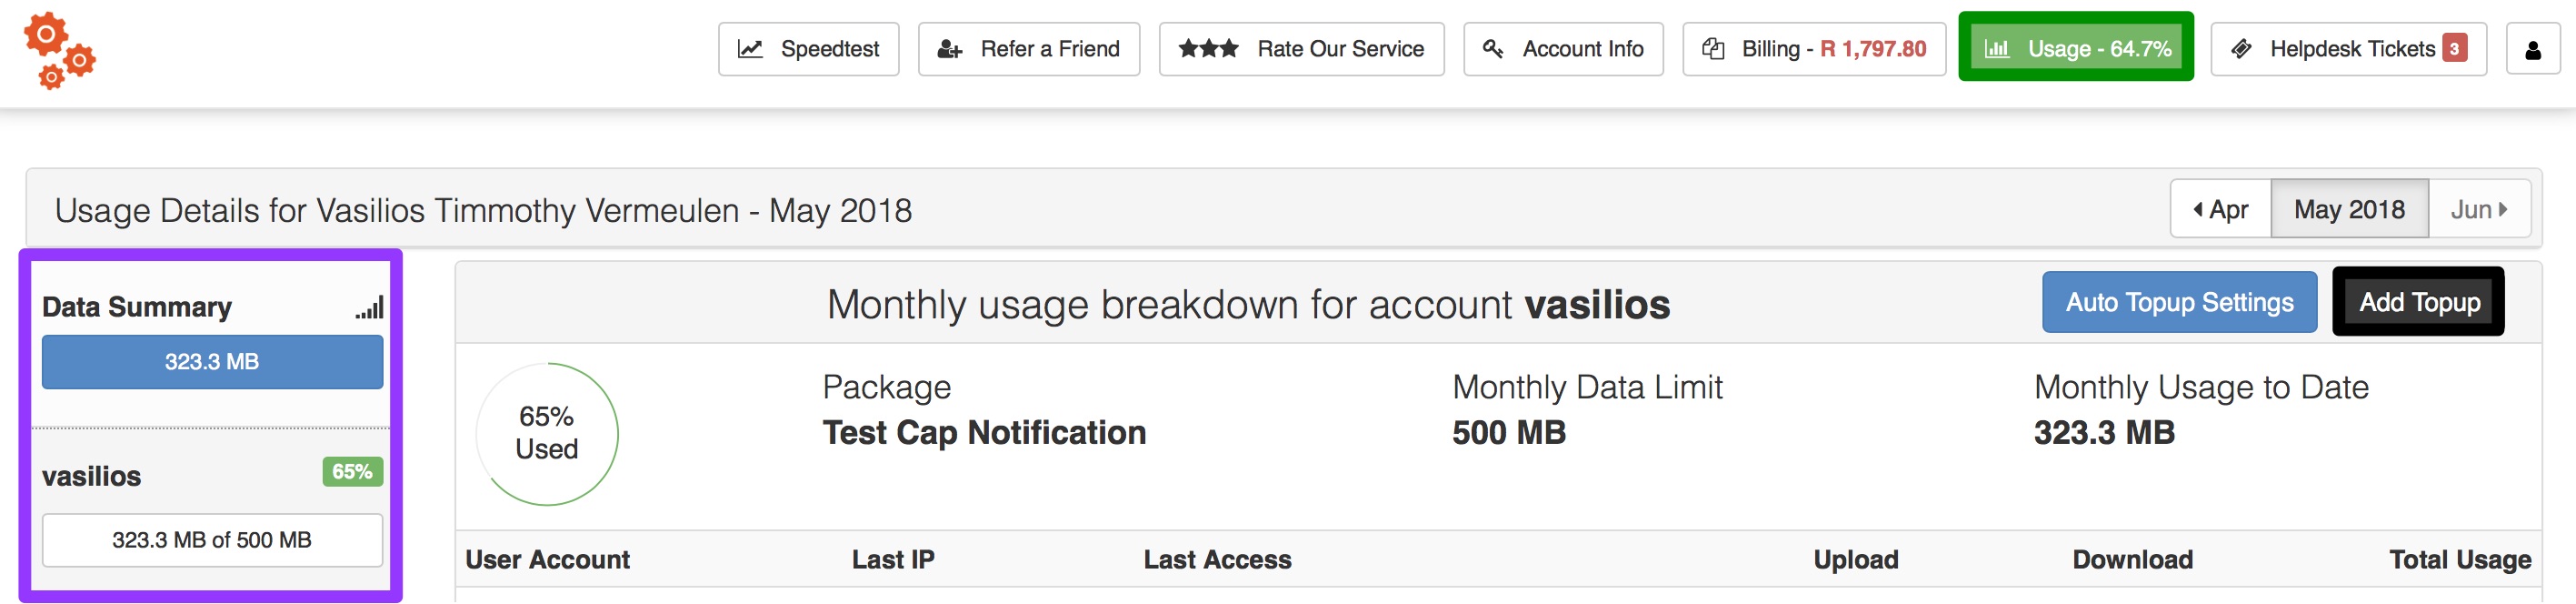
If you have more than one radius account (internet account), then you will need to click on the account you want to top-up on the left-hand side. When the account details have loaded, click on the “Add Topup” button.
On the following screen, complete the details and then click on the “Request Topup” button.
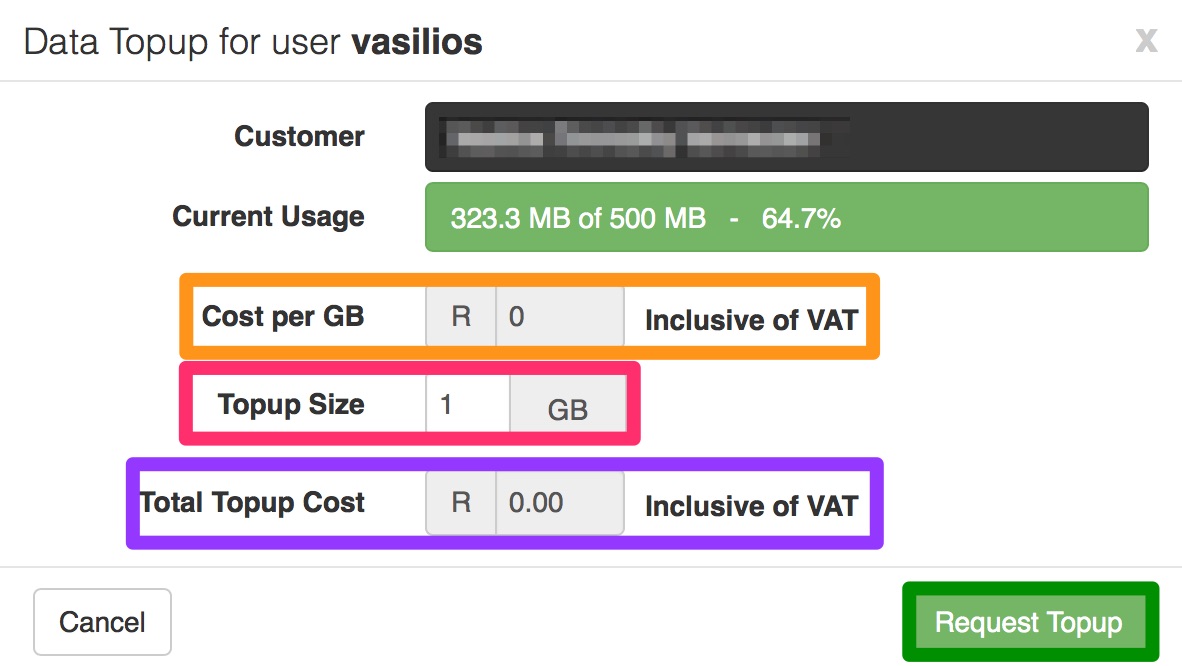
| Orange: | In this section, you can see what a top-up for 1 GB will cost you. |
| Pink: | Here, you will need to choose how many GB you want to add to your account. |
| Purple: | In this section, you will be able to see what the total amount is for the top-up that you are requesting. |
2.2. Configure my auto top-up settings:
To configure your auto top-up settings, you will need to log into your customer portal. After you have done this, click on the “Usage” button.

If you have more than one radius account (internet account), then you will need to click on the account you want to configure the auto top-up settings for on the left-hand side. When the account details have loaded, click on the “Auto Topup Settings” button.
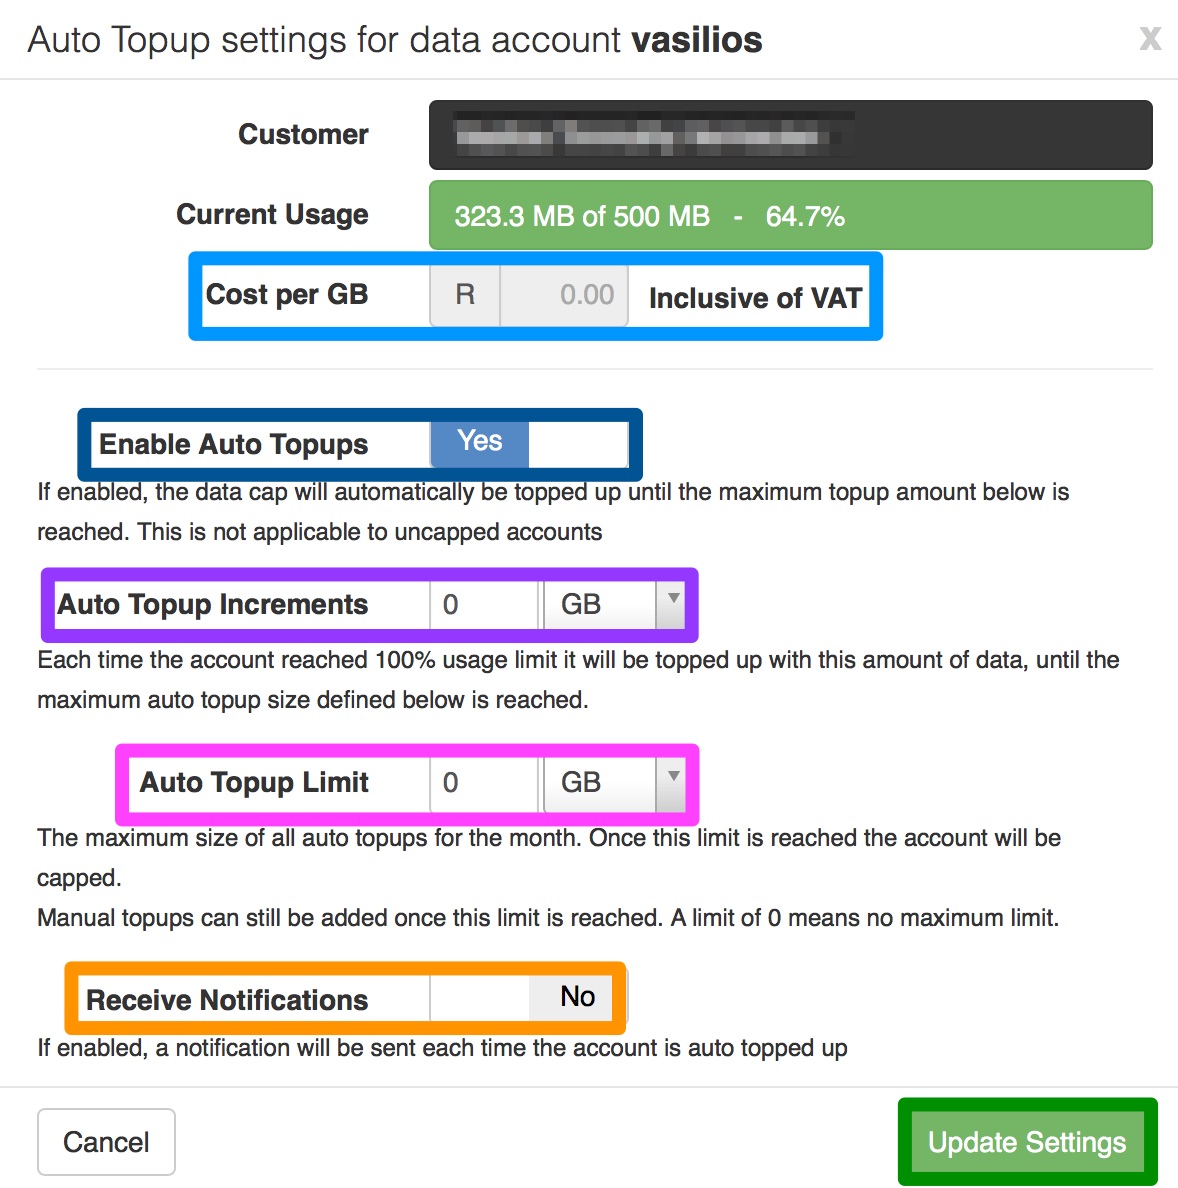
| Light Blue: | Here, you will see what the price per GB is. |
| Dark Blue: | If you would like to enable auto top-ups, then you will need to switch this button to “Yes“. |
| Purple: | In this section, you will need to choose how much data you would like to update your account with. This will be the set amount for every time your data bundle runs out.
If you only want to top-up your account with 500mb, then you need to type 0.5 into this field. If you want to top-up with 1 GB, then you will need to type a 1 (one) into this field. |
| Pink: | This section will allow you to determine the maximum additional GB that you would like to be topped up with each month. For example, if you don’t want to add more than an additional 5GB a month, then you can enter 5 in this section. After you have used this additional 5GB, then your account will not continue to auto top up. |
| Orange: | Here, you can determine whether you would like to be notified every time your account is topped up. We would suggest that you enable this function to ensure that you can monitor your usage. |
After making the changes, click on the “Update Settings” button.
3. Doing top-ups from the customer mobile app
Customers are able to do top-ups from our new customer mobile app. To do this, they will need to log into their mobile app and then navigate to the usage section. For a more detailed guide on how to use the customer mobile app, click on this link: Customer Mobile App guide
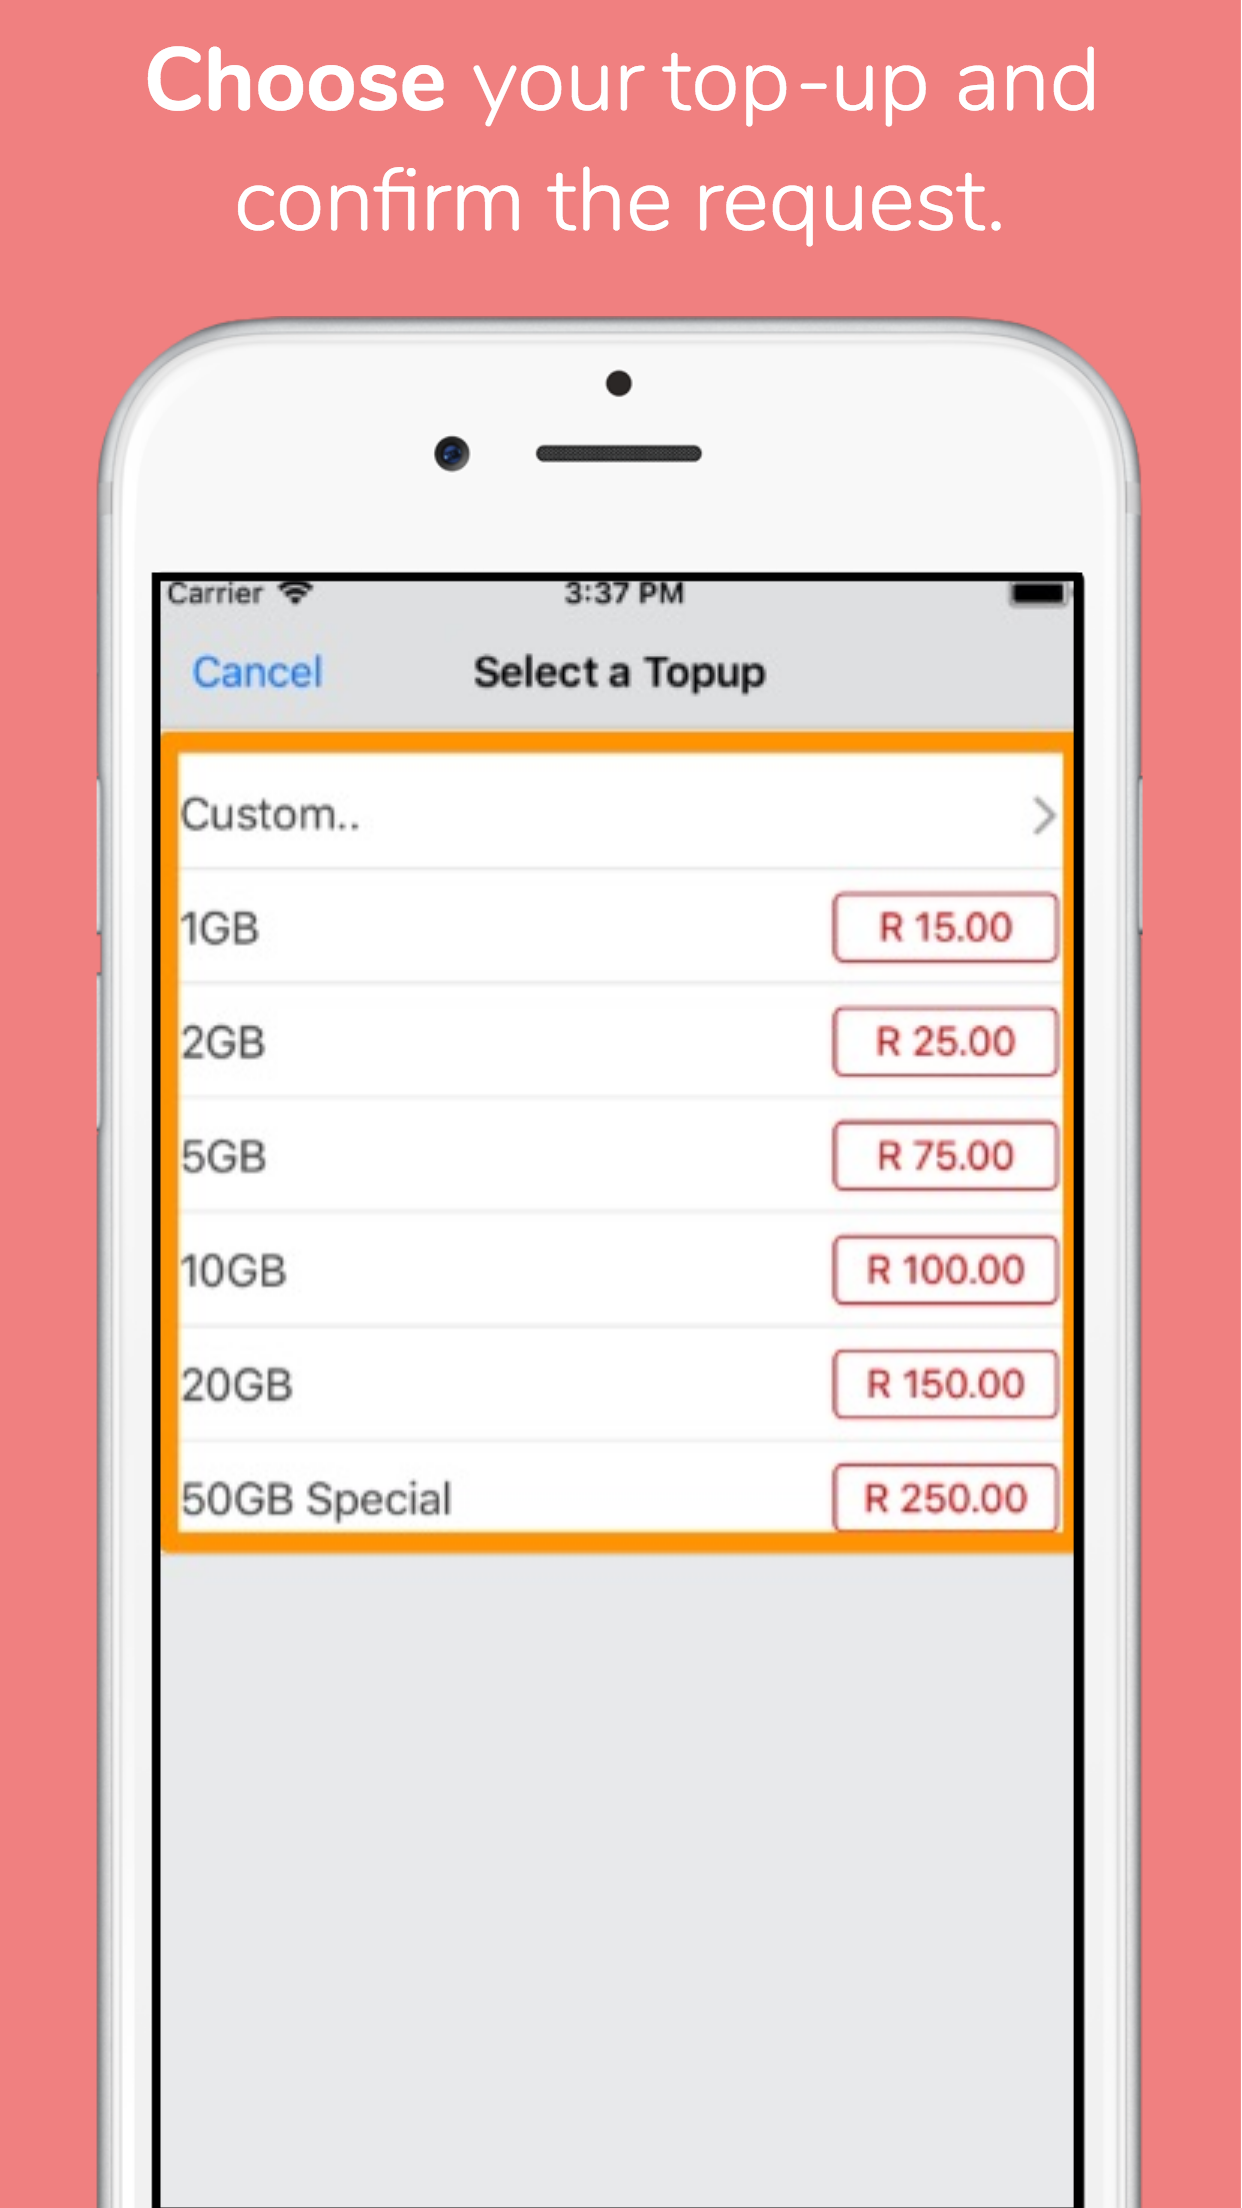
3.1. Add a top-up:
To request a top-up, go to the top-up menu. From here, you will be able to see a list of all previous top-ups that have been done as well as what the price for the top-up is. To request a top-up, click on the “Add Topup” button.
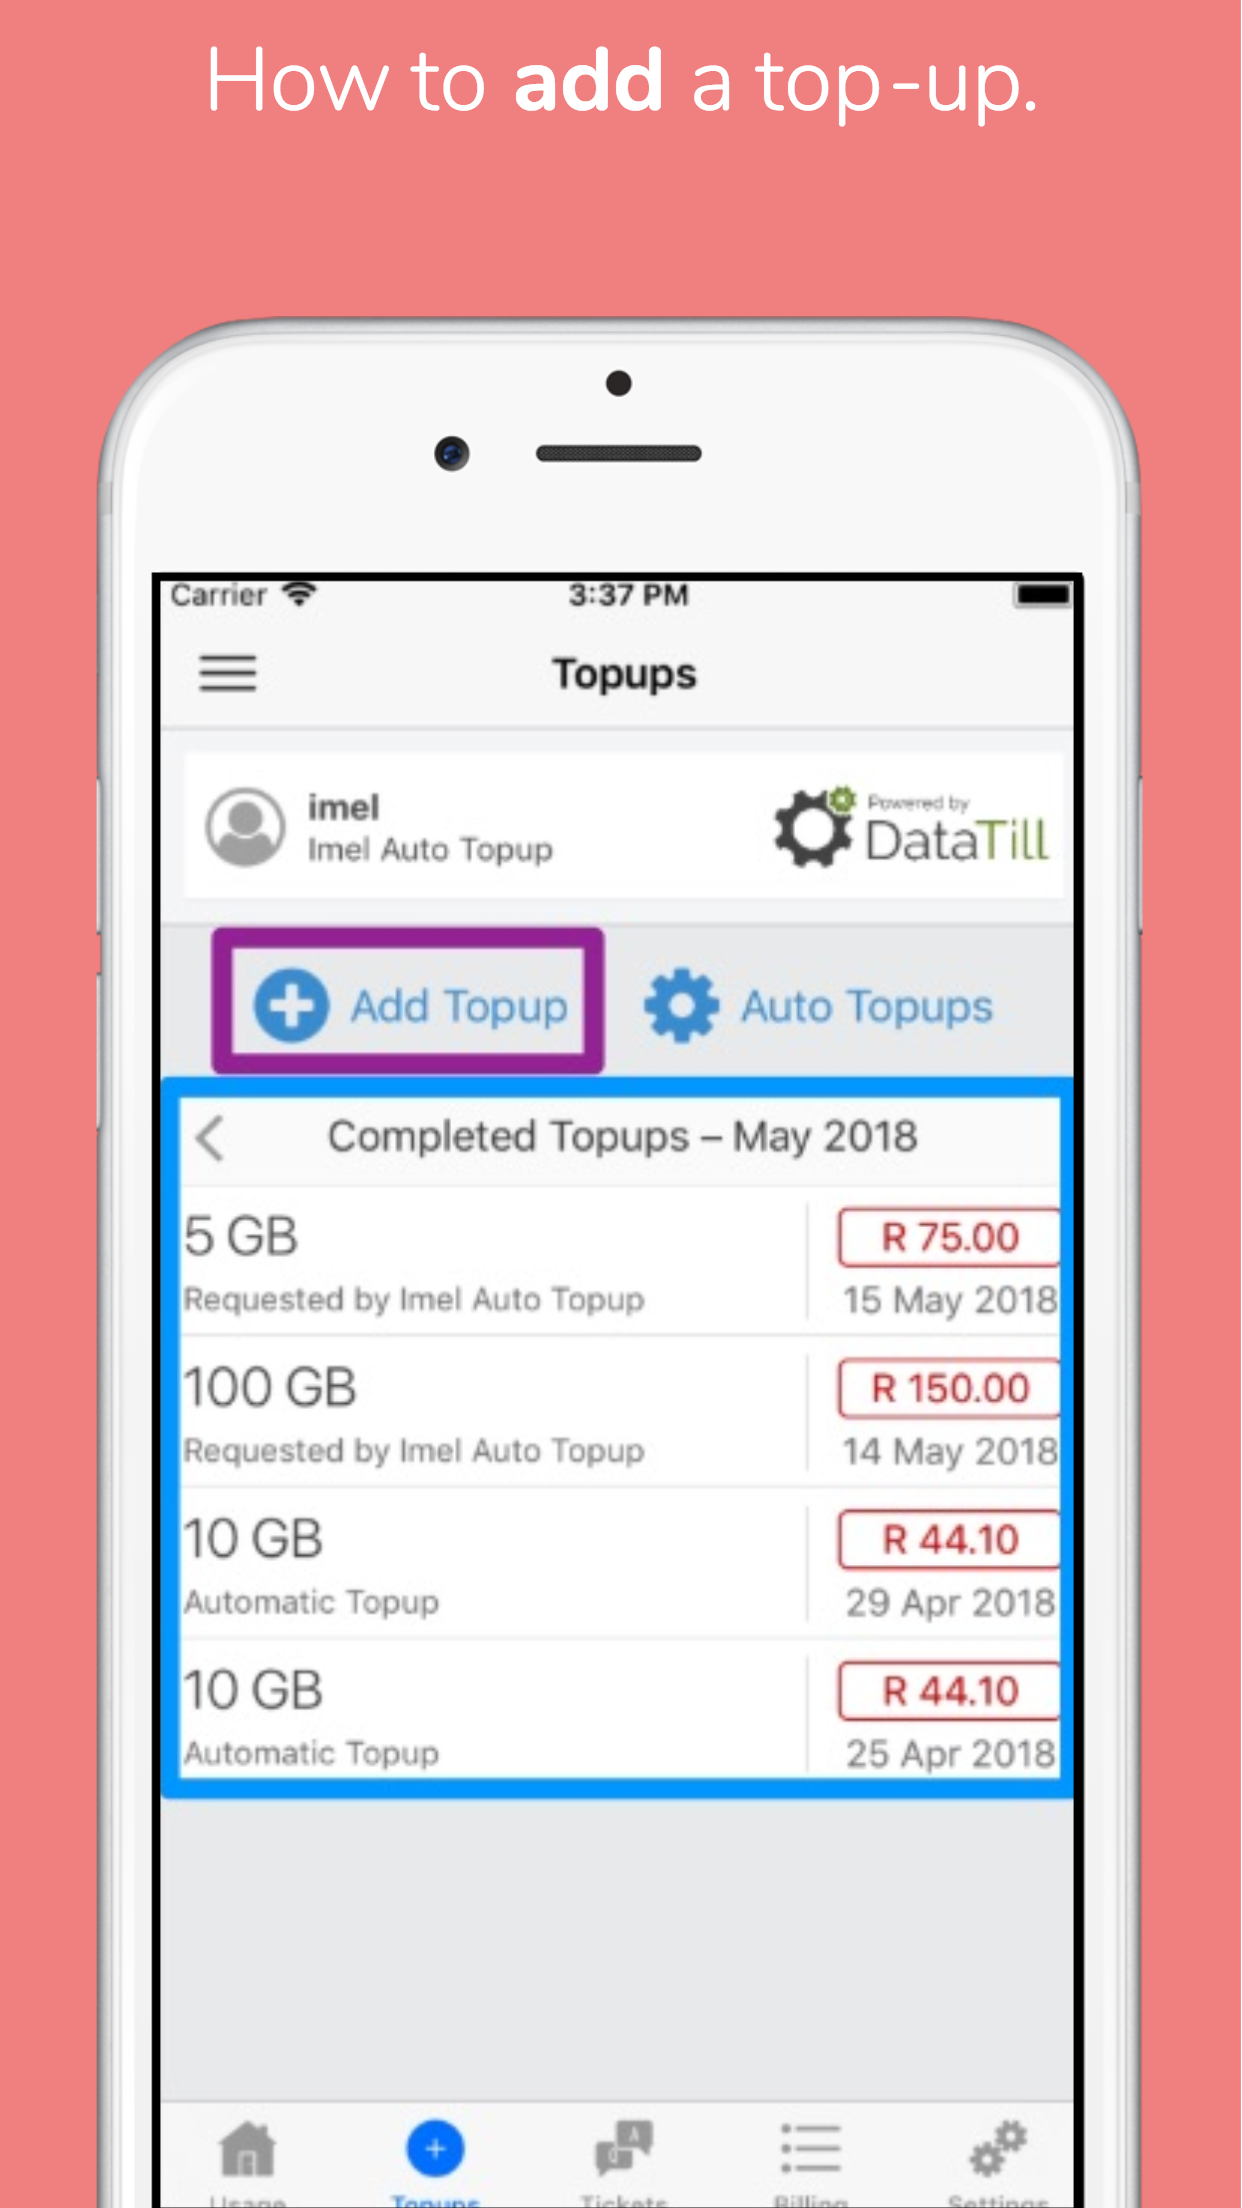
On the following list, choose and click on the top-up that you would like to request and then click on the confirm button.
3.2. Configure my auto top-up settings:
To set up or disable your auto top-up setting, go to the top-up page and then click on the “Auto Topups” button. Auto top-ups will happen each time your cap has been reached for the account.
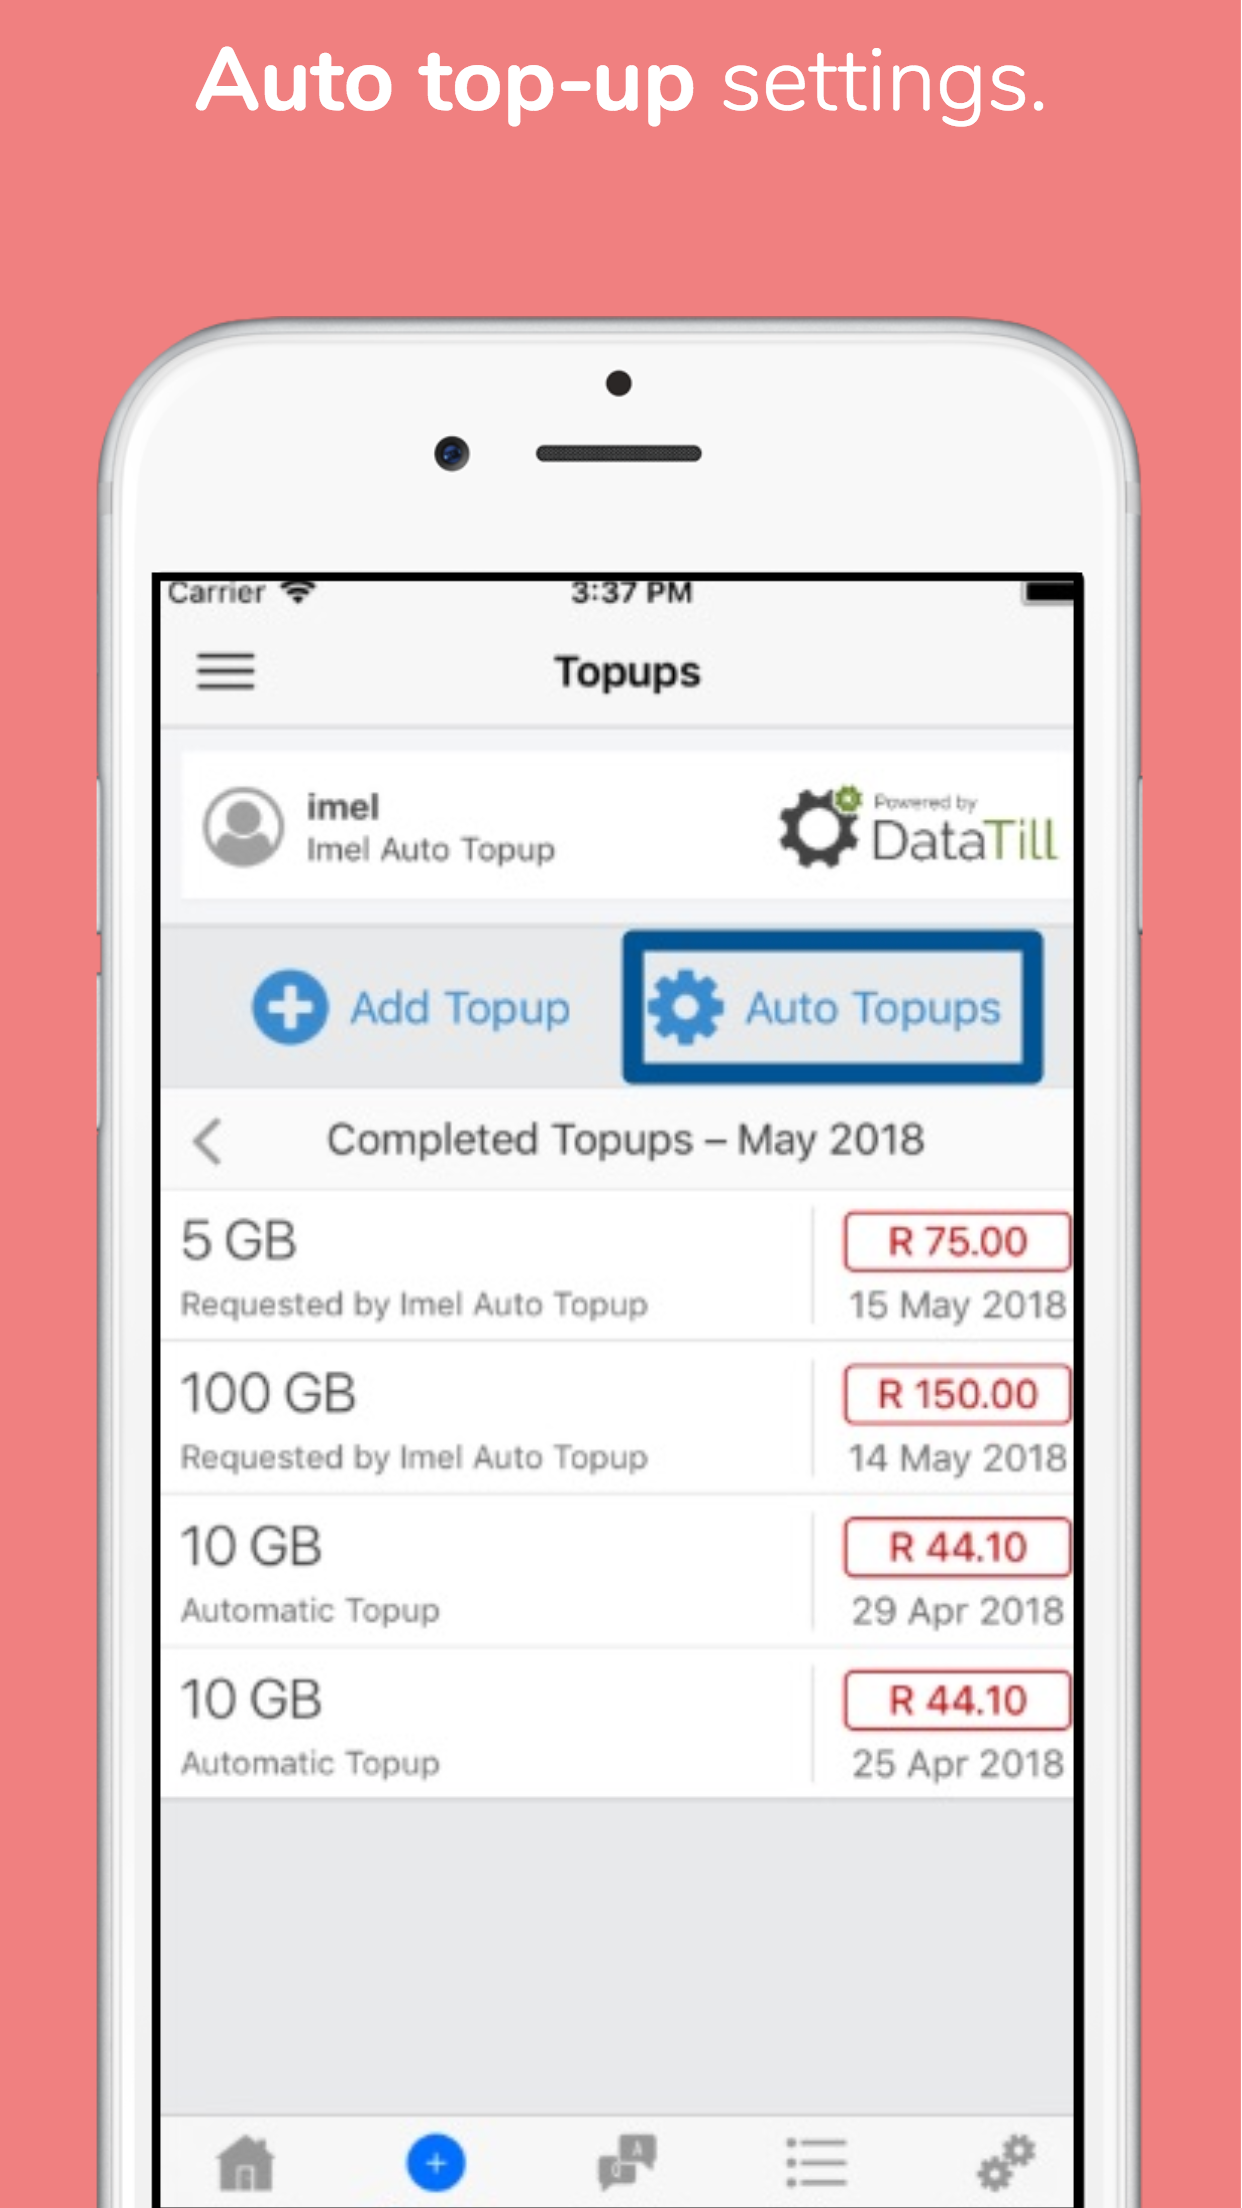
You will now be able to configure your auto top-up settings as per your needs. Read the instructions for each setting carefully before configuring auto top-ups.
4. ISP’s doing top-ups for their customers:
ISP’s can do top-ups for their customers by either adding the top-up or configuring the auto top-ups upon the customer’s request.
4.1. Doing a top-up for your customers:
To add the top-up for your customer, go to the customer’s usage screen and click on the “Add Topup” button.

After clicking on the “Add Topup” button, complete the details on the following screen:
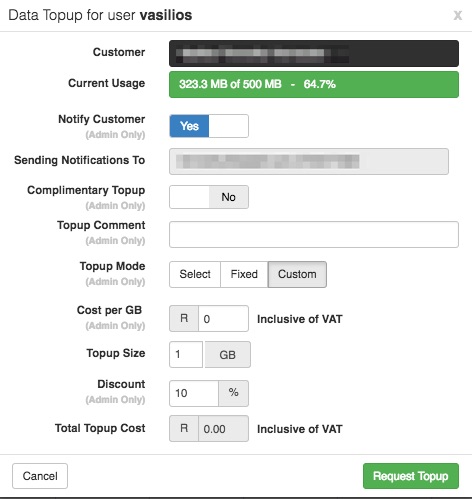
Click on the “Request Topup” button after you have completed the details.
4.2. Configuring auto top-ups for your customers:
You can configure your auto top-ups in two places:
- From the usage screen
- On the radius user
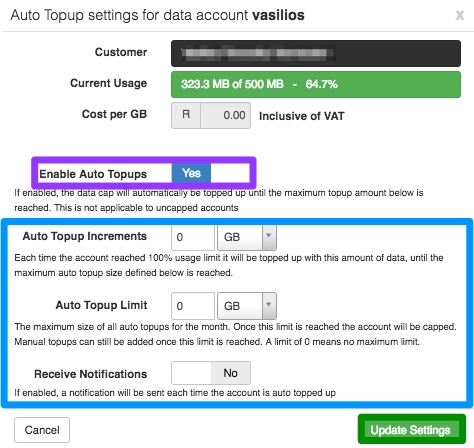
From the usage screen:
From the usage screen, click on the “Auto Topup Settings” button.

On the following screen, you will need to:
- Switch the toggle button to “Yes“
- Add the auto top-up details
- Click on the “Update Settings” button.
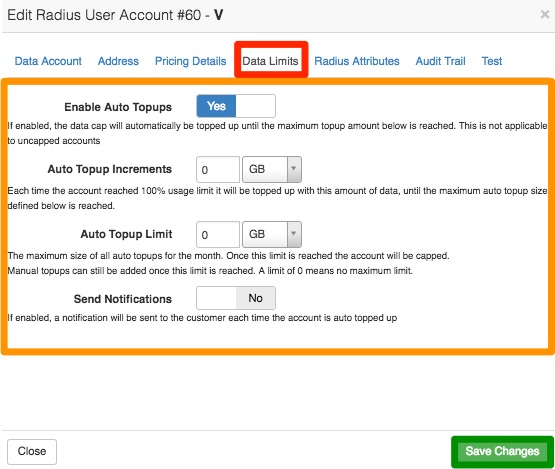
On the radius user:
To add auto top-ups, go to Radius menu and then click on the user accounts option. Find the specific radius user and then click on the edit button. Go to the “Data Limits” screen, edit the details and then click on the “Save Changes” button.
Setting up your Top Ups: See the link here