
New functionality: SendGrid
We’ve added the ability send mails via SendGrid to HeroTill, which is done via an http-based API instead of an smtp connection.
Why use SendGrid?
| Disadvantages of SMTP |
Advantages to using SendGrid’s API |
| It has a server limitation | Guaranteed delivery to sendmail’s service via http API
|
| Time delays because of multiple servers used to deliver your message which can cause delivery failure and timeout errors | Processing of bounced mails
|
| Firewalls can block common ports associated with SMTP, and also flag them as spam | Tracking of customer side mail delivery |
| Some firewalls can block ports commonly used with SMTP. It can also be hacked |
Tracking of customer side mail opening
|
| Not always a detailed record /report available | A much more detailed delivery report is now available for every message |
As you can see, SendGrid is a great tool to use to ensure better delivery and reporting and control of your sent messages.
Setting up SendGrid
We have put together this SendGrid setup guide to ensure the mail delivery and mail tracking is correctly configured
Important things to remember:
- sendmail uses the local server’s own sendmail service to deliver mail. Please ensure that it is configured correctly to allow mail delivery.
- smtp uses the settings defined below to deliver mail via an external mail server.
- The remote SMTP server needs to be configured to accept smtp connections from this host.
- SendGrid uses API settings defined below to deliver mail via a third-party http API service. An active account with https://sendgrid.comis required for this to work
Requirements for setting up SendGrid
- a subscription with Sendgrid is required for this API to work
- For an optimal spam score custom DNS entries needs to be configured
- This new functionality requires a composer update to install the SendGrid library.
- *At the same time the hybridauth composer library is being downgraded from v3 to v2 to ensure compatibility with DT2.0
- A webhook on SendGrid’s side will automatically update the maillog on the HeroTill side should an email bounce after SendGrid has delivered it. This will result in the mail being marked as failed at that point in time.
- A new “Bounced” column and mail status has been added to show mails that were bounced after they were marked as “Delivered”. The bounce functionality will only be used by SendGrid.
- The existing SMTP and sendmail delivery mechanisms do not support bounce detection
- to get delivery and open notifications to work a webhook needs to be registered in the SendGrid config. this webhook must point to /api/v1/sendgrid_webhook
- In the sangria portal (https://app.sendgrid.com/settings/mail_settings) go to Settings, Mail Settings, and enable event notifications. Use the url as indicated above for the webhook.
- Note that the relevant actions to check includes Dropped, Delivered, Bounced, Opened, etc
- Note that each time you update the mail sending options in DataTill the webhook settings will automatically be configured via an API call to SendGrid
Webhook settings
Go to www.sendgrid.com, register and create an account for yourself. Click on Integrate using our Web API or SMTP relay when you are done.
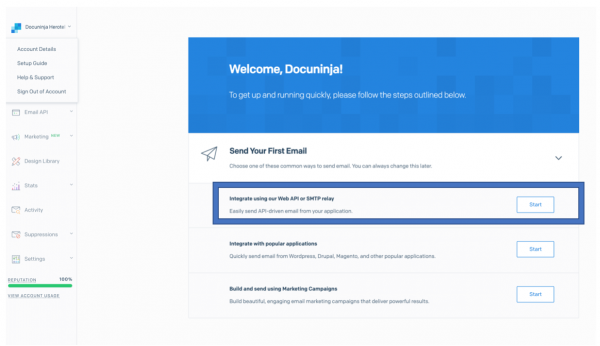
The following menu will appear:
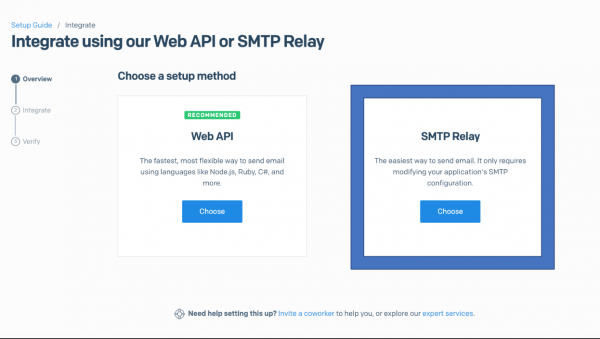 Select SMTP Relay. You will see the following screen:
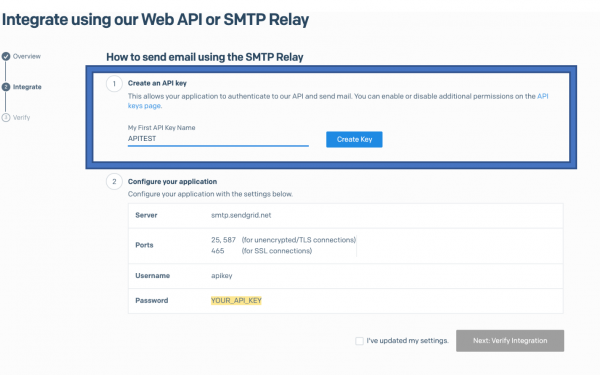 Give your API key a name, preferably something that is easy to identify. Click on create key to generate your key.
This key is essentially your password. Copy it somewhere safely, because SendGrid will not allow you to view your key again.
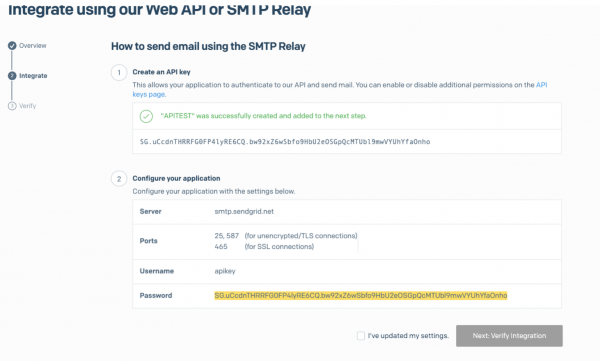
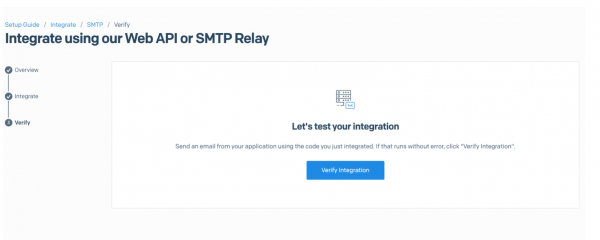
Check that you’ve updated my settings and click on verify integration.
Setting up SendGrid in HeroTill
Get your API Key ready. In HeroTill, go to Settings–> System Settings–>SMTP settings. Set the SMTP Protocol to SendGrid. and paste the key that you have just generated into the API key box.
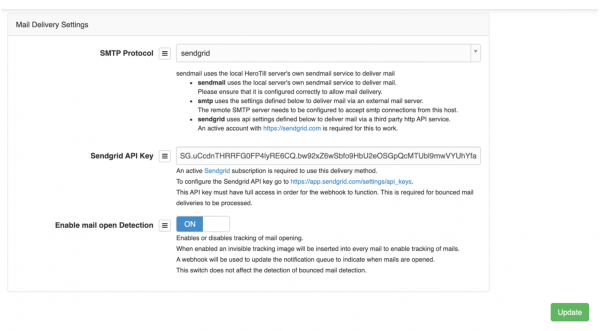
Ensure that mail open Detection is switched to yes and click on update when you are done.
Testing
To test your integration in HeroTill, go to Tools–> Messages–> Send message.
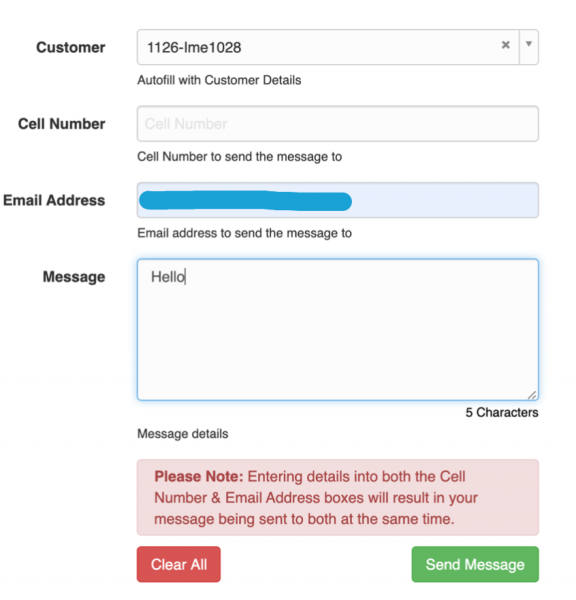
Choose a customer, enter their email address and press send.
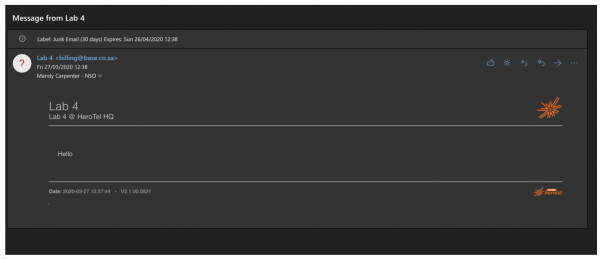
If your message was sent successfully, it will look like this:
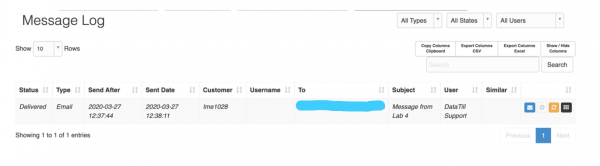
 Here on the message log we can see that it was successfully delivered.
Testing in SendGrid
In SendGrid, go to verify integration:
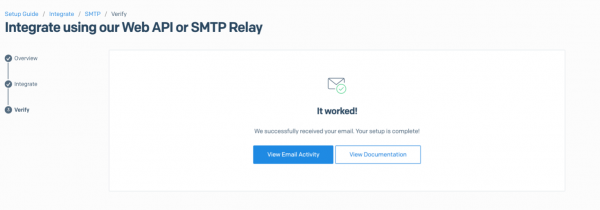
If it has worked, you will receive this message:
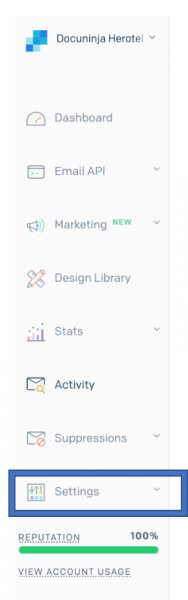
To check the details of this message, go to Activity on the left bottom menu.
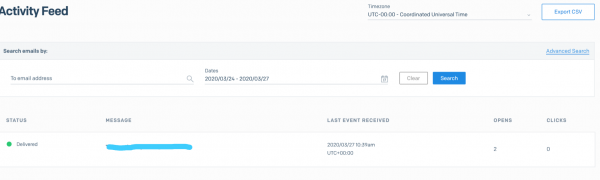
The Activity feed will open and show you your message’s details.
And that is it! If you have any further queries or feedback, please contact us on support@herotill.com