IMPROVED CALENDAR FUNCTIONALITY
We have improved the calendar by adding notifications and auditing visibility to calendar entries. This video will explain it to you in further detail:

IMPROVED CALENDAR FUNCTIONALITY
We have improved the calendar by adding notifications and auditing visibility to calendar entries. This video will explain it to you in further detail:
WHAT IS NET PROMOTER SCORE (NPS)?
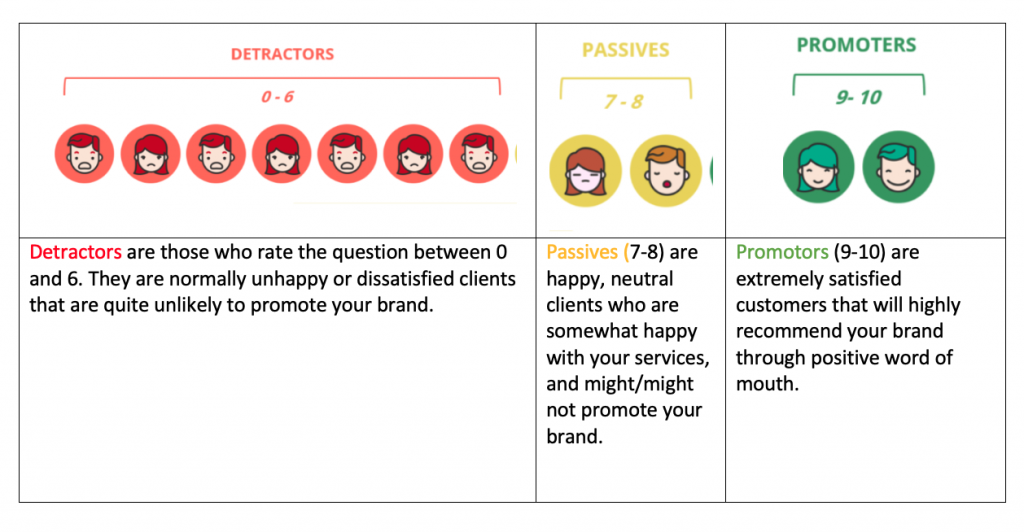
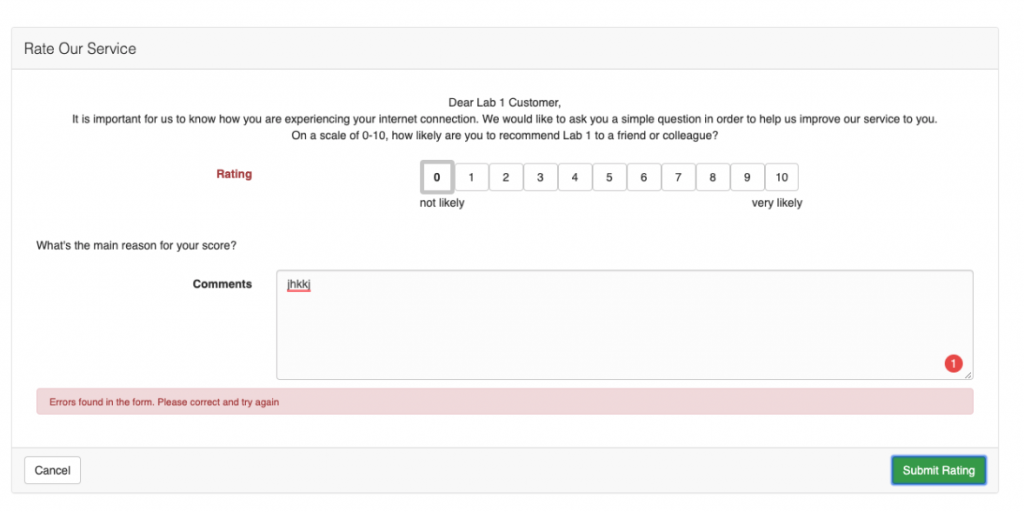
The Net Promoter Score (NPS) is a benchmark test used by companies to measure a client’s overall satisfaction with your brand, and their willingness to recommend your services or products to others. It consists of a single question with a rating scale of 0 -10 (0 being completely dissatisfied, 10 being extremely satisfied).
Customers are classified into 3 categories based on the rating that they have given:
 NPS IN HEROTILL
Previously, a rating system of 5 stars (1 = dissatisfied, 5 = extremely satisfied) was used by clients to rate our service. While this rating is a good measurement of client satisfaction, it is not an ideal way of scientifically measuring the output. This rating system has been changed to incorporate the NPS rating structure.
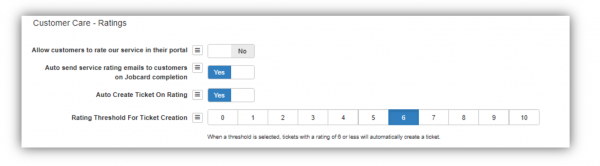
To enable customer ratings in HeroTill, go to the Sales Setup Menu (Sales->Sales Settings->Sales setup). You’ll see the following screen:
This is what it now looks like on the customer’s side:
All submitted ratings are viewable under the Sales Leads, Ratings Menu (Sales->Sales Leads->Ratings).

On this screen all new ratings wait in a queue to be acknowledged. From there a ticket can be generated for further attention, if one was not already auto created by the threshold score.
And that’s it! Your guide to NPS in HeroTill. If you have any queries, questions or feedback, please send us a mail at support@herotill.com.
New feature: 1Voucher as a payment gateway

1voucher has been added as a third-party payment gateway. It allows customers to use 1voucher vouchers as a payment method in HeroTill in the following places:
Customer Portal:
Hotspots
How does it work?
1voucher allows a customer to buy a voucher of a certain amount (cash value) which can be redeemed at certain vendors to pay for something.
Once a customer has bought a voucher (for a set amount), a 16-digit PIN is issued to the customer. This PIN is used as a payment method, until its initial value is exhausted. If a customer buys something for less than the initial amount issued on the voucher, they receive a change voucher, which can be used until the value is 0.
Scenario:
Jane buys a R500 voucher from 1Voucher. She buys R300 worth of data from a hotspot. She enters her 16-digit pin and receives her data.
She now had R200 left and is issued a change voucher from 1Voucher for R200 (with a new PIN).
She waits until her data is finished and spends the last R200 at the hotspot to buy more data using her new PIN.
Linking the 1voucher payment gateway(s) to your HeroTill
To link 1voucher as a payment gateway on HeroTill, go to Setup–>System Settings–>Payment gateways .
Select 1Voucher as a gateway, and enter your trader information:
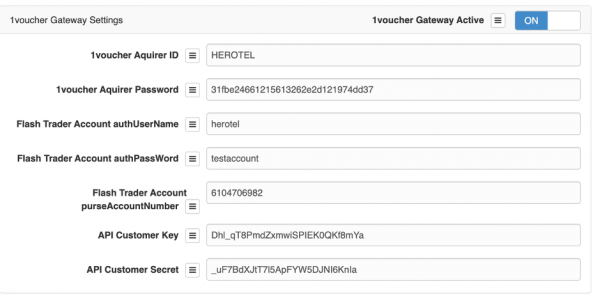
The 1voucher payment gateway screen
Click on Update and your customers will be able to pay their accounts with their 1voucher credits.
Important to remember:
A 1voucher PIN is only displayed once. This means that you cannot go back to view your PIN The same goes for change vouchers. We urge you to write down this number or take a screenshot of it. Change voucher number retention is not a HeroTill responsibility but the responsibility of the end user.
As 1voucher is a 3rd party vendor we cannot be held responsible for loss of voucher pins.
If you have any problems or questions on how to link your payment gateways with your HeroTill, please do not hesitate to contact us on support@herotill.com
For any other queries relating to failed transactions, PIN credits, failed authentications, card verifications, pending or processed payments, payment allocations, please go to http://1voucher.co.za/
New functionality: SendGrid
We’ve added the ability send mails via SendGrid to HeroTill, which is done via an http-based API instead of an smtp connection.
Why use SendGrid?
| Disadvantages of SMTP |
Advantages to using SendGrid’s API |
| It has a server limitation | Guaranteed delivery to sendmail’s service via http API
|
| Time delays because of multiple servers used to deliver your message which can cause delivery failure and timeout errors | Processing of bounced mails
|
| Firewalls can block common ports associated with SMTP, and also flag them as spam | Tracking of customer side mail delivery |
| Some firewalls can block ports commonly used with SMTP. It can also be hacked |
Tracking of customer side mail opening
|
| Not always a detailed record /report available | A much more detailed delivery report is now available for every message |
As you can see, SendGrid is a great tool to use to ensure better delivery and reporting and control of your sent messages.
Setting up SendGrid
We have put together this SendGrid setup guide to ensure the mail delivery and mail tracking is correctly configured
Important things to remember:
Requirements for setting up SendGrid
Webhook settings
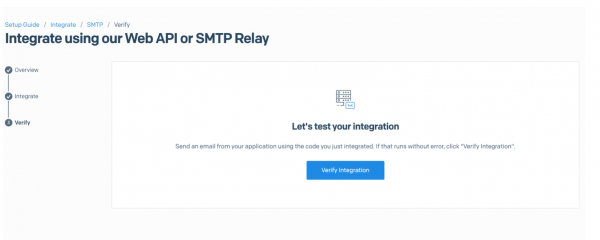
Go to www.sendgrid.com, register and create an account for yourself. Click on Integrate using our Web API or SMTP relay when you are done.
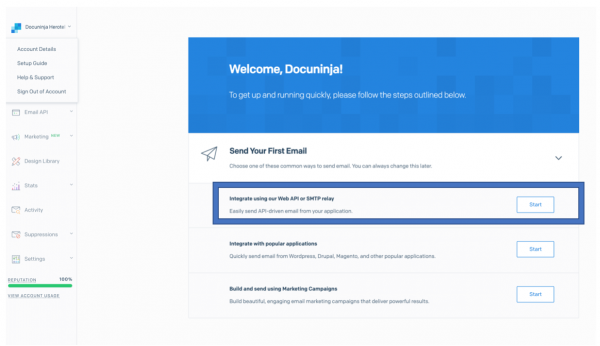
The following menu will appear:
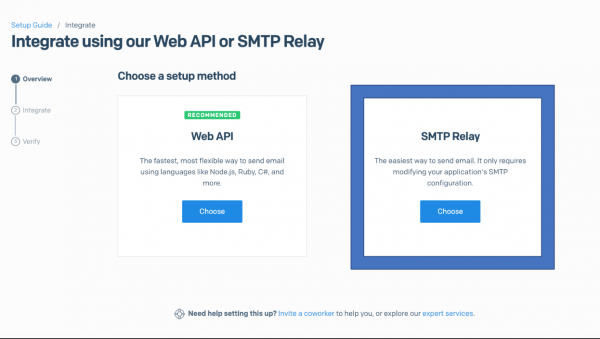 Select SMTP Relay. You will see the following screen:
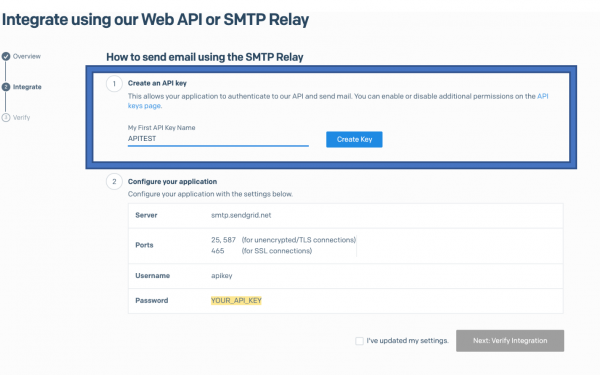 Give your API key a name, preferably something that is easy to identify. Click on create key to generate your key.
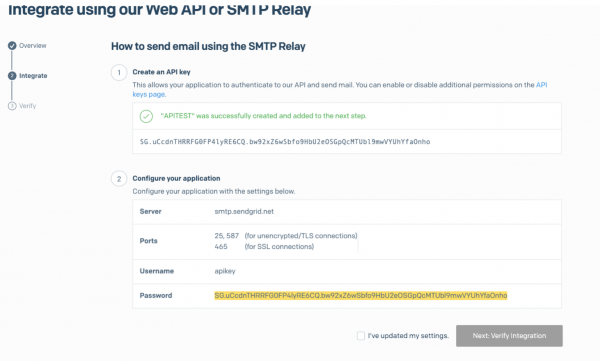
This key is essentially your password. Copy it somewhere safely, because SendGrid will not allow you to view your key again.
Check that you’ve updated my settings and click on verify integration.
Setting up SendGrid in HeroTill
Get your API Key ready. In HeroTill, go to Settings–> System Settings–>SMTP settings. Set the SMTP Protocol to SendGrid. and paste the key that you have just generated into the API key box.
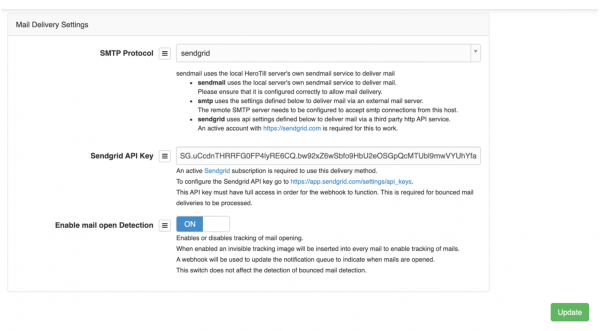
Ensure that mail open Detection is switched to yes and click on update when you are done.
Testing
To test your integration in HeroTill, go to Tools–> Messages–> Send message.
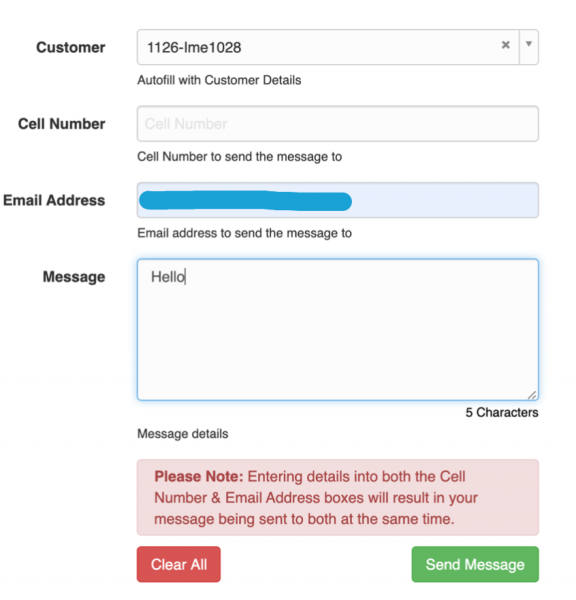
Choose a customer, enter their email address and press send.
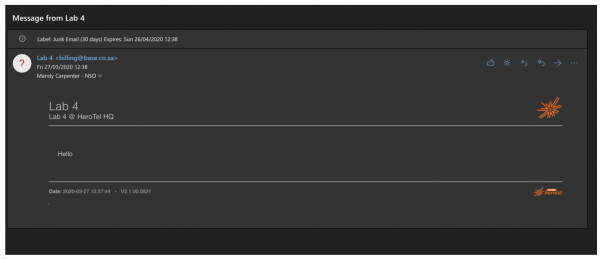
If your message was sent successfully, it will look like this:
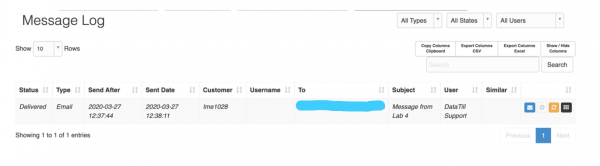
 Here on the message log we can see that it was successfully delivered.
Testing in SendGrid
In SendGrid, go to verify integration:
If it has worked, you will receive this message:
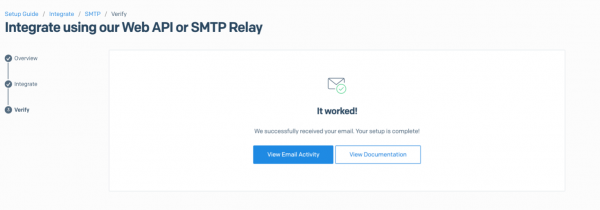
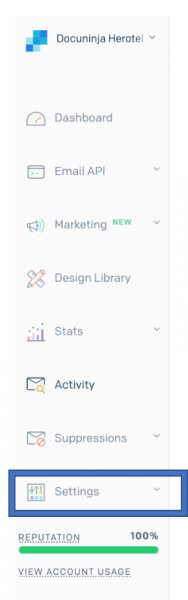
To check the details of this message, go to Activity on the left bottom menu.
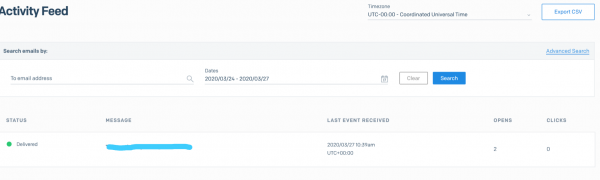
The Activity feed will open and show you your message’s details.
And that is it! If you have any further queries or feedback, please contact us on support@herotill.com
*Please note that this feature is currently only available for Cell C Fixed LTE services.
There is now integration to the fixed LTE Coverage Map to enable customers and admin users to determine upfront if the service can be provided in the required area.
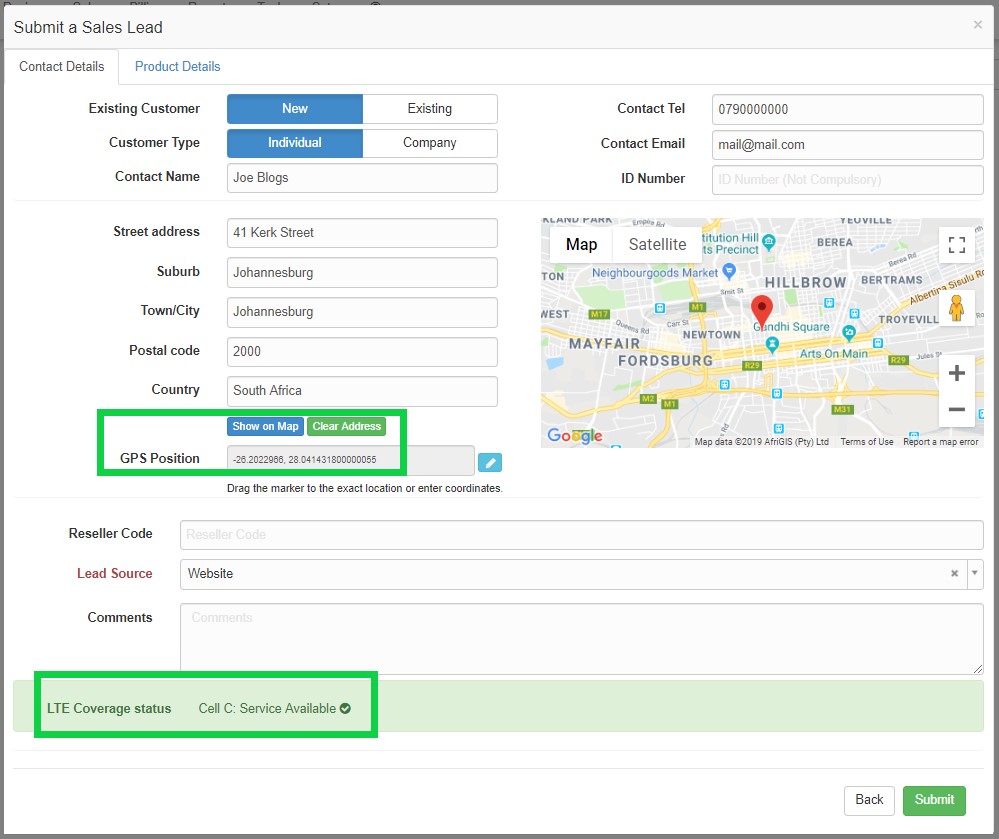
When applying online, the customer can enter his address and confirm the GPS coordinates to have the system automatically perform an LTE coverage check and display the results.
Similarly, when an admin user creates a lead, the GPS coordinates need to be confirmed with the customer so that the coverage check can be done before continuing with the process:
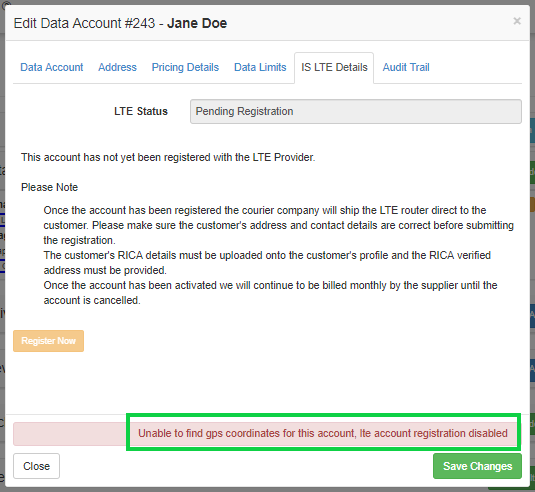
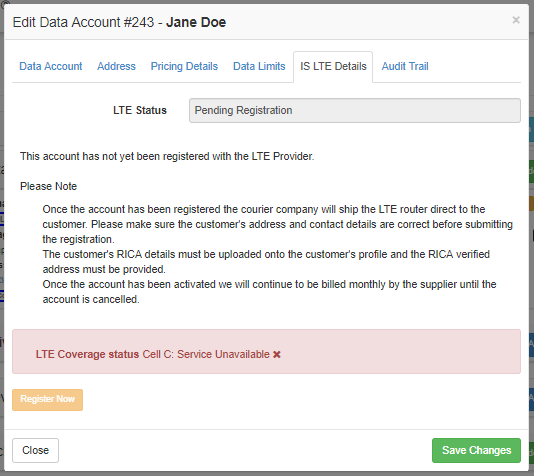
When a Data Account for the LTE service is added to a customer directly, the registration process will perform a coverage check and will be blocked if either the GPS coordinates are not available, or if LTE coverage in the area cannot be provided by the Service Provider.
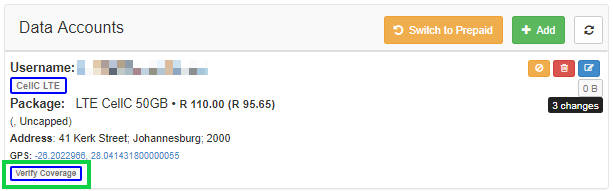
The Data Account widget on the Customer Profile also allows for coverage checking for added LTE services:
Author and Developer: JD Obeholster
The purpose of this guide is to introduce the LTE Cancellation Cut-off Date functionality.
IS currently bills its LTE services one month ahead. This means that there may be discrepancies depending on when your customers cancel their services. HeroTill has implemented a cutoff date mechanism to improve LTE cancellations on HeroTill.

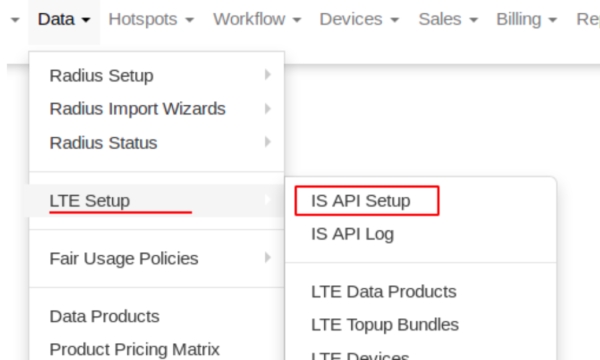
In order to configure the LTE Cancellation Cut-off Date, Navigate to the Data Menu-> LTE Setup -> IS API Setup Menu.
There are two Methods for calculating Roll-Over for Top-ups in HeroTill.
Please see the explanation and calculation for both to assist you in choosing the correct one for your company
These settings can be found under the menu Data -> Radius Settings -> Radius Setup

If this Method is selected it will calculate all months as one Value.
The following Calculation is done for a 10 Month Top-up Roll-Over for November.
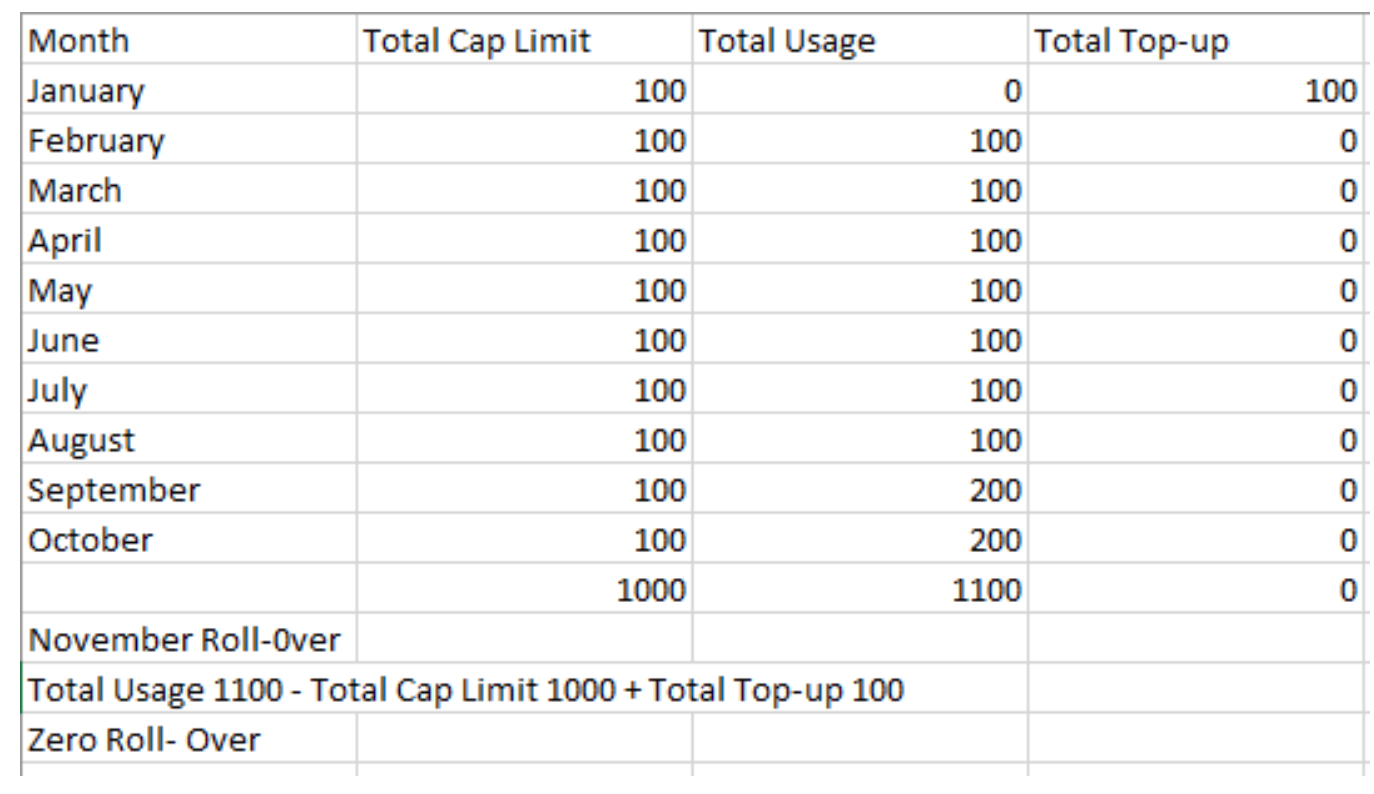
All 10 Months get calculated together, the client used a total of 1100GB out of his 1000GB Usage for 10 Months, the 100GB the client bought at the start (That is not used, Regardless) gets added to the total Limit meaning the following:
1100 – 1000 + 100 = 0

If this Method is selected it will calculate all months Apart.
The following Calculation is done for a 10 Month Top-up Roll-Over for November.
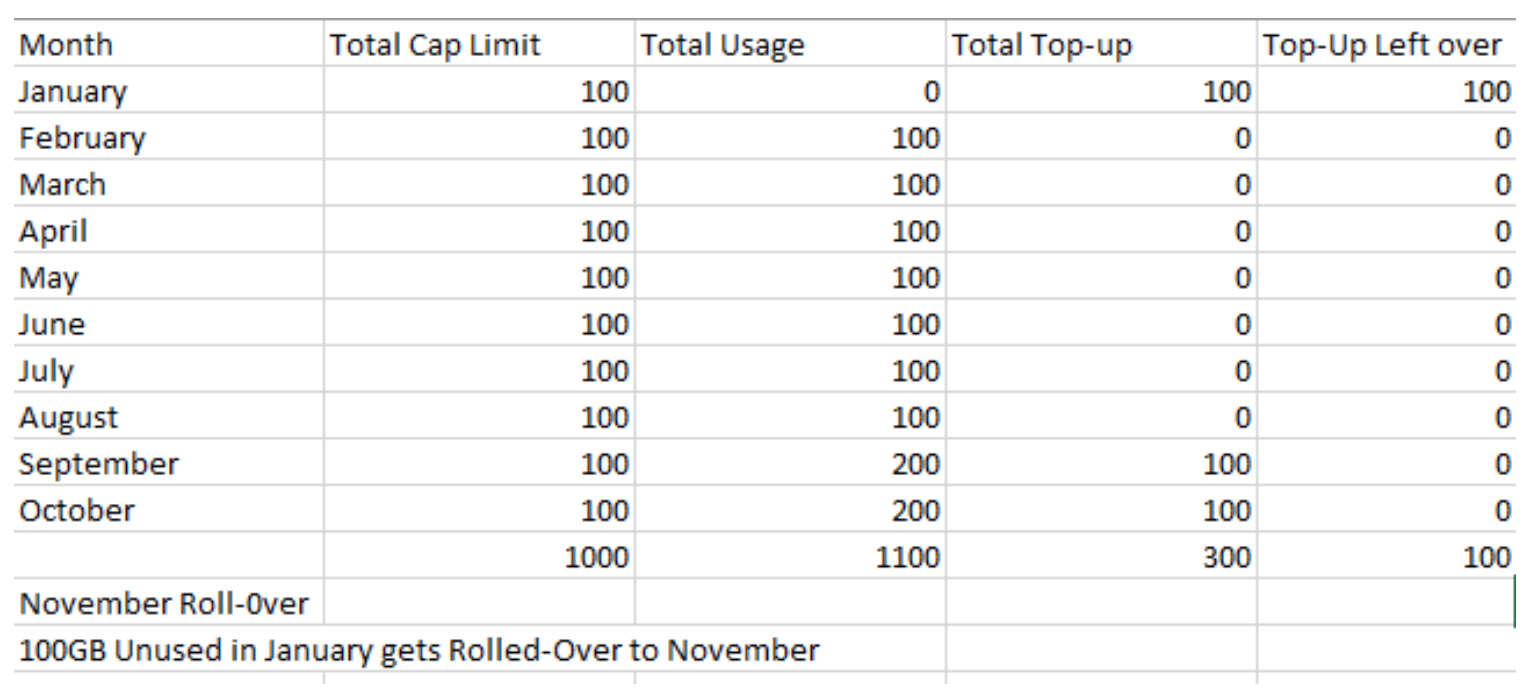 All 10 Months get calculated apart, the client used a total of 1100GB out of his 1000GB Usage for 10 Months, the 100GB the client bought at the start (Was not used during that month) and gets added as the top-up
100GB Top-up not used in January meaning November gets 100GB Top-up Roll-Over, during the months any data being used of the 100GB will become less and less each Roll-over.
So, due to 100GB Data in January, this will carry over to November.
Note the following additional information:
To enable the ability for Soft-Cap Data Products to be considered for Roll-Over the following must be implemented:
This can be found under Data -> Radius Setup -> Radius Settings


With this setting enabled, the system will account for Soft-Cap accounts when doing Roll-Over.
Please see the following documentation related to setting up Categories and Data Products:
https://support.herotill.com/icasa-setting-up-data-rollover-using-data-products/
https://support.herotill.com/setting-up-data-rollover-using-customer-categories/
HeroTill has released an improvement to the Unknown Devices Report with version 1.5.01.
First, there are a few things the user needs to be aware of concerning this report:
Users are now able to individually enable the Igore setting to choose which device IPs must be excluded from the Unknown Devices Report.
Once this setting has been enabled per device, the user can then view the list view and filter between All Ip Addresses, Ignored IPs and Non Ignored IPs.

If customers have auto top settings on then they have opted into out-of-bundle billing. To opt in or out of out-of-bundle billing the customer can manage this setting in the customer portal by navigating to Usage -> Auto top-up

They can then enable the settings as seen below:

Alternatively, clients can make a request to the wisp to turn this on or off. The admin user can navigate to the customer’s edit page -> View usage -> Auto top-up settings
If you would like to remove the functionality for customers to do this on the customer portal, you can turn the setting off.
Navigate to Data -> Radius setup -> Radius settings -> Allow end user auto top ups

As mentioned in the description. If disabled, the setting will only hide the auto popups button for customers on the portal. It will not disable the auto top-up functionality itself or remove the functionality from customers who have it set up.
Data Transfers have been considered for Prepaid Data Users.
Data Rollovers can be managed for Individual Packages using the Edit Data Products feature. If you would rather manage rollover settings on a Customer level, please refer to this blog instead: ICASA: Setting up Data Rollover using Customer Categories.
NOTE: If both the Data Product and Customer Category Roll over settings are enabled, the data product rollover settings will take precedence. (Wisps are encouraged to only use the rollover settings on individual products)
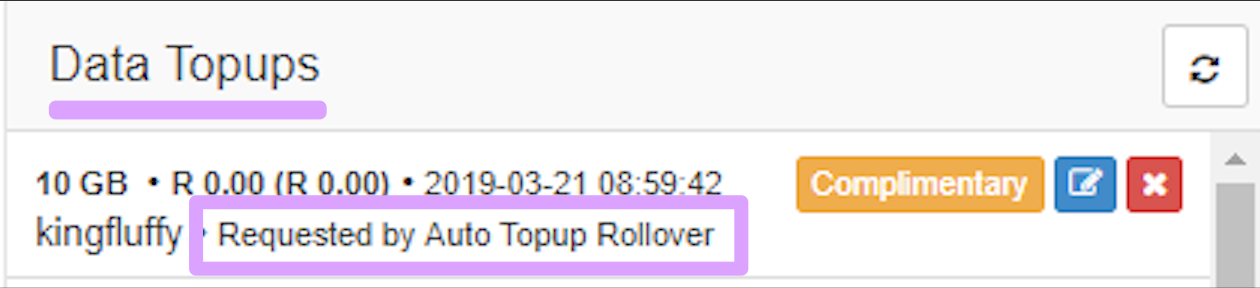
Any data (monthly and /or top-ups) which is rolled over from this setting will appear as an auto rolled over top-up on the customer profile:
To apply a specific customer category to a bulk list of customers, follow the steps below on how to import a CSV list to customer categories:

Data Rollovers can be managed for customers using the customer categories feature. If you would rather manage rollover settings on a product level, please refer to this blog instead: ICASA: Setting up Data Rollover using Data Products
NOTE: If both the Data Product and Customer Category Roll over settings are enabled, the data product rollover settings will take precedence. (Wisps are encouraged to only use the rollover settings on individual products)
Any data (monthly and /or top-ups) which is rolled over from this setting will appear as an auto rolled over top-up on the customer profile:
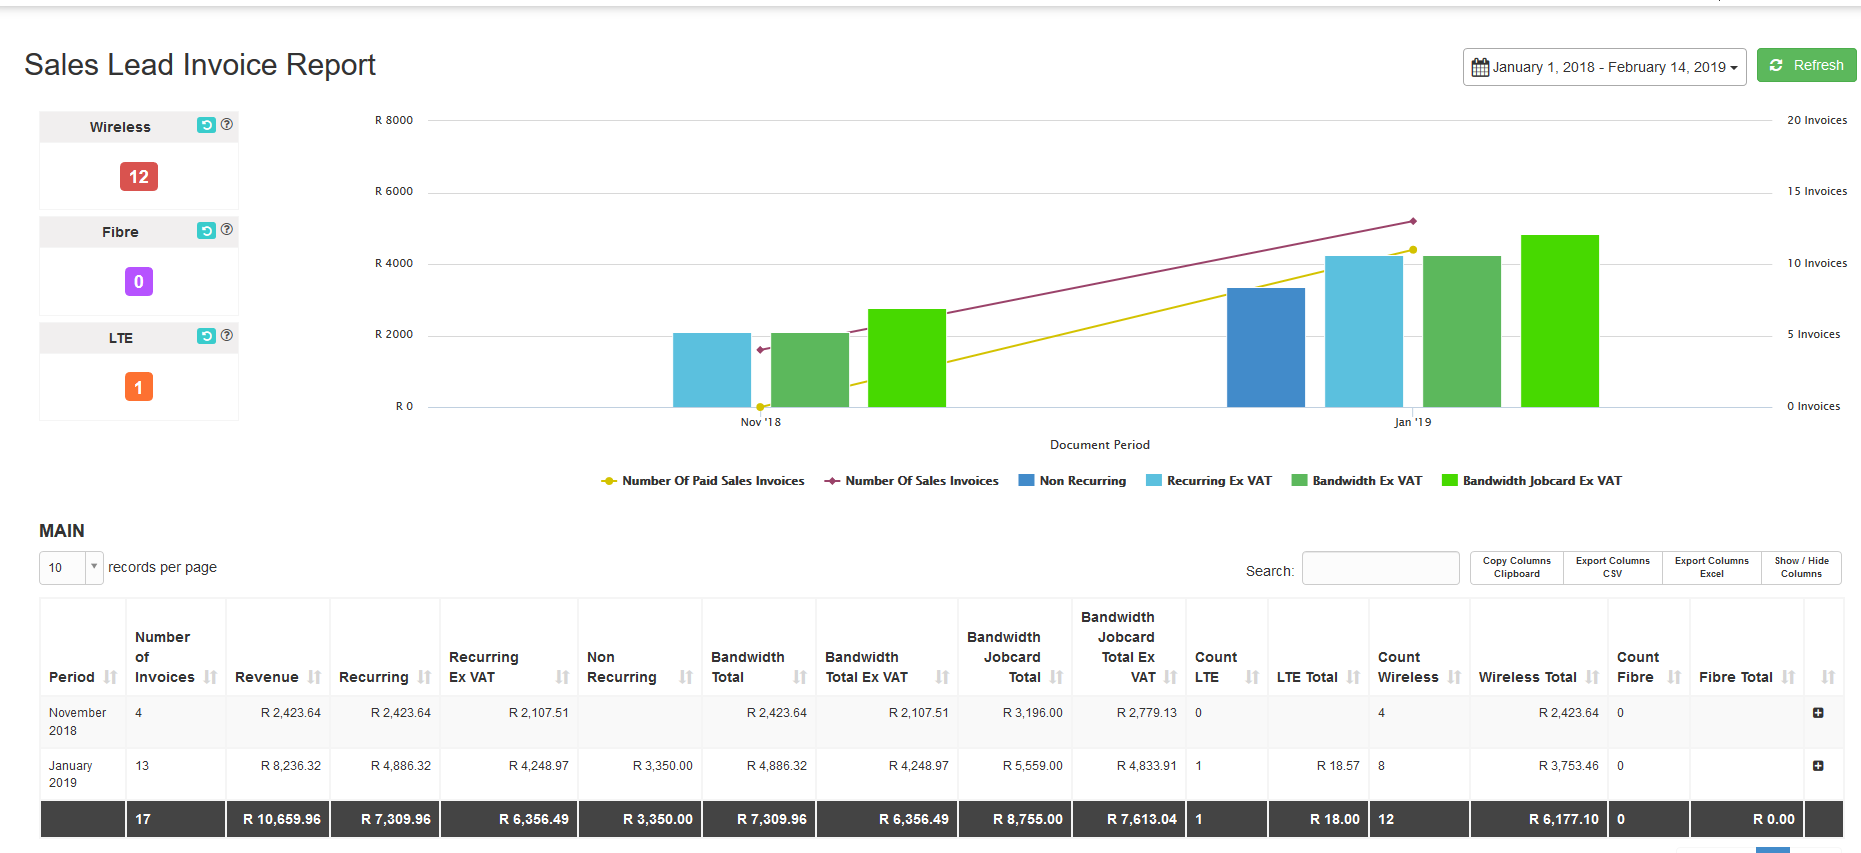
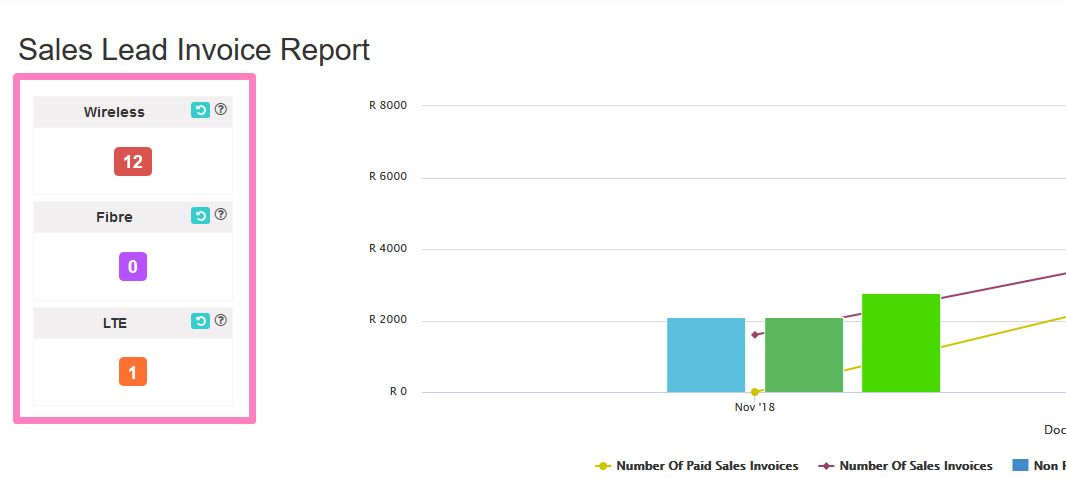
HeroTill has added a new monthly reporter for figures generated from the Lead to Receipt process. This report includes comprehensive dropdowns, graphs and data point summaries.
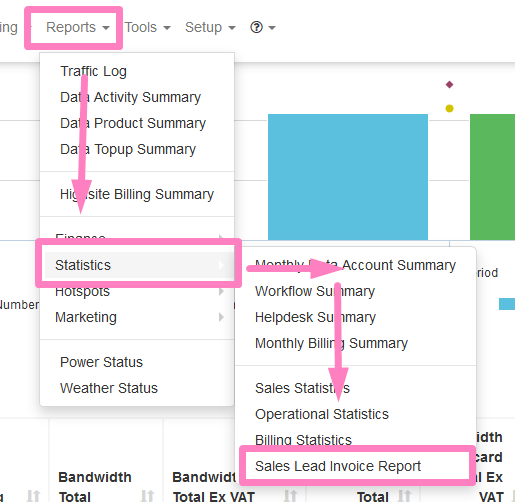
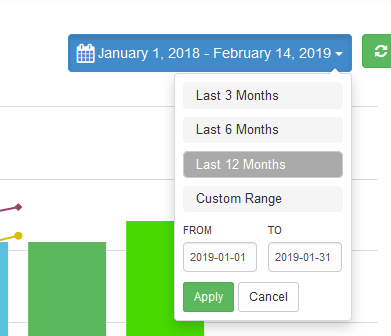
This report can be located by navigating to Reports > Statistics > Sales Lead Invoice Report.
It is important to note, that the report works on a monthly/ month to month basis. The Date Picker is specifically geared to allow the user to choose date ranges for the last 3 months, 6 months, 12 months and custom month to month ranges.
The Data Point summaries on the left, displays the number of data products linked by their commission categories.
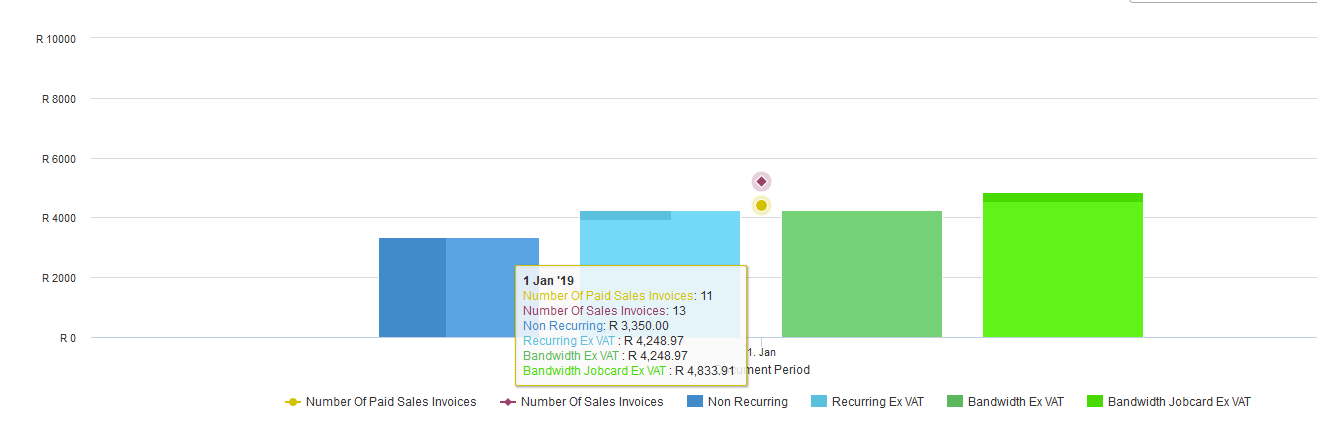
When hovering over the graph information, the user is able to see trends in fugures as well as overall totals for the following:
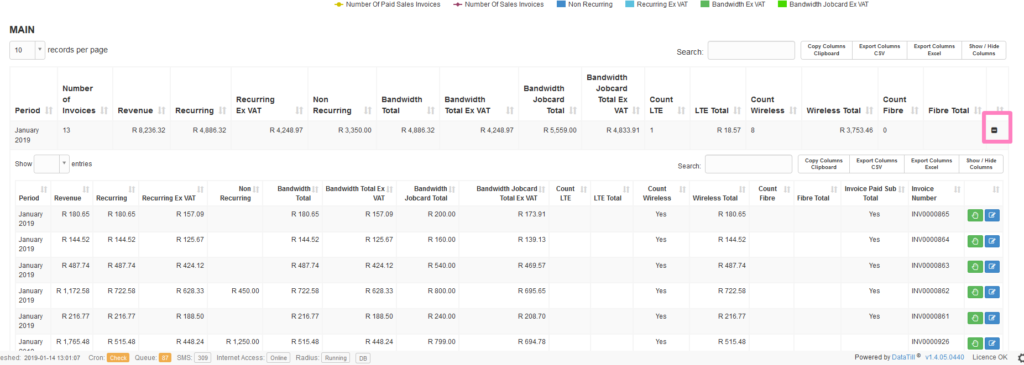
This report also has a comprehensive dropdown, which allows the user the ability to expand (and collapse) the data to analyse the full break down of each figure per invoice.

During the festive period, we noticed a few of our customers had not changed their VAT settings to the increased 15 %, effective from 01 April 2018.
It is important to note that any invoices issued from this date onwards (01 April 2018) must be charged at 15 % VAT.
If you make use of VAT within HeroTill, please ensure that the following settings are correct:
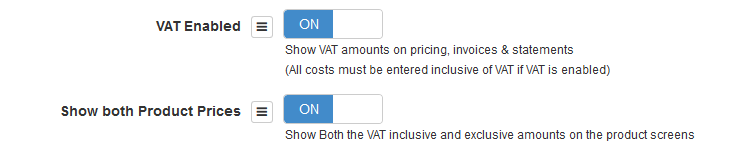
Step 1: To confirm that your HeroTill is set to use VAT, navigate to Billing > Billing Setup > Billing Setup. The following two settings should be enabled.
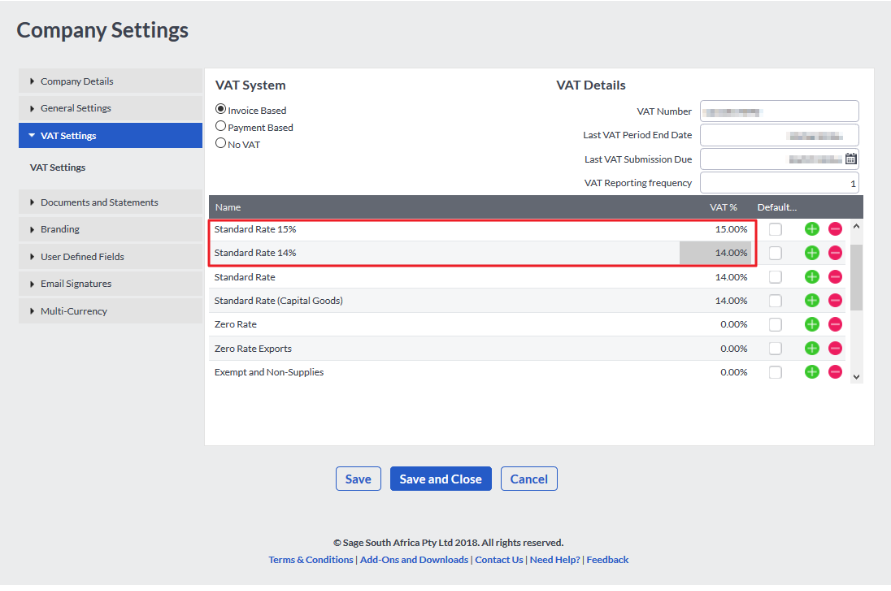
Step 2: For customers that use the Sage One Accounting Integration, you will need to check the following settings on your Sage One Account.
You will need to add two new “Standard Rate” VAT rates in Sage One. You will do this by navigating to Company > Change Company Settings > VAT Settings.
Add “14 % Standard Rate” and “15 % Standard Rate” and Save and Close. You will need to ensure that these new rates are synced correctly back to HeroTill – but we will cover this step in further down.
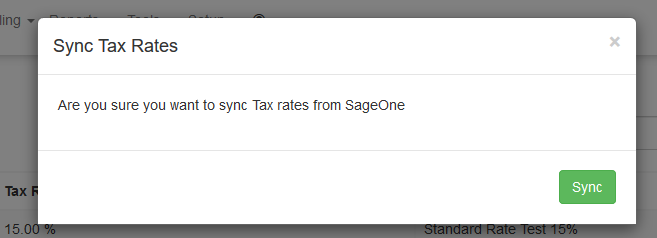
Step 3: In HeroTill you will need to make sure your VAT rates are correctly synced with Sage One.
To do this, navigate to Billing > Billing Setup > Default Tax Rates > click on the button to Sync Tax Rates. Once the pop up appears, click on Sync to proceed.

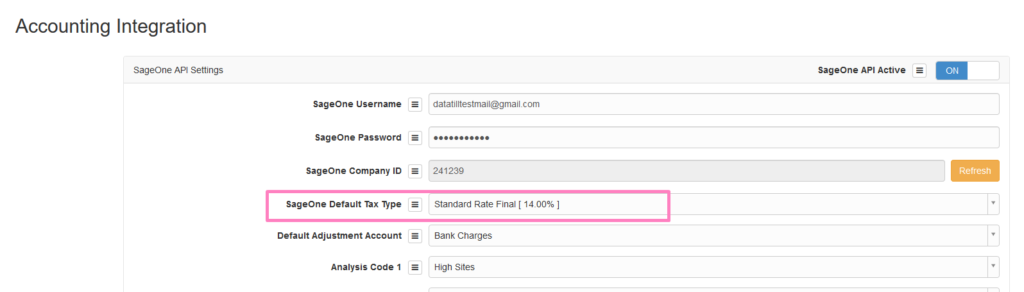
Step 4: This step is crucial to the VAT setup as it will ensure that the correct VAT rate will be billed. Once the sync has completed, you will need to check your VAT settings to ensure that they are correct. You should have at least two VAT rates listed now.

Step 5: Do spot checks on your billing documents and Products.
Before pushing any billing documents to Sage One, individually or through the Month End Process, do spot checks on your billing documents to ensure the correct 15 % VAT Rate is being used by default.
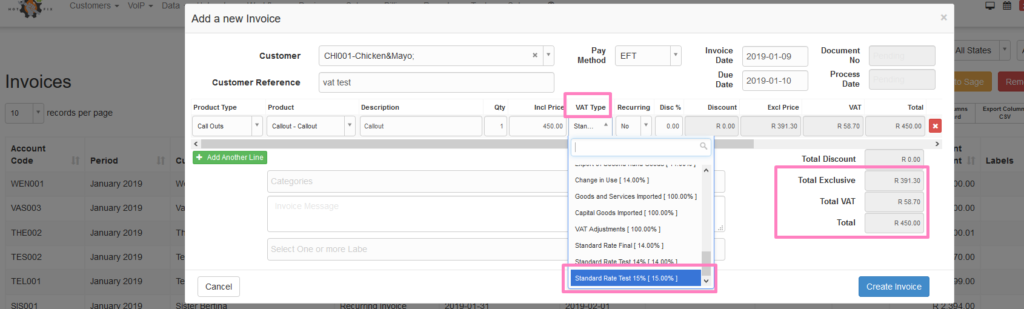
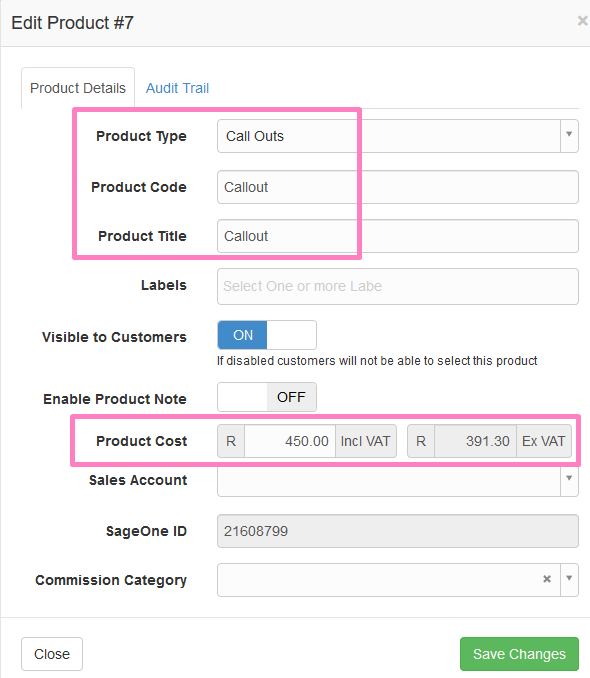
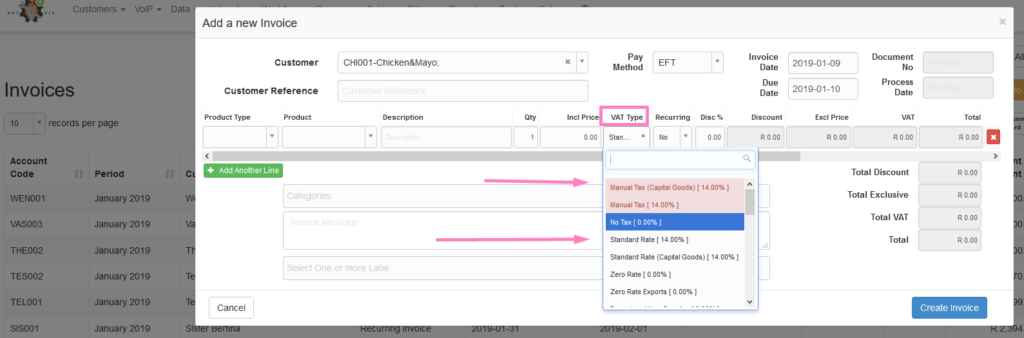
HeroTill will also be introducing a new improvement to the VAT Type dropdown on all billing documents. The user will now see invalid VAT types that should not be used, in red text. Valid VAT types will be displayed in normal text.
You may view the previous VAT blog from March 2018, by clicking on the link here.
Please feel free to contact our Support Call Centre, should you need any assistance with checking your VAT setup.
HeroTill has added a few improvements to the Data Accounts menu.
A new column, Circuit ID (enabled under the Show/Hide Columns button) can now be displayed on the Data Accounts list view.

The Circuit ID for Telkom radius accounts will be auto-collected from the active radius session. For other radius accounts (wireless Services) the Caller ID or MAC address is collected and stored in this field.
The Caller ID / Circuit ID shows on the customer’s:
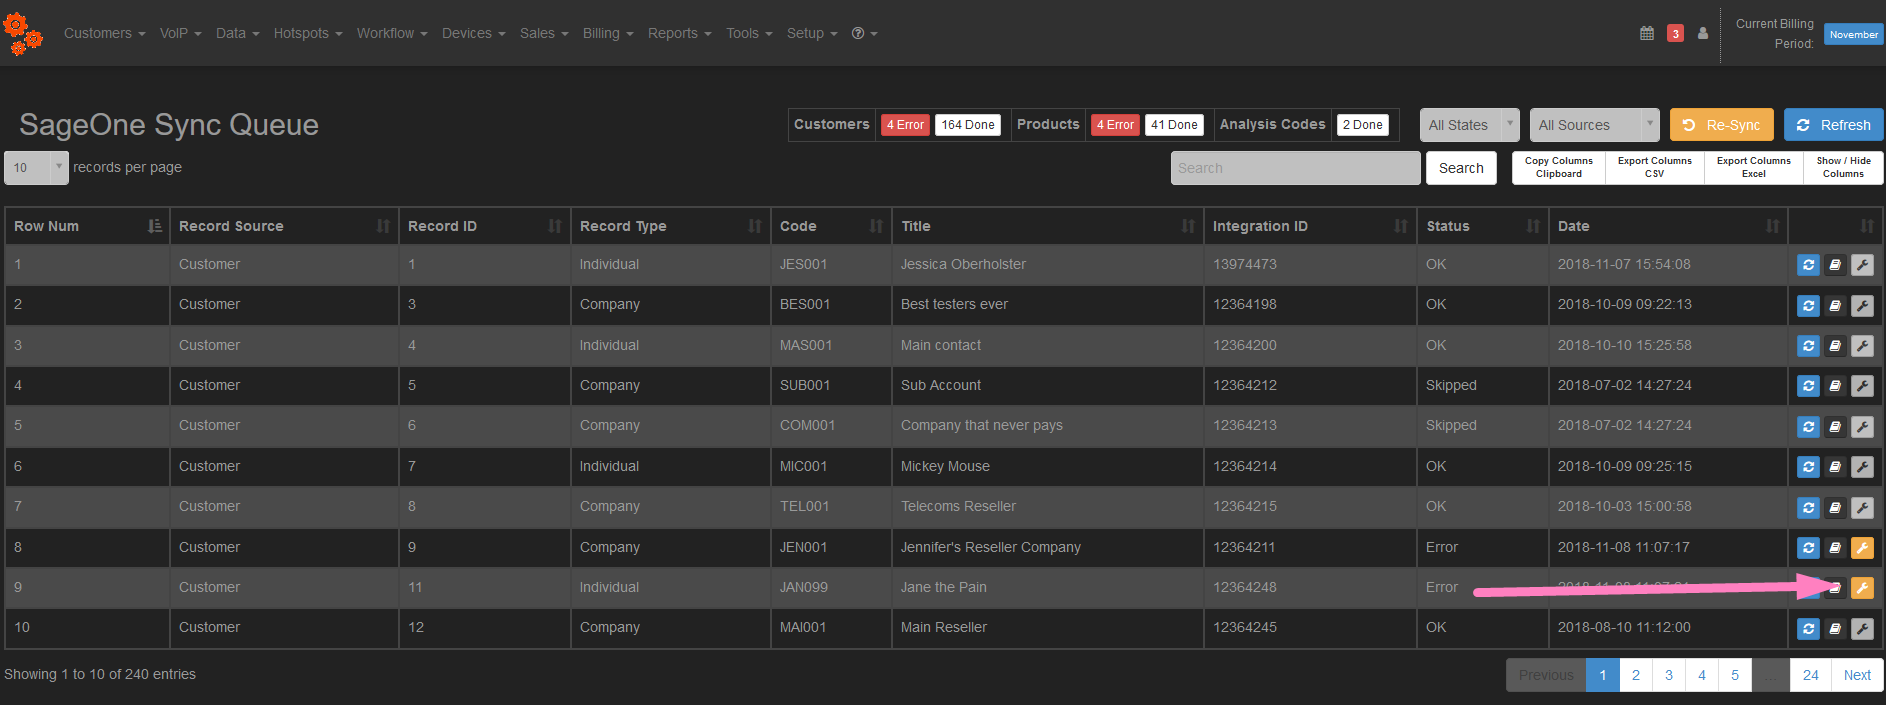
When attempting to sync your Sage One data with HeroTill, a few issues may arise due to the following scenarios:
These issues will prevent the sync from taking place and an error message/log will be visible.
HeroTill has now improved the Sage One Sync Queue, to include automatic fixes and proposed solutions for common errors.
In the example below, you will see records that were not sucessfully synced now have a new orange tool icon next to them.
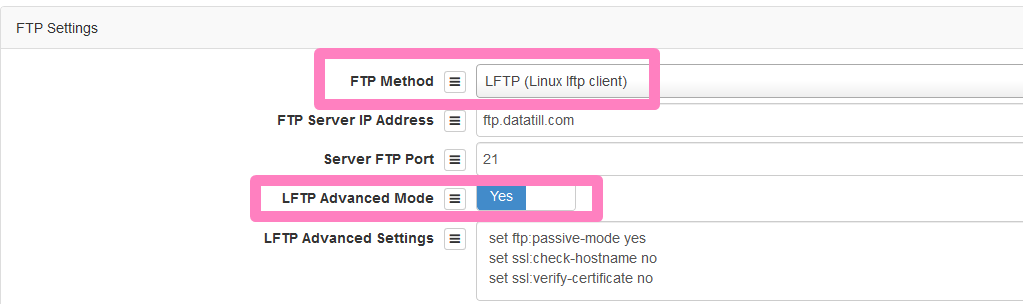
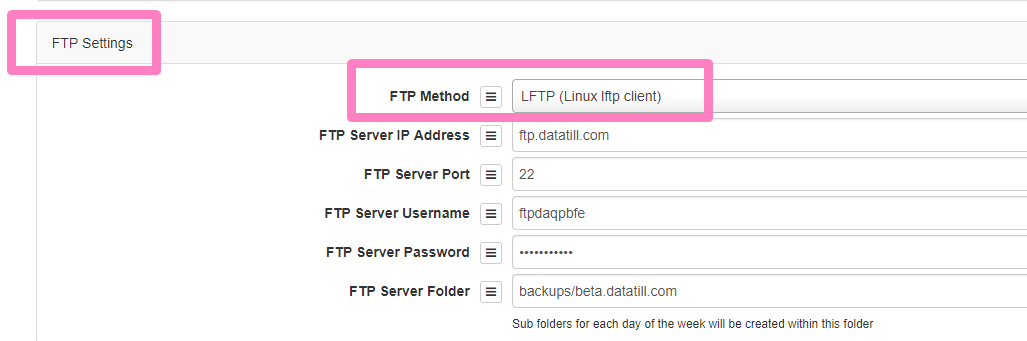
HeroTill has introduced the FTP backup setting to allow for the use of the external third party LFTP library.
When the user navigates to Setup > System Settings > System Backups > under the FTP Settings | FTP Method, the user will now see the option “LFTP (Linux lftp client)” as an available option to choose from.
All mandatory fields below this option must be filled in correctly, to ensure successful backups.
With the release of 1.4.03 Hotfix 3, an Advanced Mode switch has been introduced as well. The Advanced Mode will allow the user to add additional flags/custom settings to the LFTP command. An example of this is when the destination FTP server requires SSL verification to be disabled for a connection to succeed.